1. Introduction
This manual provides essential instructions for the safe and efficient operation, setup, and maintenance of your WASJOYE 1.2 Cu Ft Home Cabinet Safe Box. Please read this manual thoroughly before using the product and retain it for future reference. This safe is designed for secure storage of valuables, documents, and other personal items, featuring a digital keypad, safety key lock, and robust steel construction.
2. Safety Information
- Always store emergency keys in a secure location away from the safe and not inside the safe itself.
- Ensure the safe is securely mounted to a wall or floor to prevent unauthorized removal.
- Do not expose the safe to extreme temperatures or humidity.
- Keep children away from the safe and its operating mechanisms.
- Regularly check battery levels to ensure proper function of the electronic lock.
3. What's Included
Verify that all components are present in the package:
- Safe Box (1)
- Emergency Keys (2)
- Instruction Manual (1)
- Mat (1)
- Shelf (1)
- Expansion Screws (4)
- Type-C Cable (1)
4. Setup
4.1 Initial Opening
Upon receiving your safe, use one of the provided emergency keys to open the safe for the first time. Insert the key into the keyhole, turn it clockwise, and then turn the knob to open the door.
4.2 Battery Installation
The safe requires four (4) AA batteries (not included) for the electronic keypad to function. The battery compartment is located on the inside of the safe door.
- Open the safe door using the emergency key.
- Locate the battery compartment cover on the inside of the door.
- Remove the cover and insert four AA batteries, ensuring correct polarity (+/-).
- Replace the battery compartment cover.
Refer to the image below for visual guidance on battery installation.

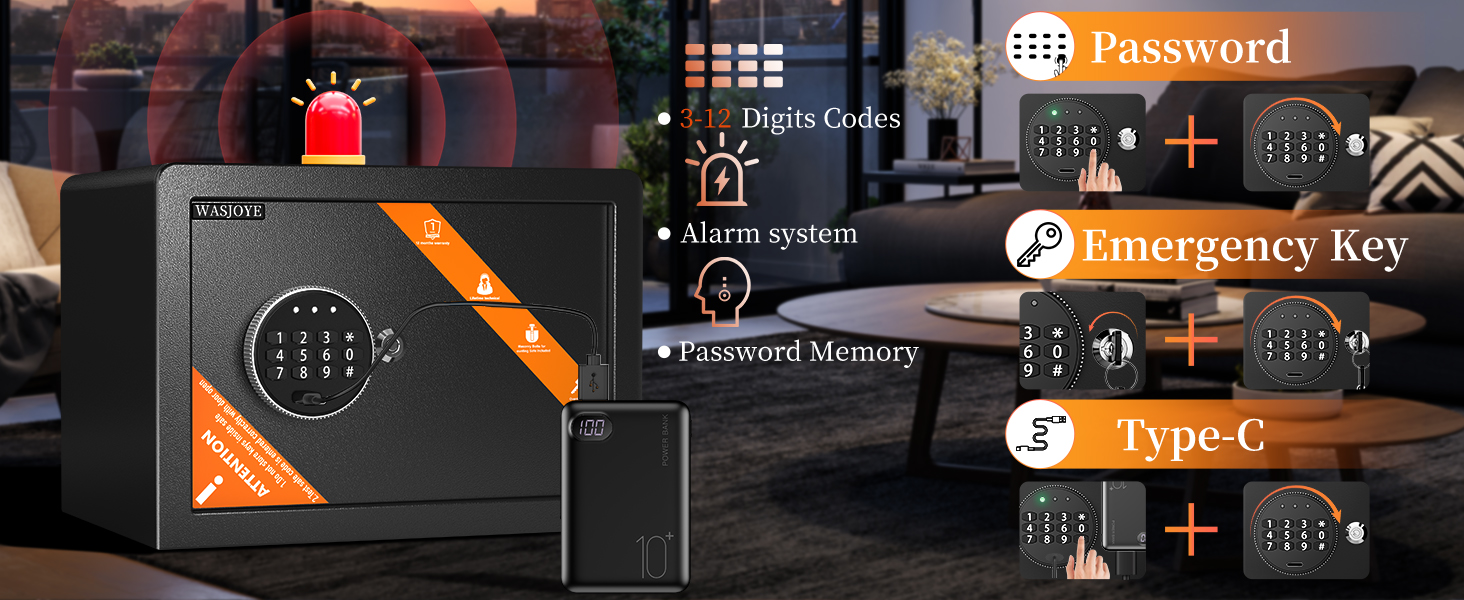
4.3 Setting/Changing the Passcode
You can set a 3-8 digit passcode for your safe.
- With the safe door open, press the red reset button located on the inside of the door, near the hinge. You will hear a beep.
- Enter your desired 3-8 digit passcode on the keypad.
- Press the "#" button to confirm. The green light will illuminate, indicating successful programming.
- Test the new passcode with the door open to ensure it works correctly before closing the safe.
Watch this video for a demonstration of setting the password:
4.4 Mounting the Safe
The safe features pre-drilled holes for secure mounting to a wall or floor. Use the included expansion screws for installation.
- Choose a stable, dry, and secure location for your safe.
- Mark the drilling points through the pre-drilled holes inside the safe.
- Drill holes in the wall or floor at the marked positions.
- Insert the expansion screws into the drilled holes.
- Align the safe with the screws and secure it tightly.
5. Operating Instructions
5.1 Opening the Safe with Passcode
- Enter your 3-8 digit passcode on the keypad.
- Press the "#" button. The green light will illuminate.
- Turn the knob clockwise within 5 seconds to open the safe door.
5.2 Emergency Opening Methods
In case of forgotten passcode or dead batteries, the safe can be opened using two emergency methods:
- Emergency Key: Insert the emergency key into the keyhole, turn it clockwise, and then turn the knob to open the door.
- Type-C Power + Passcode: If batteries are dead, connect the provided Type-C cable to an external power source (e.g., power bank) and plug it into the Type-C port on the safe. Then, enter your passcode as usual.
The following video demonstrates the various opening methods and features:
5.3 Smart Alarm System
The safe is equipped with an intelligent anti-intrusion system. If an incorrect passcode is entered three consecutive times, the safe will automatically lock for 2 minutes, and a 30-second audible alarm will sound to deter unauthorized access.

6. Maintenance
6.1 Battery Replacement
When the battery is low, the keypad's red light will flash. Replace all four AA batteries promptly to ensure continuous operation. Use the Type-C cable for temporary power if batteries die before replacement.
6.2 Cleaning
Clean the exterior of the safe with a soft, damp cloth. Avoid using abrasive cleaners or solvents that could damage the finish. Do not allow water to enter the electronic components.
7. Troubleshooting
- Safe does not open with passcode: Ensure batteries are not low (red light indicator). Try using the Type-C emergency power. Verify the passcode is entered correctly, followed by '#'. If still unsuccessful, use the emergency key.
- Keypad is unresponsive: Check battery installation and replace if necessary. Use the Type-C emergency power.
- Alarm sounds unexpectedly: This indicates three incorrect passcode entries. Wait for the 2-minute lockout period to end before attempting to open again.
- Door does not close properly: Ensure no items are obstructing the door or locking bolts. Check that the locking bolts retract fully when the door is open.
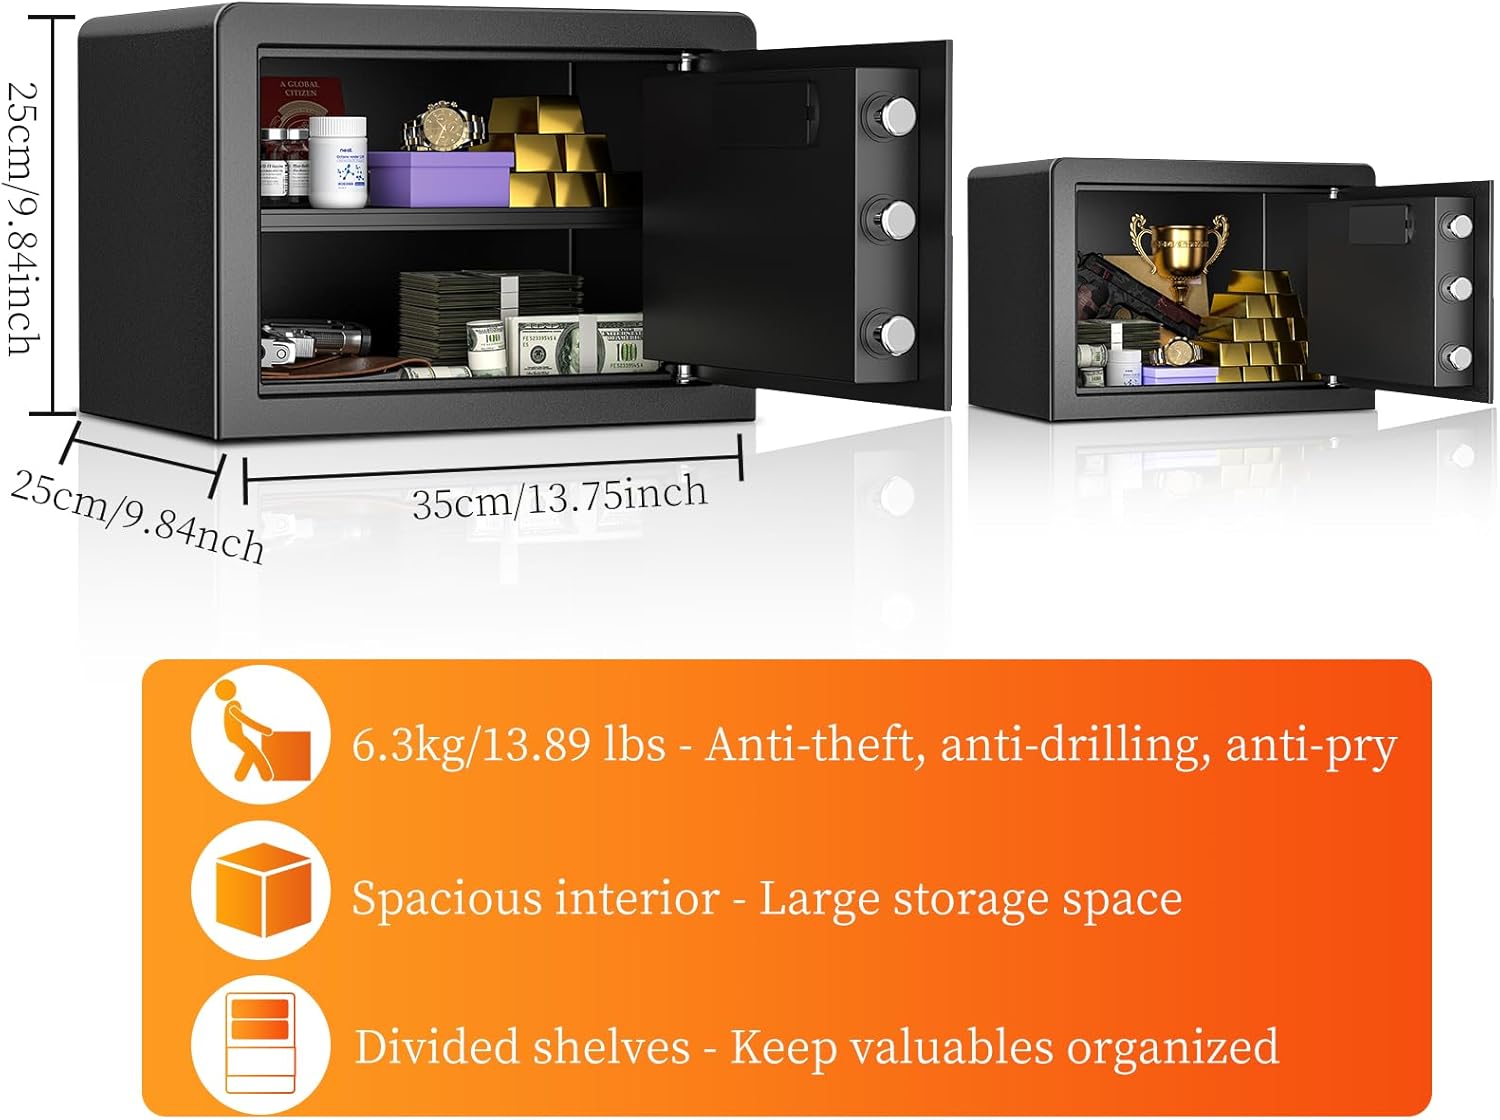
8. Specifications
| Feature | Detail |
|---|---|
| Brand | WASJOYE |
| Model Number | US-25EO-2 |
| Product Dimensions | 9.84"D x 9.84"W x 13.78"H |
| Capacity | 1.2 Cubic Feet |
| Lock Type | Combination, Electronic, Key |
| Material | Alloy Steel |
| Special Features | Alarm System, Anti-Theft, Combination Lock, Removable Shelf, Sensor Light |
| Mounting Type | Floor Mount, Wall Mount |
| Item Weight | 15.57 pounds |
| Water Resistance Level | Not Water Resistant |


9. Warranty and Support
WASJOYE offers a 12-month worry-free warranty for this product. For any questions, suggestions, or support needs regarding your safe, please contact WASJOYE customer service. You can typically find contact information on your order detail page or the official WASJOYE website.


