1. Introduction
Thank you for purchasing the MEDALight F30 Mini Camera Flash. This compact and powerful manual hot shoe flash is designed to provide versatile lighting for your photography needs. With its GN15 guide number and 7 power levels, it offers precise control over light output. Please read this manual thoroughly before using the product to ensure proper operation and to maximize its performance.
2. What's in the Box
- MEDALight F30 Mini Camera Flash
- Gift Box
3. Safety Information
To prevent damage to the product or injury to yourself or others, please observe the following safety precautions:
- Do not disassemble, repair, or modify the flash unit.
- Keep the flash unit dry. Do not expose it to rain, moisture, or high humidity.
- Do not touch the flash tube immediately after firing, as it can be very hot.
- Keep out of reach of children.
- Use only the specified battery type (9V battery). Ensure correct polarity when inserting batteries.
- Remove batteries if the flash will not be used for an extended period.
4. Parts Identification
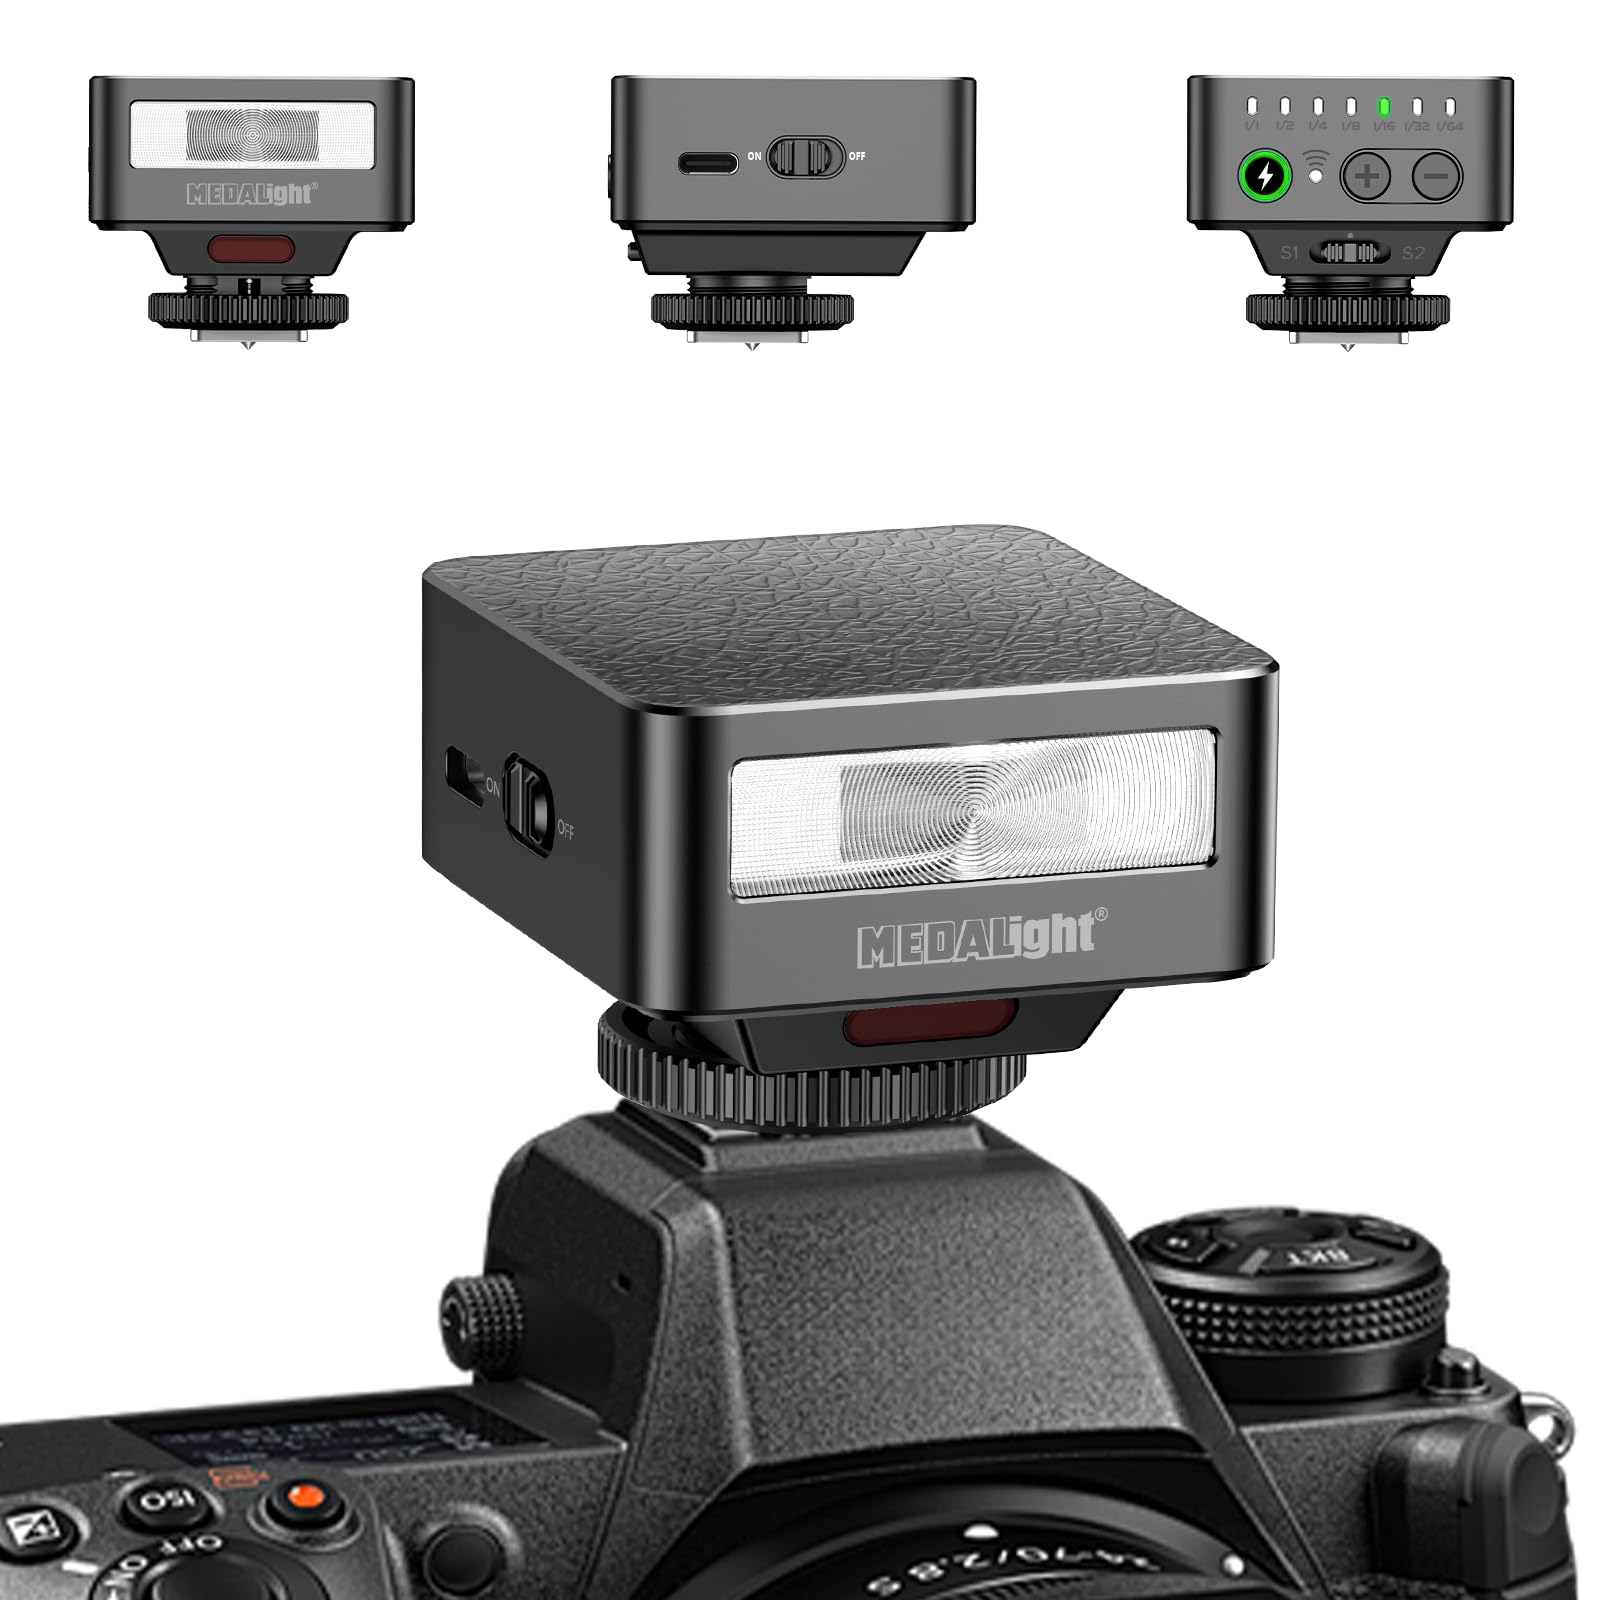
This image displays the MEDALight F30 Mini Camera Flash. The main view shows the flash unit attached to a camera's hot shoe. In the upper left, a front view of the flash highlights the flash tube and the 'MEDALight' logo. In the upper center, a side view reveals the 'ON/OFF' switch. In the upper right, a top view shows the power level indicators (1/1 to 1/64), a charge indicator, and '+' and '-' buttons for adjustment, along with S1 and S2 optical slave modes.
- Flash Tube: Emits light for illumination.
- ON/OFF Switch: Powers the flash unit on or off.
- Power Level Indicators: LEDs indicating the current power output (1/1, 1/2, 1/4, 1/8, 1/16, 1/32, 1/64).
- Charge Indicator: LED that illuminates when the flash is ready to fire.
- '+' Button: Increases flash power output.
- '-' Button: Decreases flash power output.
- Hot Shoe Mount: Connects the flash to the camera's hot shoe.
- S1/S2 Optical Slave Sensors: Detect other flash bursts for off-camera triggering.
5. Setup
5.1 Battery Installation
- Locate the battery compartment cover on the flash unit.
- Open the cover.
- Insert one 9V battery (included) into the compartment, ensuring correct polarity (+/-).
- Close the battery compartment cover securely.
5.2 Mounting on Camera
- Slide the hot shoe mount of the F30 flash into your camera's hot shoe slot.
- Tighten the locking ring on the flash unit to secure it firmly to the camera.
- Ensure the flash is properly seated and stable before use.
6. Operating Instructions
6.1 Powering On/Off
Slide the ON/OFF switch to the 'ON' position to power on the flash. Slide it to 'OFF' to power off.
6.2 Adjusting Power Levels
Once powered on, the flash will begin charging. The charge indicator LED will illuminate when the flash is ready to fire. Use the '+' and '-' buttons to adjust the flash power output. The power level indicators will show the current setting, ranging from 1/1 (full power) down to 1/64.
- Press '+' to increase power (e.g., from 1/64 to 1/32).
- Press '-' to decrease power (e.g., from 1/1 to 1/2).
6.3 Using Optical Slave Modes (S1/S2)
The F30 flash features S1 and S2 optical slave modes for off-camera triggering. These modes allow the F30 to fire in sync with another flash unit.
- S1 Mode: The flash will fire when it detects the first flash burst from a master flash. This is suitable for manual flash systems.
- S2 Mode: The flash will ignore the pre-flash (if any) from a master flash and fire on the second flash burst. This is suitable for TTL flash systems that emit a pre-flash.
To activate S1 or S2 mode, ensure the flash is powered on and then press the appropriate button (S1 or S2) on the top panel. The corresponding indicator will light up.
6.4 Compatibility Note
This flash is compatible with Sony ZV1, ZV-E10, Ricoh GR3, Nikon, Canon, Fuji, Digital Film Cameras, and DSLR Cameras. It is NOT compatible with Sony ZV-1F.
7. Maintenance
7.1 Cleaning
To clean the flash unit, use a soft, dry cloth. Do not use abrasive cleaners, solvents, or strong chemicals, as they may damage the surface or internal components.
7.2 Storage
When not in use for an extended period, store the flash unit in a cool, dry place. Remove the 9V battery to prevent leakage and potential damage to the flash.
8. Troubleshooting
| Problem | Possible Cause | Solution |
|---|---|---|
| Flash does not power on. | Battery is dead or incorrectly inserted. | Check battery polarity or replace with a new 9V battery. |
| Flash does not fire. | Flash not fully charged; hot shoe connection loose; camera settings incorrect. | Wait for charge indicator to light up; ensure flash is securely mounted; check camera's flash settings. |
| Flash fires inconsistently in slave mode. | Incorrect slave mode (S1/S2) selected; sensor obstructed; ambient light interference. | Ensure correct S1/S2 mode for your master flash; clear any obstructions from the sensor; test in different lighting conditions. |
9. Specifications
- Model: F30
- Guide Number (GN): 15
- Power Levels: 7 (1/1, 1/2, 1/4, 1/8, 1/16, 1/32, 1/64)
- Flash Sync Speed: 1/500s
- Camera Flash Type: Hotshoe
- Batteries: 1 x 9V battery (included)
- Item Weight: 3.52 ounces (approximately 100g)
- Package Dimensions: 3.94 x 3.94 x 0.79 inches (10 x 10 x 2 cm)
- Compatible Mountings: Sony ZV1, ZV-E10, Ricoh GR3, Nikon, Canon, Fuji, Digital Film Cameras, DSLR Cameras (Not Compatible for Sony ZV-1F)
- Manufacturer: Zhuhai jingjia technology co.,ltd
10. Warranty & Support
For warranty information or technical support, please refer to the documentation provided with your purchase or contact the seller/manufacturer directly. Keep your proof of purchase for any warranty claims.


