1. Introduction
This manual provides instructions for the Fosmon Bike Anti-Theft Alarm, a multi-functional device designed to enhance bicycle security and visibility. It integrates an anti-theft alarm, front and rear lights, an auto brake light, turn signals, and a bicycle horn, all controllable via a wireless remote. The unit is USB-C rechargeable and features an IP65 waterproof rating.
2. Package Contents
Verify that all items are present in the package:
- Fosmon Bike Anti-Theft Alarm Unit (Tail Light & Alarm)
- Fosmon Bike Headlight Unit
- Wireless Remote Control
- USB-C Charging Cable
- Mounting Brackets (for seat post and handlebar)
- Zip Ties
- Allen Key
- Screws and Nuts
- Rubber Shims/Pads
- User Manual
Video: Unboxing and overview of the anti-theft alarm components.
3. Setup and Installation
Before first use, fully charge both the alarm unit and the headlight unit using the provided USB-C cable.
3.1 Mounting the Alarm Unit (Tail Light)
- Select a suitable location on your bike's seat post.
- Attach the seat post mounting bracket using the provided screws and Allen key. Ensure it is securely fastened.
- Slide the alarm unit onto the mounted bracket until it clicks into place.
3.2 Mounting the Headlight Unit
- Attach the handlebar mounting bracket to your bike's handlebar.
- Secure the headlight unit to the bracket.
3.3 Pairing the Remote Control
The remote control may need to be paired with the alarm unit. Up to 8 remotes can be paired to one alarm.
- Press the DISARM button on the remote.
- Press and hold the PAIRING button on the alarm unit for 3 seconds until you hear a tone confirming you are in pairing mode. The alarm will beep.
- Press the ARM button on your remote to pair the alarm. If successful, you will hear a "Du Du" tone.
Video: Instructions on pairing the remote control to the alarm unit.
Video: Detailed installation guide for the anti-theft alarm on a bicycle.
4. Operating Instructions
4.1 Remote Control Functions
The wireless remote control allows easy management of the alarm and lights:
- Arm Button (Lock Icon): Press once to arm the anti-theft alarm. The alarm will beep once.
- Disarm Button (Unlock Icon): Press once to disarm the anti-theft alarm. The alarm will beep twice.
- Ringtone Button (Lightning Bolt Icon): Press to cycle through 3 different horn sounds.
- Bell Button (Bell Icon): Press to locate your bike by sounding the alarm.
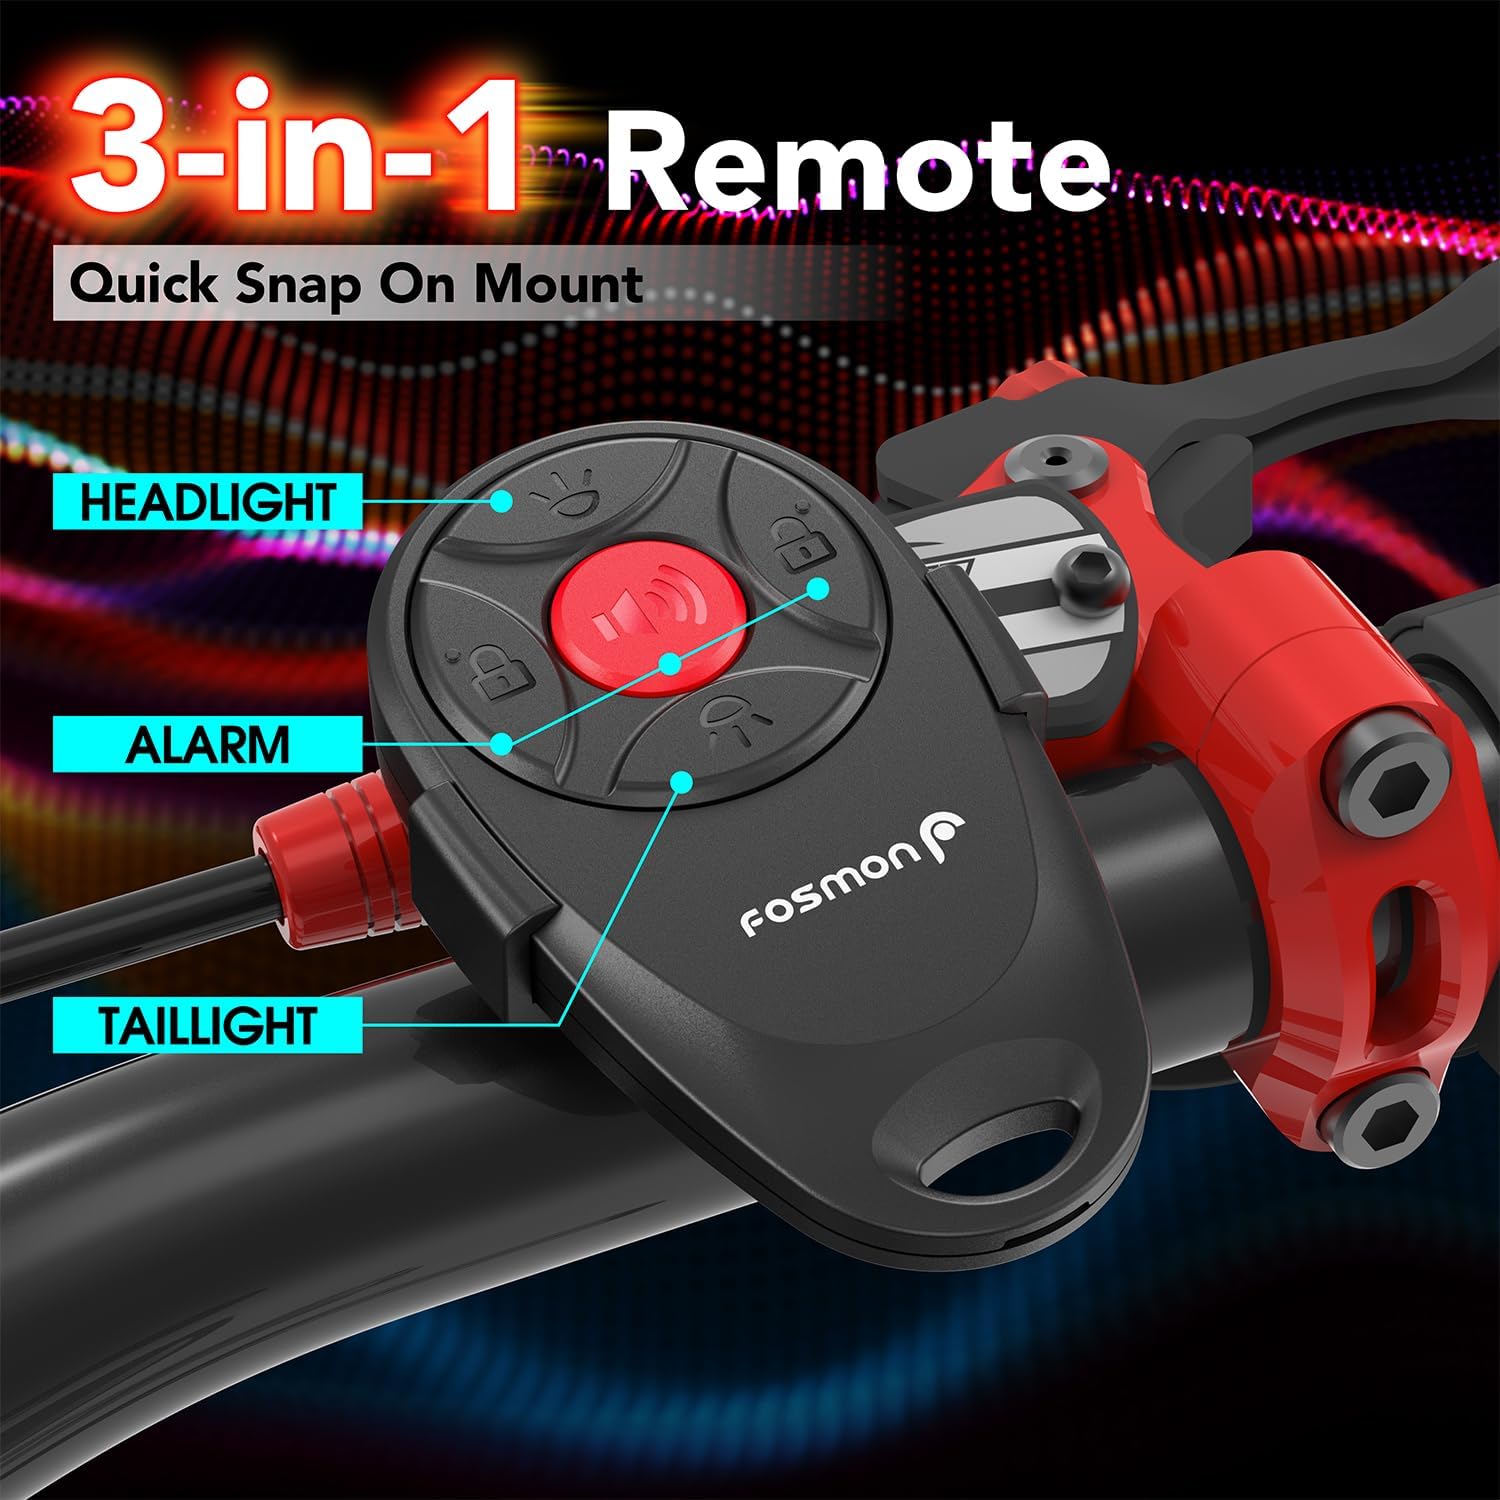
Image: The 3-in-1 remote control with labeled buttons for headlight, alarm, and tail light functions.
4.2 Lighting Modes (Tail Light)
The rear tail light features 4 lighting modes and an auto brake light function:
- Blinking Mode: Provides intermittent flashes for visibility.
- Breathing Mode: Light fades in and out smoothly.
- Fast Blinking Mode: Rapid flashes for increased attention.
- Steady Light Mode: Constant illumination.
- Auto Brake Light: An accelerometer detects rapid deceleration and activates a bright, steady brake light to warn traffic behind you.
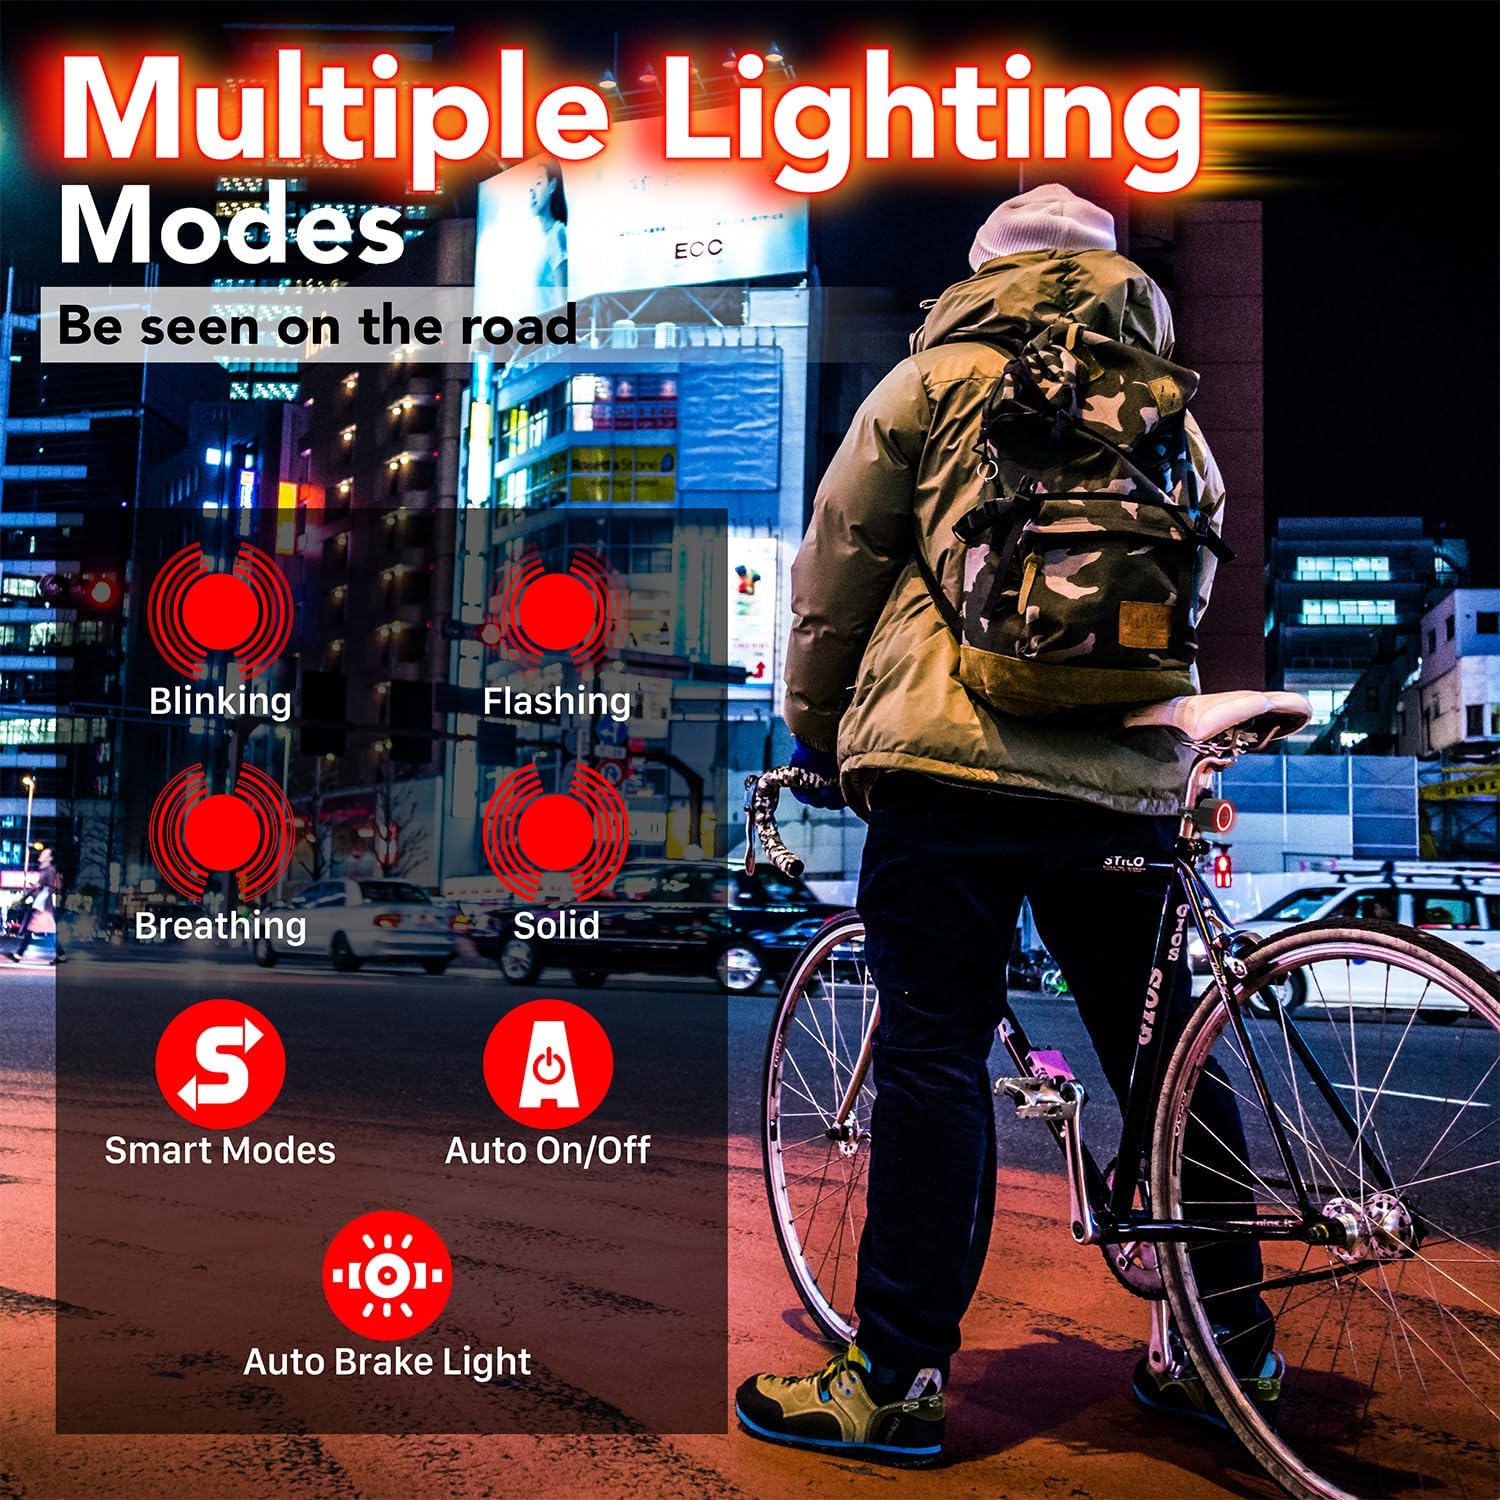
Image: Visual representation of the tail light's multiple lighting modes and smart features.
Video: Demonstration of the smart brake light and various tail light modes.
4.3 Headlight Modes
The front headlight provides three illumination settings:
- High Light: Maximum brightness for clear visibility.
- Low Light: Reduced brightness for less intense illumination.
- Flash Light: Flashing mode for enhanced daytime or emergency visibility.

Image: The headlight unit demonstrating its three light settings.
4.4 Anti-Theft Alarm
When armed, the alarm emits a loud 110dB sound upon detecting movement or vibration, deterring potential theft.

Image: The alarm unit highlighting its 110dB sound capability.
4.5 Bicycle Horn
The alarm unit also functions as a bicycle horn, offering three distinct sounds for signaling. Press the Ringtone button on the remote to cycle through these sounds.
5. Sensitivity Adjustment
The alarm has 7 sensitivity levels to prevent false triggers. These levels are indicated by musical pitches (Do, Re, Mi, Fa, So, La, Ti), where 'Do' is the highest sensitivity and 'Ti' is the lowest.
- Press and hold the DISARM button on the remote for about 6 seconds until the remote's blue indicator light stays on. The alarm will sound during this process; ignore it.
- Short press the ARM button to cycle through the sensitivity levels. Each press will play a different musical pitch.
- Once you hear the desired sensitivity pitch, press the DISARM button once to exit the setting.
Video: Guide on how to adjust the alarm's sensitivity levels.
6. Volume Adjustment
The alarm has 3 volume levels.
- Press and hold the DISARM button on the remote for about 6 seconds until the remote's blue indicator light stays on.
- Press the BELL button to cycle through the three volume levels.
- Once the desired volume is confirmed, press the DISARM button once to exit the setting.
7. Charging
Both the alarm unit and headlight unit are equipped with built-in 700mAh rechargeable batteries and charge via USB-C.
- Connect the provided USB-C cable to the charging port on each unit and to a USB power source.
- During charging, the indicator light on the unit will illuminate.
- The indicator light will turn off once the unit is fully charged.

Image: The alarm and headlight units connected to USB-C for charging.
8. Maintenance
To ensure optimal performance and longevity of your Fosmon Bike Anti-Theft Alarm:
- Waterproof Rating: The alarm unit has an IP65 waterproof rating, protecting it from dust and low-pressure water jets. Avoid submerging the device in water.
- Battery Care: Recharge the battery regularly, especially if the device will not be used for an extended period. The built-in 700mAh battery lasts up to 3 months on a single charge depending on usage.
- Cleaning: Wipe the device with a soft, damp cloth. Do not use harsh chemicals or abrasive cleaners.
- Storage: Store the device in a cool, dry place when not in use.

Image: The IP65 waterproof and dustproof rating of the alarm unit.
9. Troubleshooting
If you encounter issues with your Fosmon Bike Anti-Theft Alarm, refer to the following common solutions:
- Alarm not responding to remote: Ensure the remote's battery is not depleted. Re-pair the remote control with the alarm unit as described in Section 3.3.
- Alarm false triggers: Adjust the sensitivity level to a lower setting (e.g., 'Ti' for lowest sensitivity) as described in Section 5.
- Lights not working: Check if the unit is fully charged. Ensure the correct button on the remote is being pressed for the desired light mode.
- Low alarm volume: Adjust the volume level to a higher setting as described in Section 6.
- Battery not charging: Ensure the USB-C cable is properly connected to both the unit and the power source. Try a different USB-C cable or power adapter.
10. Specifications
| Feature | Detail |
|---|---|
| Model Number | 51142HOMFW |
| Manufacturer | Fosmon |
| Product Dimensions | 4.57 x 3.56 x 4.83 cm |
| Weight | 274.99 g |
| Battery | 1 Lithium Metal battery (included), 700mAh |
| Alarm Loudness | 110dB |
| Waterproof Rating | IP65 |
| Country of Origin | China |
11. Warranty and Support
Fosmon products come with a limited lifetime warranty. For questions or support, please contact our dedicated USA-based customer support team 24 hours a day, 7 days a week. Refer to Fosmon’s official website for more information regarding warranty terms and contact details.


