1. Introduction
Thank you for choosing an Indesit appliance. This user manual provides essential information for the correct and safe use of your new Indesit IMA 752 MY TIME SPT washing machine. Please read these instructions carefully before using the appliance and keep them for future reference. This manual covers installation, operation, maintenance, and troubleshooting.
For additional support, please visit the official Indesit website or contact customer service.
2. Safety Information
Always follow basic safety precautions when using electrical appliances to reduce the risk of fire, electric shock, and injury to persons. This appliance is intended for household use only.
- Do not allow children to play with the appliance.
- Ensure the appliance is properly grounded.
- Do not touch the appliance with wet hands or feet.
- Unplug the appliance before performing any cleaning or maintenance.
- Keep packaging materials away from children.
3. Setup and Installation
3.1 Unpacking
Remove all packaging materials. Ensure no parts are missing or damaged. Keep packaging materials out of reach of children.
3.2 Removing Transit Bolts
Before using the washing machine, it is crucial to remove the transit bolts located at the rear of the appliance. Failure to do so can cause significant damage during operation. Refer to the installation guide for detailed instructions on removing these bolts.
3.3 Positioning and Leveling
Place the washing machine on a flat, stable surface. Adjust the adjustable feet to ensure the appliance is perfectly level. Proper leveling reduces vibration and noise during operation.

Image 1: Side view of the Indesit IMA 752 MY TIME SPT washing machine, illustrating its compact design suitable for various placements. This view helps in understanding the appliance's dimensions for installation.
3.4 Water Connection
Connect the water inlet hose to a cold water tap with a 3/4" thread. Ensure the connection is secure to prevent leaks. Do not use old hoses; always use the new hoses supplied with the appliance.
3.5 Drain Connection
Position the drain hose correctly. It can be hooked over the edge of a sink or connected to a dedicated drain pipe. Ensure the hose is not kinked or obstructed, and that the end is at a height between 65 cm and 100 cm from the floor.
3.6 Electrical Connection
Plug the power cord into a properly grounded electrical outlet. Ensure the voltage and frequency match the specifications on the appliance's rating plate. Do not use extension cords or multiple adapters.
4. Operating Instructions
4.1 Control Panel Overview
The control panel allows you to select wash programs, adjust settings, and start/pause cycles.
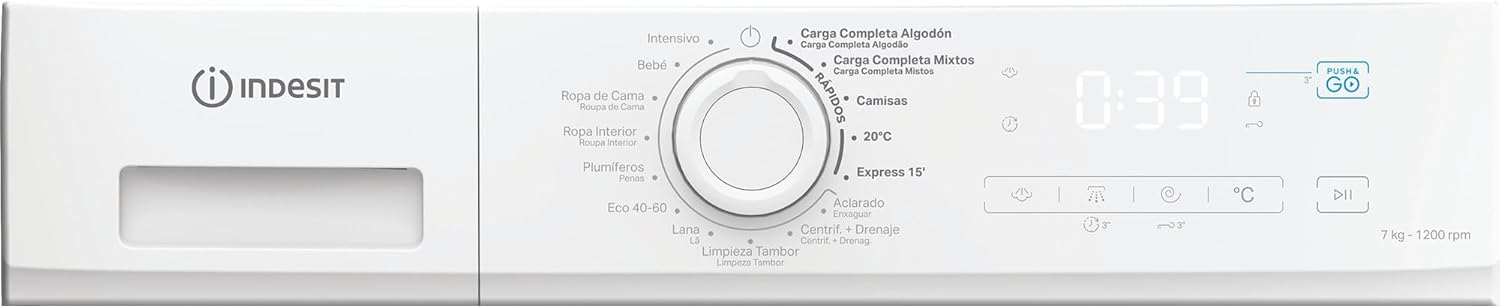
Image 2: Detailed view of the control panel, showing the program selector knob, digital display, and various function buttons. This panel is central to operating the washing machine.
4.2 Loading Laundry
Open the washing machine door and load the laundry into the drum. Do not overload the machine; refer to the program chart for maximum load capacities. Close the door firmly.

Image 3: The washing machine with its door open, revealing the drum. This image demonstrates how to access the drum for loading and unloading laundry.
4.3 Adding Detergent and Additives
Pull out the detergent dispenser drawer. Add the appropriate amount of detergent to the main wash compartment and any additives (e.g., fabric softener) to their designated compartments. Close the drawer gently.

Image 4: The detergent dispenser drawer, pulled out to show the compartments for detergent and fabric softener. Proper use of these compartments ensures effective cleaning and care for your garments.
4.4 Selecting a Program
Turn the program selector knob to choose the desired wash program. The digital display will show the default duration and temperature for the selected program.
- Carga Completa Algodón (Full Load Cotton): For heavily soiled cotton items.
- Carga Completa Mixtos (Full Load Mixed): For mixed loads of cotton and synthetics.
- Camisas (Shirts): Specific program for shirts.
- 20°C: Low-temperature wash for lightly soiled items.
- Express 15': Quick wash for small, lightly soiled loads.
- Aclarado (Rinse): Additional rinse cycle.
- Centrif. + Drenaje (Spin + Drain): Spin and drain cycle.
- Limpieza Tambor (Drum Clean): Program for cleaning the washing machine drum.
- Lana (Wool): Gentle wash for wool garments.
- Eco 40-60: Energy-efficient program for cotton and mixed items washable at 40°C or 60°C.
- Plumíferos (Duvets): Program for washing duvets and padded items.
- Ropa Interior (Underwear): Gentle wash for delicate underwear.
- Ropa de Cama (Bedding): Program for bed linen.
- Bebé (Baby): Hygienic wash for baby clothes.
- Intensivo (Intensive): For very dirty and resistant garments.
4.5 Push & Go Function
The Push & Go button offers a convenient way to start a daily mixed load wash cycle without needing to select a program. Simply press and hold the 'Push & Go' button for 2 seconds to start a 45-minute cycle at 30°C, suitable for cotton and synthetic garments.

Image 5: The 'Push & Go' logo, indicating a feature for simplified operation. This icon represents the quick start function for a standard wash cycle.
4.6 Starting and Pausing a Cycle
Press the Start/Pause button to begin the selected wash cycle. To pause a running cycle, press the Start/Pause button again. Press it once more to resume.
5. Maintenance and Cleaning
5.1 Cleaning the Detergent Dispenser
Regularly clean the detergent dispenser drawer to prevent detergent residue buildup. Remove the drawer, rinse it under running water, and clean any stubborn residue with a brush. Reinsert the drawer.
5.2 Cleaning the Filter
The filter should be cleaned periodically to ensure proper drainage. Locate the filter at the bottom front of the machine. Place a shallow container underneath to catch any residual water. Unscrew the filter, remove any lint or foreign objects, rinse it, and screw it back in securely.
5.3 Cleaning the Exterior
Wipe the exterior of the washing machine with a soft, damp cloth. Do not use abrasive cleaners or solvents, as these can damage the surface.
5.4 Door Seal Maintenance
After each wash, wipe the rubber door seal to remove any water or lint. This helps prevent mold and unpleasant odors.
5.5 Winter Precautions
If the appliance is to be stored in an unheated area, drain all water from the hoses and pump to prevent freezing and damage. Disconnect the water inlet hose and drain the remaining water from the drum.
6. Troubleshooting
Before contacting customer service, please refer to the following troubleshooting guide for common issues.
| Problem | Possible Cause | Solution |
|---|---|---|
| Washing machine does not start | Power cord not plugged in; door not closed properly; Start/Pause button not pressed. | Check power connection; ensure door is latched; press Start/Pause. |
| Water does not fill | Water tap closed; water inlet hose kinked; water supply cut off. | Open water tap; straighten hose; check water supply. |
| Water does not drain | Drain hose kinked or blocked; filter clogged. | Straighten hose; clean filter. |
| Excessive vibration/noise | Transit bolts not removed; machine not level; uneven load. | Remove transit bolts; adjust feet to level; redistribute laundry. |
| Detergent residue in drawer | Detergent dispenser clogged; too much detergent used. | Clean dispenser; use recommended amount of detergent. |
7. Specifications
Detailed technical specifications for the Indesit IMA 752 MY TIME SPT washing machine.
| Feature | Specification |
|---|---|
| Model Number | IMA 752 MY TIME SPT |
| Brand | Indesit |
| Capacity | 7 Kilograms |
| Maximum Spin Speed | 1200 rpm |
| Energy Efficiency Rating | B |
| Dimensions (D x W x H) | 47.4 x 60 x 85 cm |
| Weight | 60 kg |
| Loading Type | Front Load |
| Color | White |
| Manufacturer | Whirlpool Electrodomesticos S.A |
| Included Components | Power cable |


Image 6: Icons representing the 7kg capacity and Energy Efficiency Class B of the washing machine, highlighting key performance metrics.
8. Warranty and Support
This Indesit appliance comes with a manufacturer's warranty. Please refer to the warranty card included with your purchase for specific terms and conditions, including the warranty period and coverage details.
For technical assistance, spare parts, or to report a fault, please contact Indesit customer service. You can find contact information on the official Indesit website or in the documentation provided with your appliance.
When contacting support, please have your appliance's model number (IMA 752 MY TIME SPT) and serial number ready. This information is typically found on a label inside the door or at the back of the appliance.


