
1. Introduction and Overview
The CMSTEDCD 8K HDMI + 2 Displayport KVM Switch is designed to allow up to four computers or laptops to share three monitors and four USB 3.0 peripheral devices. This device is ideal for users who need to manage multiple systems efficiently, providing a streamlined workspace and enhanced productivity. It supports high-resolution video output up to 8K@60Hz and 4K@144Hz, ensuring a high-quality visual experience.

Figure 1: The CMSTEDCD KVM Switch and its accompanying accessories, including cables, remote control, and power adapter.
2. Package Contents
Please verify that all items are present in the package:
- 1 x CMSTEDCD 8K HDMI + 2 Displayport KVM Switch (Model: SW345-Deep Blue)
- 4 x USB 3.0 A-to-A Cables
- 1 x IR Extend Cable
- 1 x IR Remote Control
- 1 x DC 12V Power Adapter
- 1 x User Manual (this document)

Figure 2: Visual representation of the KVM switch dimensions and the complete list of package contents.
3. Product Features
- Multi-Computer Control: Connects up to 4 computers to share 3 monitors and 4 USB 3.0 peripherals.
- High Resolution Support: Supports resolutions up to 8K@60Hz, backward compatible with 4K@144Hz, 4K@120Hz, and 1080P@240Hz.
- USB 3.0 Connectivity: Features four USB 3.0 ports with a maximum transfer rate of 5Gbps, backward compatible with USB 2.0 and 1.1. Supports hot-swapping for connected devices.
- Multiple Switching Methods: Easily switch between connected computers using the front panel buttons or the included IR remote control. An IR extend cable allows for flexible placement of the KVM switch.
- Broad Compatibility: Compatible with most major brands of computers and monitors, supporting operating systems such as Windows, XP, MacOS, and Linux.
- Stable Operation: Powered by a 12V power adapter to ensure stable performance.

Figure 3: The KVM switch supports high resolutions including 8K@60Hz and 4K@144Hz.

Figure 4: USB 3.0 ports provide fast data transfer speeds of up to 5Gbps.
4. Setup and Connection
Follow these steps to connect your KVM switch:
- Power Off Devices: Ensure all computers and monitors are powered off before making connections.
- Connect Monitors to KVM Output: Connect your three monitors to the KVM's OUT ports (OUT A, OUT B, OUT C) using two DisplayPort cables and one HDMI cable.
- Connect Computers to KVM Input: For each computer (PC1, PC2, PC3, PC4):
- Connect two DisplayPort cables and one HDMI cable from your computer's graphics card to the corresponding PC IN ports on the KVM (e.g., PC1IN DP A, PC1IN DP B, PC1IN HDMI C).
Note: Your computer's graphics card must be equipped with 2 DisplayPort outputs and 1 HDMI output to properly connect all three monitors. - Connect one USB 3.0 A-to-A cable from your computer's USB 3.0 port to the corresponding USB 3.0 port under the PC IN section on the KVM (e.g., PC1IN USB 3.0).
Note: Each computer requires a USB 3.0 cable connection to the KVM for USB peripherals to be recognized.
- Connect two DisplayPort cables and one HDMI cable from your computer's graphics card to the corresponding PC IN ports on the KVM (e.g., PC1IN DP A, PC1IN DP B, PC1IN HDMI C).
- Connect USB Peripherals: Connect your keyboard, mouse, printer, USB flash drives, or other USB 3.0 peripheral devices to the USB 3.0 ports on the front panel of the KVM switch.
- Connect Power Adapter: Plug the DC 12V power adapter into the KVM switch's DC 12V port and then into a power outlet.
- Power On Devices: Power on the KVM switch, then your monitors, and finally your computers.
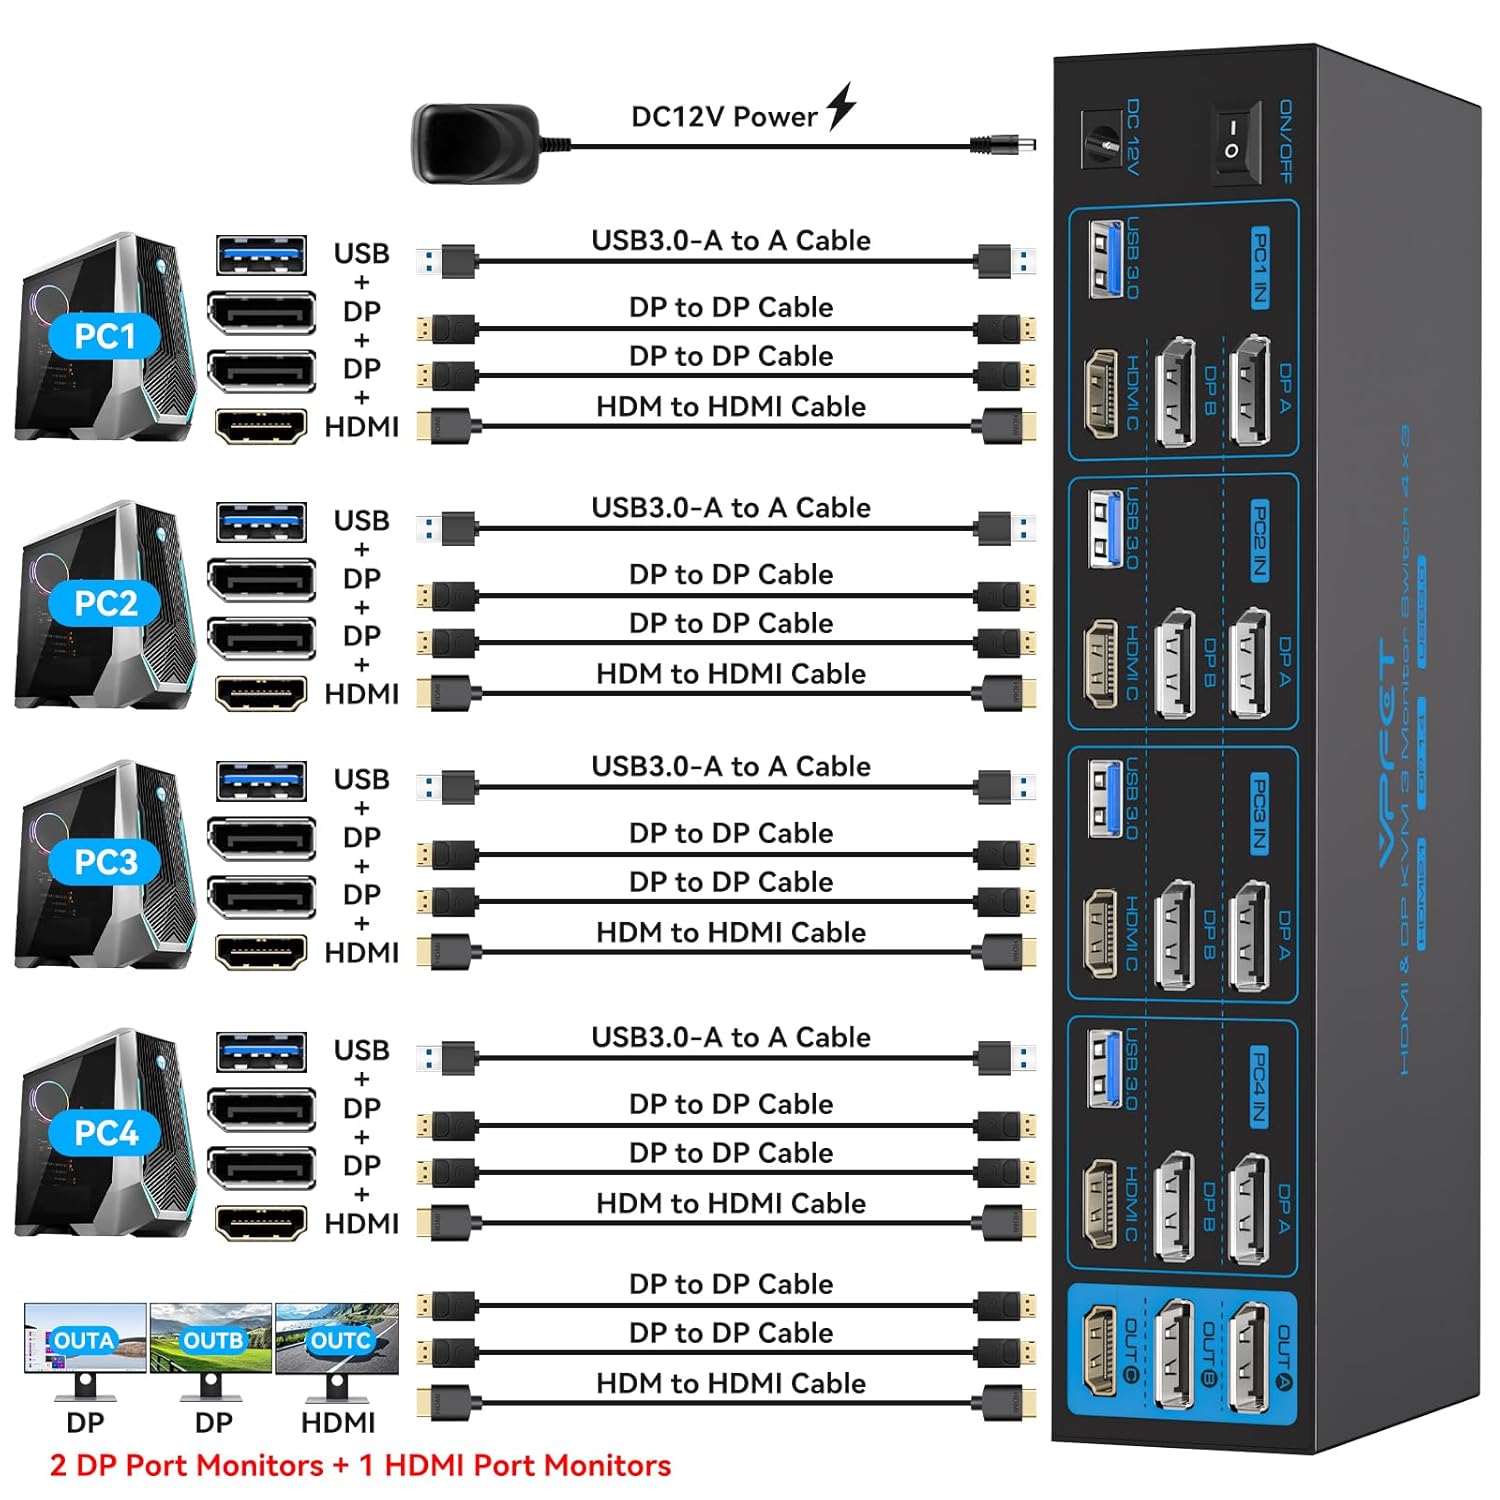
Figure 5: Comprehensive connection diagram showing how to link computers, monitors, and USB devices to the KVM switch.

Figure 6: Example setup demonstrating the KVM switch managing four computers and three monitors in extended or mirror mode.
5. Operation
Once all connections are made and devices are powered on, you can switch between the connected computers using the following methods:
- Front Panel Buttons: Press the corresponding PC1, PC2, PC3, or PC4 button on the front panel of the KVM switch to switch to the desired computer.
- IR Remote Control: Use the included IR remote control to switch between computers. Point the remote at the IR receiver on the KVM switch or connect the IR extend cable for more flexible placement.
The KVM switch supports both extended and copy (mirror) display modes, depending on your computer's display settings. Please configure your display settings on each computer as needed.
Note: Cross-display functionality (displaying one computer's output across multiple KVM-connected monitors simultaneously) is not supported. The KVM is designed for switching entire sets of displays and USB peripherals between different PCs.

Figure 7: The KVM switch offers convenient switching via front panel buttons or the included remote control.
6. Specifications
| Feature | Specification |
|---|---|
| Model Number | SW345-Deep Blue |
| Brand | CMSTEDCD |
| Product Dimensions (L x W x H) | 23.7 x 8.4 x 4.9 cm (9.3 x 3.3 x 1.9 inches) |
| Item Weight | 1.06 kg |
| Material | Metal |
| Video Inputs | 4 x (2x DisplayPort, 1x HDMI) |
| Video Outputs | 3 x (2x DisplayPort, 1x HDMI) |
| USB Ports | 4 x USB 3.0 (for peripherals), 4 x USB 3.0 (for PC connection) |
| Max Resolution | 8K@60Hz, 4K@144Hz, 1080P@240Hz |
| Operating Voltage | 12 Volts (AC) |
| Current Rating | 1 Amps |
| Switch Type | Push Button |
| Country of Origin | China |
7. Troubleshooting
- No Display on Monitors:
- Ensure all video cables (DisplayPort and HDMI) are securely connected between the computers and the KVM, and between the KVM and the monitors.
- Verify that your computer's graphics card has the required 2 DisplayPort outputs and 1 HDMI output.
- Check if the KVM switch is powered on and the power adapter is properly connected.
- Try restarting the KVM switch, monitors, and computers.
- USB Peripherals Not Recognized:
- Ensure that a USB 3.0 A-to-A cable is connected from each computer's USB 3.0 port to the corresponding USB 3.0 input on the KVM switch.
- Check the connection of your USB peripherals to the KVM's front panel USB 3.0 ports.
- Try connecting the USB peripheral directly to the computer to confirm it functions independently.
- Switching Issues:
- If using the remote control, ensure there are no obstructions between the remote and the IR receiver. Replace remote batteries if necessary.
- Confirm that the correct input button (PC1, PC2, etc.) is being pressed.
- Resolution or Refresh Rate Problems:
- Ensure your monitors and graphics cards support the desired resolution and refresh rate.
- Check the quality and length of your HDMI and DisplayPort cables; longer or lower-quality cables can affect high-resolution signals.
8. Warranty and Support
CMSTEDCD provides a 24-month warranty from the date of purchase for this KVM switch. If you encounter any issues or require technical assistance within this period, please contact us directly through Amazon's messaging system. We are committed to providing technical support, exchange, or refund services to ensure your satisfaction.