1. Important Safety Instructions
Please read all instructions carefully before using the appliance. Keep this manual for future reference.
- Electrical Safety: Ensure the voltage rating on the appliance matches your local power supply. Do not immerse the power cord, plug, or the appliance itself in water or other liquids.
- Hot Surfaces: The coffee machine produces hot water and steam. Surfaces may become hot during operation. Use handles and knobs, and allow the machine to cool before cleaning.
- Children and Vulnerable Persons: This appliance is not intended for use by persons with reduced physical, sensory or mental capabilities, or lack of experience and knowledge, unless they have been given supervision or instruction concerning use of the appliance by a person responsible for their safety. Keep out of reach of children.
- Proper Use: Use the appliance only for its intended purpose of brewing coffee. Do not operate the machine with a damaged cord or plug, or if it has been dropped or damaged in any way.
- Maintenance: Regular cleaning and descaling are essential for optimal performance and longevity. Refer to the 'Maintenance and Cleaning' section.
2. Product Overview
Familiarize yourself with the components and features of your SINBO SCM-2996 Espresso Coffee Machine.

Figure 2.1: Front view of the SINBO SCM-2996 Espresso Coffee Machine during operation, showing coffee being dispensed into a cup.
Key Components:
- Control Panel: Intuitive touch screen for selecting coffee types and functions.
- Water Tank: Removable transparent tank for water supply.
- Milk Tank: Removable 500ml internal milk tank for milk-based beverages.
- Portafilter: 52mm portafilter compatible with ground coffee and various coffee capsules.
- Drip Tray: Removable tray to collect excess liquids, ensuring a clean countertop.
- Cup Warmer Plate: Top plate designed to pre-heat coffee cups.
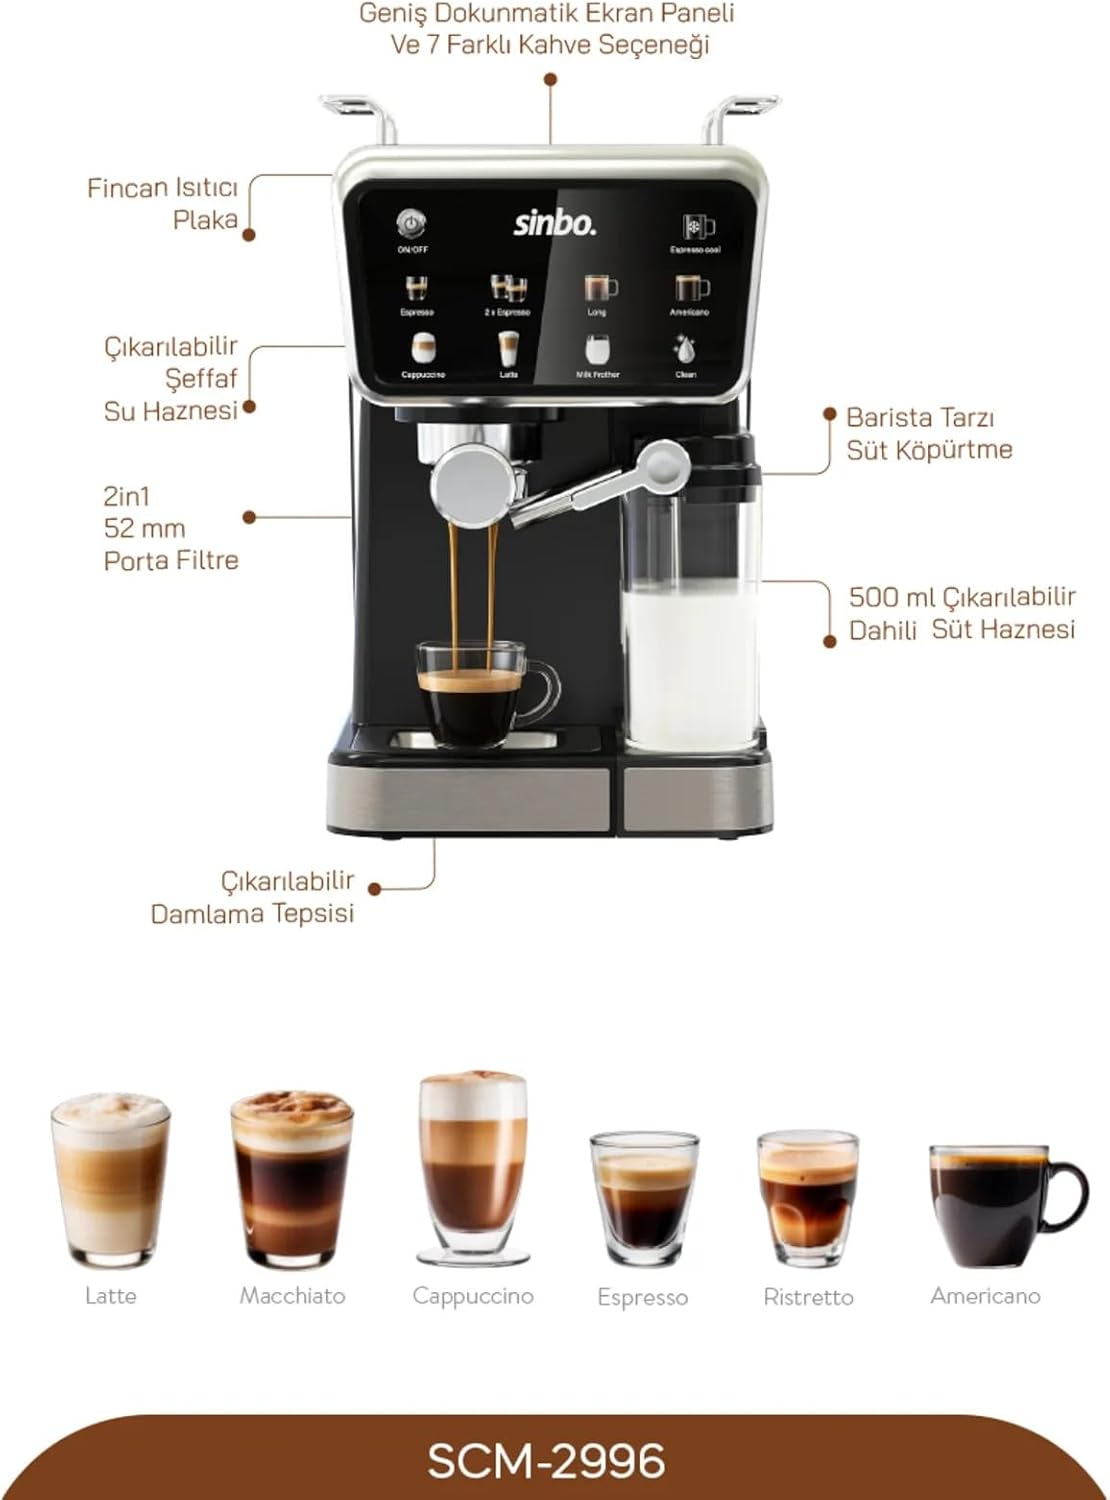
Figure 2.2: Detailed view of the machine highlighting key components such as the cup warmer, removable water tank, 52mm portafilter, 500ml removable milk tank, and removable drip tray. Also shows examples of Latte, Macchiato, Cappuccino, Espresso, Ristretto, and Americano.
Key Features:
- 20 Bar Pressure Pump: Ensures optimal extraction for rich espresso.
- Integrated Milk Frother: For creamy cappuccinos and lattes.
- Capsule Coffee Compatibility: Supports various coffee capsule types for convenience.
- Wide Touch Screen Panel: Easy selection of multiple coffee options.
- Multiple Coffee Options: Prepare Espresso, Double Espresso, Long, Americano, Cappuccino, Latte, and use the Milk Frother function.

Figure 2.3: Overview of key features including 20 Bar pressure, 500ml internal milk tank, capsule coffee attachment, and the ability to prepare 5 different types of coffee.
3. Setup
Follow these steps to set up your coffee machine for the first time.
- Unpacking: Carefully remove all packaging materials. Check for any damage.
- Placement: Place the machine on a stable, flat, heat-resistant surface, away from water sources and direct sunlight. Ensure adequate ventilation.
- Initial Cleaning: Before first use, clean all removable parts (water tank, milk tank, portafilter, drip tray) with warm soapy water, then rinse thoroughly.
- Fill Water Tank: Remove the transparent water tank from the back of the machine. Fill it with fresh, cold drinking water up to the MAX level. Replace the tank securely.
- First Use Cycle (Priming):
- Ensure the water tank is filled.
- Place a large container under the coffee spout and milk frother.
- Plug in the machine and press the ON/OFF button.
- Allow the machine to heat up.
- Run a cycle of hot water through the coffee spout without coffee.
- Run a cycle of steam/hot water through the milk frother to prime the system.
4. Operating Instructions
Learn how to brew your favorite coffee beverages with ease.

Figure 4.1: The machine in action, preparing a latte, highlighting the wide touch screen panel and its various coffee options.
4.1. Brewing Espresso (Ground Coffee)
- Ensure the water tank is filled.
- Select the appropriate filter basket for single or double espresso and place it in the portafilter.
- Add desired amount of finely ground coffee to the filter basket. Tamp the coffee evenly.
- Attach the portafilter to the brewing head by aligning it and rotating it to the right until secure.
- Place a pre-heated cup on the drip tray under the portafilter spouts.
- Press the 'Espresso' or '2x Espresso' icon on the touch screen. The machine will automatically brew and stop.
4.2. Using Coffee Capsules
The machine is compatible with various coffee capsules.

Figure 4.2: The machine demonstrating compatibility with various coffee capsule types, allowing for quick coffee preparation.
- Ensure the water tank is filled.
- Insert the capsule adapter into the portafilter.
- Place a coffee capsule into the adapter.
- Attach the portafilter to the brewing head.
- Place a cup under the spout.
- Select your desired coffee type (e.g., Espresso, Long) from the touch screen.
4.3. Preparing Milk-Based Beverages (Cappuccino, Latte)
- Fill the removable milk tank with cold milk (dairy or non-dairy) up to the desired level.
- Ensure the milk tank is securely attached to the machine.
- Brew your espresso shot directly into your cup as described in section 4.1 or 4.2.
- Place the cup with espresso under the milk frother spout.
- Select 'Cappuccino' or 'Latte' from the touch screen. The machine will automatically froth and dispense milk into your cup.
- For manual milk frothing, select 'Milk Frother' and adjust the steam wand as needed.
4.4. Hot Water Function
To dispense hot water for tea or Americano:
- Place a cup under the coffee spout.
- Select the 'Long' or 'Americano' option on the touch screen (depending on desired volume).
5. Maintenance and Cleaning
Regular cleaning ensures the longevity and optimal performance of your machine.
5.1. Daily Cleaning
- Drip Tray: Empty and rinse the removable drip tray after each use or when the indicator floats up.
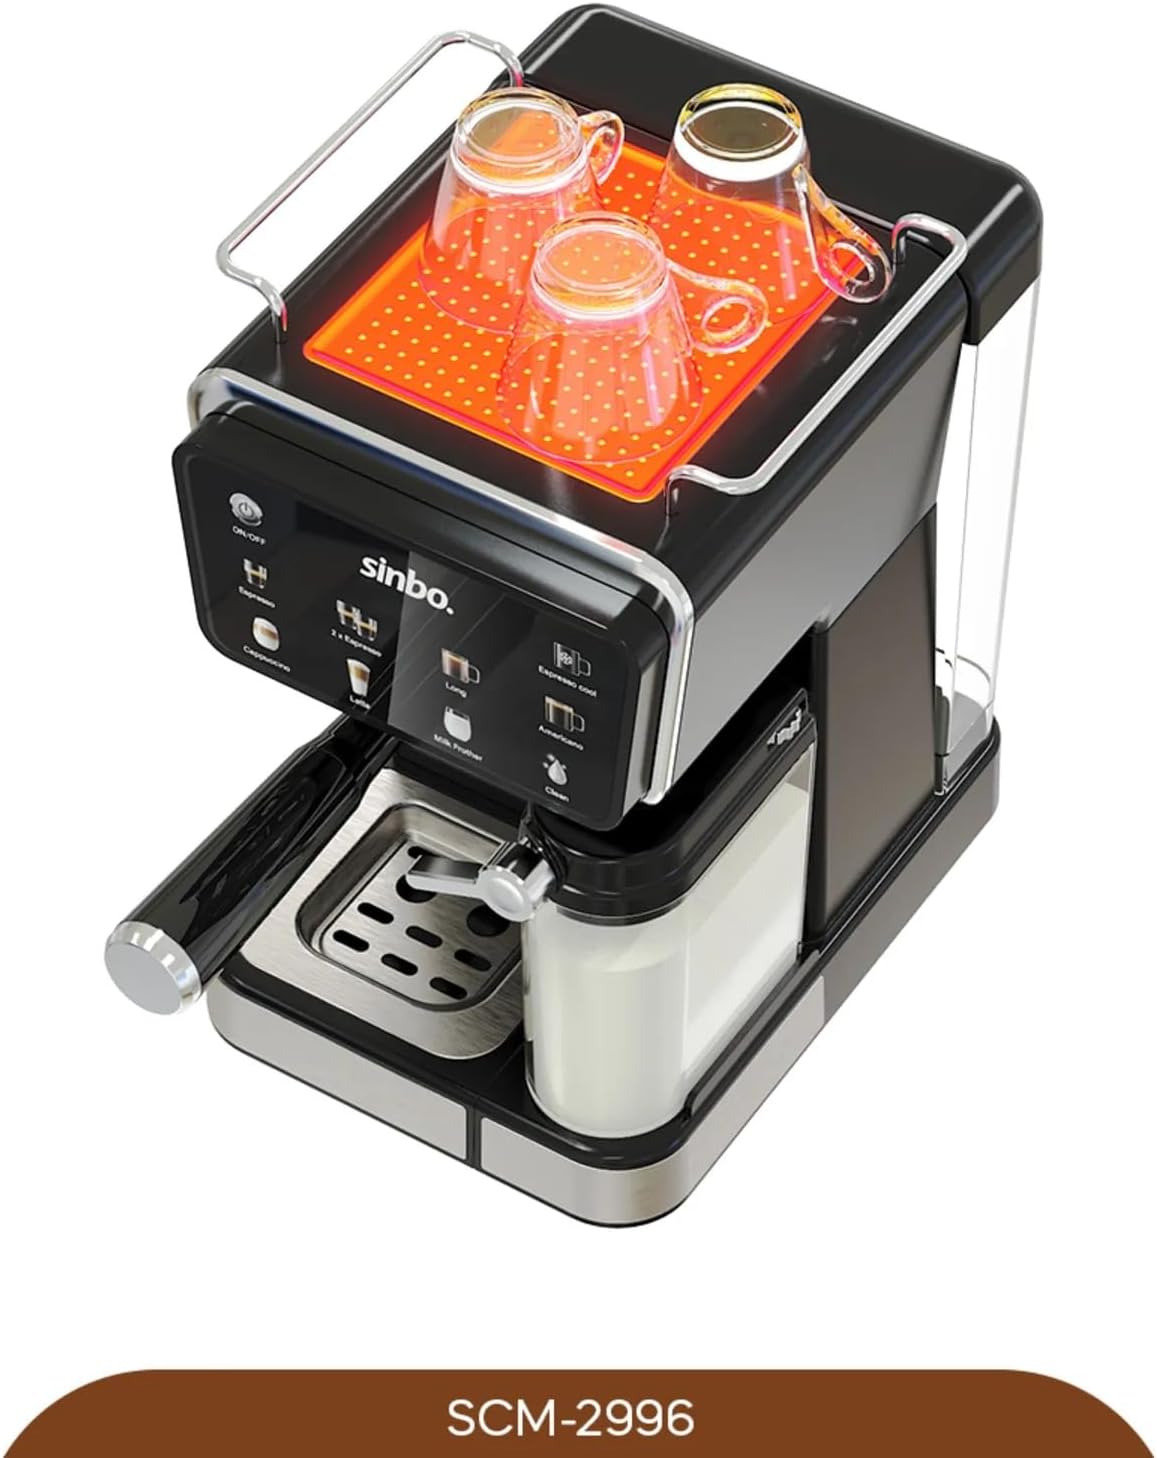
Figure 5.1: Top view of the machine, showing the cup warmer plate and the overall compact design, which facilitates access to the drip tray for cleaning.
- Portafilter and Filter Baskets: Remove used coffee grounds. Rinse the portafilter and filter baskets under warm water.
- Milk Tank and Frother: After each milk-based beverage, remove the milk tank and rinse it thoroughly. Run the 'Clean' cycle on the touch screen to flush the milk frother system. This prevents milk residue buildup.
- Exterior: Wipe the exterior of the machine with a soft, damp cloth. Do not use abrasive cleaners or solvents.
5.2. Descaling
Descaling is crucial to remove mineral buildup and maintain machine efficiency. The frequency depends on water hardness and usage.
- Empty the water tank and drip tray.
- Fill the water tank with a descaling solution mixed according to the descaler manufacturer's instructions.
- Place a large container under the coffee spout and milk frother.
- Initiate the descaling process (refer to the machine's specific descaling mode if available, or run several cycles of hot water/steam until the tank is empty).
- After descaling, rinse the water tank thoroughly and fill it with fresh water.
- Run several cycles of fresh water through the machine to flush out any remaining descaling solution.
6. Troubleshooting
Refer to this section for common issues and their solutions.
| Problem | Possible Cause | Solution |
|---|---|---|
| No coffee dispenses | Water tank empty; Machine not primed; Clogged filter/spout. | Fill water tank; Perform first use cycle; Clean portafilter/spout; Descale machine. |
| Coffee is too weak/watery | Insufficient coffee grounds; Coarse grind; Machine needs descaling. | Increase coffee amount; Use finer grind; Descale machine. |
| Milk not frothing properly | Milk tank empty; Milk frother clogged; Cold milk not used. | Fill milk tank; Clean milk frother thoroughly; Use cold milk. |
| Machine leaks water | Water tank not seated correctly; Drip tray full; Seal issues. | Reseat water tank; Empty drip tray; Contact customer support if issue persists. |
| Machine not turning on | Not plugged in; Power outlet issue. | Check power cord connection; Try a different outlet. |
7. Specifications
| Feature | Specification |
|---|---|
| Brand | Sinbo |
| Model Number | SCM-2996 |
| Product Dimensions | 38 x 36 x 28 cm |
| Pressure | 20 Bar |
| Milk Tank Capacity | 500 ml |
| First Available Date | July 2, 2025 |
8. Warranty and Support
Your SINBO SCM-2996 Espresso Coffee Machine comes with a manufacturer's warranty. Please refer to the warranty card included in your product packaging for specific terms and conditions.
For technical support, service, or warranty claims, please contact the retailer where you purchased the product or visit the official Sinbo website for customer service contact information.
Always provide your product model number (SCM-2996) and purchase details when seeking support.


