1. Introduction
The CORSAIR Nautilus 360 RS LCD Liquid CPU Cooler delivers efficient, low-noise cooling for your CPU while offering a vibrant 2.1-inch IPS LCD screen for customization. This All-In-One (AIO) liquid cooler is designed for high-performance systems, ensuring optimal thermal transfer and quiet operation. This manual provides essential information for installation, operation, maintenance, and troubleshooting.
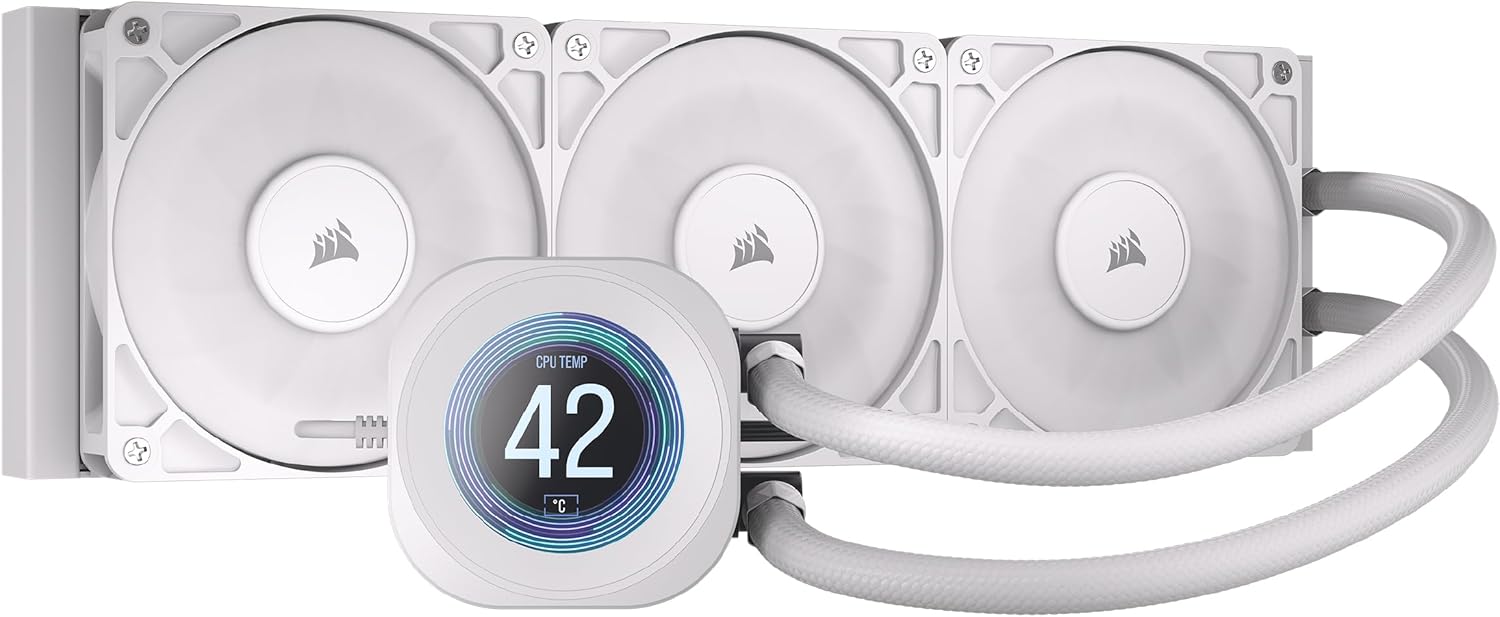
Figure 1: CORSAIR Nautilus 360 RS LCD Liquid CPU Cooler (White)
2. Key Features
- 2.1" IPS LCD Screen: Customizable display for temperatures, GIFs, or custom images via iCUE Software.
- Efficient, Low-Noise Pump: Maintains high coolant flow at a quiet 20 dBA.
- Convex Cold Plate with Pre-Applied Thermal Paste: Ensures superior thermal transfer and simplifies installation.
- 3x RS120 Fans: High static pressure fans with CORSAIR AirGuide technology and Magnetic Dome bearings for efficient, low-noise cooling (10 - 36 dB(A)).
- Daisy-Chain Connections: Minimizes cable clutter for a cleaner build.
- Wide Compatibility: Supports Intel LGA 1851/1700 and AMD AM5/AM4 platforms.
3. Setup and Installation
Follow these steps for proper installation of your CORSAIR Nautilus 360 RS LCD Liquid CPU Cooler.
3.1. Package Contents
Ensure all components are present before beginning installation:
- CORSAIR NAUTILUS 360 RS LCD Liquid CPU Cooler (Radiator, Pump/Cold Plate with LCD, Tubing)
- 3x RS120 Fans
- Mounting Kit for Intel & AMD CPU Sockets (Brackets, Standoffs, Screws, Nuts)
- PWM Extension Cable
- Fan and Radiator Mounting Screws
- Warranty & Safety Leaflet

Figure 2: Included Components
3.2. Motherboard Preparation
- For AMD AM5/AM4: Remove the motherboard's plastic retention brackets around the CPU socket. Keep the original backplate.
- For Intel LGA 1851/1700: Use the provided Intel backplate. Adjust the mounting hole position on the backplate to match your CPU socket (e.g., 1700).
3.3. Waterblock Installation
- Install the appropriate standoffs onto the motherboard's CPU socket holes.
- Attach the correct mounting brackets (Intel or AMD) to the standoffs using the provided screws. Ensure they are finger-tight.
- Remove the protective sticker from the cold plate of the waterblock.
- Carefully place the waterblock onto the CPU, aligning the bracket nuts with the screws on the mounting brackets.
- Tighten the screws on the waterblock bracket in a diagonal pattern until secure, ensuring even mounting pressure.

Figure 3: Cold Plate and Daisy-Chain Connections
3.4. Radiator and Fan Installation
- Mount the RS120 fans to the radiator using the long fan screws. Ensure the fan airflow direction is as desired (typically intake or exhaust from the case).
- Mount the radiator assembly to your PC case in the desired location (e.g., top, front).

Figure 4: RS120 Fan with AirGuide Technology
3.5. Cable Connections
- Connect the pump power cable to the CPU_OPT or AIO_PUMP header on your motherboard.
- Connect the fan PWM cables to the fan splitter cable.
- Connect the fan splitter cable to a CPU_FAN header on your motherboard to power the fans and enable PWM control.
- Connect the USB cable from the waterblock to an available USB 2.0 header on your motherboard. This is essential for iCUE software control and LCD functionality.
Video 1: CORSAIR RS-R ARGB Fans Video Trailer. This video showcases the visual effects and features of CORSAIR RS-R ARGB fans, which are similar to the RS120 fans included with this cooler.
Video 2: CORSAIR iCUE LINK TITAN RX RGB AIO Trailer. This video demonstrates the iCUE LINK ecosystem and RGB capabilities of a related CORSAIR AIO cooler, providing insight into the brand's lighting and control features.
4. Operating Instructions
4.1. iCUE Software Control
The CORSAIR Nautilus 360 RS LCD Liquid CPU Cooler is fully controllable via CORSAIR's iCUE software. Download and install the latest version of iCUE from the official CORSAIR website.
- LCD Customization: Use iCUE to display CPU/GPU temperatures, fan speeds, pump RPM, animated GIFs, or custom images on the 2.1-inch IPS LCD screen.
- Cooling Profiles: Create and manage custom fan and pump speed profiles to balance performance and noise levels.
- Monitoring: Monitor system vitals in real-time through the iCUE dashboard.

Figure 5: iCUE Software for LCD Control and Customization
4.2. Fan Speed Control (PWM)
The RS120 fans support PWM (Pulse Width Modulation) control, allowing for precise adjustment of fan speeds. This enables the system to automatically adapt fan speeds based on CPU temperature, optimizing for either quiet operation or maximum cooling performance.
5. Maintenance
Regular maintenance ensures optimal performance and longevity of your liquid CPU cooler.
- Radiator Cleaning: Periodically clean dust from the radiator fins using compressed air. Ensure the system is powered off before cleaning.
- Fan Cleaning: Gently wipe fan blades with a soft, dry cloth to remove dust buildup.
- Tubing Inspection: Check tubing for any signs of kinks, leaks, or damage.
- Coolant: The AIO cooler is a sealed unit and does not require coolant refills or maintenance.
6. Troubleshooting
- High CPU Temperatures:
- Ensure the waterblock is securely mounted to the CPU with adequate pressure.
- Verify that the pump power cable is correctly connected to the motherboard's AIO_PUMP or CPU_OPT header.
- Check fan connections and ensure they are spinning. Adjust fan curves in iCUE for higher performance if needed.
- Clean any dust buildup on the radiator fins.
- Fans Not Spinning or Loud:
- Confirm fan cables are properly connected to the splitter and the splitter to the CPU_FAN header.
- Check fan speed settings in iCUE. Adjust to a quieter profile if noise is an issue.
- Inspect fans for any obstructions.
- LCD Screen Not Displaying:
- Ensure the USB cable from the waterblock is securely connected to a USB 2.0 header on the motherboard.
- Verify iCUE software is installed and running.
- Check for any driver updates for the cooler or iCUE software.
7. Specifications
| Feature | Specification |
|---|---|
| Product Dimensions | 396mm L x 120mm W x 27mm H (15.59"L x 4.72"W x 1.06"H) |
| Brand | Corsair |
| Power Connector Type | 4-Pin (PWM) |
| Cooling Method | Water |
| Compatible Devices | Desktop |
| Noise Level | 20 Decibels (Pump), 10 - 36 dB(A) (Fans) |
| Material | Plastic, Metal, Glass |
| Maximum Rotational Speed | 2100 RPM (Fans) |
| UPC | 840440400363 |
| Item Model Number | CW-9061034-WW |
| Item Weight | 3.51 pounds |
| Color | White |
| Coldplate Material | Copper |
| Radiator Material | Aluminum |
| Tubing Length | 450mm |
| Tubing Material | White Sleeved Low-Permeation Rubber |
| Cooling Socket Support | AMD: AM5, AM4 | Intel: 1851, 1700 |
8. Warranty and Support
The CORSAIR Nautilus 360 RS LCD Liquid CPU Cooler comes with a manufacturer's warranty. Please refer to the included Warranty & Safety Leaflet for specific terms and conditions.
For technical support, driver downloads, or further assistance, please visit the official Corsair support website or contact their customer service.
- Corsair Support Website: www.corsair.com/support


