1. Introduction
This manual provides detailed instructions for the safe and effective operation, maintenance, and troubleshooting of your AWithZ U3 Pro 5000mAh Battery Spot Welder. Please read this manual thoroughly before using the device to ensure proper function and to prevent damage or injury. Keep this manual for future reference.
Safety Information
- Always wear appropriate personal protective equipment (PPE), including safety glasses, when operating the spot welder.
- Ensure the work area is well-ventilated and free from flammable materials.
- Do not operate the device with wet hands or in damp conditions.
- Avoid touching the welding tips during or immediately after operation, as they can be extremely hot.
- Do not attempt to weld materials other than those specified (nickel-plated sheets, iron, steel, aluminum sheets).
- Keep the device out of reach of children.
2. Package Contents
Verify that all items listed below are included in your package:
- AWithZ U3 Pro 5000mAh Battery Spot Welder Unit
- Spot Welding Pens (2 pieces)
- Nickel Plates (2 meters)
- Grinding Gauze
- USB Type-C Charging Cable
- English Instruction Manual

Image: The AWithZ U3 Pro spot welder unit, two spot welding pens, a roll of nickel strip, a USB-C charging cable, and a piece of grinding gauze, illustrating the complete package contents.
3. Product Overview
The AWithZ U3 Pro is a portable battery spot welder designed for various battery pack assembly and repair tasks. It features a 2-inch color LCD screen, 90 adjustable power gears, and a 5000mAh internal battery.
Component Identification

Image: A detailed view of the AWithZ U3 Pro spot welder unit with key components labeled. These include the soldering pen connection port, smart welding pen secondary interface, select button, ON/OFF/Switch button, display screen, USB output port, Type-C charging port, and manual mode trigger button on the welding pen.
- Soldering Pen Connection Port: Connects the welding pens to the main unit.
- Smart Welding Pen Secondary Interface: Additional connection point for welding pens.
- Select Button: Used for navigating menu options and confirming selections.
- ON/OFF/Switch Button: Powers the device on or off, and may switch modes.
- Display Screen: 2-inch color LCD for displaying settings and operational status.
- USB Output: Can be used to charge external devices (power bank function).
- Type-C Charging Port: For charging the spot welder's internal battery.
- Manual Mode Trigger Button (on pen): Activates welding in manual mode.
4. Setup
4.1 Initial Charging
Before first use, or if the device has been stored for an extended period, fully charge the spot welder. A full charge typically takes about 3 hours.
- Connect the provided USB Type-C charging cable to the Type-C charging port on the spot welder.
- Connect the other end of the cable to a suitable USB power adapter (not included).
- The display screen will indicate charging status.

Image: A four-step visual guide demonstrating how to use the spot welder. Step 1 shows charging the device, Step 2 shows turning it on and selecting gear options, Step 3 shows installing the spot welding pen, and Step 4 shows the spot welding process.
4.2 Attaching Welding Pens
Ensure the device is powered off before attaching or detaching the welding pens.
- Insert the connectors of the welding pens firmly into the soldering pen connection ports on the top of the main unit.
- Ensure a secure connection to prevent poor conductivity during welding.
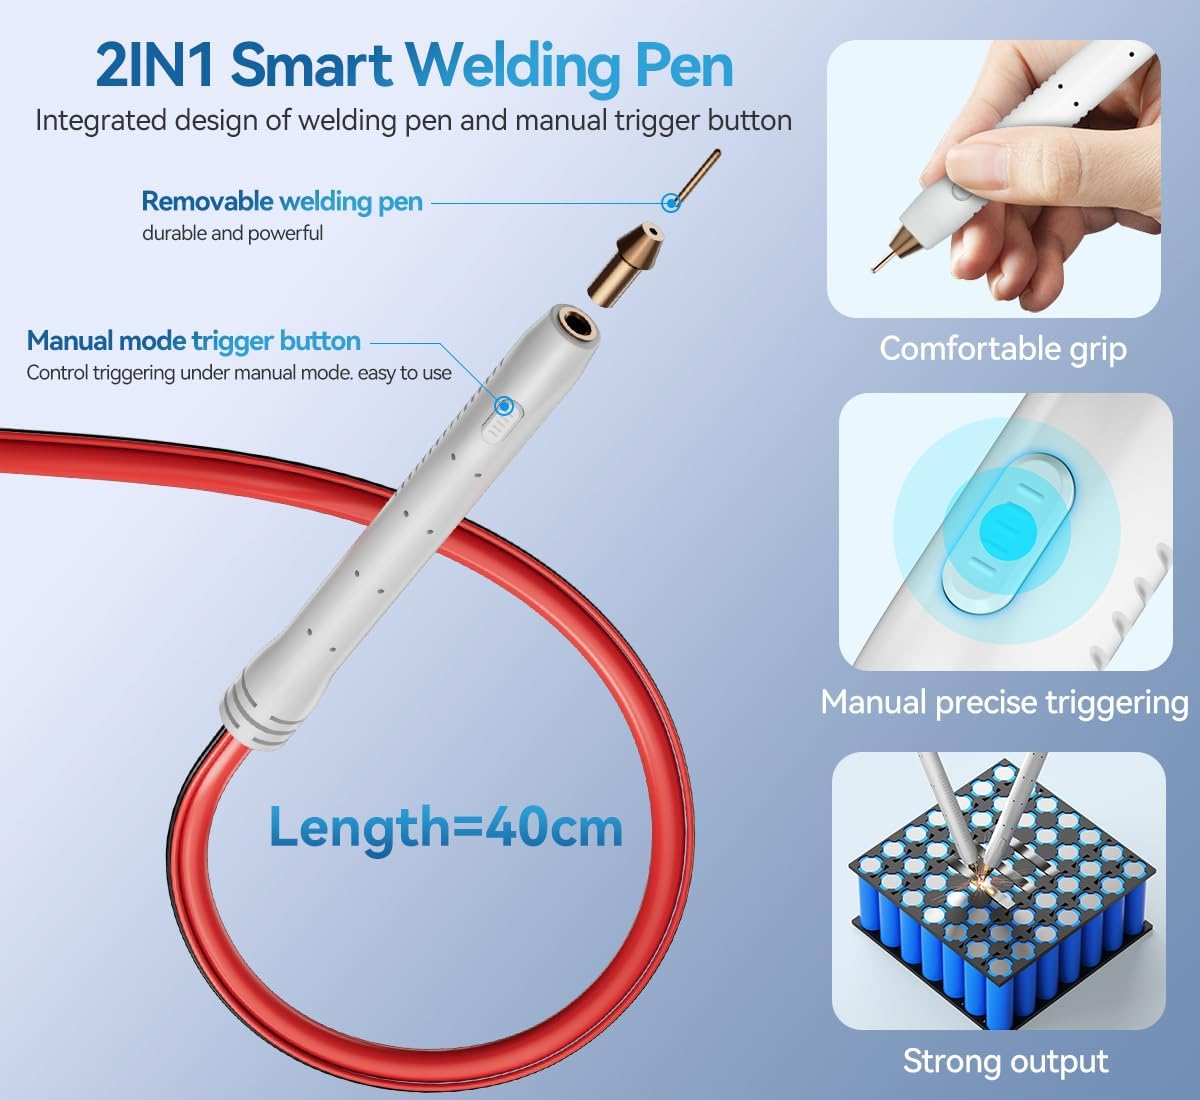
Image: A close-up of the 2-in-1 smart welding pen, highlighting its removable welding pen tip and the manual mode trigger button. The pen is shown with a length of 40cm.
5. Operating Instructions
5.1 Powering On/Off
- To power on, press and hold the ON/OFF/Switch button until the display screen illuminates.
- To power off, press and hold the ON/OFF/Switch button until the screen turns off.
5.2 Navigating the User Interface (UI)
The 2-inch color LCD screen displays various settings and operational parameters in a circular UI. Use the Select button to navigate and adjust settings.

Image: A close-up of the AWithZ U3 Pro's 2-inch color LCD screen, showing the circular user interface with settings such as Intermittent (20ms), Preheat (10ms), Mode (Auto), Stitch Welding (Thrice), Gear (9.0), Trigger (0.5s), and current/voltage indicators.
5.3 Adjusting Welding Parameters
The device offers 90 adjustable power gears and other customizable settings.
- Gear: Adjusts the welding power level from 1 to 90. Higher numbers indicate more power. Select the appropriate gear based on the thickness and material of the nickel strip.
- Preheat: Sets a preheating time (e.g., 10ms) to prepare the material for welding.
- Intermittent: Configures the interval between multiple spot welds.
- Trigger: Sets the trigger delay or duration.
- Mode: Switch between Auto and Manual welding modes.
- Stitch Welding: Allows for multiple spot welds in quick succession (e.g., 3 times).

Image: Two images of the AWithZ U3 Pro unit, demonstrating the screen's 180-degree flipping capability for improved viewing angles.
5.4 Performing a Spot Weld
- Prepare the surfaces to be welded, ensuring they are clean and free of oxidation.
- Select the appropriate welding gear based on the material thickness (0.1-0.35mm nickel-plated sheets are supported).
- Auto Mode: Place both welding pen tips firmly onto the nickel strip and battery terminal. The device will automatically detect contact and initiate the weld after a short delay.
- Manual Mode: Place both welding pen tips firmly onto the nickel strip and battery terminal. Press the manual mode trigger button on the welding pen to initiate the weld.
- Ensure firm and even pressure on both welding tips during the weld.
- For optimal results, weld on the edge of the nickel piece for a firmer connection.

Image: The AWithZ U3 Pro spot welder in action, showing the welding pens applying spot welds to nickel strips connecting multiple 18650-type batteries. The image also displays different gear settings (2.1, 5.3, 7.7) and indicates support for 0.1-0.35mm nickel-plated sheet thickness.
5.5 Continuous Spot Welding
The U3 Pro features a 'Continuous Spot Welding Time' enhancement, allowing you to perform up to 3 consecutive spot welds in the same position without lifting the welding pens. This is useful for creating stronger bonds.
6. Applications
The AWithZ U3 Pro spot welder is versatile and can be used for various tasks involving battery assembly and repair:
- Forming 18650/21700 battery packs.
- Repairing electronic equipment such as handheld electric drills and children's electric toys.
- Welding stainless steel and stainless steel splicing for handmade projects.
- Welding button cells.

Image: A collage illustrating various applications of the spot welder, including making battery packs, welding button cells, making power banks, and repairing electric vacuums and hair dryers.
Compatible Battery Types
- Cylindrical batteries (e.g., 18650, 21700)
- Button batteries
- Transplant batteries
Compatible Material Types
- Nickel-plated Sheet
- Iron Sheet
- Steel Sheet
- Aluminum Sheet (Note: Welding aluminum may require specific settings or techniques due to its properties.)

Image: A graphic illustrating the universal compatibility of the AWithZ U3 Pro, showing various battery types (cylindrical, button, transplant) and material types (nickel-plated, iron, steel, aluminum sheets) that can be welded.
7. Maintenance
7.1 Cleaning
- Regularly clean the welding pen tips with the provided grinding gauze to remove oxidation and ensure good conductivity.
- Wipe the main unit with a soft, dry cloth. Do not use abrasive cleaners or solvents.
7.2 Replacing Pen Tips
The welding pen tips are designed to be replaceable. If tips become excessively worn or damaged, they can be easily removed and new ones installed.
7.3 Battery Care
- Avoid fully discharging the battery frequently to prolong its lifespan.
- Store the device in a cool, dry place when not in use, ideally with a partial charge (around 50%).
- Recharge the device every few months if stored for long periods to prevent deep discharge.
8. Troubleshooting
This section addresses common issues you might encounter with your AWithZ U3 Pro spot welder.
| Problem | Possible Cause | Solution |
|---|---|---|
| Weak or inconsistent welds | Low power setting (Gear) Dirty or oxidized welding tips Insufficient pressure on pens Nickel strip too thick for current setting | Increase the Gear setting. Clean welding tips with grinding gauze. Apply more firm and even pressure. Use a thinner nickel strip or higher power setting. |
| Device does not power on | Battery is discharged Faulty ON/OFF button | Charge the device fully. Contact customer support if charging does not resolve the issue. |
| Welding pens not triggering | Loose connection Manual mode button not pressed (in manual mode) Auto mode not detecting contact | Ensure pens are securely connected. Press the manual trigger button firmly. Ensure both tips make good contact with the material. |
| Screen display issues | Protective film still on screen Software glitch | Remove the protective film. Try restarting the device. If issues persist, contact support. |
Switching UI Language
To quickly switch the UI language, press the 3 buttons of the spot welder simultaneously.
9. Specifications
| Feature | Specification |
|---|---|
| Model Number | U3 Pro |
| Battery Capacity | 5000mAh (Internal Lithium Polymer) |
| Charging Time | Approximately 3 hours |
| Adjustable Gears | 90 Levels |
| Display | 2-inch Color LCD Screen |
| Welding Thickness Support | 0.1-0.35mm (Nickel-plated sheets) |
| Welding Pen Length | 40cm |
| Continuous Spot Welding | Up to 3 times in a row |
| Power Source | Battery Powered |
| Item Weight | 1 pound |
| Package Dimensions | 6 x 4 x 1.3 inches |

Image: A graphic representation of the 5000mAh battery capacity, with a battery icon and a gauge indicating the capacity range up to 7500mAh, highlighting the device's power source.
10. Warranty and Support
The AWithZ U3 Pro Battery Spot Welder is designed for durability and performance. For specific warranty details, please refer to the warranty card included in your product packaging or contact AWithZ customer support.
Customer Support
If you encounter any issues not covered in this manual or require further assistance, please contact AWithZ customer support through the retailer where you purchased the product or visit the official AWithZ website for contact information.
Online Resources:
- For additional information and support, visit the AWithZ Store on Amazon.


