1. Introduction
This manual provides detailed instructions for the installation, operation, and maintenance of the BIGTREETECH EBB42 CAN Bus and BIQU Nebula Extruder Kit. This kit is designed to enhance 3D printing performance with advanced features and compatibility for various 3D printer setups.
2. Product Overview and Features
The BIGTREETECH EBB42 CAN Bus and BIQU Nebula Extruder Kit combines a robust extruder with a versatile adapter board, offering improved control and filament handling for 3D printers.

Image: The BIGTREETECH EBB42 CAN Bus board shown alongside the BIQU Nebula Extruder. This image displays the two main components of the kit.
Key Features:
- Smart Upgrade: Onboard MAX31865 for 2-wire/4-wire PT100/PT1000 selection, supporting CAN or USB communication. Features a 120R CAN terminal resistance selectable by jumper cap, reserved CAN expansion interface, and RGB interface for lighting needs.
- Easy to Use: A 36-step (42-step) motor extruder nozzle adapter board that simplifies wiring via USB or CAN communication. Includes BOOT and RESET buttons for DFU mode firmware updates.
- Intelligent Feeder and Unloader: BIQU Nebula Extruder features a built-in filament sensor for automatic feeding upon insertion. A Gcode switch allows one-click filament return and supports customizable functions for flexible and efficient printing.
- 6KG+ Stable Extrusion Force: Utilizes large-diameter hardened steel dual extrusion gears and a precision planetary gear reduction system, providing over 6KG of stable extrusion force for excellent grip and traction on various filaments, minimizing slipping or grinding.
- Compatibility: The BIQU Nebula Extruder uses installation holes compatible with LGX Lite and popular print heads such as StealthBurner and EVA3. Open-source appearance models allow users to design custom installation brackets.
3. Components and Connections
This section details the main components of the kit and their primary connections.

Image: Close-up view of the BIGTREETECH EBB 36/42 CAN Bus boards, highlighting their compact design and various connection points. These boards are designed for connecting Klipper expansion devices.
EBB42 Board Connections:

Image: Detailed view of the EBB42 board showing connections for PT100/PT1000 sensors (2-wire or 4-wire support via MAX31865), CAN bus, and USB. The 120R terminal resistance for CAN can be selected via a jumper cap.
- PT100/PT1000: Supports 2-wire or 4-wire configurations for temperature sensing, enabled by the onboard MAX31865.
- CAN Bus: For communication with Klipper expansion devices. A 120R terminal resistance can be enabled using a jumper cap.
- USB: Provides an alternative communication method and allows for firmware updates in DFU mode.
- RGB Port: A reserved port for connecting RGB lighting.
- ADXL345 Accelerometer: Onboard for advanced motion sensing.

Image: Close-up of the EBB42 board highlighting the reserved RGB port for illumination and the onboard ADXL345 accelerometer.

Image: Detail of the EBB42 board showing the jumper cap for selecting USB power supply, along with ESD and Surge Protection features for enhanced safety.
Nebula Extruder Features:

Image: The BIQU Nebula Extruder featuring dynamic RGB lighting, which can be customized for visual alerts and progress monitoring.
- Transparent Magnetic Cover: Allows for easy filament monitoring and tool-free access for adjustments.
- Smart Auto-Loading: Built-in sensor automatically loads filament when inserted.
- One-Button Unload: Simplifies filament removal with a single press.

Image: The BIQU Nebula Extruder showcasing its transparent magnetic cover, which allows for easy filament monitoring and tool-free access for maintenance or adjustments.

Image: Illustration of the BIQU Nebula Extruder's smart auto-loading mechanism, where a sensor grabs and loads filament, and the one-button unload feature for instant filament removal.
4. Setup and Installation
This section outlines the general steps for installing the EBB42 CAN Bus board and the Nebula Extruder. Specific installation procedures may vary based on your 3D printer model and print head.
4.1. EBB42 CAN Bus Board Installation
- Mounting: Secure the EBB42 board to your printer's tool head or an appropriate location, ensuring it is stable and does not interfere with printer movement.
- Wiring: Connect the stepper motor, heater, thermistor (PT100/PT1000), and other peripherals to the designated ports on the EBB42 board. Refer to the pinout diagram for precise connections.
- CAN Bus Connection: Connect the EBB42 board to your mainboard via the CAN bus. Ensure the 120R terminal resistance jumper is correctly set if required by your CAN network configuration.
- Power Supply: Provide power to the EBB42 board. You may use the USB connection for power if selected via the jumper cap, or a dedicated power input.
- Firmware: Update your Klipper firmware to recognize and communicate with the EBB42 board. Use the BOOT and RESET buttons to enter DFU mode for firmware flashing via USB.
4.2. BIQU Nebula Extruder Installation
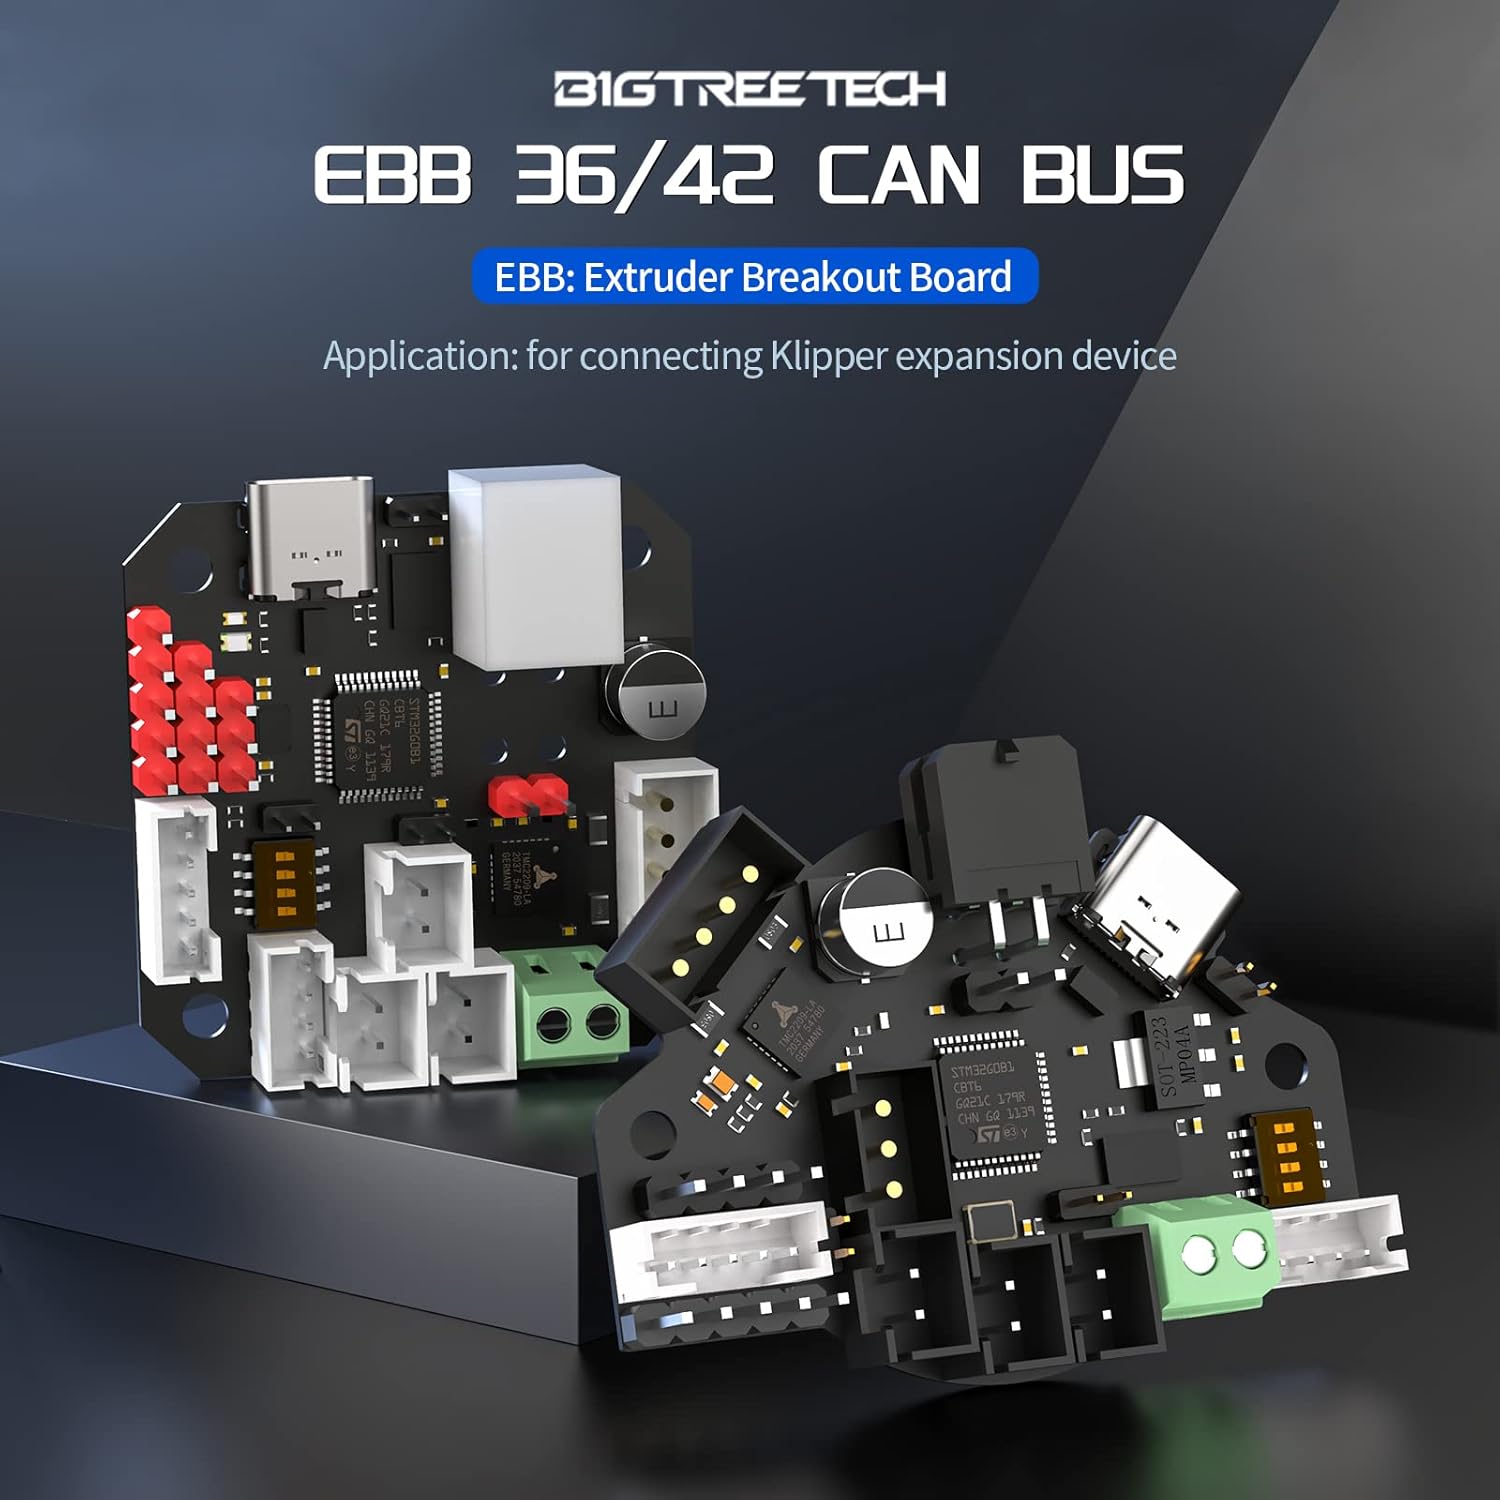
Image: The BIQU Nebula Extruder shown mounted on a 3D printer tool head, illustrating its compatibility with popular print heads like StealthBurner and EVA3. The image emphasizes its universal fit.
- Mounting: The Nebula Extruder is designed with mounting holes compatible with LGX Lite, StealthBurner, and EVA3 print heads. Attach the extruder securely to your chosen print head assembly.
- Motor Connection: Connect the extruder's stepper motor to the EBB42 board's motor driver port.
- Filament Sensor: Ensure the filament sensor is correctly positioned and connected.
- Filament Path: Verify that the filament path is clear and unobstructed through the extruder.
- Calibration: After installation, perform necessary E-steps calibration and PID tuning for optimal extrusion performance.
For detailed model files and user manual updates, refer to the official BIGTREETECH resources: github.com/bigtreetech/Nebula and bttwiki.com/Nebula.html.
5. Operating Instructions
5.1. Filament Loading
- Ensure your 3D printer is powered on and the hotend is preheated to the appropriate temperature for your filament type.
- Insert the filament into the extruder's input port. The built-in filament sensor will detect the filament and automatically initiate the loading process.
- Observe the filament as it feeds through the extruder and exits the nozzle. If necessary, manually assist the filament until it extrudes smoothly.
5.2. Filament Unloading
- Preheat the hotend to the filament's melting temperature.
- Press the designated Gcode switch or initiate the unload command from your printer's interface. The extruder will automatically retract the filament.
- Once the filament is fully retracted, gently pull it out from the extruder.
5.3. CAN Bus Communication
The EBB42 board communicates with your mainboard via CAN bus, providing a reliable and high-speed connection. Ensure your Klipper configuration is correctly set up to utilize the CAN bus for communication with the EBB42.
5.4. RGB Lighting Control
If an RGB strip is connected to the reserved RGB port, you can control its lighting effects through your printer's firmware (e.g., Klipper). This allows for visual feedback on printer status or aesthetic customization.
6. Maintenance
Regular maintenance ensures the longevity and optimal performance of your BIGTREETECH EBB42 CAN Bus and BIQU Nebula Extruder Kit.
- Clean Extruder Gears: Periodically inspect and clean the dual extrusion gears to remove any accumulated filament dust or debris. The transparent magnetic cover allows for easy access.
- Check Filament Path: Ensure the filament path is clear and free from obstructions.
- Inspect Wiring: Regularly check all wiring connections to the EBB42 board for looseness or damage.
- Firmware Updates: Keep your EBB42 firmware and Klipper configuration updated to benefit from the latest features and bug fixes.
7. Troubleshooting
This section provides solutions to common issues you might encounter.
7.1. Extrusion Issues (Under/Over-extrusion)
- Check E-steps: Ensure your extruder's E-steps are correctly calibrated in your firmware.
- Filament Diameter: Verify that the filament diameter setting in your slicer matches the actual filament.
- Nozzle Clog: Inspect the nozzle for clogs and clear if necessary.
- Gear Cleanliness: Clean the extruder gears as described in the Maintenance section.
7.2. Communication Errors (CAN Bus/USB)
- Wiring: Double-check all CAN bus and USB connections for secure fit.
- Jumper Settings: Ensure CAN bus terminal resistance jumper (120R) is correctly set.
- Firmware: Confirm that the EBB42 firmware and Klipper configuration are compatible and correctly flashed.
- Power: Verify the EBB42 board is receiving adequate power.
7.3. Filament Sensor Not Triggering
- Sensor Connection: Check the filament sensor's connection to the EBB42 board.
- Sensor Obstruction: Ensure the sensor path is clear and not blocked by debris.
- Firmware Configuration: Verify the filament sensor is enabled and correctly configured in your Klipper setup.
8. Specifications
| Feature | Description |
|---|---|
| Product Name | BIGTREETECH EBB42 CAN Bus + BIQU Nebula Extruder Kit |
| EBB Board Model | EBB42 (for 42-step motors) |
| Extruder Model | BIQU Nebula Extruder |
| Communication | CAN Bus, USB |
| Thermistor Support | PT100/PT1000 (2-wire/4-wire, via MAX31865) |
| Extrusion Force | 6KG+ (Stable) |
| Extruder Gears | Large-diameter hardened steel dual extrusion gears |
| Extruder Features | Built-in Filament Sensor, Transparent Magnetic Cover, One-Button Unload |
| EBB Board Features | Onboard ADXL345 Accelerometer, Reserved RGB Interface, ESD & Surge Protection |
| Compatibility | StealthBurner, EVA3, LGX Lite (mounting holes) |
| ASIN | B0FGD8T5TH |
| First Available | May 22, 2025 |
9. Warranty and Support
For warranty information and technical support, please refer to the official BIQU or BIGTREETECH website or contact their customer service directly. Keep your purchase receipt for warranty claims.
Official resources and community support can often be found at:


