1. Important Safety Instructions
Read all instructions carefully before operating this appliance. Failure to follow these instructions may result in electric shock, fire, and/or serious injury.
- Always wear appropriate personal protective equipment, including eye protection, hearing protection, and sturdy footwear, when operating the unit.
- Ensure the power cord is in good condition and avoid cutting, damaging, or tangling it. Keep the cord away from heat, oil, sharp edges, or moving parts.
- Do not operate the unit in wet conditions or expose it to rain.
- Keep children, bystanders, and pets at a safe distance (at least 50 feet / 15 meters) from the operating area.
- Before performing any maintenance, cleaning, or when not in use, always unplug the unit from the power source.
- Inspect the unit for damaged parts before each use. Do not operate if any part is damaged.
- Important: Ensure the collection bag is securely attached and the rope is tightened firmly onto the red collar before attaching it to the machine. Recheck the attachment before each use to prevent debris from escaping.
2. Product Overview and Components
Familiarize yourself with the various parts of your Shop-Vac 3-in-1 Electric Leaf Blower, Vacuum, and Mulcher for safe and effective operation.
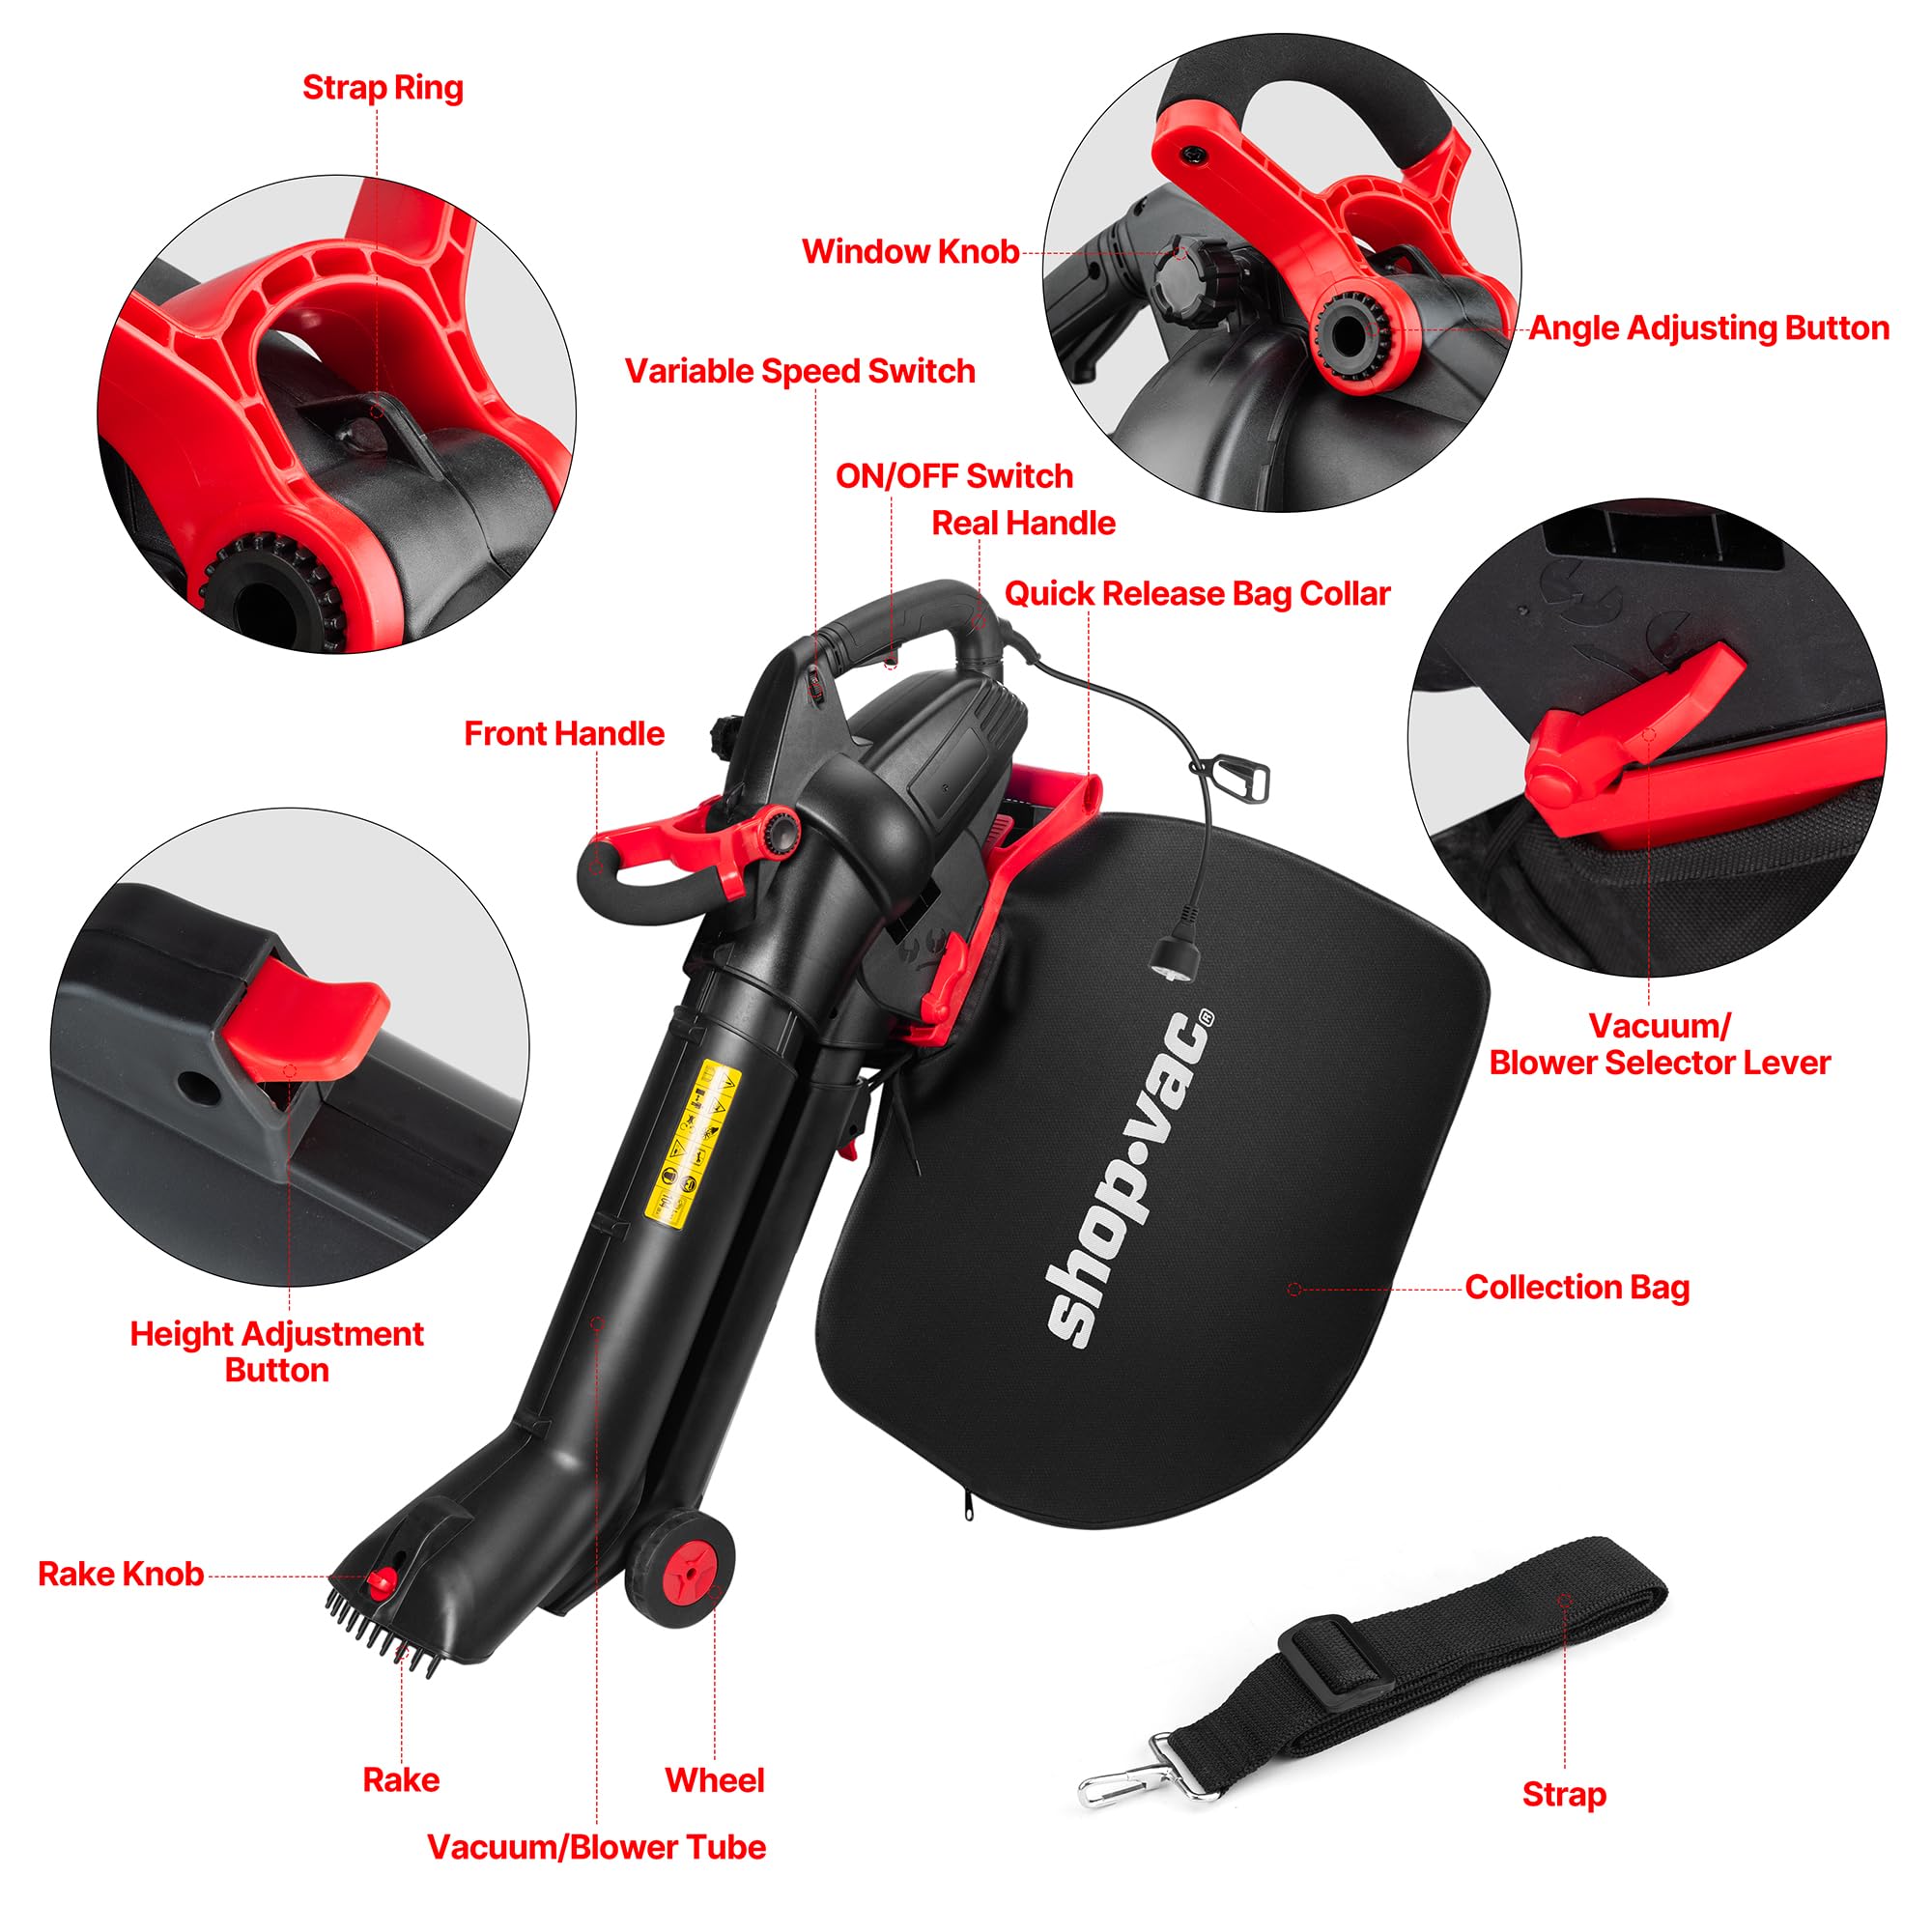
Image Description: This diagram provides a detailed view of the Shop-Vac 3-in-1 Electric Leaf Blower, Vacuum, and Mulcher, with key components clearly labeled. These include the Front Handle, Real Handle, ON/OFF Switch, Variable Speed Switch, Quick Release Bag Collar, Window Knob, Angle Adjusting Button, Vacuum/Blower Selector Lever, Collection Bag, Strap Ring, Height Adjustment Button, Rake Knob, Rake, Vacuum/Blower Tube, Wheel, and Shoulder Strap.
Key Components:
- Front Handle: Provides additional grip and control during operation.
- Real Handle: Main grip for operating the unit.
- ON/OFF Switch: Activates and deactivates the motor.
- Variable Speed Switch: Adjusts the motor speed for different tasks.
- Quick Release Bag Collar: Mechanism for attaching and detaching the collection bag.
- Vacuum/Blower Selector Lever: Switches between blowing and vacuuming modes.
- Collection Bag: Gathers vacuumed and mulched debris.
- Shoulder Strap: Provides comfort and support for hands-free operation.
- Height Adjustment Button: Allows adjustment of the tube length for ergonomic use.
- Wheels: Facilitate easy maneuverability across surfaces.
3. Setup
3.1 Attaching the Collection Bag
Proper attachment of the collection bag is crucial for safe and effective vacuuming and mulching.
- Insert the support frame buckle of the collection bag into the housing slot on the main unit. Ensure it clicks into place, indicating it is properly secured.
- Locate the rope on the collection bag. Tighten this rope firmly around the red collar of the unit. This creates a secure seal and prevents debris from escaping.
- Before each use, visually inspect and gently tug on the bag to confirm it is securely fastened.

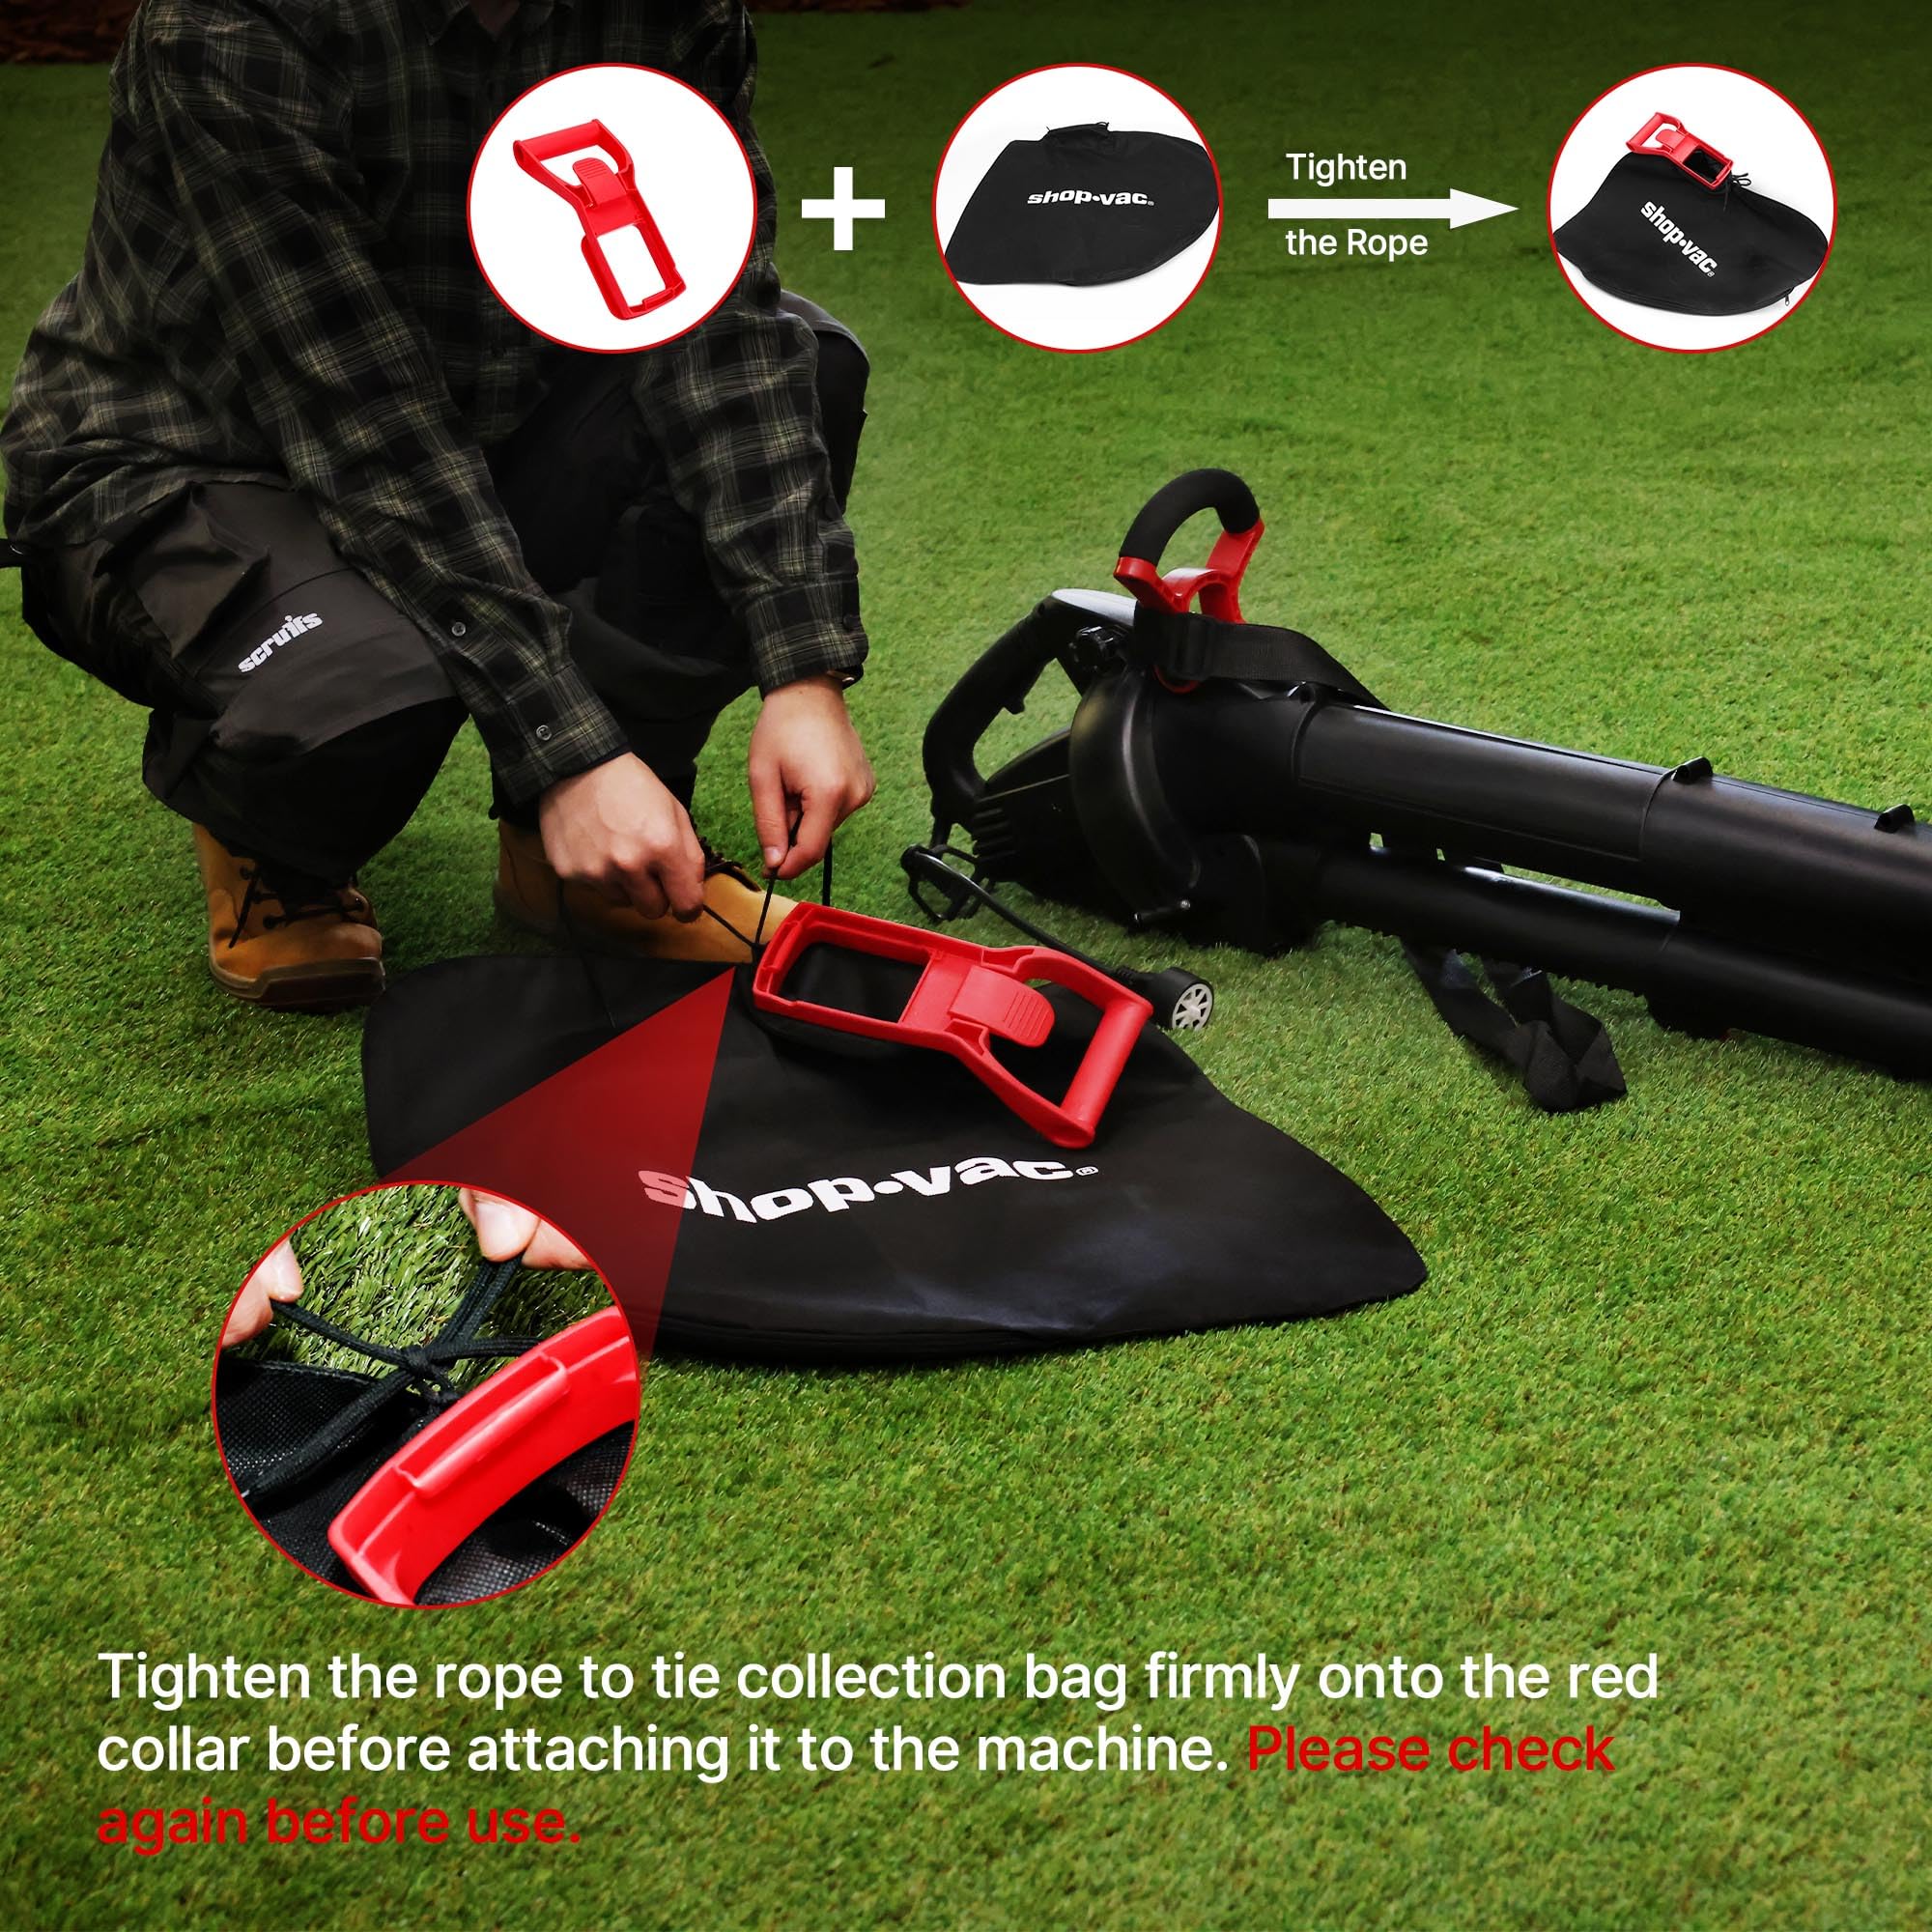
Image Description: The left image shows the 'Install' and 'Dismantle' steps for the collection bag, illustrating how to insert the buckle and press the spring lever for release. The right image demonstrates the critical step of tightening the rope to secure the collection bag firmly onto the red collar of the machine before use.
3.2 Attaching the Shoulder Strap
For enhanced comfort and reduced fatigue during extended use, attach the provided shoulder strap.
- Locate the strap rings on the unit.
- Attach the clips of the shoulder strap to these rings.
- Adjust the strap length to a comfortable position that allows for hands-free operation and proper balance of the unit.
3.3 Power Connection
This unit operates on a 120V AC power supply.
- Plug the power cord into a suitable 120V electrical outlet.
- If an extension cord is necessary, ensure it is rated for outdoor use and has sufficient gauge for the unit's amperage (up to 12A) to prevent overheating and power loss.
4. Operation
Your Shop-Vac 3-in-1 unit offers blowing, vacuuming, and mulching functions. Always ensure the unit is properly assembled and the collection bag is secure before starting.
4.1 Switching Modes (Blower, Vacuum, Mulcher)
The unit allows for quick transitions between blowing and vacuuming. Mulching occurs automatically when in vacuum mode.

Image Description: This composite image displays the Shop-Vac unit in its three primary operational modes: Blower, Vacuum, and Mulcher. The 'Blower' image shows the unit pushing leaves away, the 'Vacuum' image shows it collecting leaves, and the 'Mulcher' image shows the collection bag filled with shredded debris.
- To Blow: Adjust the Vacuum/Blower Selector Lever to the 'Blower' position. This directs airflow out of the nozzle to clear debris.
- To Vacuum and Mulch: Adjust the Vacuum/Blower Selector Lever to the 'Vacuum' position. The unit will draw in leaves and debris, automatically mulching them before depositing them into the collection bag.
4.2 Powering On and Speed Control
The unit features a 2-speed variable control for adapting to different tasks.
- To start the unit, press the ON/OFF Switch.
- Use the Variable Speed Switch to select between two speeds: a lower speed for light cleaning and a higher speed for heavy-duty work. The motor can deliver up to 15,500 RPM for maximum efficiency.
4.3 Adjusting Height for Comfort
The unit's height can be adjusted to suit individual user comfort and optimize operation.
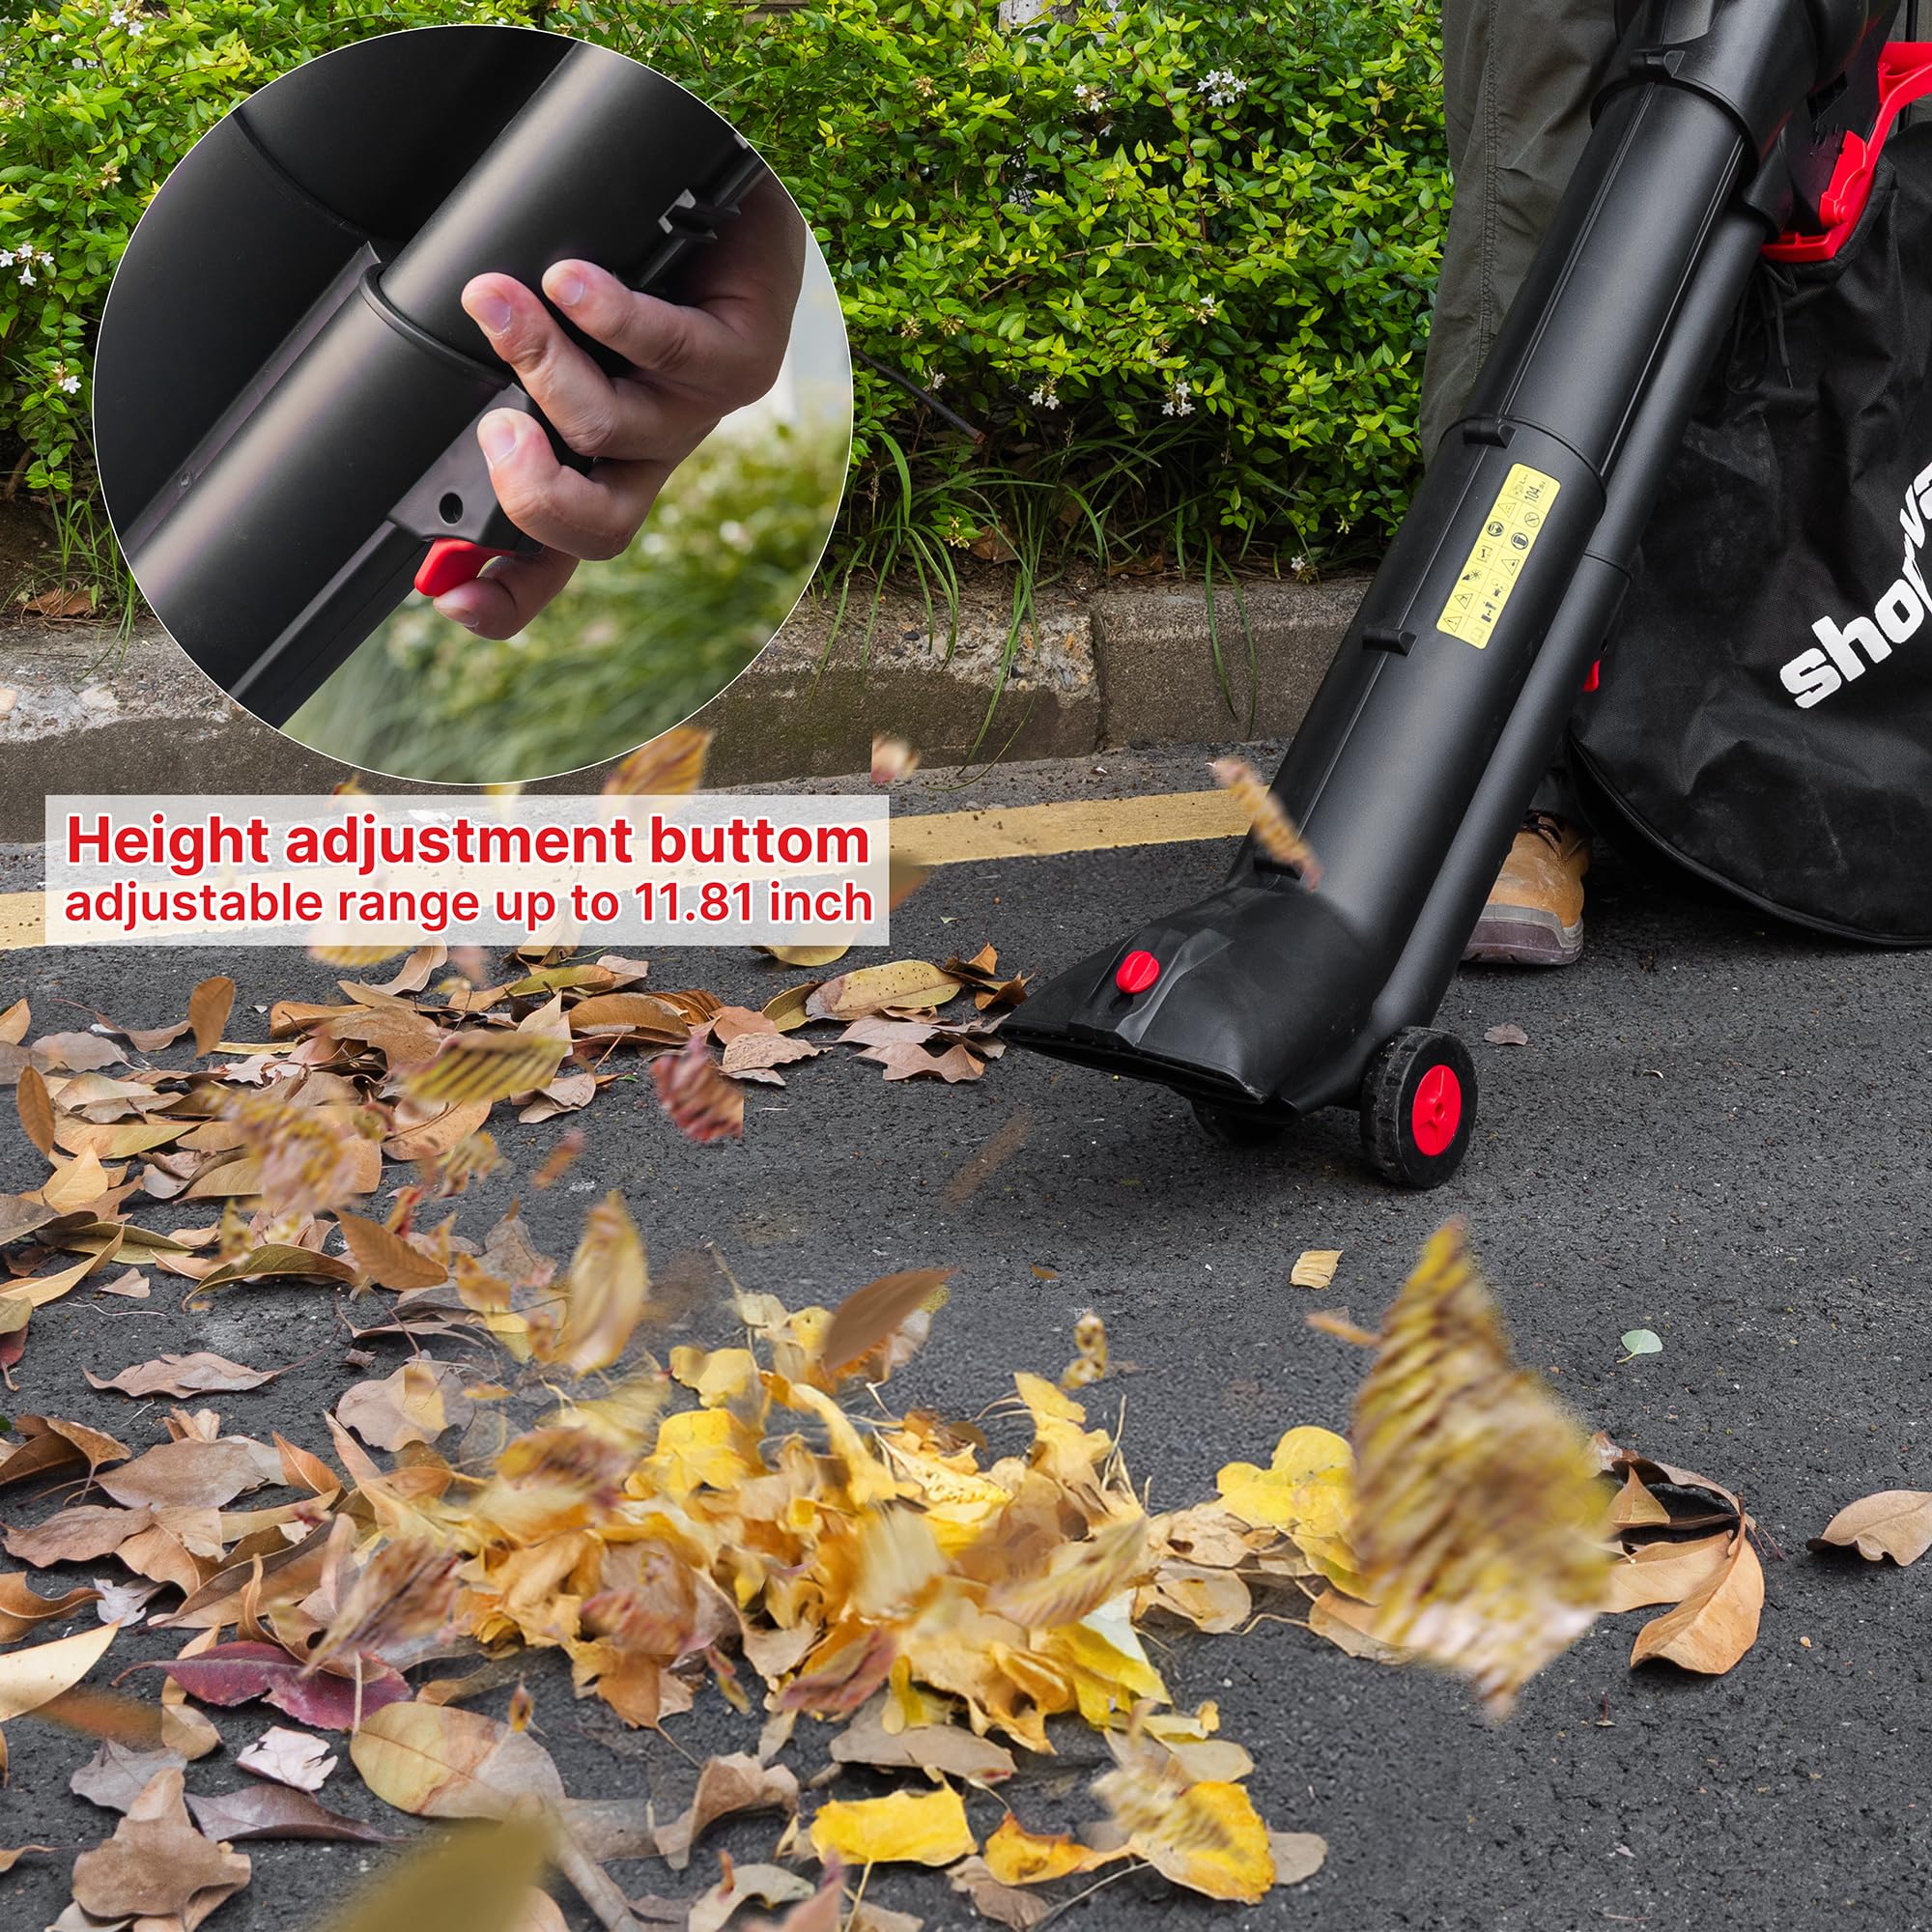
Image Description: A close-up view of the red height adjustment button located on the main tube of the unit. Pressing this button allows the user to extend or retract the tube, customizing the tool's length for ergonomic operation.
- Press the Height Adjustment Button located on the vacuum/blower tube.
- Extend or retract the tube to your desired length. The adjustable range is up to 11.81 inches.
- Release the button to lock the tube in place.
4.4 Using the Shoulder Strap and Wheels
The integrated wheels and shoulder strap enhance mobility and reduce physical strain.

Image Description: A user is shown operating the Shop-Vac unit while wearing the shoulder strap, demonstrating how it provides support and allows for more comfortable, hands-free use during lawn care tasks.
- For extended use, utilize the shoulder strap to distribute the unit's weight (approximately 8.16 lbs / 3.7 kg), reducing arm fatigue.
- The integrated wheels at the front of the nozzle allow for easy pushing and maneuvering across hard surfaces like driveways and patios, especially when vacuuming.
5. Maintenance
Regular maintenance ensures the longevity and optimal performance of your unit.
- Cleaning the Unit: After each use, unplug the unit and wipe down the exterior with a damp cloth. Do not use harsh chemicals or abrasive cleaners.
- Clearing Jams: If the unit experiences a clog, especially during vacuuming, immediately unplug it. The unit features a trap door on the side for easy access to clear jams. Unscrew the captive screw and open the hinged door to remove any obstructions. Ensure the door is securely closed and the screw tightened before resuming operation.
- Collection Bag Care: Empty the 35L collection bag regularly. Clean the bag as needed by shaking out debris or rinsing with water and allowing it to air dry completely before reattaching.
- Mulcher Inspection: If the machine makes a rattling sound after inhaling hard objects, immediately stop using it, unplug, and inspect the mulching mechanism for any foreign objects or damage. Clean the device thoroughly before resuming use.
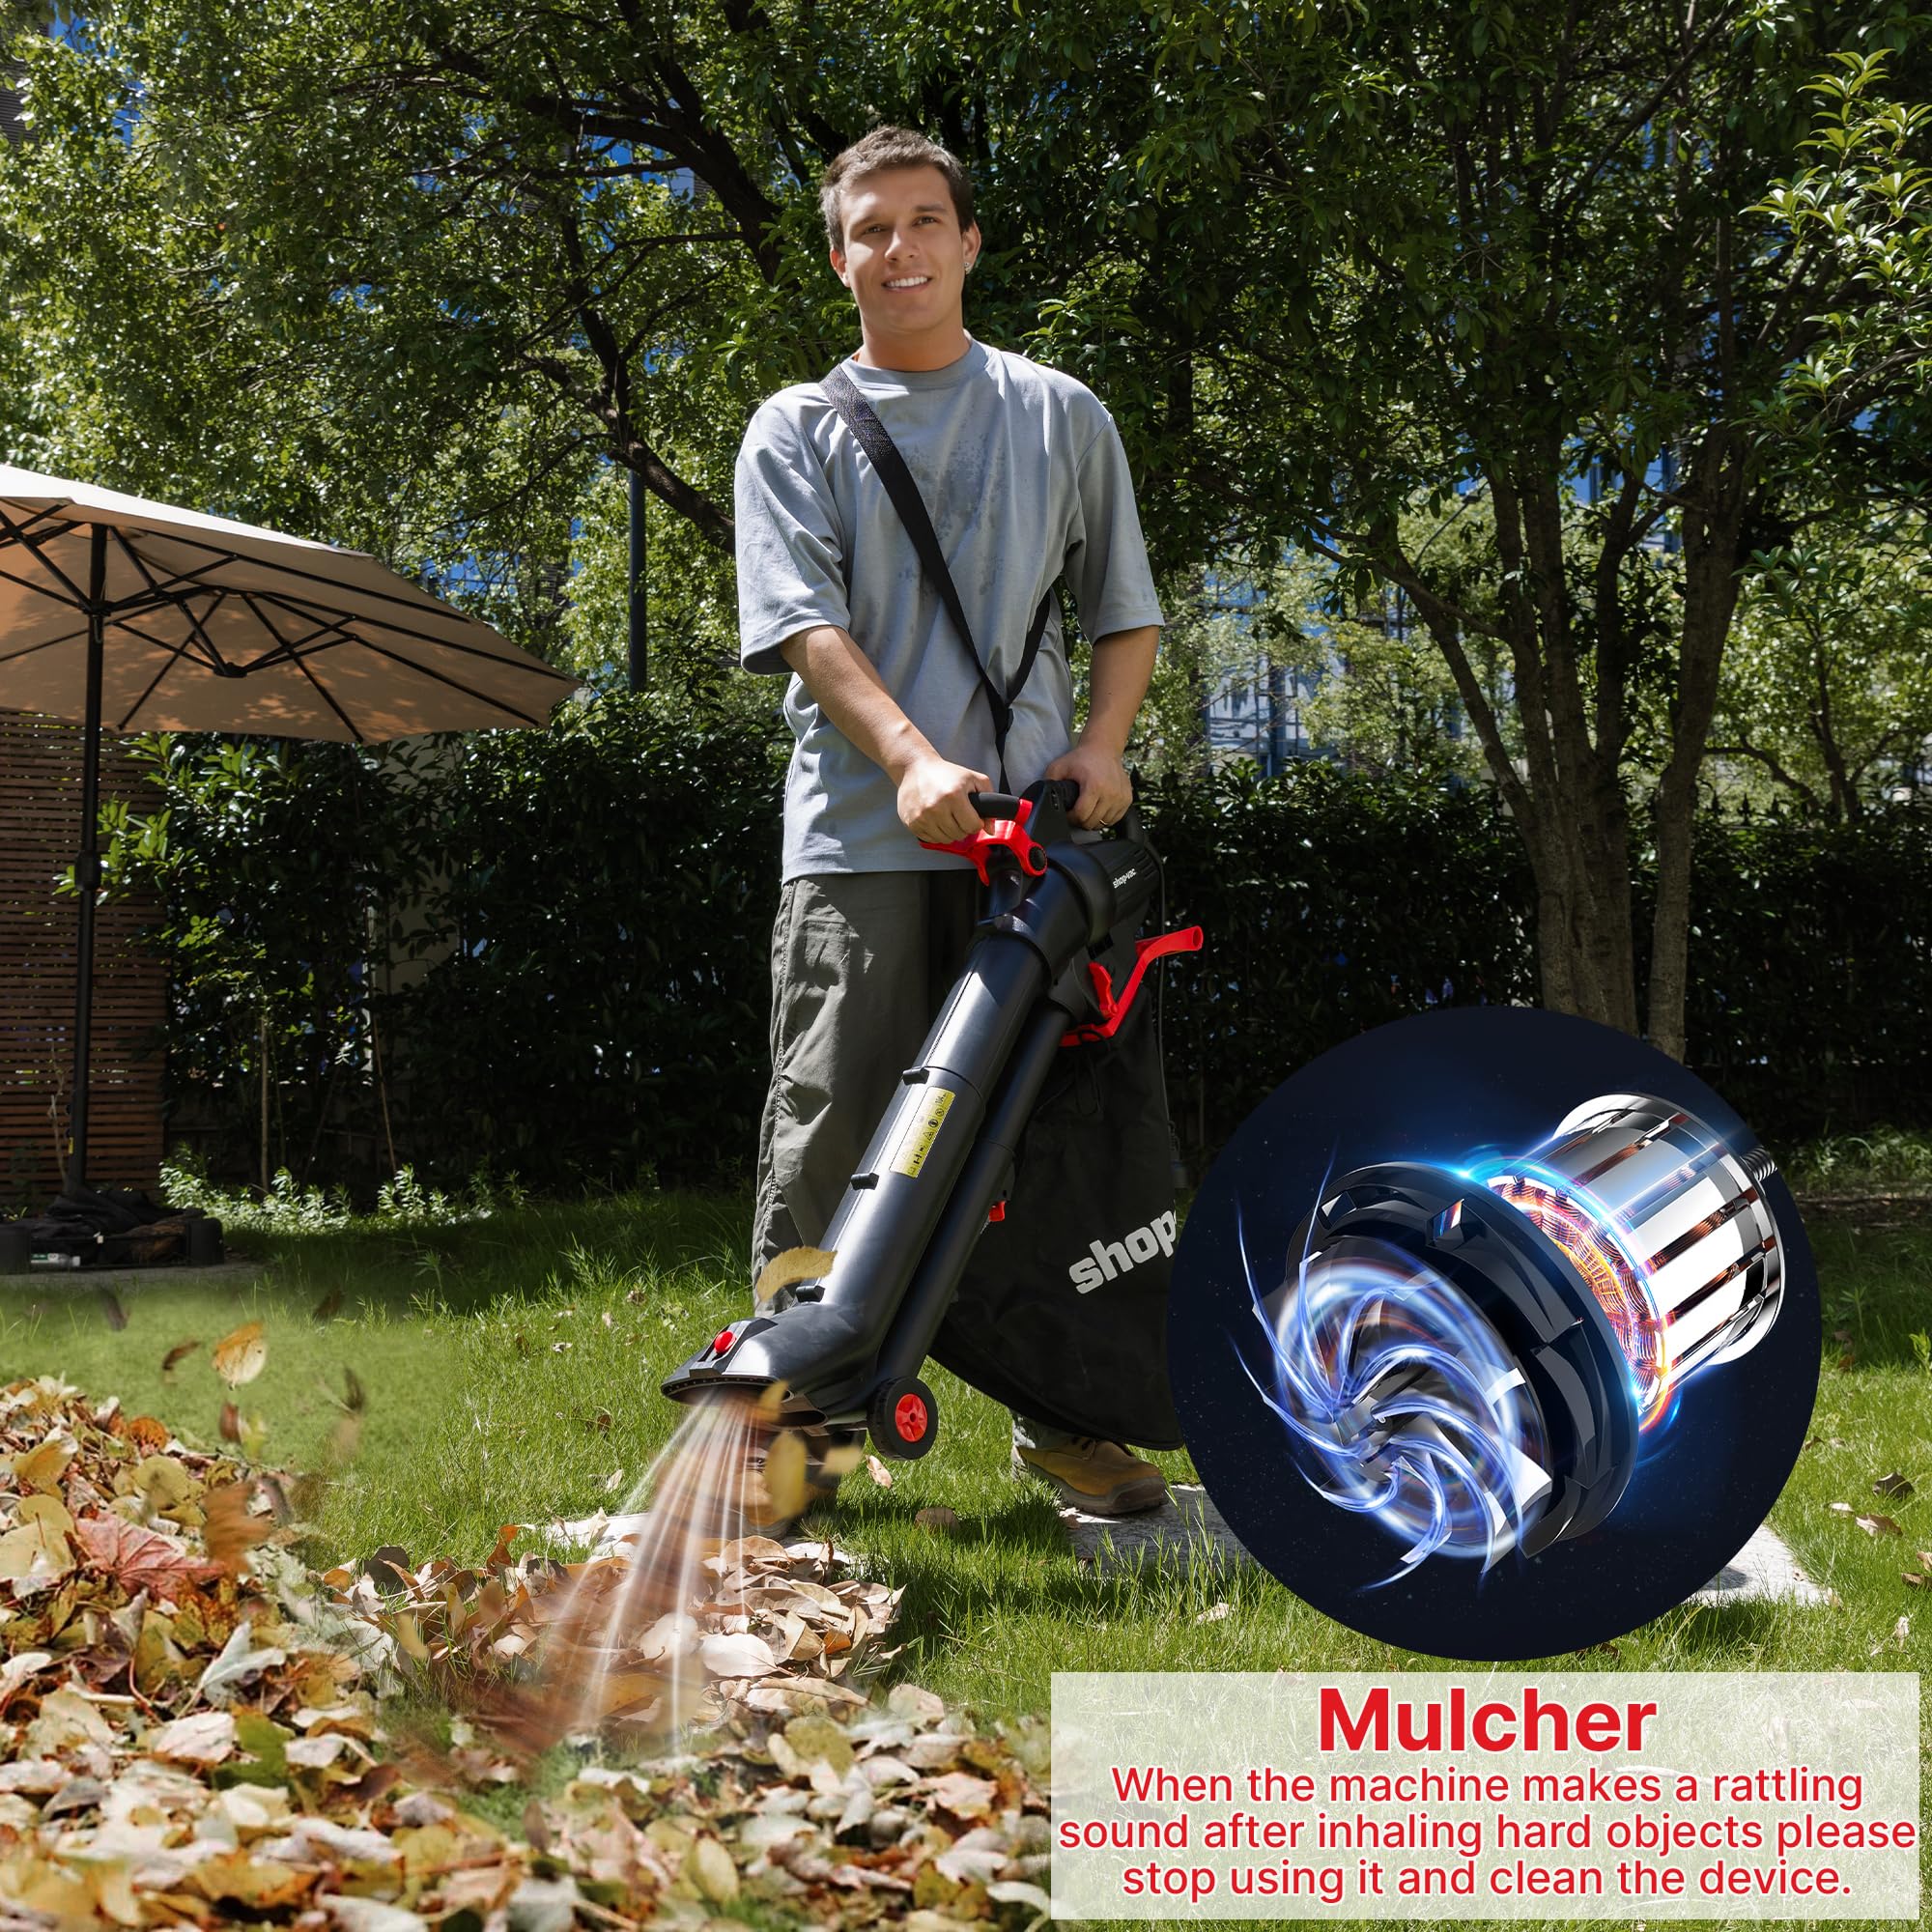
Image Description: An illustrative graphic depicting the internal mulching mechanism of the unit, showing how leaves are shredded into smaller pieces. This highlights the automatic mulching function during vacuum operation.
6. Troubleshooting
Refer to this section for common issues and their solutions.
| Problem | Possible Cause | Solution |
|---|---|---|
| Unit does not start | No power supply; ON/OFF switch not engaged. | Ensure the unit is securely plugged into a working 120V outlet. Press the ON/OFF switch firmly. |
| Reduced suction or blowing power | Clogged vacuum/blower tube; full collection bag; improper bag attachment. | Unplug the unit and clear any obstructions from the tube. Empty the collection bag. Re-secure the collection bag, ensuring the rope is tightened. |
| Mulched debris escaping from bag | Collection bag not securely attached. | Immediately stop operation. Unplug the unit. Re-attach the collection bag, ensuring the support frame buckle is clicked into place and the rope is tightened firmly around the red collar. |
| Unit clogs frequently with large leaves | Leaves are too large or wet for efficient mulching. | For very large or wet leaves, consider breaking them up manually before vacuuming, or use the blower function to move them. Clear clogs as described in the Maintenance section. |
| Rattling sound during operation | Hard object ingested into mulching mechanism. | Immediately stop and unplug the unit. Inspect the mulching area and clear any foreign objects. |
7. Specifications
Technical details for the Shop-Vac 3-in-1 Electric Leaf Blower, Vacuum, and Mulcher.
| Feature | Specification |
|---|---|
| Brand | Shop-Vac |
| Model Name | 5430234 |
| Power Source | AC (Corded Electric) |
| Voltage | 120V |
| Amperage | 4A to 12A (Variable) |
| Airflow | Up to 530 CFM |
| Wind Speed | Up to 180 MPH |
| Motor Speed | Up to 15,500 RPM |
| Collection Bag Capacity | 35 Liters |
| Item Weight | 8.16 lbs (3.7 kg) |
| Product Dimensions (LxWxH) | 32.87" x 7.48" x 10.03" |
| UPC | 026282544490 |
8. Warranty and Support
For warranty information, please refer to the documentation included with your product at the time of purchase or visit the official Shop-Vac website. If you require technical assistance or have questions not covered in this manual, please contact Shop-Vac customer support.
Shop-Vac Customer Support: Please refer to the contact information provided on the product packaging or the official brand website for the most current support details.


