1. Introduction
This manual provides essential instructions for the safe and effective operation, maintenance, and troubleshooting of your EAFC 12V 6A Smart Battery Charger & Maintainer. Please read this manual thoroughly before using the device.

Figure 1: EAFC 12V 6A Smart Battery Charger and Maintainer. This image displays the red charger unit with its LCD screen, control button, and attached red and black alligator clips for battery connection.
2. Safety Information
Always observe the following safety precautions to prevent injury or damage to the charger or battery:
- Ensure the charger is connected to a 110-220V AC power source.
- Do not charge non-rechargeable batteries.
- Avoid charging frozen or damaged batteries.
- Operate in a well-ventilated area.
- Keep out of reach of children.
- Do not expose the charger to rain or excessive moisture.
- Disconnect the AC power before connecting or disconnecting battery clamps.
- Ensure correct polarity: Red clamp to positive (+), Black clamp to negative (-).
3. Product Features
- Microprocessor-controlled for automatic operation.
- Compatible with most 12V lead-acid batteries, including Calcium, GEL, AGM, Wet, and EFB types.
- LCD display for real-time charging status.
- Pulse repair function to help restore battery performance.
- Integrated protections: Overheat, overcharge, short circuit, and reverse polarity.
- Automatic adjustment of charging voltage for winter and summer conditions.
4. Setup and Connection
- Prepare the Battery: Ensure the battery terminals are clean and free of corrosion. If charging an in-vehicle battery, ensure the vehicle's ignition is off and all accessories are disconnected.
- Connect to Battery:
- Connect the red positive (+) clamp to the positive (+) terminal of the battery.
- Connect the black negative (-) clamp to the negative (-) terminal of the battery.
- For in-vehicle charging, connect the black clamp to the vehicle chassis away from the battery and fuel line if the battery is not easily accessible.
- Connect to Power: Plug the charger's AC power cord into a standard 110-220V AC electrical outlet. The LCD display will illuminate.

Figure 2: Proper connection of the EAFC charger to a car battery. The red clamp is attached to the positive terminal, and the black clamp to the negative terminal.
5. Operating Instructions
- Automatic Detection: Once connected to power and battery, the charger will automatically detect the battery voltage and type.
- Mode Selection: Press the "MODE" button to cycle through available charging modes. The LCD display will show the selected mode (e.g., Car/Truck, AGM/GEL, Motorcycle, Repair).
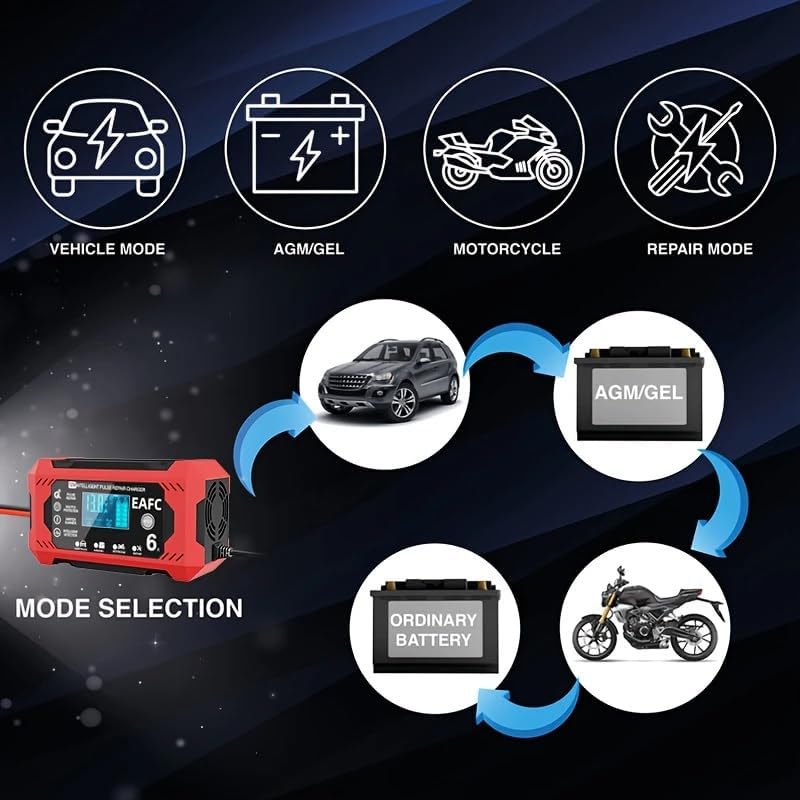
Figure 3: Mode selection options on the EAFC charger, including modes for cars/trucks, AGM/GEL batteries, motorcycles, and a repair mode.
- Charging Process: The charger will begin charging automatically based on the selected mode and detected battery condition. The LCD will display charging progress, voltage, and current.
- Winter/Summer Mode: The charger automatically adjusts charging voltage based on ambient temperature.
- Winter Mode: Activated below 10°C (50°F) for optimal charging in cold conditions.
- Summer Mode: Activated above 27°C (80.6°F) for optimal charging in warm conditions.

Figure 4: The charger's automatic winter and summer mode detection, which adjusts charging parameters according to ambient temperature for efficient charging.
- Pulse Repair Function: Select "Repair" mode for deeply discharged or sulfated batteries. This mode uses pulse technology to help restore battery capacity.

Figure 5: The EAFC charger's pulse repair function, designed to address issues like long idle time, lack of endurance, battery aging, and weak starting force.
- Completion: The charger will automatically stop charging when the battery is fully charged and switch to maintenance mode. The LCD will indicate "FUL" or 100%.
6. Maintenance
- Cleaning: Disconnect the charger from power and battery. Wipe the casing with a soft, dry cloth. Do not use solvents or abrasive cleaners.
- Storage: Store the charger in a cool, dry place when not in use. Ensure cables are neatly coiled and not kinked.
- Battery Maintenance: Regularly check battery terminals for corrosion and clean as necessary. Ensure battery fluid levels are adequate for non-sealed batteries.
7. Troubleshooting
| Problem | Possible Cause | Solution |
|---|---|---|
| Charger not turning on. | No AC power; faulty outlet; damaged power cord. | Check AC power connection and outlet. Inspect power cord for damage. |
| Charger not charging. | Incorrect battery connection (reverse polarity); battery voltage too low (below 8V); battery severely damaged. | Verify correct polarity. Ensure battery voltage is above 8V. If battery is severely damaged, it may not be rechargeable. |
| "ERR" or error code on display. | Internal fault; battery fault; short circuit. | Disconnect and reconnect the charger. If error persists, consult customer support. |
| Charger gets warm during operation. | Normal operation; poor ventilation. | Some warmth is normal. Ensure adequate ventilation around the charger. |
8. Specifications
| Model | 12V 6A Smart Battery Charger & Maintainer |
| Input Voltage | AC 110-220V, 50-60Hz |
| Output Voltage | 12V |
| Max Output Current | 6A |
| Minimum Start Voltage | 8.0V |
| Battery Range | 4-100Ah |
| Battery Types | Most lead-acid batteries (Calcium, GEL, AGM, Wet, EFB) |
| Cooling | Fan |
| Product Dimensions | 142mm (5.59in) x 75mm (2.95in) x 51mm (2.00in) |
| Item Weight | Approximately 0.48 kg (1.06 lbs) |

Figure 6: Dimensions of the EAFC 12V 6A Smart Battery Charger, showing its length, width, and height.
9. Warranty and Support
For warranty information or technical support, please contact EAFC customer service through the retailer where the product was purchased. Keep your purchase receipt as proof of purchase.
For general inquiries, you may visit the EAFCAuto Store on Amazon.


