1. Introduction
Thank you for choosing the Lordear 33x19 Inch Black Smart Waterfall Drop-In Kitchen Sink. This manual provides essential information for the proper installation, operation, and maintenance of your new kitchen sink. Please read these instructions carefully before beginning installation and retain them for future reference.
This workstation sink is crafted from premium T-304 stainless steel with a 16-gauge thickness and features an elegant gunmetal black finish. It is designed for durability and functionality in your kitchen.
2. Package Contents
Verify that all components listed below are present and undamaged before proceeding with installation. If any parts are missing or damaged, please contact Lordear customer support.
- 33x19 Black Kitchen Sink (Drop-In) x1
- Cutting Board x1
- Waterfall Faucet x1
- Glass Rinser x1
- Roll-Up Rack for Drying x1
- Sink Bottom Grid x1
- Colander x1
- Drain Assembly x1
- Mounting Clips (1 set)
- Cutout Template Paper x1
- Instruction Manual x1

Image 1: Overview of the Lordear 33x19 inch black smart waterfall drop-in kitchen sink and its complete set of accessories.
3. Setup and Installation
3.1 Pre-Installation Checklist
- Required Tools: Phillips screwdriver, adjustable wrench, silicone sealant, measuring tape, jigsaw (for countertop cutout), safety glasses, gloves.
- Countertop Preparation: Ensure your countertop is clean, dry, and properly supported. The recommended minimum cabinet base size is 36 inches.
- Cutout Dimensions: Use the provided cutout template paper. The recommended cutout size is 32.2 inches (L) x 18.2 inches (W).

Image 2: Detailed dimensions and cutout specifications for the sink installation.
3.2 Installation Steps
- Prepare Countertop: Place the cutout template on your countertop and trace the outline. Carefully cut the opening using a jigsaw.
- Install Faucet and Accessories: Attach the waterfall faucet, glass rinser, and any other desired accessories (e.g., soap dispenser) to the designated holes on the sink deck before dropping the sink into the countertop. Follow the individual instructions provided with each accessory.
- Apply Sealant: Apply a bead of silicone sealant around the perimeter of the countertop cutout.
- Position Sink: Carefully lower the sink into the countertop opening, ensuring it is centered and aligned.
- Secure with Clips: From underneath the countertop, attach and tighten the mounting clips to secure the sink firmly in place. Ensure even pressure around the sink.
- Connect Plumbing: Install the drain assembly and connect the water supply lines to the faucet. Ensure all connections are tight to prevent leaks.
- Test: Turn on the water supply and check for any leaks around the faucet, drain, and sink edges.
4. Operating Instructions
4.1 Faucet Operation
The included faucet features multiple water flow modes for various tasks:
- Pull-Out Faucet: The main faucet head can be pulled out for extended reach and flexibility. It offers three distinct spraying modes: Powerful Mode, Spray Mode, and Stream Mode. Switch between modes using the button on the faucet head.
- Waterfall Mode: An independent water mode control activates the waterfall feature, providing a broad, gentle flow of water.
- Hot/Cold Regulation: Adjust water temperature using the faucet handle.
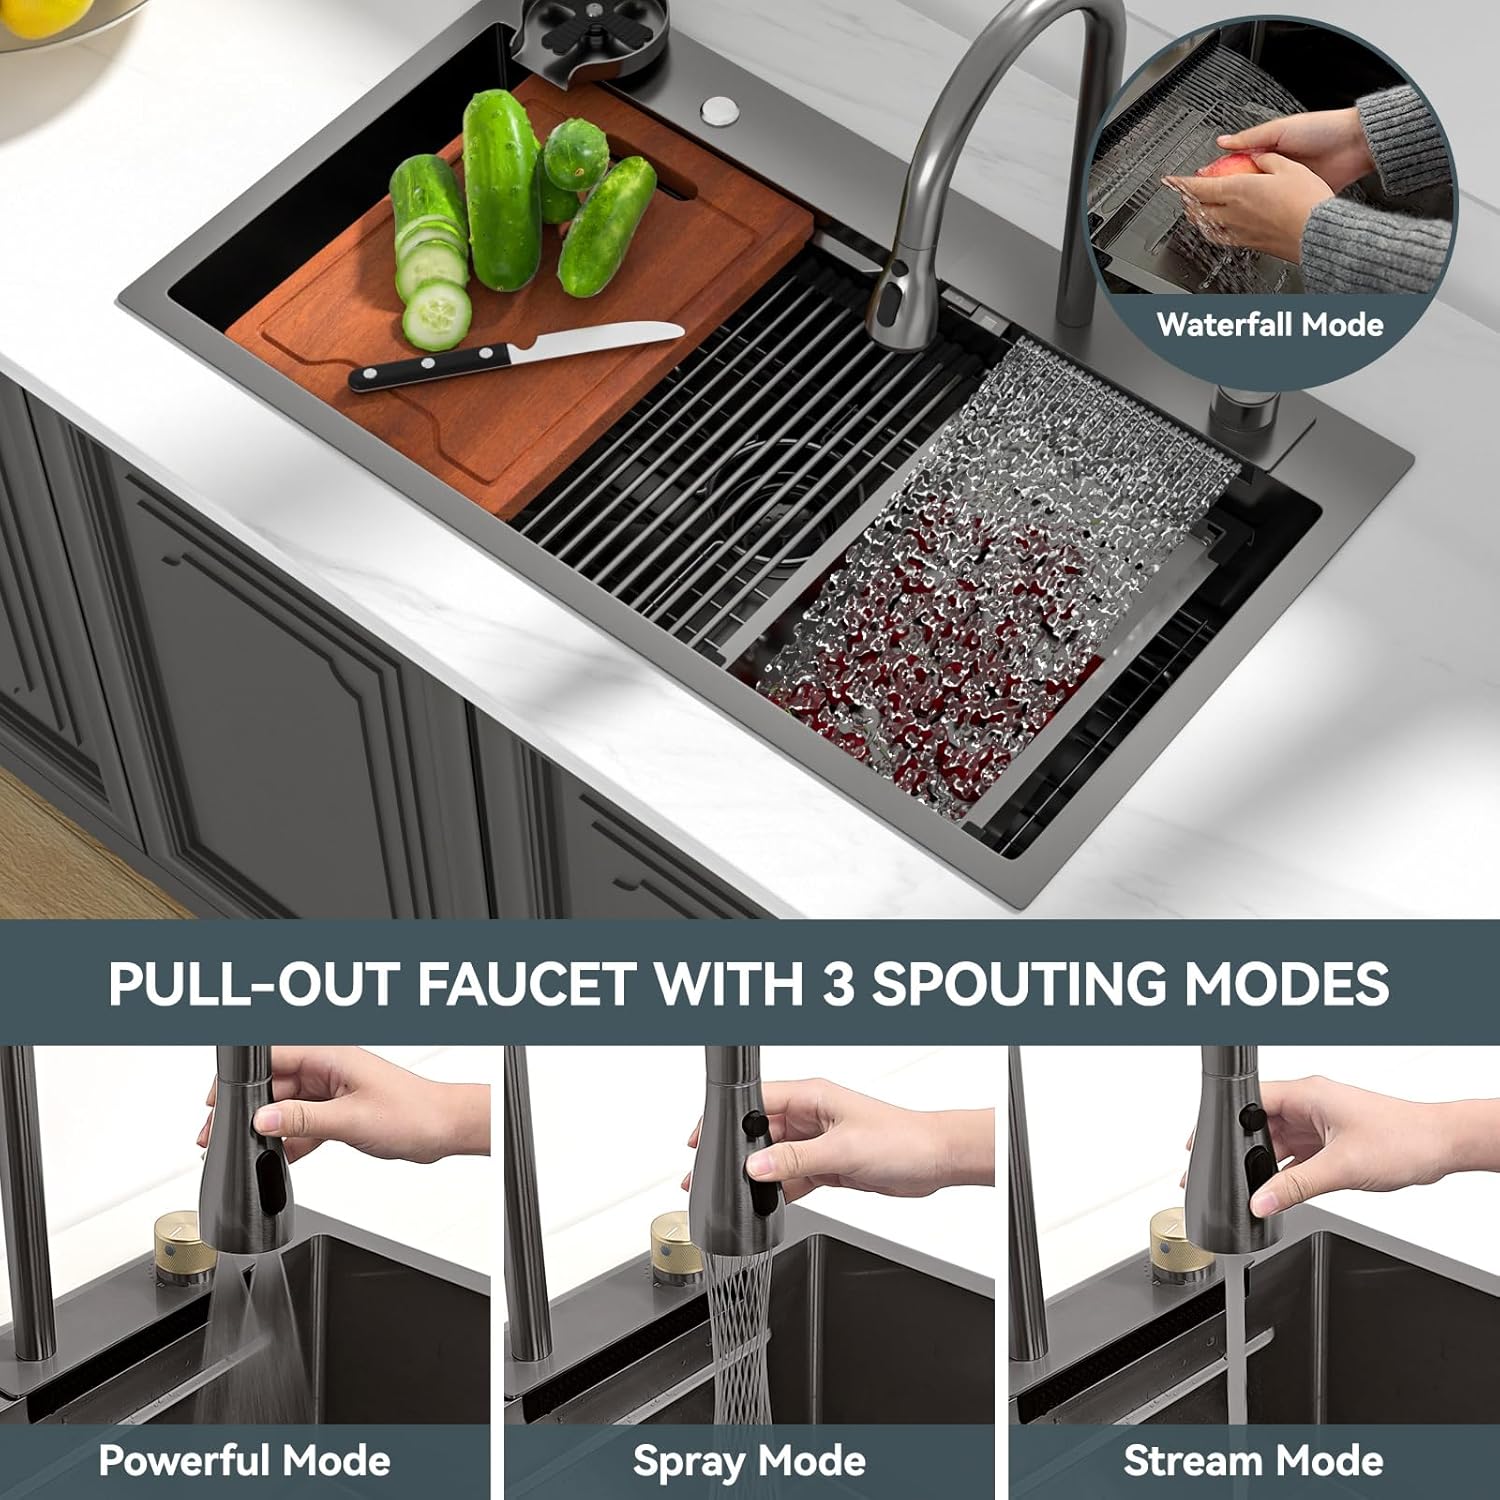
Image 3: Illustration of the faucet's three distinct water flow modes.
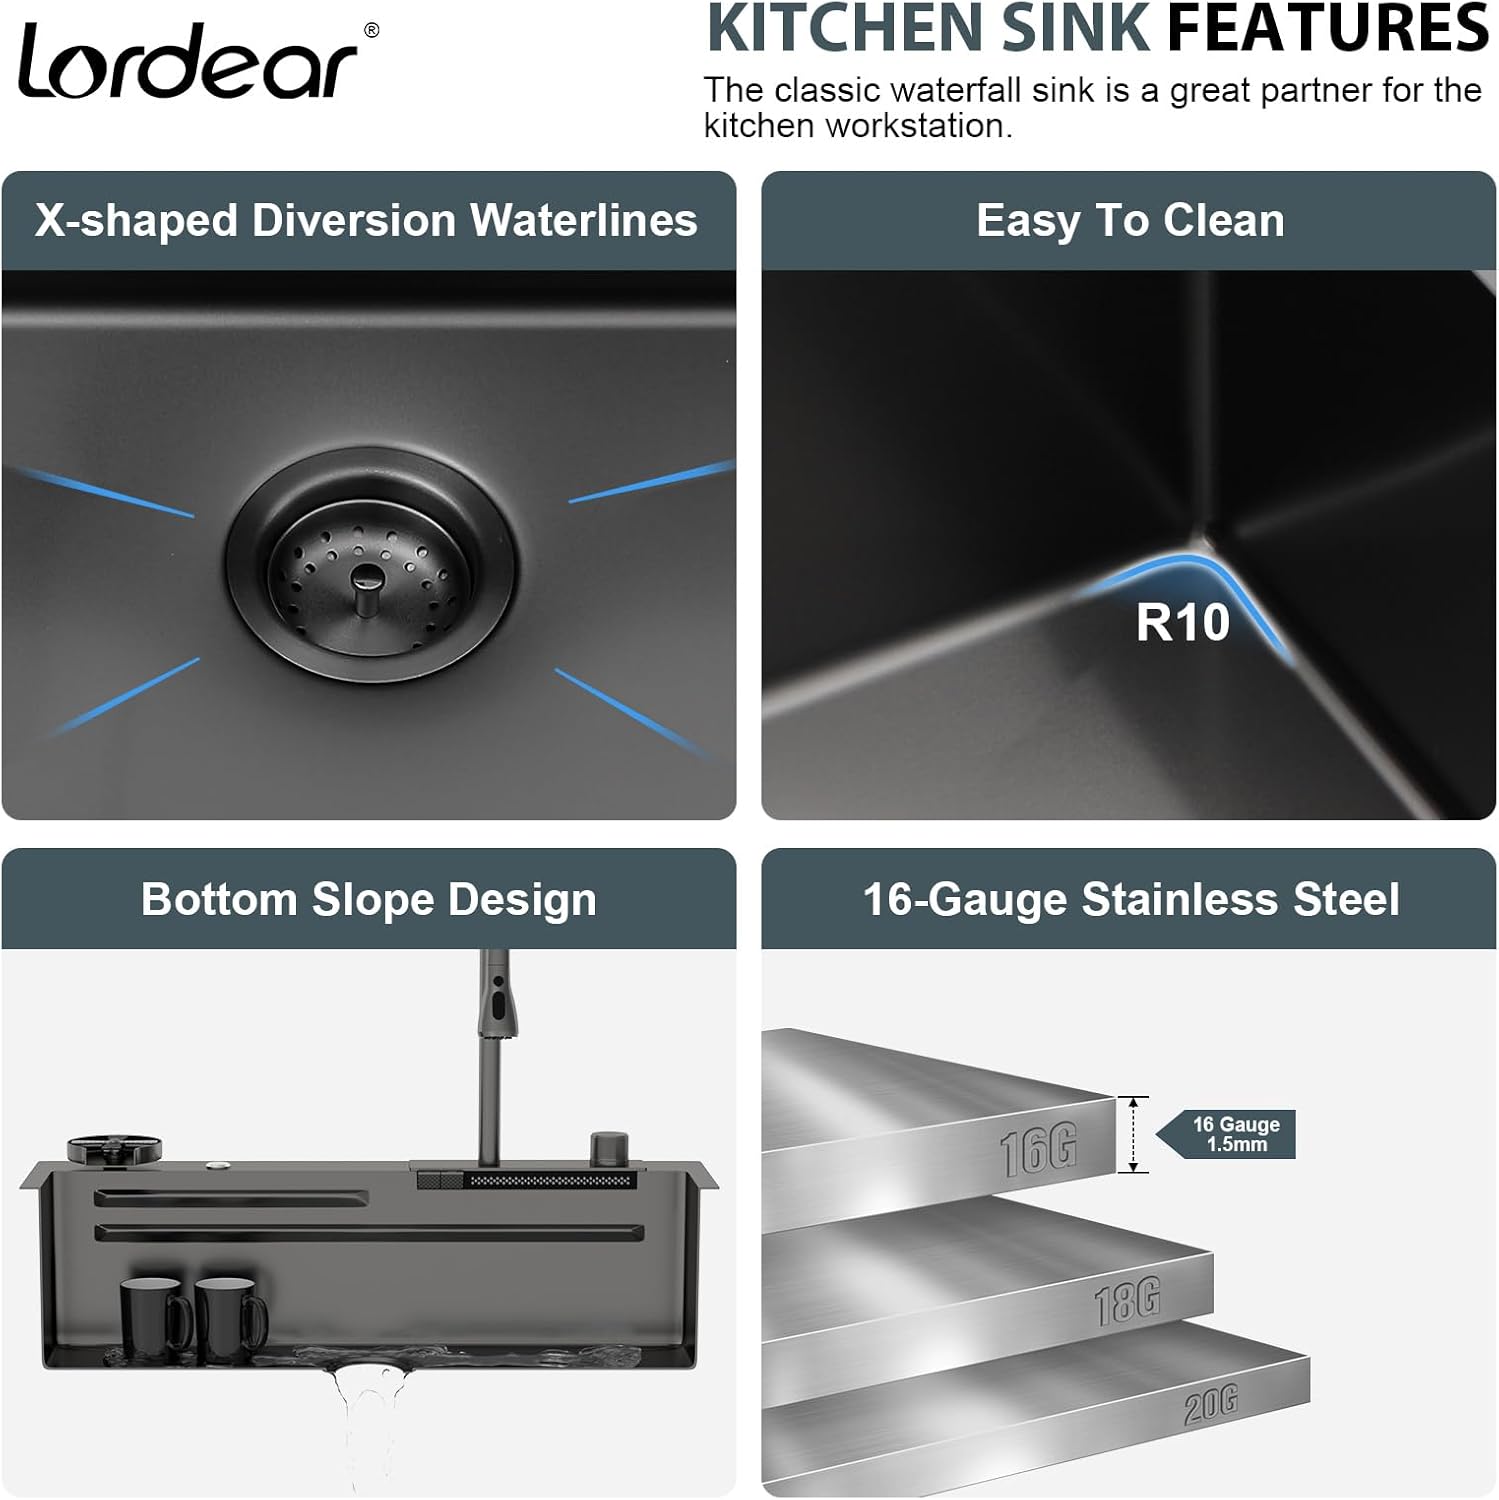
Image 4: Close-up of the various water features and controls on the sink.
4.2 Workstation Accessories
This sink is designed as a workstation, allowing you to slide custom accessories across the integrated ledge to maximize usable space. These accessories include:
- Cutting Board: Use for food preparation directly over the sink.
- Dish Rack: Provides a convenient space for drying dishes.
- Drainage Basket: Ideal for washing fruits and vegetables or draining small items.
- Roll-Up Rack: A versatile accessory for drying or holding items.

Image 5: The sink configured as a workstation with various accessories.
4.3 Cup Rinser
The integrated cup rinser provides multi-angle strong flushing for quick and efficient cleaning of cups and glasses. Simply press down on the rinser to activate the water spray.
5. Maintenance and Care
Proper care will ensure the longevity and appearance of your Lordear kitchen sink.
- Daily Cleaning: Use a soft towel or sponge with mild soap and water to clean the sink surface. Rinse thoroughly and wipe dry to prevent water spots.
- Avoid Abrasives: Do not use abrasive cleaners, steel wool, or harsh chemicals, as these can damage the gunmetal black finish and the Nano-PVD layer.
- Prevent Scratches: Avoid dropping sharp or heavy objects into the sink. The 16-gauge stainless steel is durable, but excessive force can cause damage.
- R10 Round Corners: The R10 round corners are designed for easier cleaning, preventing dirt and grime buildup in tight angles.
- X-Shape Flow Line: The X-shape diversion waterlines on the bottom of the sink facilitate efficient drainage, preventing water pooling.
- Sound Reduction: The sink features thickened rubber pads (3.0mm thick panel) to effectively reduce noise during use.
- During Remodeling: Keep the sink away from decoration materials during remodeling projects to prevent accidental damage or staining.

Image 6: Key design features contributing to the sink's durability and ease of maintenance.

Image 7: Sound reduction technology with 3mm thickened mat for quiet operation.
6. Troubleshooting
If you encounter any issues with your Lordear kitchen sink, please refer to the following common solutions:
- Slow Drainage: Check the drain assembly for any obstructions. Ensure the X-shape flow lines are clear. If using a garbage disposal, ensure it is functioning correctly.
- Leaks: Inspect all plumbing connections under the sink. Tighten any loose fittings. If leaks persist, re-apply silicone sealant around the sink rim or consult a professional plumber.
- Water Spots/Stains: These are often caused by mineral deposits. Use a non-abrasive cleaner specifically designed for stainless steel sinks. Always rinse thoroughly and dry the sink after each use.
- Faucet Malfunction: If the faucet has low pressure or inconsistent spray, check the aerator for mineral buildup and clean it if necessary. Ensure water supply lines are fully open.
For complex issues or if problems persist, it is recommended to contact a qualified plumber or Lordear customer support.
7. Specifications
| Feature | Specification |
|---|---|
| Brand | Lordear |
| Model Number | LTBS33199R1-FY3 |
| Color | Gunmetal Black-Waterfall Sink |
| Material | Stainless Steel (T304, 16 Gauge) |
| Size | 33x19 inch |
| Product Dimensions (External) | 33"L x 19"W x 9"D |
| Product Dimensions (Internal) | 31"L x 14.8"W x 8.75"D |
| Cutout Size | 32.2"L x 18.2"W |
| Minimum Cabinet Base Width | 36 Inches |
| Style | Drop in |
| Installation Type | Countertop |
| Finish Type | NANO-PVD Layer |
| Shape | Rectangular |
| Drain Opening | Standard 3-1/2" (fits garbage disposal) |
| Item Weight | 39.9 pounds (18.14 Kilograms) |
| Included Components | Sink, Cutting Board, Waterfall Faucet, Glass Rinser, Roll-Up Rack, Sink Bottom Grid, Colander, Drain Assembly, Mounting Clips, Cutout Template |
8. Warranty and Support
Lordear is committed to providing high-quality products. While specific warranty details are not provided in this manual, please retain your proof of purchase. For any warranty claims, technical assistance, or support inquiries, please contact Lordear customer service through their official channels or the retailer where the product was purchased.
Manufacturer: Lordear


