1. Introduction
Thank you for choosing the chartustriable 2 Doors Armoire Wardrobe Closet. This manual provides detailed instructions for assembly, operation, maintenance, and troubleshooting to ensure safe and proper use of your new furniture. Please read all instructions carefully before beginning assembly and retain this manual for future reference.
Important Safety Information
- Always assemble the product on a soft, clean surface to prevent scratches.
- Ensure all parts and hardware are present before beginning assembly.
- Do not overtighten screws, as this may damage the material.
- This cabinet must be securely anchored to the wall using the provided anti-tip safety feature to prevent tipping and potential injury.
- Keep small parts away from children during assembly.
2. Parts List
Before assembly, carefully unpack all components and compare them with the parts list provided in your packaging. Ensure all pieces are accounted for and undamaged. If any parts are missing or damaged, please contact customer support.
Refer to the assembly video below for visual identification of components and hardware.

Figure 2.1: Various components including hardware, glass door, drawers, and anti-tipping device.
3. Assembly Instructions
For a detailed visual guide, please watch the official assembly video below. It demonstrates each step of the assembly process.
Video 3.1: Official assembly guide for the chartustriable 2 Doors Armoire Wardrobe Closet.
This video provides a step-by-step walkthrough of the entire assembly process, from unboxing to final setup.
Step-by-Step Guide:
- Preparation (Video: 0:11): Lay the furniture box facing the arrow and use a utility knife to cut through the tape to prevent scratching the boards. Organize all parts and hardware.
- Assemble Side Panels (Video: 0:46): Combine plates No. 4 and No. 9, and plates No. 3 and No. 9 using part E screws. Insert cork D into the designated holes.
- Connect Side Panels with Support (Video: 2:05): Combine plate No. 15 with the assembled No. 3 and No. 4 combinations. Insert cork D into the holes.
- Assemble Base Structure (Video: 2:30): Combine plates No. 1, No. 10, and No. 3. Fix part E screws and part P in the indicated positions.
- Assemble Drawer Frames (Video: 3:29): Find plates No. 12, No. 13, and No. 11. Fix eccentric rod B and plug D into holes. Combine these pieces as shown. Lock eccentric wheel A.
- Install Drawer Slides (Video: 4:25): Find plates No. 5 and No. 6. Place part L3 drawer slides and secure with part N screws. Combine No. 6 and No. 13 plates, then No. 5 and No. 12 plates. Fix part E screws.
- Connect Drawer Frame Sections (Video: 5:36): Combine the No. 8 and No. 5 combinations. Then combine the No. 5 and No. 3 combinations. Lock eccentric wheel A.
- Attach Back Panels (Video: 6:37): Find the combination of the two blocks of No. 7 plate and the cabinet. Fix part O screws. Place part Q and secure with part N7.
- Stand Cabinet Upright (Video: 7:08): Carefully stand the assembled cabinet upright.
- Install Hanging Rod (Video: 7:26): Combine part YG and part Y2. Place the YG set into the designated slots inside the cabinet.
- Install LED Light (Video: 7:38): Combine the LED parts. Place the LED assembly into the top interior of the cabinet.
- Assemble Drawers (Video: 8:48): Find boards No. 18, No. 19, No. 20, No. 21, No. 22, and No. 23. Combine No. 20 and No. 21, fix part N3. Combine No. 19 and No. 21, fix part N3. Combine No. 21 and No. 22. Combine No. 18 and No. 23, fix eccentric rod B. Combine No. 18 and No. 22. Flip out the drawer. Place part F2 and secure with part Z. Lock eccentric wheel A2.
- Install Drawer Handles (Video: 10:22): Place part I2 and secure it with parts JD and J3.
- Insert Drawers (Video: 11:03): Place the assembled drawers into the cabinet. Fix part J3.
- Assemble Doors (Video: 11:24): Locate boards No. 16 and No. 17. Place part X2 and secure with part N1. Place part X8 and secure with part N1. Place part MH and fix with part N. Place part I2 and fix with part J.
- Install Doors (Video: 12:49): Install the No. 17 assembly and fix it with part N. Install the No. 16 assembly and fix it with part N.
- Remove Protective Film (Video: 13:01): Carefully remove the protective film from the mirror.
- Anti-Tipping Installation (Video: 13:15): This step is crucial for safety. Adjust the anti-tipping brackets, mark the points, drill fixed holes, and secure the brackets to the wall. After reinforcing, use sticker C to cover the surface for aesthetics.
4. Operating Instructions
LED Sensor Light:
The wardrobe is equipped with a human body intelligent induction light. The light automatically turns on when the door is opened and turns off when the door is closed. The induction range is approximately 5 meters, allowing for easy visibility of clothes at night. The LED light is rechargeable via the included USB charging cable and can operate for 3-5 months on a single charge.

Figure 4.1: The LED sensor light illuminates the wardrobe interior when opened.
Drawers and Storage:
The two integrated drawers provide convenient storage for smaller items. The smooth-gliding mechanism ensures easy access. The upper section features a hanging rod for dresses, jackets, and shirts, while the lower sections offer stacking areas for folded clothes and other items.

Figure 4.2: Overview of the functional storage areas within the wardrobe.
5. Maintenance
Cleaning:
Wipe surfaces with a soft, damp cloth. Avoid using harsh chemicals or abrasive cleaners, as these may damage the finish. For glass surfaces, use a glass cleaner and a lint-free cloth.
Hardware Check:
Periodically check all screws and connections to ensure they remain tight. Retighten if necessary to maintain stability and prevent wobbling.
6. Troubleshooting
- LED Light Not Working:
- Check if the LED light is charged. Recharge using the provided USB cable.
- Ensure the sensor is not obstructed. - Drawers Sticking or Not Closing Smoothly:
- Verify that the drawer slides are correctly installed and aligned.
- Check for any obstructions in the drawer tracks.
- Ensure all screws on the drawer slides are securely tightened. - Cabinet Wobbles:
- Confirm that all assembly screws are fully tightened.
- Ensure the anti-tip device is correctly installed and securely anchored to the wall. - Doors Not Closing Properly:
- Check hinge alignment and adjust if necessary.
- Ensure no items inside the wardrobe are obstructing the doors.
7. Specifications
| Feature | Detail |
|---|---|
| Brand | chartustriable |
| Model Name | DJ0870 |
| Product Dimensions | 19.7"D x 31.5"W x 71"H |
| Color | White |
| Material | Engineered Wood |
| Special Feature | Adjustable Shelf, LED Sensor Light, Mirror |
| Mounting Type | Floor Mount |
| Number of Drawers | 2 |
| Item Weight | 126 Pounds |
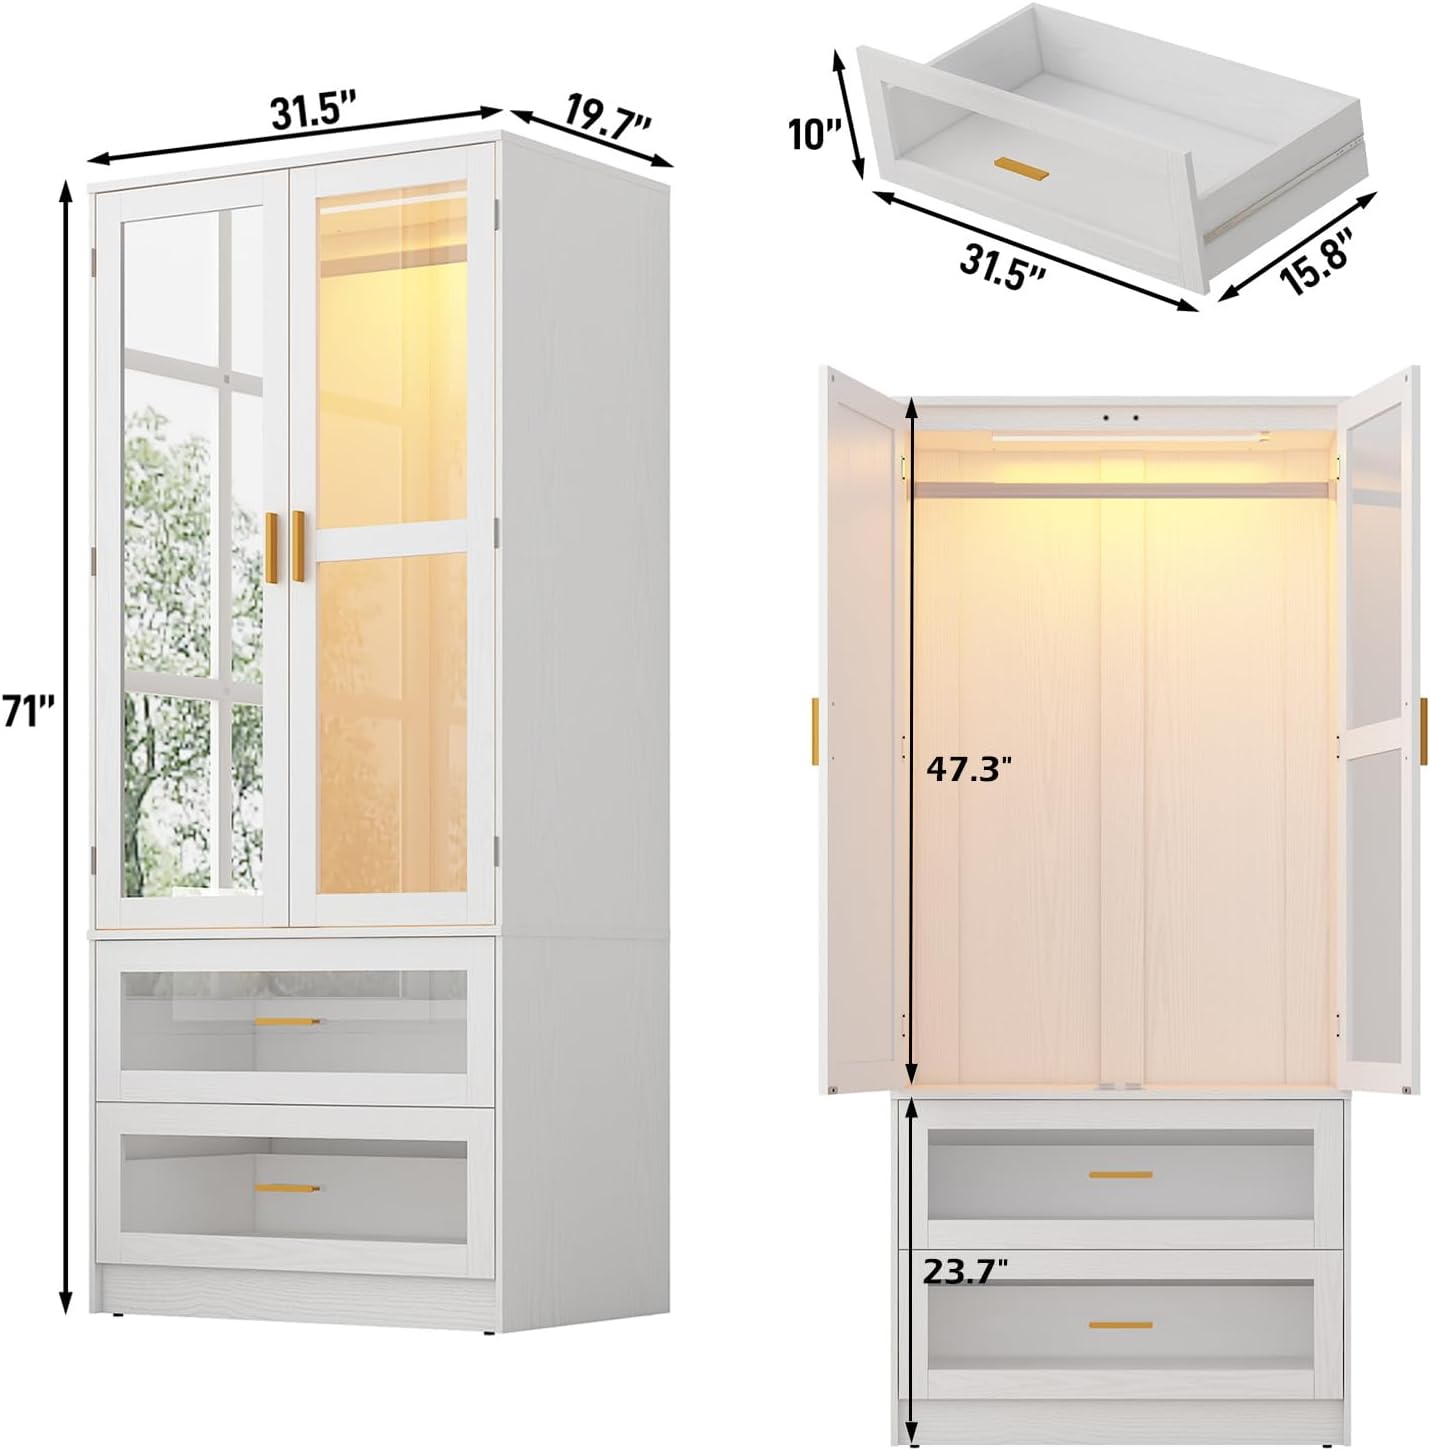
Figure 7.1: Product dimensions overview.
8. Warranty and Support
For any questions regarding assembly, missing parts, or product issues, please contact chartustriable customer support. We are committed to providing assistance and ensuring your satisfaction.
Please refer to your purchase documentation for specific warranty details.