Introduction
Thank you for choosing the Morpilot Electric Milk Frother and Steamer. This manual provides essential information for the safe and efficient operation, maintenance, and troubleshooting of your new appliance. Please read it thoroughly before first use and retain it for future reference.

Figure 1: Morpilot Electric Milk Frother and Steamer with whisk and cleaning brush.
Important Safety Information
To ensure safe operation and prevent damage to the appliance, please observe the following safety precautions:
- Read all instructions before using the appliance.
- Do not immerse the power base in water or other liquids. Only the glass jug is dishwasher safe.
- Ensure the appliance is placed on a stable, flat, heat-resistant surface.
- Do not operate the appliance with a damaged cord or plug.
- Keep out of reach of children.
- Always unplug the frother when not in use and before cleaning.
- Do not overfill the milk frother beyond the indicated MAX lines to prevent overflow.
- The appliance features Strix temperature control for automatic shut-off to prevent burning or over-frothing.
- When using the hot milk function, remove the metal coil from the whipper.
Package Contents
Your Morpilot Electric Milk Frother and Steamer package includes:
- 1 x Glass Electric Milk Frother (Base and Jug)
- 1 x Cleaning Brush
- 1 x User Manual (this document)
Product Overview
Familiarize yourself with the components of your milk frother:
- Glass Jug: Transparent, with clear MAX/MIN measurement lines for heating (500ml) and frothing (250ml). Features a heat-resistant handle and precision drip spout.
- Power Base: Contains the heating element and control buttons.
- Whisk: Detachable metal coil for frothing.
- Control Buttons: Power button and four function indicator lights (Red, Blue, Purple, Green).

Figure 2: Control panel and function indicators.
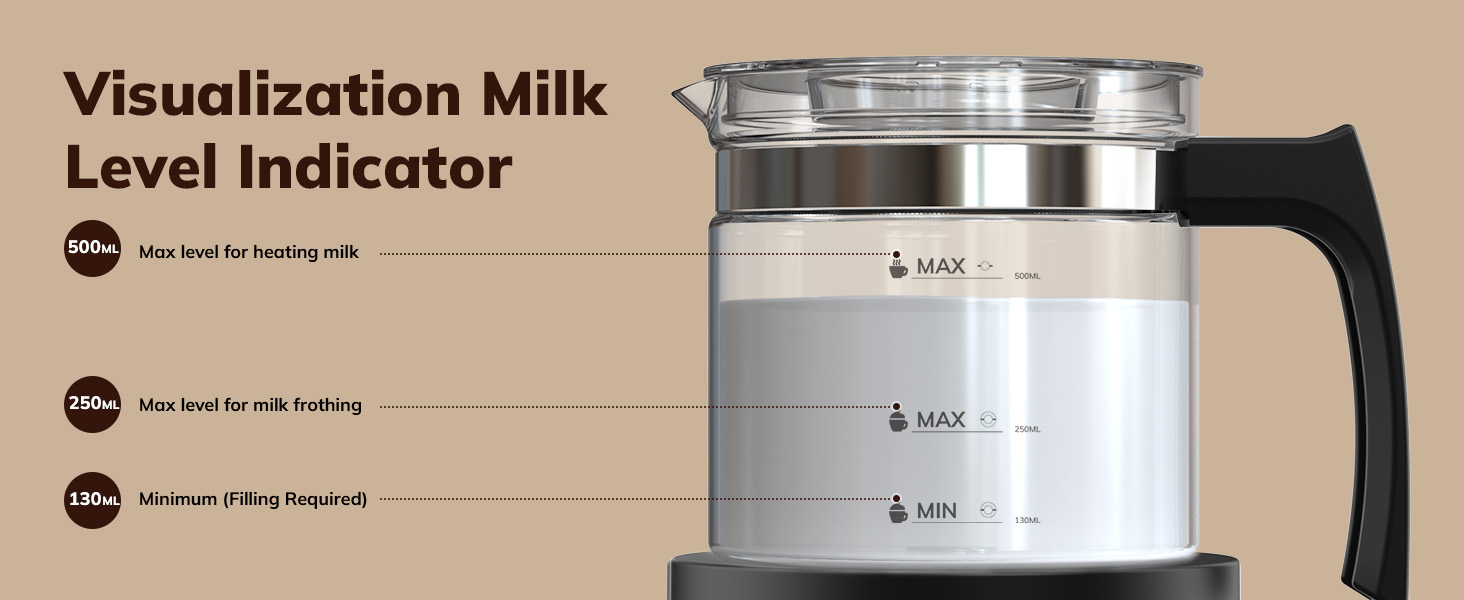
Figure 3: Visualization of milk level indicators for heating (MAX 500ml), frothing (MAX 250ml), and minimum fill (MIN 130ml).
Setup
- Unpack: Carefully remove all components from the packaging.
- Clean: Before first use, wash the glass jug and whisk thoroughly with warm soapy water, or place them in the dishwasher. Wipe the power base with a damp cloth. Ensure all parts are completely dry before assembly.
- Assemble: Place the whisk securely inside the glass jug. Position the glass jug onto the power base.
- Power: Plug the power cord into a suitable electrical outlet.
Operating Instructions
Your Morpilot Milk Frother offers four distinct functions. It is recommended to use cold, fresh, full-fat, or semi-skimmed milk for optimal results.
General Operation:
- Pour milk into the glass jug, observing the MAX/MIN fill lines. For frothing, do not exceed the lower MAX line (250ml). For heating only, do not exceed the upper MAX line (500ml).
- Place the lid on the glass jug.
- Press the power button to cycle through the four functions. The indicator light below the base will change color to indicate the selected function.
- The frother will automatically stop when the selected function is complete.
Function Selection:
| Indicator Color | Function | Description | Max Capacity |
|---|---|---|---|
| Red | Hot & Thick Froth | Produces dense, hot milk foam. Ideal for cappuccinos. | 250ml |
| Blue | Cold Froth | Creates cold milk foam without heating. Perfect for iced lattes. | 250ml |
| Purple | Hot Milk | Heats milk without frothing. Remove whisk for this function. | 500ml |
| Green | Hot & Light Froth | Produces light, hot milk foam. Suitable for lattes and macchiatos. | 250ml |
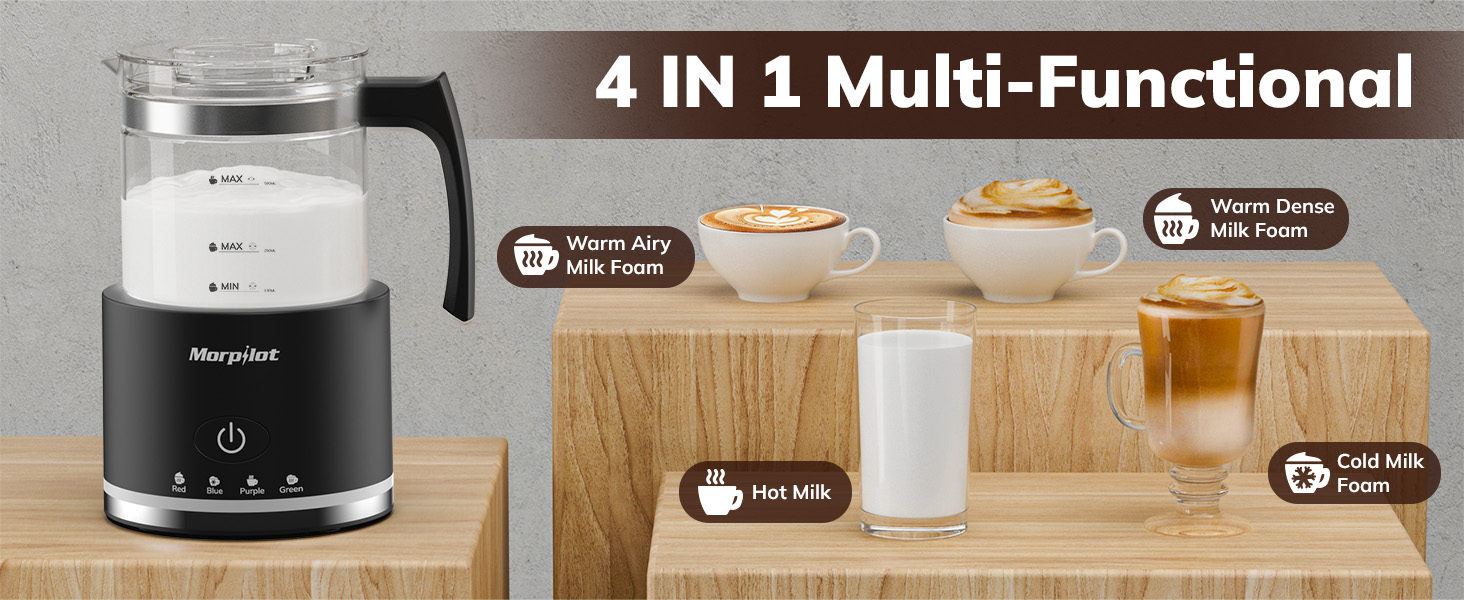
Figure 4: Overview of the four functions.

Figure 5: Example of Warm Dense Milk Foam.

Figure 6: Example of Cold Milk Foam.

Figure 7: Example of Hot Milk.

Figure 8: Example of Warm Airy Milk Foam.
Maintenance and Cleaning
Proper cleaning ensures the longevity and hygiene of your milk frother.
- Detachable Design: The milk frother features a split design, allowing the glass jug to be separated from the power base for easy cleaning.
- Dishwasher Safe: The glass jug and whisk are dishwasher safe for added convenience.
- Hand Washing: If hand washing, use warm soapy water and the provided cleaning brush. Rinse thoroughly.
- Power Base: Wipe the power base with a soft, damp cloth. Do not immerse the power base in water.
- Drying: To ensure optimal performance, please wipe off any water stains from the base of the milk jug after each cleaning before reattaching to the power base.

Figure 9: The glass jug and whisk are dishwasher safe.

Figure 10: The split design allows for easy and safe cleaning of the glass jug.
Troubleshooting
If you encounter issues with your Morpilot Milk Frother, refer to the common problems and solutions below:
| Problem | Possible Cause | Solution |
|---|---|---|
| Frother does not turn on. | Not plugged in or loose connection. | Ensure the power cord is securely plugged into a working outlet. |
| Milk is not frothing properly. | Incorrect milk type or quantity; whisk not properly installed. | Use cold, fresh, full-fat or semi-skimmed milk. Do not exceed the 250ml MAX line for frothing. Ensure the whisk is securely placed. |
| Milk is not heating. | Incorrect function selected; whisk still in place for hot milk function. | Select the Purple (Hot Milk) function. Remove the metal coil from the whipper for heating only. |
| Appliance stops unexpectedly. | Automatic shut-off activated (normal operation). | This is a safety feature. Allow the unit to cool down before next use if it stops prematurely. |
Specifications
- Brand: Morpilot
- Model Name: HS001
- Color: Black
- Material: Acrylonitrile Butadiene Styrene (ABS), Glass
- Product Dimensions: 4.72"W x 7.08"H
- Capacity: 16.9 Fluid Ounces (500ml for heating, 250ml for frothing)
- Power Source: Corded Electric
- Wattage: 600 watts
- Special Features: 4 Functions, Auto Shut-Off, BPA Free, Dishwasher Safe (jug and whisk)
- Item Weight: 1.89 Pounds
- UPC: 810142349864
Warranty and Support
Morpilot is committed to providing high-quality products and customer satisfaction. If you require assistance, have questions, or encounter any issues with your Electric Milk Frother and Steamer, please do not hesitate to contact our support team.
"Need help? We're here for you! Reach out anytime for support."
Please refer to your purchase documentation for specific warranty details and contact information.


