1. Introduction
The upHere UE2 Elite K8 is a high-performance dual-tower CPU air cooler designed for efficient heat dissipation. It features a redesigned visual architecture with a matte-black finish, 8 direct-touch copper heatpipes, and dual hydraulic bearing fans for optimal cooling and quiet operation. The cooler is engineered for easy installation and broad compatibility with various Intel and AMD sockets.
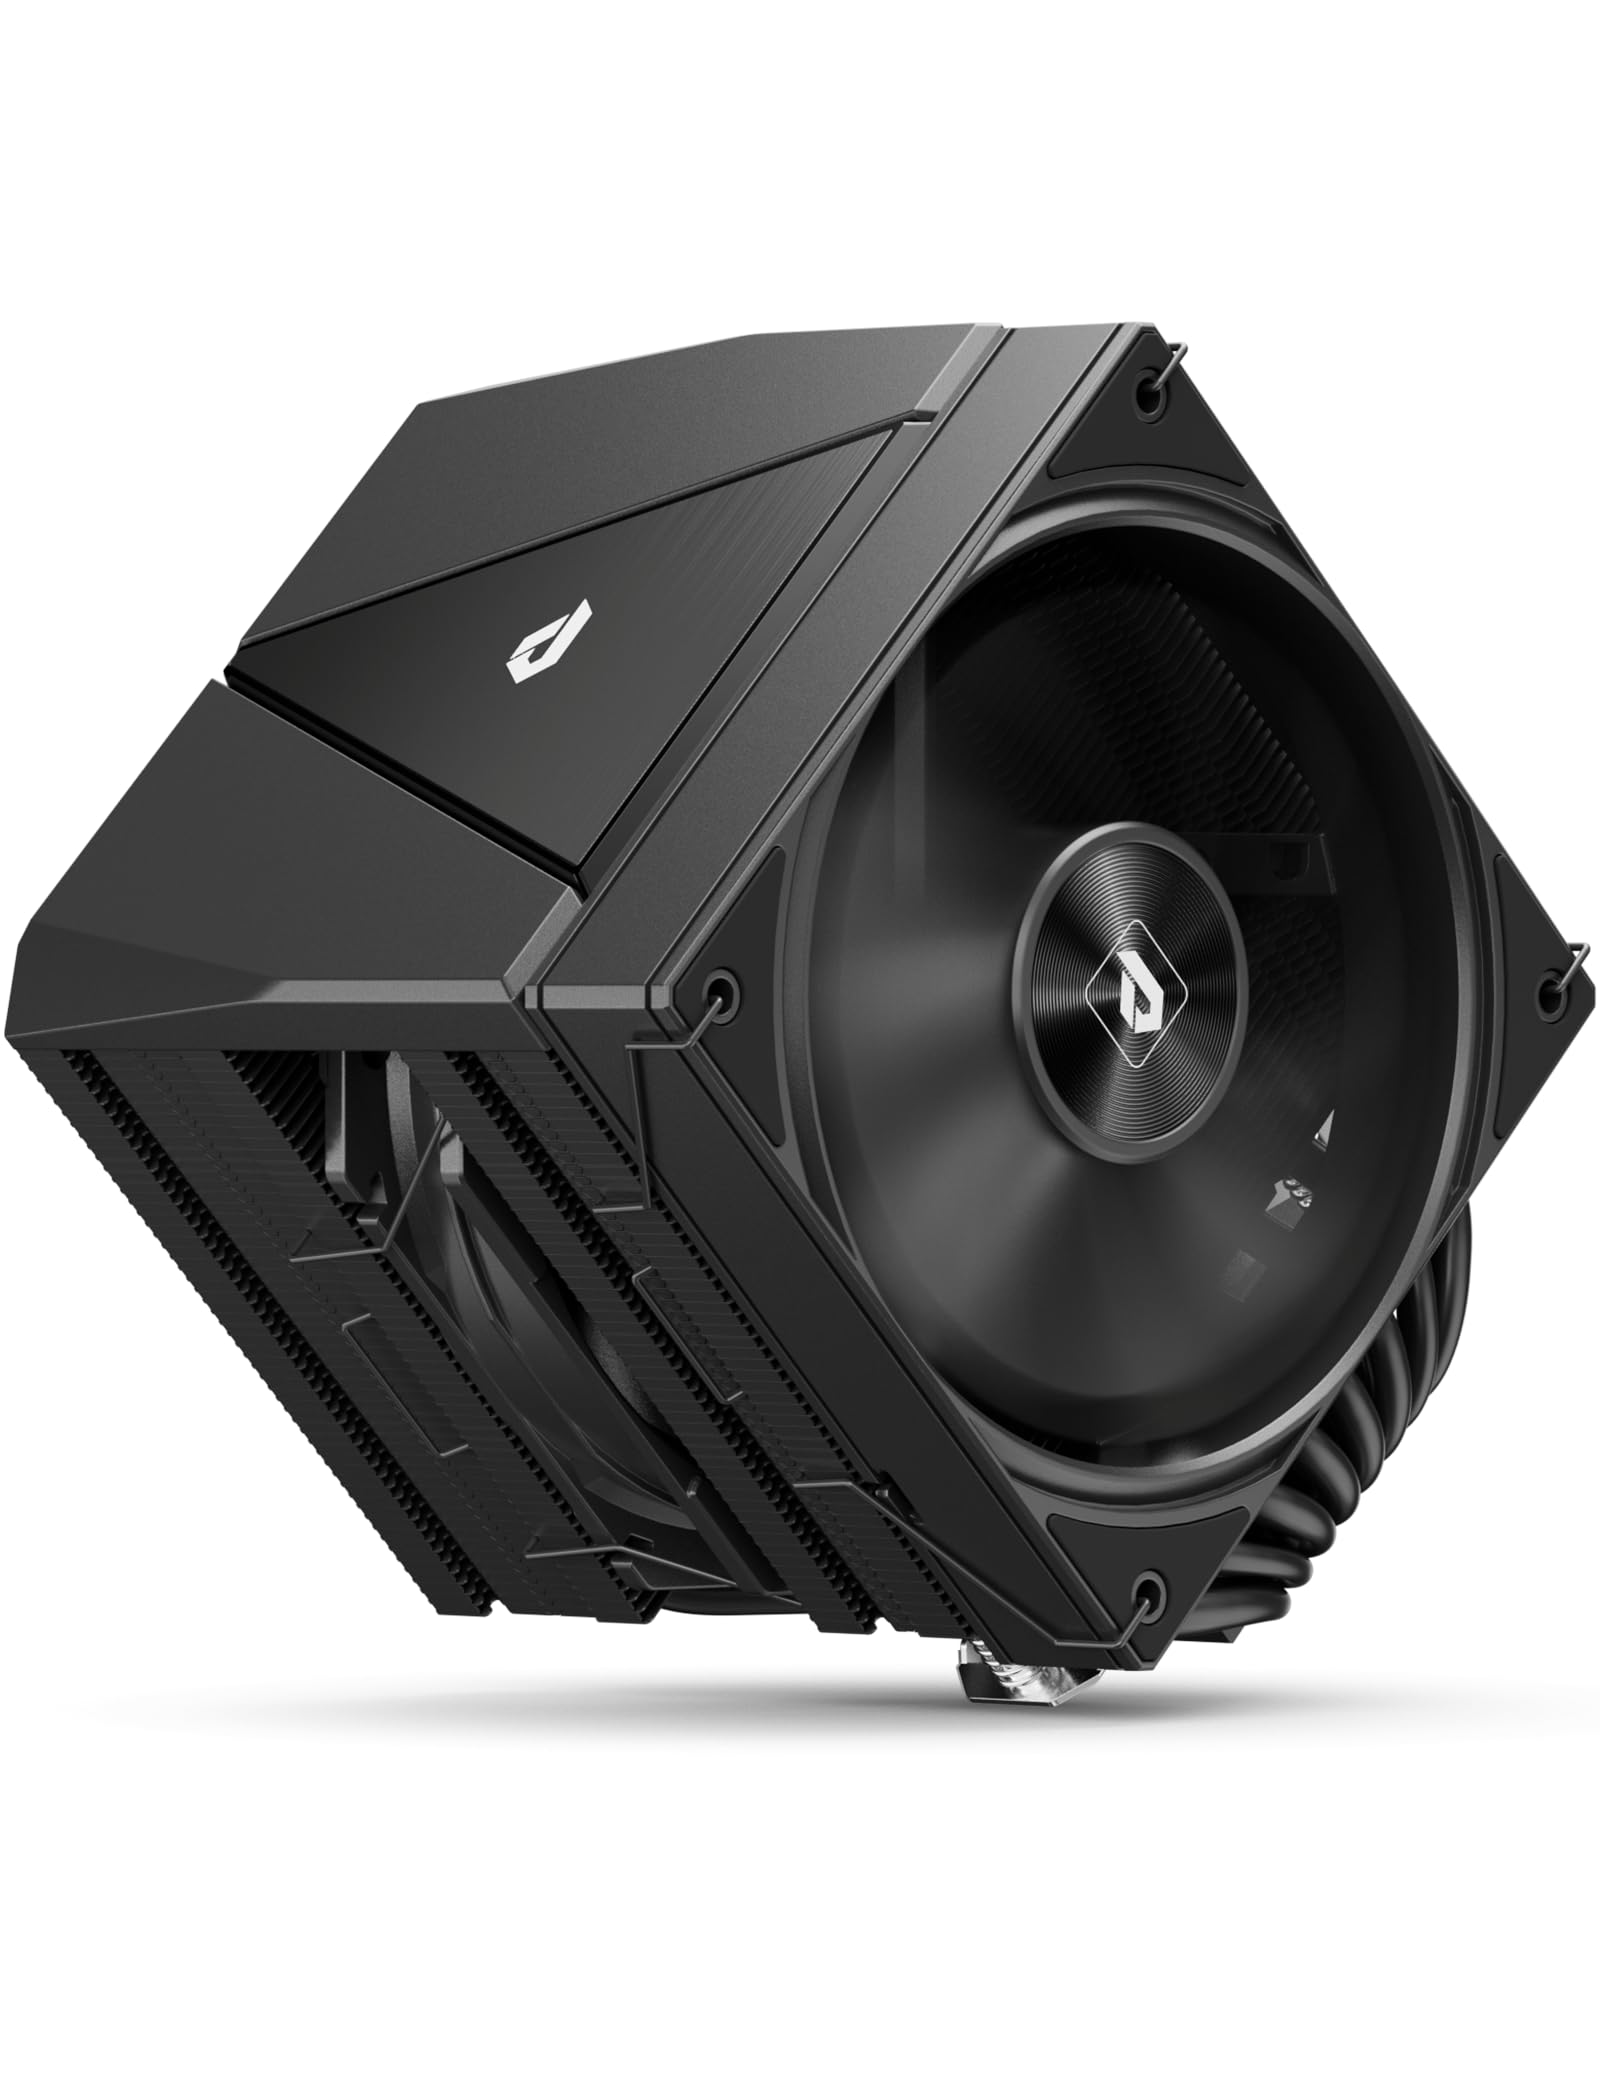
Image 1.1: upHere UE2 Elite K8 CPU Air Cooler in a system.
2. Package Contents
Verify that all components are present in your package before beginning installation:
- UE2 Elite K8 CPU Air Cooler (with pre-installed fans)
- User Guide
- Intel Socket Mounting Kit (Backplate, Standoffs, Mounting Brackets, Screws)
- AMD Socket Mounting Kit (Mounting Brackets, Screws)
- Thermal Paste
- Thermal Paste Spatula
- Screwdriver

Image 2.1: Included components for quick installation.
3. Installation Guide
This section provides detailed steps for installing your upHere UE2 Elite K8 CPU Air Cooler. Please refer to the official installation video for visual guidance.
Video 3.1: Official Installation Guide for upHere UE2 Elite Series CPU Air Cooler.
3.1. Intel Socket Installation (LGA 1851/1700/2011/2066/115X)
- Prepare the Backplate: Adjust the universal backplate to match your Intel socket type (e.g., 115X/1200, 1700/1851, 1366). Ensure the pins are in the correct position.
- Install Backplate: Place the adjusted backplate on the rear of your motherboard, aligning the holes with the CPU socket mounting points.
- Attach Standoffs: From the front of the motherboard, screw the appropriate standoffs into the backplate.
- Secure Mounting Brackets: Place the Intel mounting brackets over the standoffs and secure them with the provided screws using the screwdriver. Tighten evenly.
- Apply Thermal Paste: Apply a pea-sized amount of thermal paste to the center of your CPU's integrated heat spreader (IHS). Use the included spatula to spread it evenly into a thin layer across the entire surface.
- Remove Protective Film: Carefully peel off the protective film from the cooler's base.
- Mount the Cooler: Align the cooler with the mounting brackets and gently place it onto the CPU. Ensure the cooler is oriented correctly for optimal airflow and RAM clearance.
- Secure the Cooler: Use the screwdriver to tighten the spring-loaded screws on the cooler's mounting plate. Tighten in an alternating pattern (e.g., diagonal) until snug to ensure even pressure.
- Attach Magnetic Top Cover: Place the magnetic top cover onto the heatsink. This cover provides a clean aesthetic and allows for easy access to the mounting screws without removing the fans.
- Connect Fan Wires: Connect the 4-pin PWM fan connector(s) to the CPU_FAN header on your motherboard. If your cooler has RGB lighting, connect the RGB cable to the appropriate header (e.g., 5V ARGB header).

Image 3.1: No fan-removal installation with magnetic cover.
3.2. AMD Socket Installation (AM5/AM4/AM3)
- Remove Stock Brackets: Remove the plastic retention brackets from the stock AMD backplate on your motherboard. Keep the original backplate in place.
- Attach Standoffs: Screw the appropriate standoffs into the stock AMD backplate.
- Secure Mounting Brackets: Place the AMD mounting brackets over the standoffs and secure them with the provided screws using the screwdriver. Tighten evenly.
- Apply Thermal Paste: Apply a pea-sized amount of thermal paste to the center of your CPU's integrated heat spreader (IHS). Use the included spatula to spread it evenly into a thin layer across the entire surface.
- Remove Protective Film: Carefully peel off the protective film from the cooler's base.
- Mount the Cooler: Align the cooler with the mounting brackets and gently place it onto the CPU. Ensure the cooler is oriented correctly for optimal airflow and RAM clearance.
- Secure the Cooler: Use the screwdriver to tighten the spring-loaded screws on the cooler's mounting plate. Tighten in an alternating pattern (e.g., diagonal) until snug to ensure even pressure.
- Attach Magnetic Top Cover: Place the magnetic top cover onto the heatsink.
- Connect Fan Wires: Connect the 4-pin PWM fan connector(s) to the CPU_FAN header on your motherboard. If your cooler has RGB lighting, connect the RGB cable to the appropriate header (e.g., 5V ARGB header).

Image 3.2: Magnetic top cover for easy installation and maintenance.
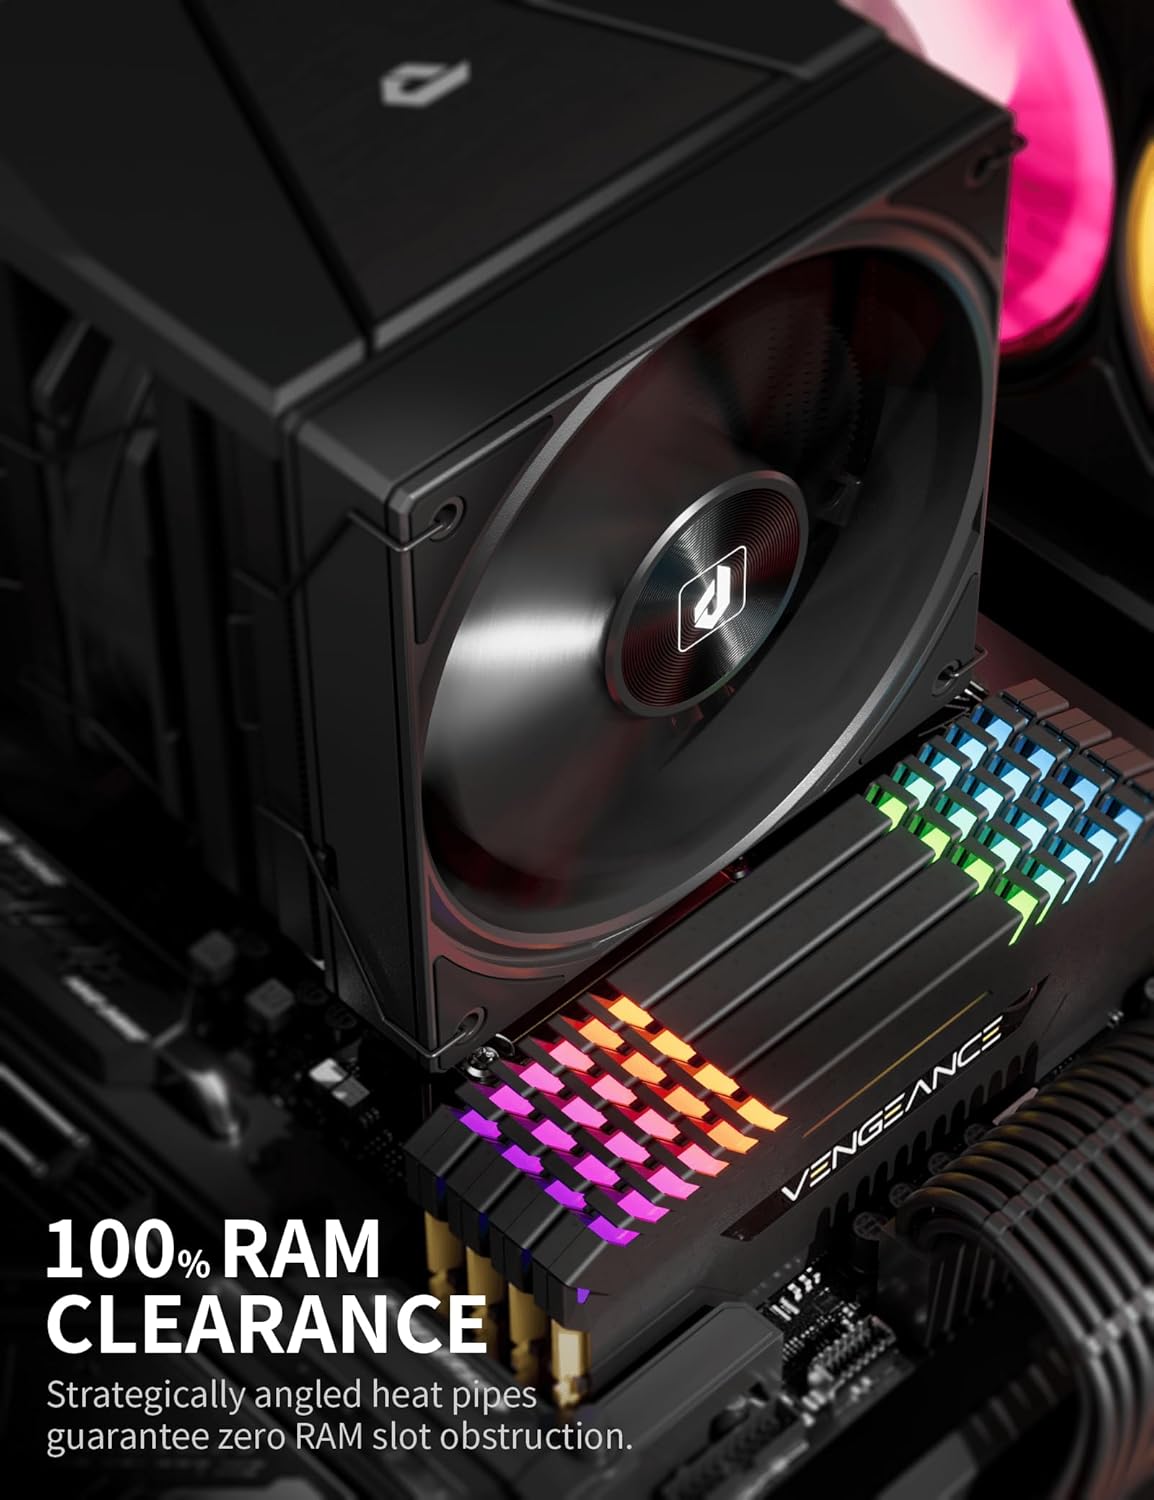
Image 3.3: 100% RAM clearance due to angled heatpipes.
4. Operating Instructions
The upHere UE2 Elite K8 CPU Air Cooler is designed for optimal performance with minimal user intervention once installed. The dual 120mm PWM fans automatically adjust their speed based on CPU temperature, ensuring efficient cooling while maintaining low noise levels.
- Automatic Fan Control: The fans operate within a speed range of 600-1650 RPM, controlled by your motherboard's PWM signal. This ensures that fan speed scales with CPU load, providing necessary cooling during intensive tasks and quiet operation during lighter use.
- Noise Level: At maximum speed, the fans produce a noise level of ≤27 dB(A), designed to be whisper-quiet for most users.
- Airflow: The dual fans deliver up to 68 CFM of airflow, effectively moving heat away from the heatsink.

Image 4.1: Dual-tower dual-fan design for balanced performance and silence.
Video 4.2: upHere UE2 Elite Dual Tower 8 Heat Pipes CPU Air Cooler product showcase.
5. Maintenance
Regular maintenance ensures the longevity and optimal performance of your CPU cooler.
- Dust Cleaning: Periodically inspect the heatsink fins and fan blades for dust accumulation. Use compressed air or a soft brush to gently remove dust. Ensure the fans are not spinning rapidly during cleaning to prevent damage.
- Thermal Paste Reapplication: It is recommended to reapply thermal paste every 2-3 years, or if you remove the cooler for any reason. Old thermal paste can dry out and lose effectiveness.
- Fan Inspection: Check fan cables for secure connections and ensure no cables are obstructing fan rotation.
6. Troubleshooting
If you encounter issues with your CPU cooler, consider the following:
- High CPU Temperatures:
- Ensure the cooler is securely mounted and making full contact with the CPU.
- Verify that thermal paste was applied correctly and evenly.
- Check fan connections to the motherboard and ensure they are spinning.
- Ensure adequate airflow within your PC case.
- Excessive Fan Noise:
- Check for dust buildup on fan blades.
- Ensure no cables are interfering with fan rotation.
- Verify fan settings in your motherboard's BIOS/UEFI. Adjust fan curves if necessary.
- RGB Lighting Not Working:
- Ensure the RGB cable is correctly connected to a compatible 5V ARGB header on your motherboard.
- Check your motherboard's RGB software for control and settings.
If problems persist, please contact upHere customer support for further assistance.
7. Specifications
| Feature | Specification |
|---|---|
| Brand | upHere |
| Model | UE2 Elite K8 |
| Cooling Method | Air |
| Heat Pipes | 8 x Φ6mm Copper Direct-Touch |
| Fan Size | 120mm PWM |
| Fan Speed | 600-1650 RPM ±10% |
| Air Flow Capacity | 68 CFM |
| Noise Level | ≤27 dB(A) |
| Power Connector Type | 4-Pin PWM |
| Voltage | 12 Volts |
| Wattage (TDP) | 280 watts |
| Material | Aluminum (Fins), Copper (Heatpipes) |
| Compatible Devices | Desktop, Laptop (CPU) |
| Compatible Sockets | Intel (LGA 1851/1700/1200/115x/2066), AMD (AM5/AM4/AM3) |
| Product Dimensions | 155 x 123 x 122 mm (approx. 6.1 x 4.84 x 4.8 inches) |
| Item Weight | 2.61 pounds |

Image 7.1: Technical specifications and dimensions.
8. Warranty and Support
upHere products are manufactured to high-quality standards. For warranty information, technical support, or any product-related inquiries, please refer to the official upHere website or contact their customer service directly. Keep your purchase receipt as proof of purchase for warranty claims.


