
kidoom FHSM-705
Contents
kidoom Multifunction Sewing Machine User Manual
Model: FHSM-705
1. Introduction
Thank you for choosing the kidoom Multifunction Sewing Machine, Model FHSM-705. This machine is designed for a wide range of sewing projects, offering strong motor performance, enhanced piercing power, and 59 stitch applications. With its full metal frame, it provides durability and stable operation. This manual provides essential information for safe operation, setup, maintenance, and troubleshooting to ensure you get the most out of your sewing machine.
Please read this manual thoroughly before operating the machine and keep it for future reference.
2. Safety Instructions
To reduce the risk of burns, fire, electric shock, or injury to persons:
- Always unplug the machine from the electrical outlet immediately after using and before cleaning, removing covers, or making any user servicing adjustments.
- Do not allow to be used as a toy. Close attention is necessary when this machine is used by or near children.
- Use this machine only for its intended use as described in this manual. Use only attachments recommended by the manufacturer as contained in this manual.
- Never operate this machine if it has a damaged cord or plug, if it is not working properly, if it has been dropped or damaged, or dropped into water.
- Never drop or insert any object into any opening.
- Do not use outdoors.
- Do not operate where aerosol (spray) products are being used or where oxygen is being administered.
- To disconnect, turn all controls to the off position, then remove plug from outlet.
- Keep fingers away from all moving parts. Special care is required around the sewing machine needle.
- Always use the proper needle plate. The wrong plate can cause the needle to break.
- Do not use bent needles.
- Do not pull or push fabric while stitching. This may deflect the needle causing it to break.
- Wear safety glasses when operating the sewing machine.
3. Product Overview
The kidoom FHSM-705 is a versatile sewing machine designed for both beginners and experienced users. It features a robust full metal frame for stability and longevity, a powerful motor for enhanced piercing capability, and a wide selection of 59 stitch applications to cater to various sewing needs.
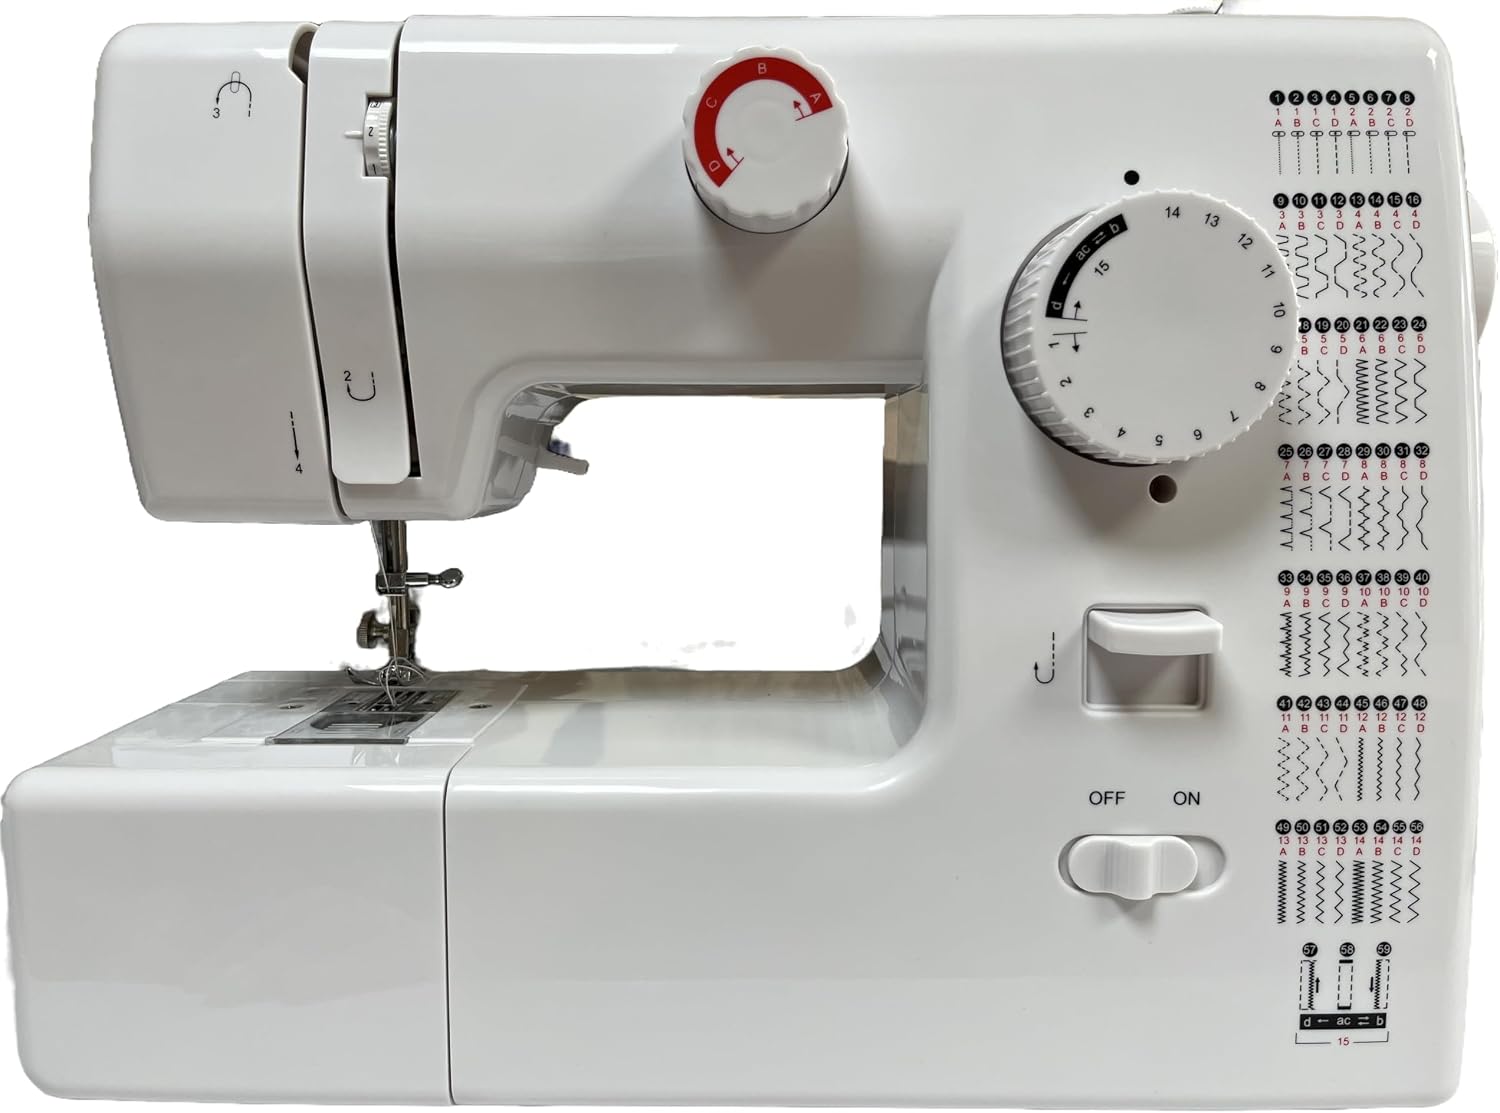
Figure 3.1: kidoom Multifunction Sewing Machine FHSM-705
The image above displays the kidoom Multifunction Sewing Machine FHSM-705 from a front-right perspective. The machine is predominantly white with distinct red and black markings on its control dials. Key operational components visible include the needle, presser foot, and stitch plate. On the right side of the machine's main body, a prominent circular dial allows for the selection of various stitch patterns, numbered from 1 to 15, alongside visual representations of the 59 available stitches. Below this dial, an ON/OFF switch and a lever for reverse stitching are located. The upper left section of the machine features a tension dial and integrated threading guides, essential for proper thread management. The machine's design highlights its full metal frame construction, emphasizing its durability. The clearly labeled stitch patterns on the machine's surface illustrate the extensive range of options, from fundamental straight stitches to intricate decorative and zigzag designs.
Key Features:
- Strong Motor with Enhanced Piercing Power
- 59 Stitch Applications
- Full Metal Frame for Durability
- Includes Foot Pedal
- Integrated Storage Drawer
- Comprehensive Accessory Kit
4. Setup
4.1 Unboxing and Placement
Carefully remove the sewing machine from its packaging. Place the machine on a stable, flat surface with adequate lighting. Ensure there is enough space around the machine for comfortable operation and fabric handling.
4.2 Power Connection
Connect the foot pedal plug into the corresponding jack on the machine. Plug the power cord into a standard electrical outlet. Ensure the machine's ON/OFF switch is in the 'OFF' position before connecting to power.
4.3 Threading the Machine
Proper threading is crucial for good stitch quality. Follow these steps carefully:
- Raise the presser foot lever.
- Place a spool of thread on the spool pin.
- Guide the thread through the upper thread guide.
- Bring the thread down through the tension discs, ensuring it is seated correctly.
- Pull the thread up through the take-up lever from right to left.
- Guide the thread down through the lower thread guides.
- Thread the needle from front to back.
- Pull approximately 6 inches of thread through the needle eye.
- Insert a properly wound bobbin into the bobbin case, ensuring the thread unwinds in the correct direction.
- Close the bobbin cover.
5. Operating Instructions
5.1 Stitch Selection
The kidoom FHSM-705 offers 59 stitch applications. To select a stitch, turn the large circular stitch selection dial on the right side of the machine until the desired stitch number aligns with the indicator mark. Refer to the stitch chart printed on the machine for available patterns and their corresponding numbers.
5.2 Basic Sewing
- Ensure the machine is properly threaded and the bobbin is installed.
- Place the fabric under the presser foot, aligning the edge with the desired seam allowance guide on the needle plate.
- Lower the presser foot lever.
- Turn the machine ON using the ON/OFF switch.
- Gently press the foot pedal to start sewing. Control your speed by varying the pressure on the pedal.
- Guide the fabric gently with both hands, ensuring it feeds smoothly under the needle. Do not pull or push the fabric forcefully.
- To secure the beginning and end of a seam, use the reverse stitch lever (usually located near the stitch selection dial) to sew a few stitches backward.
- When finished sewing, raise the needle to its highest position, raise the presser foot, and gently pull the fabric away from the machine.
- Cut the threads using the thread cutter located on the machine or with scissors.
5.3 Tension Adjustment
The tension dial (usually located on the top front of the machine) controls the balance between the upper and bobbin threads. For most general sewing, a mid-range setting is suitable. Adjust the tension if stitches appear too loose or too tight on either side of the fabric. Increase the number for tighter upper thread tension, decrease for looser.
6. Maintenance
6.1 Cleaning
Regular cleaning helps maintain your machine's performance. Always unplug the machine before cleaning.
- Lint and Dust: Use a small brush or lint brush to remove lint and dust from the bobbin area, feed dogs, and under the needle plate.
- Machine Surface: Wipe the exterior of the machine with a soft, dry cloth. Do not use harsh chemicals or abrasive cleaners.
6.2 Lubrication (Oiling)
Refer to your machine's specific oiling points if indicated in a separate diagram or section. Generally, a few drops of high-quality sewing machine oil are applied to moving metal parts that rub together, such as the hook race area. Do not over-oil.
6.3 Needle Replacement
Replace the needle regularly (after every 8-10 hours of sewing or when it becomes dull or bent) to prevent skipped stitches and fabric damage. Ensure the flat side of the needle faces the back when inserting.
7. Troubleshooting
This section addresses common issues you might encounter. For problems not listed here, please contact customer support.
| Problem | Possible Cause | Solution |
|---|---|---|
| Skipped Stitches | Incorrect needle, bent needle, improper threading, incorrect tension. | Replace needle with correct type/size, re-thread machine, adjust tension. |
| Thread Breaking | Incorrect threading, too much tension, poor quality thread, bent needle, burr on needle plate. | Re-thread, reduce tension, use good quality thread, replace needle, check for burrs. |
| Fabric Not Feeding | Presser foot not lowered, feed dogs clogged with lint, stitch length set to zero. | Lower presser foot, clean feed dogs, adjust stitch length. |
| Machine Jams | Improper bobbin winding/insertion, thread tangled in bobbin case, fabric pulled forcefully. | Check bobbin, clear tangled thread, avoid pulling fabric. |
8. Specifications
Detailed specifications for the kidoom Multifunction Sewing Machine FHSM-705:
| Attribute | Value |
|---|---|
| Brand | kidoom |
| Model Number | FHSM-705 |
| UPC | 635393168725 |
| Product Dimensions | 6.57 x 16.73 x 12.99 inches (6.57"D x 16.73"W x 12.99"H) |
| Item Weight | 11.07 pounds |
| Color | White |
| ASIN | B0FG1CXJ7H |
| Date First Available | June 29, 2025 |
9. Warranty and Support
Your kidoom Multifunction Sewing Machine FHSM-705 comes with a standard manufacturer's warranty covering defects in materials and workmanship under normal use. Please retain your proof of purchase for warranty claims.
For technical support, troubleshooting assistance beyond this manual, or warranty inquiries, please contact kidoom customer service. Contact information can typically be found on the product packaging or the official kidoom website.
Please have your model number (FHSM-705) and purchase date ready when contacting support.
Ask a question about this manual
Ask about setup, troubleshooting, compatibility, parts, safety, or missing instructions. Manuals+ will review the question and use this page’s manual context to help answer it.