Introduction
This manual provides detailed instructions for the installation, setup, and operation of the QIACHIP 30A 433Mhz Wireless Remote Control Switch. This system is designed for controlling DC motors, linear actuators, and similar devices within a 5V-30V DC range, offering versatile control options including forward, reverse, and stop functions.
Safety Information
- Ensure the power supply is disconnected before any wiring or installation to prevent electric shock.
- Verify the voltage and current ratings of your motor and power supply are compatible with the receiver (DC 5V-30V, Max 30A).
- Do not expose the receiver to moisture or extreme temperatures.
- Installation should be performed by qualified personnel if you are unsure about electrical wiring.
Package Contents
The package includes the following components:
- 1 x QIACHIP KR1202-30R 30A Relay Receiver
- 2 x QIACHIP KT05-AB Wireless Transmitters (Remote Controls)

Image: The QIACHIP KR1202-30R receiver module and two KT05-AB remote controls included in the package.
Specifications
| Brand | QIACHIP |
| Model Number | KR1202-30R+2KT05-AB |
| Operating Voltage | DC 5V-30V |
| Max Load Current | 30A |
| RF Frequency | 433.92Mhz |
| Control Range | Up to 200 feet (60 meters) in open space, with through-wall capability. |
| Switch Modes | Self-locking, Momentary, Interlocking |
| Connectors | Tool-free lever connectors |
| Receiver Dimensions | 55mm x 30mm x 23mm (approx.) |

Image: Detailed dimensions of the KR1202-30R receiver module.
Setup and Wiring
Wiring Diagram
Connect the receiver to your DC power supply and motor according to the following diagram. Ensure correct polarity for both input and output connections.
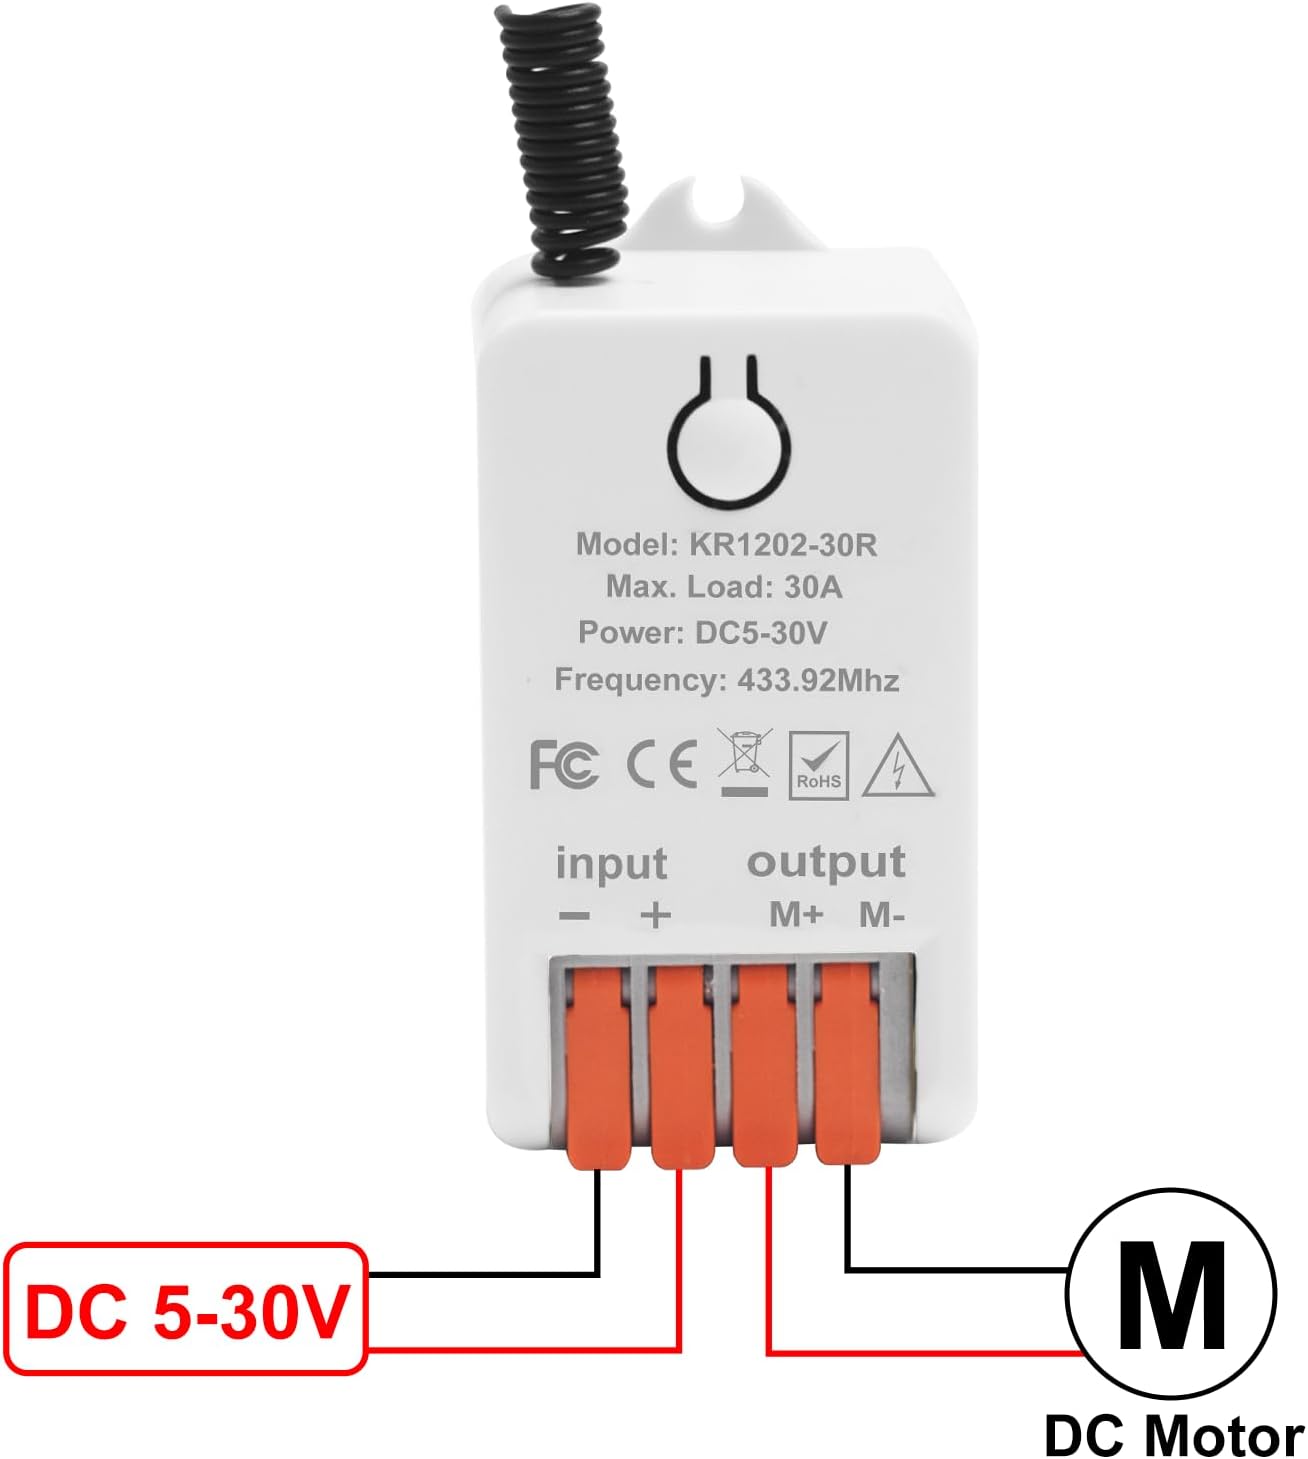
Image: General wiring diagram showing DC 5-30V input and DC motor output connections.

Image: Detailed wiring for a DC motor, illustrating connections for power input and motor output.
Pairing the Remote Control (Learning Mode)
The receiver supports three operating modes: Momentary, Self-locking, and Interlocking. The pairing process is similar for all modes, but the button presses differ.
- Clear Existing Codes: Press and hold the learning button on the receiver for approximately 8 seconds until the indicator light flashes rapidly and then turns off. This clears all previously paired remotes.
- Enter Learning Mode: Press the learning button on the receiver once (for Momentary mode), twice (for Self-locking mode), or three times (for Interlocking mode). The indicator light will turn on, indicating it's ready to learn.
- Pair Remote: While the indicator light is on, press the desired button on your remote control (e.g., button A for forward, button B for reverse, button C for stop). The indicator light on the receiver will flash and then turn off, confirming successful pairing.
- Test: After pairing, test the remote control to ensure the motor responds as expected.
Note: Refer to the video below for a visual demonstration of the pairing process and different operating modes.
Video: Demonstration of the QIACHIP 1202-30R DC Motor Forward/Reverse Controller, showing wiring and different operating modes (Toggle, Momentary, Interlock) with remote control pairing.
Operating Instructions
Once the receiver is wired and the remote control is paired, you can operate your connected DC motor.
- Button A: Activates the motor in the forward direction.
- Button B: Activates the motor in the backward (reverse) direction.
- Button C: Stops the motor.
The exact behavior of buttons A, B, and C will depend on the selected operating mode (Momentary, Self-locking, or Interlocking) during the pairing process.

Image: Remote control in use, demonstrating control over a garage door's movement.
Application Examples
This wireless remote control switch is suitable for a wide range of DC 5V-30V motor applications, including but not limited to:
- Linear Actuators
- Garage Doors
- Curtain Motors
- Electric Windows
- Lift Tables
- Barrier Gates
- Winches
- Shutters and Awnings

Image: Visual representation of diverse applications for the remote control system.

Image: Remote control in use, demonstrating control over a barrier gate's movement.
Maintenance
- Keep the receiver and remote controls clean and dry.
- Replace remote control batteries when the operating range decreases or the indicator light dims.
- Periodically check wiring connections for security and integrity.
Troubleshooting
- Motor not responding:
- Check power supply to the receiver.
- Verify motor wiring connections and polarity.
- Ensure the remote control is paired correctly (re-pair if necessary).
- Check remote control battery.
- Reduced control range:
- Replace remote control battery.
- Ensure there are no significant obstructions between the remote and receiver.
- Avoid strong electromagnetic interference sources.
- Motor runs continuously or not at all:
- Re-check the selected operating mode during pairing. Clear all codes and re-pair in the desired mode.
- Inspect the receiver for any visible damage.
Warranty and Support
For warranty information or technical support, please contact QIACHIP customer service through the retailer where the product was purchased. Please have your model number (KR1202-30R+2KT05-AB) and purchase date available.
You can also visit the official QIACHIP store on Amazon for additional resources and contact information: QIACHIP Store