
ASUS ROG-THOR-1000P3-GAMING
Contents
ASUS ROG Thor 1000W Platinum III PSU User Manual
Model: ROG-THOR-1000P3-GAMING
1. Introduction
This manual provides detailed instructions for the installation, operation, and maintenance of your ASUS ROG Thor 1000W Platinum III Power Supply Unit. Designed for high-performance computing, this PSU features 80 PLUS Platinum certification, ATX 3.1 compliance, GaN MOSFET technology, a GPU-First intelligent voltage stabilizer, and a magnetic OLED display. Please read this manual thoroughly before use to ensure proper functionality and safety.
2. Safety Information
- Always disconnect the power cord from the wall outlet before installing, removing, or cleaning the PSU.
- Do not open the PSU casing. High voltages are present inside, and opening it will void the warranty.
- Ensure proper grounding to prevent electrical shock.
- Use only the modular cables provided with this PSU. Using incompatible cables may cause damage to the PSU or connected components.
- Install the PSU in a well-ventilated area, away from heat sources and moisture.
3. Package Contents
Verify that all items are present in your package:
- ASUS ROG Thor 1000W Platinum III PSU
- Modular Cable Set (including native 16-pin PCIe power cable)
- AC Power Cord
- Mounting Screws
- Cable Ties
- User Manual and Documentation

Image: The ASUS ROG Thor 1000W Platinum III Power Supply Unit and its retail packaging.
4. Product Overview
The ASUS ROG Thor 1000W Platinum III PSU integrates advanced features for optimal performance and reliability:
- GaN MOSFET: Delivers up to 30% more power efficiency and a more organized internal layout for cooler operation.
- GPU-First Intelligent Voltage Stabilizer: Enhances voltage delivery to your graphics card by up to 45% for smoother gaming and unwavering performance.
- Magnetic OLED Display: Shows real-time power draw and can be swapped to either side of the unit to accommodate fan-up or fan-down PSU installation.
- Turbo Mode: Premium components and a fine-tuned fan curve unlock support for extended power excursions.
- ROG Heatsinks and Aluminum Enclosure: Synergize for superior cooling, keeping system thermals under control.
- Dual-Ball-Fan Bearings: Designed to last up to twice as long as sleeve bearing designs.
- ATX 3.1 Compatible: Compliant with the ATX 3.1 standard, ensuring enhanced voltage and current regulation for the latest hardware, including a native 16-pin PCIe power cable.
- Etched Modular Cables: Feature pliable premium material for effortless cable management and exceptional safety.
- 80 PLUS Platinum Certified: Utilizes low-ESR capacitors and premium components for industry-leading power efficiency.

Image: Overview of the PSU's key features.
5. Setup
5.1 Physical Installation
- Ensure your computer is powered off and unplugged from the wall outlet.
- Remove your old PSU (if applicable) and clear the PSU mounting area in your PC case.
- Carefully place the ASUS ROG Thor 1000W Platinum III PSU into the designated bay.
- Secure the PSU to the case using the provided mounting screws.
5.2 Cable Connections
Connect the necessary modular cables to your components. The PSU is fully modular, allowing you to connect only the cables you need.
- 24-pin ATX Cable: Connect to your motherboard's main power connector.
- CPU (EPS) Cables: Connect to your motherboard's CPU power connectors (4+4 pin or 8-pin).
- PCIe Gen 5.0 (16-pin) Cable: Connect directly to compatible graphics cards. Ensure the connector is fully seated.
- PCIe (6+2 pin) Cables: Connect to graphics cards requiring 6-pin or 8-pin power.
- SATA Cables: Connect to SATA devices such as SSDs, HDDs, and optical drives.
- Molex Cables: Connect to older peripherals or case fans.

Image: The native 16-pin PCIe power cable, compliant with ATX 3.1 and PCIe Gen 5.0 standards.
5.3 OLED Display Orientation
The magnetic OLED display can be repositioned to suit your PSU mounting orientation (fan-up or fan-down). Gently detach the display and reattach it to the desired side of the PSU for optimal visibility.

Image: The magnetic OLED display showing real-time power draw, which can be repositioned.
6. Operating
6.1 Power On/Off
After all connections are secure, plug the AC power cord into the PSU and a wall outlet. Flip the main power switch on the back of the PSU to the 'ON' position. Your system is now ready to power on.
6.2 Turbo Mode
The Turbo Mode feature allows the PSU to support extended power excursions, providing additional stability during peak loads. Refer to your system's monitoring software or the PSU's OLED display for power consumption details.
6.3 OLED Display Functionality
The integrated OLED display provides real-time monitoring of your system's power draw. This allows you to keep track of power consumption and ensure your system operates within optimal parameters.
6.4 RGB Lighting (Aura Sync)
The PSU features customizable RGB lighting. Connect the PSU's RGB header to a compatible motherboard's Aura Sync header to synchronize lighting effects with other ASUS Aura Sync components. Use the ASUS Aura Sync software to customize lighting patterns and colors.
7. Maintenance
7.1 Cleaning
To maintain optimal performance and longevity, regularly clean your PSU. Ensure the PSU is powered off and unplugged before cleaning.
- Use compressed air to remove dust from the fan and ventilation grilles.
- Wipe the exterior with a soft, dry cloth. Avoid using liquid cleaners.
7.2 Fan Maintenance
The PSU features dual-ball-fan bearings, known for their durability and long lifespan. Regular dust removal, as described above, is generally sufficient for fan maintenance. If you notice unusual fan noise or reduced airflow, ensure there are no obstructions.
8. Troubleshooting
- No Power: Ensure the AC power cord is securely connected to both the PSU and the wall outlet. Check that the main power switch on the PSU is in the 'ON' position. Verify all modular cables are correctly seated.
- System Instability/Crashes: This could indicate insufficient power delivery or a faulty component. Check the OLED display for power draw. Ensure all power connectors to the motherboard and graphics card are properly connected. If issues persist, test components individually or consult a professional.
- Unusual Noise: Check for loose screws or cables inside the PC case. If the noise originates from the PSU fan, ensure it is free of dust and obstructions.
- OLED Display Not Working: Ensure the display is correctly attached to the magnetic points. If it remains unresponsive, try detaching and reattaching it.
9. Specifications
| Feature | Specification |
|---|---|
| Brand | ASUS |
| Model Name | ROG-THOR-1000P3-GAMING |
| Series | ROG-THOR-1000P3-GAMING |
| Output Wattage | 1000 Watts |
| 80 PLUS Certification | Platinum |
| ATX Standard | ATX 3.1 |
| Compatible Devices | Personal Computer |
| Connector Type | ATX |
| Cooling Method | Air |
| Item Weight | 5.2 Pounds |
| Product Dimensions (LxWxH) | 7.5 x 5.9 x 3.3 inches |
| Color | BLACK |
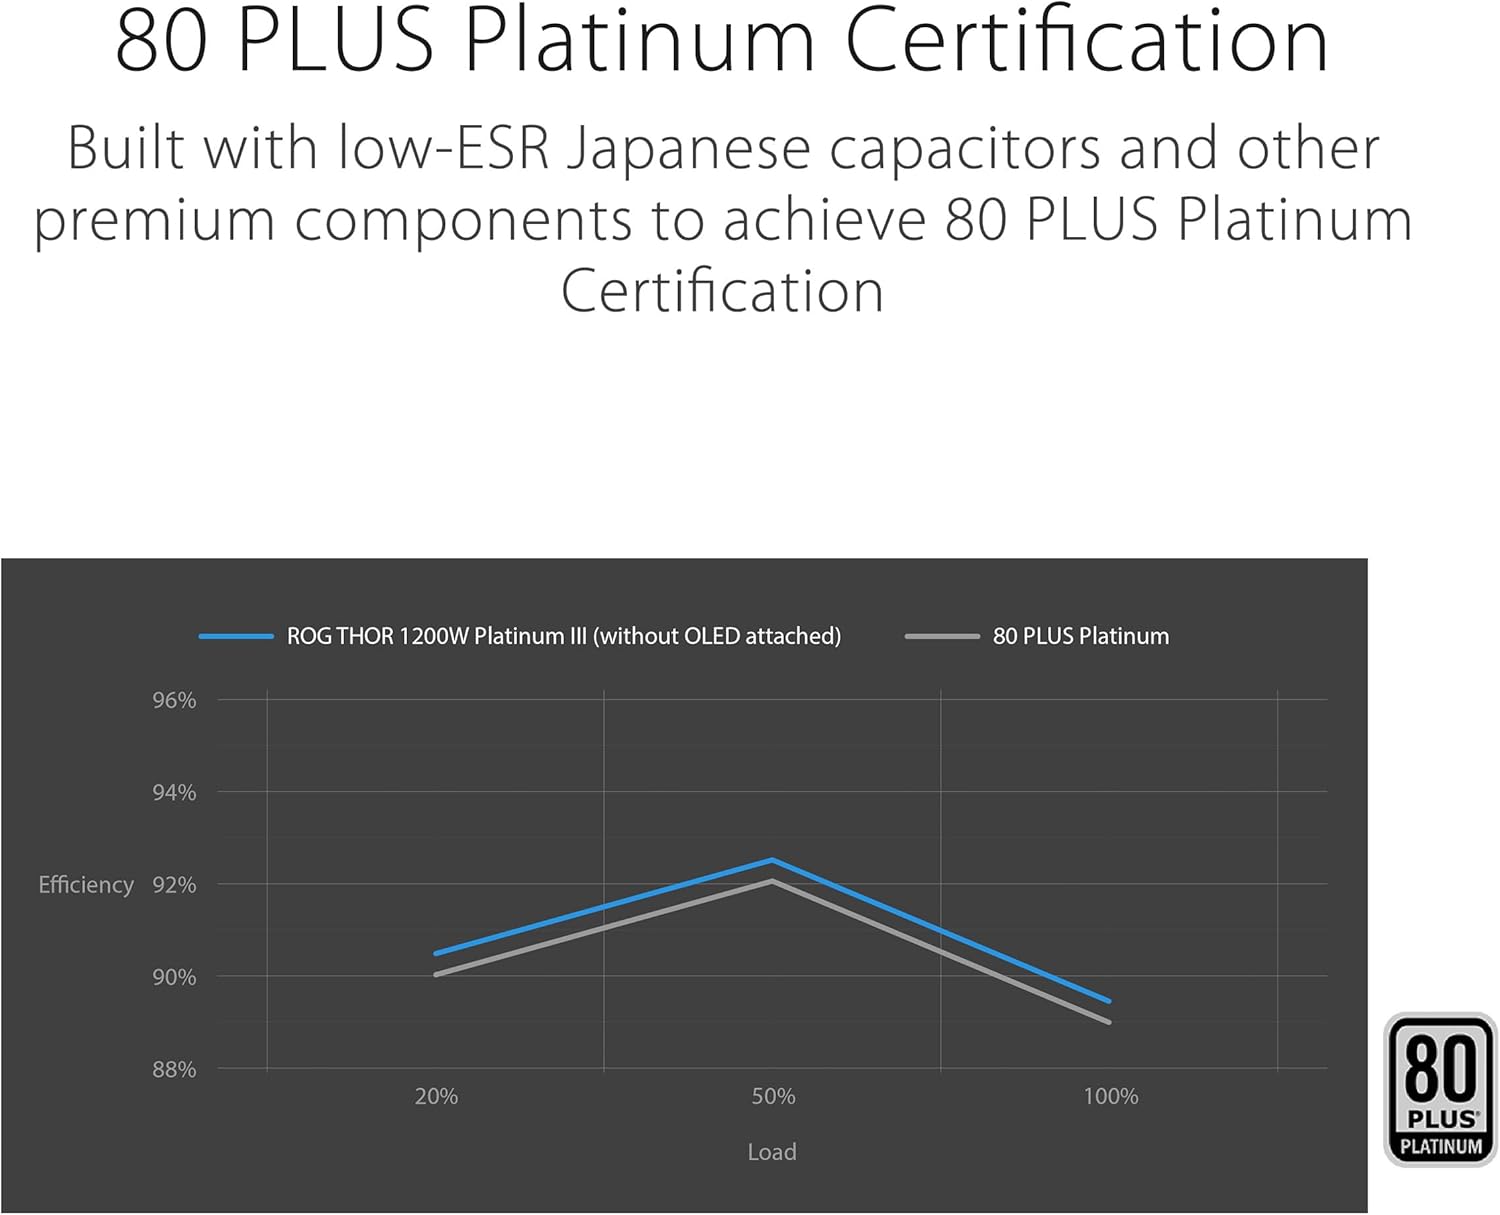
Image: 80 PLUS Platinum Certification efficiency graph.
10. Warranty & Support
10.1 Warranty Information
The ASUS ROG Thor 1000W Platinum III PSU is backed by a 10-year warranty, covering defects in materials and workmanship under normal use. Please retain your proof of purchase for warranty claims.

Image: The 10-Year Warranty badge, highlighting extended product support.
10.2 Technical Support
For technical assistance, troubleshooting, or warranty inquiries, please visit the official ASUS support website or contact their customer service. You can find more information at www.asus.com/support.
Ask a question about this manual
Ask about setup, troubleshooting, compatibility, parts, safety, or missing instructions. Manuals+ will review the question and use this page’s manual context to help answer it.