1. Introduction
This manual provides essential information for the installation, operation, and maintenance of your Varstrom TSDZ2B, TSDZ8, or TSDZ16 Mid Drive Motor Kit. This kit is designed to convert standard bicycles into electric bikes, offering pedal assistance through a torque sensor system. Please read this manual thoroughly before attempting installation or operation to ensure safe and correct usage.
2. Product Overview and Components
The Varstrom Mid Drive Motor Kit includes the motor unit, display, battery (optional), brake levers or sensors, thumb throttle, cranks, chainwheel, speed sensor, wiring harness, and various mounting hardware. The core of the system is the mid-drive motor, which integrates a torque sensor for a natural riding experience.

Image 2.1: Overview of the Varstrom Mid Drive Motor Kit, including the motor, display, battery, and various accessories.
2.1 What's in the Box
The following components are typically included with your Varstrom Mid Drive Motor Kit:

Image 2.2: Detailed view of all components included in the Varstrom Mid Drive Motor Kit packaging.
- Varstrom x Tong-sheng 48V Mid Drive Motor (TSDZ2B, TSDZ8, or TSDZ16)
- Display (Optional: EKD01, M58, or DZ40)
- Battery (Optional)
- Brake Levers (Default) or Brake Sensors
- Thumb Throttle
- Cranks and Chainwheel
- Speed Sensor & Magnets
- 1T4 Wiring Harness
- Lock Nuts (1 set)
- Cable Ties
- Wrench
- Washers
- Installation Manual
3. Specifications
The Varstrom Mid Drive Motor Kit is available in several configurations, each offering different power outputs and torque levels. All models feature a torque sensor for responsive pedal assistance.
3.1 Motor Specifications

Image 3.1: Comparative specifications for TSDZ2B, TSDZ8, and TSDZ16 mid-drive motors.
| Feature | TSDZ2B | TSDZ8 | TSDZ16 |
|---|---|---|---|
| Rated Voltage Power | 48V 500W | 48V 750W | 48V 1000W |
| Max Torque | 80 N.m | 120 N.m | 160 N.m |
| Max Speed | 30-35 KM/H | 50-55 KM/H | 55-60 KM/H |
| Weight | About 3.8 KG | About 4.7 KG | About 6 KG |
| BB Width Compatibility | 68-73mm | ||
| Waterproof Grade | IPX5 | IPX5 | IPX6 |

Image 3.2: Motor dimensions and detailed specifications for compatibility.
3.2 Display Options
Various display units are compatible with the Varstrom Mid Drive Motor Kit, offering different features and interfaces.

Image 3.3: Features and specifications of EKD01, M58, and DZ40 display options.
3.3 Battery Parameters (Optional)
If purchased with a battery, refer to the specific battery parameters for your model.

Image 3.4: Specifications for various optional battery types, including Shark and YingWu models.
4. Setup and Installation
Installation of the mid-drive motor kit requires mechanical aptitude and specific tools. If you are unsure about any step, it is recommended to seek professional assistance.
4.1 Bottom Bracket Compatibility
The motor kit is designed to fit bicycles with a bottom bracket shell length of 68mm to 73mm and an inner diameter of 34mm to 36mm. Verify your bicycle's bottom bracket dimensions before proceeding with installation.
4.2 Wiring Diagram
Proper connection of all components is crucial for the system's functionality. Refer to the wiring diagram below for guidance.
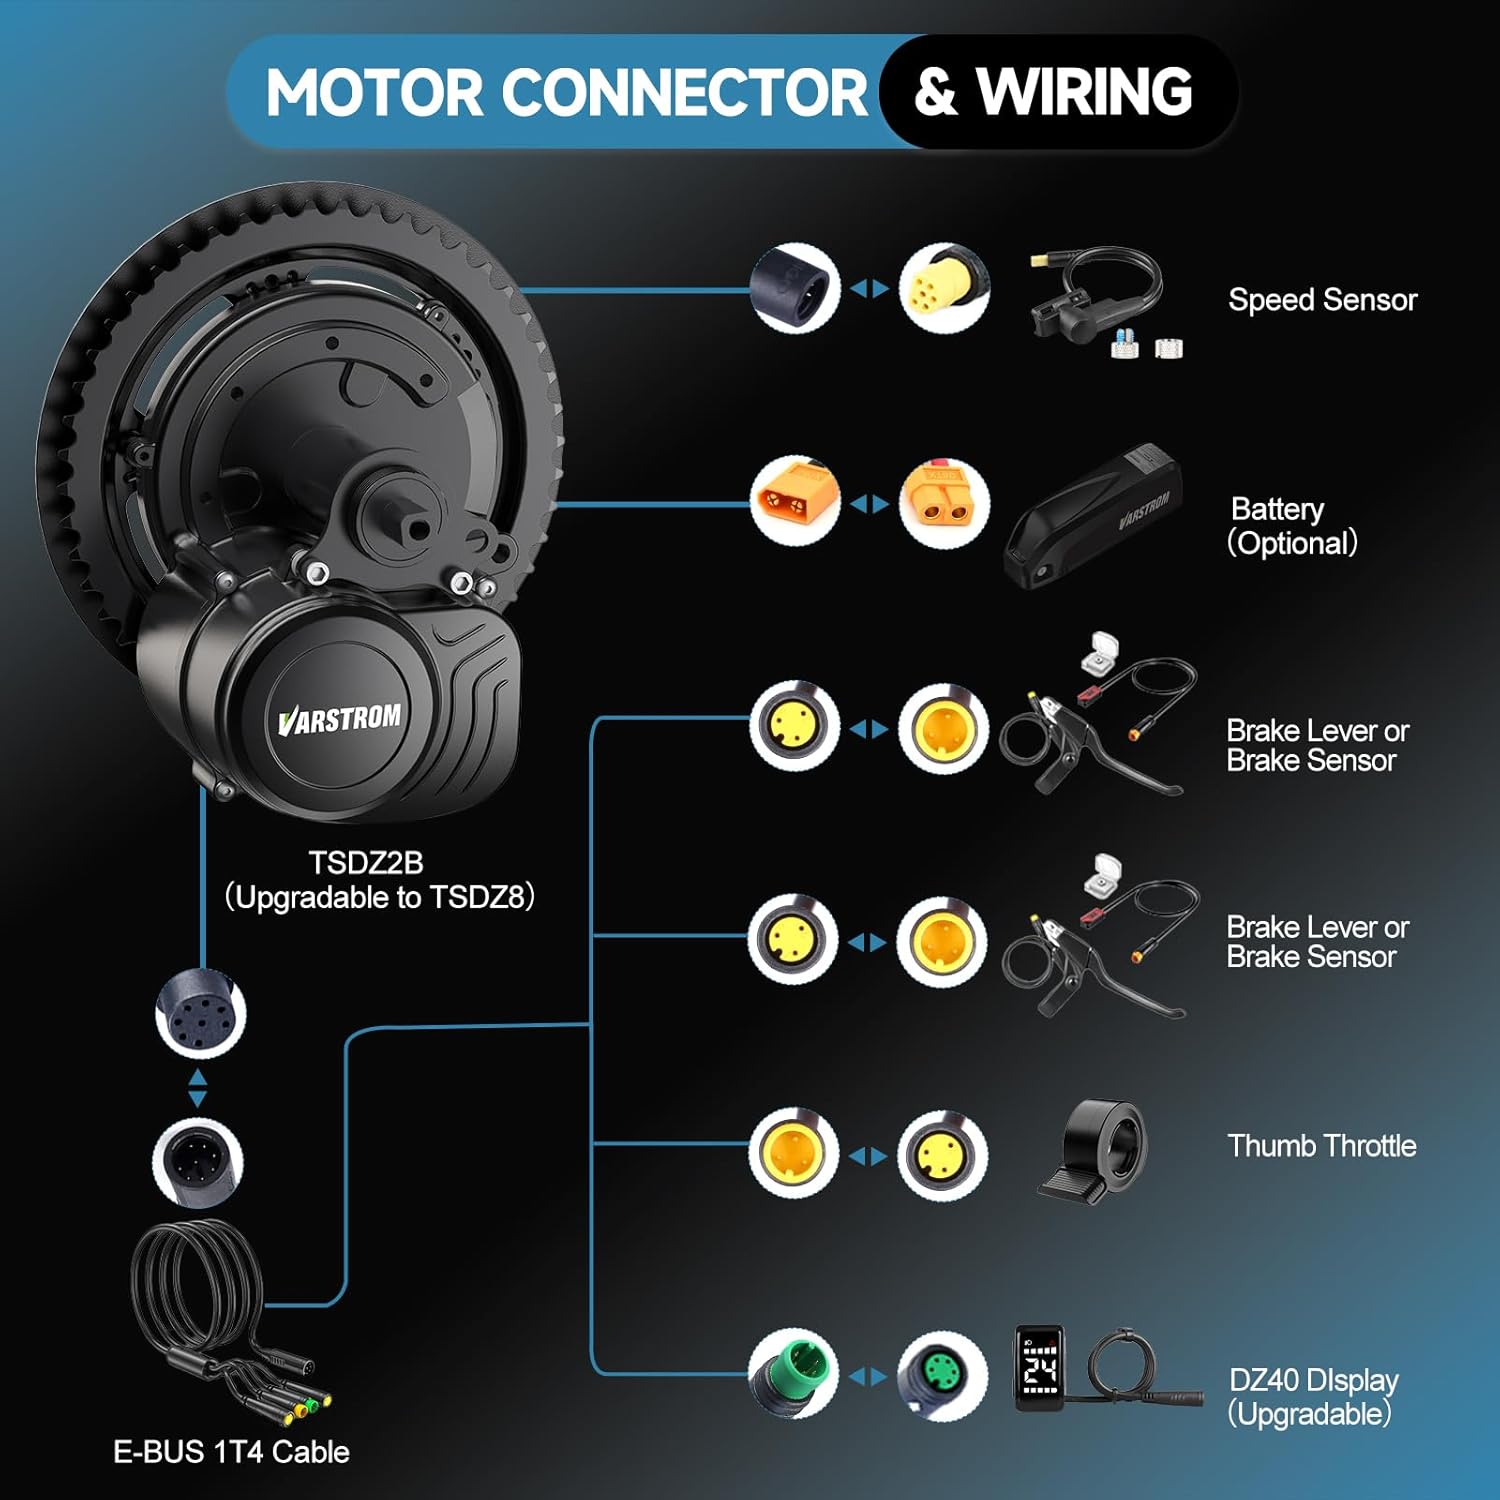
Image 4.1: Diagram illustrating the connections for the motor, speed sensor, battery, brake levers/sensors, thumb throttle, and display.
4.3 General Installation Steps (Summary)
- Remove existing cranks and bottom bracket from your bicycle.
- Install the mid-drive motor unit into the bottom bracket shell, ensuring it is securely fastened with the provided lock nuts.
- Attach the chainwheel and cranks to the motor spindle.
- Mount the display, thumb throttle, and brake levers/sensors onto the handlebars.
- Install the speed sensor on the rear chainstay and attach the magnet to a spoke on the rear wheel.
- Connect all components to the motor using the 1T4 wiring harness, following the wiring diagram.
- Mount the battery securely to the bicycle frame (if applicable) and connect it to the motor system.
- Perform a functional test to ensure all components are working correctly before riding.
5. Operating Instructions
The Varstrom Mid Drive Motor Kit provides a natural and intuitive riding experience thanks to its torque sensor technology.
5.1 Powering On/Off
- To power on the system, press and hold the power button on your display unit.
- To power off, press and hold the power button again until the display turns off.
5.2 Assist Modes
The system offers multiple assist modes to suit different riding conditions:
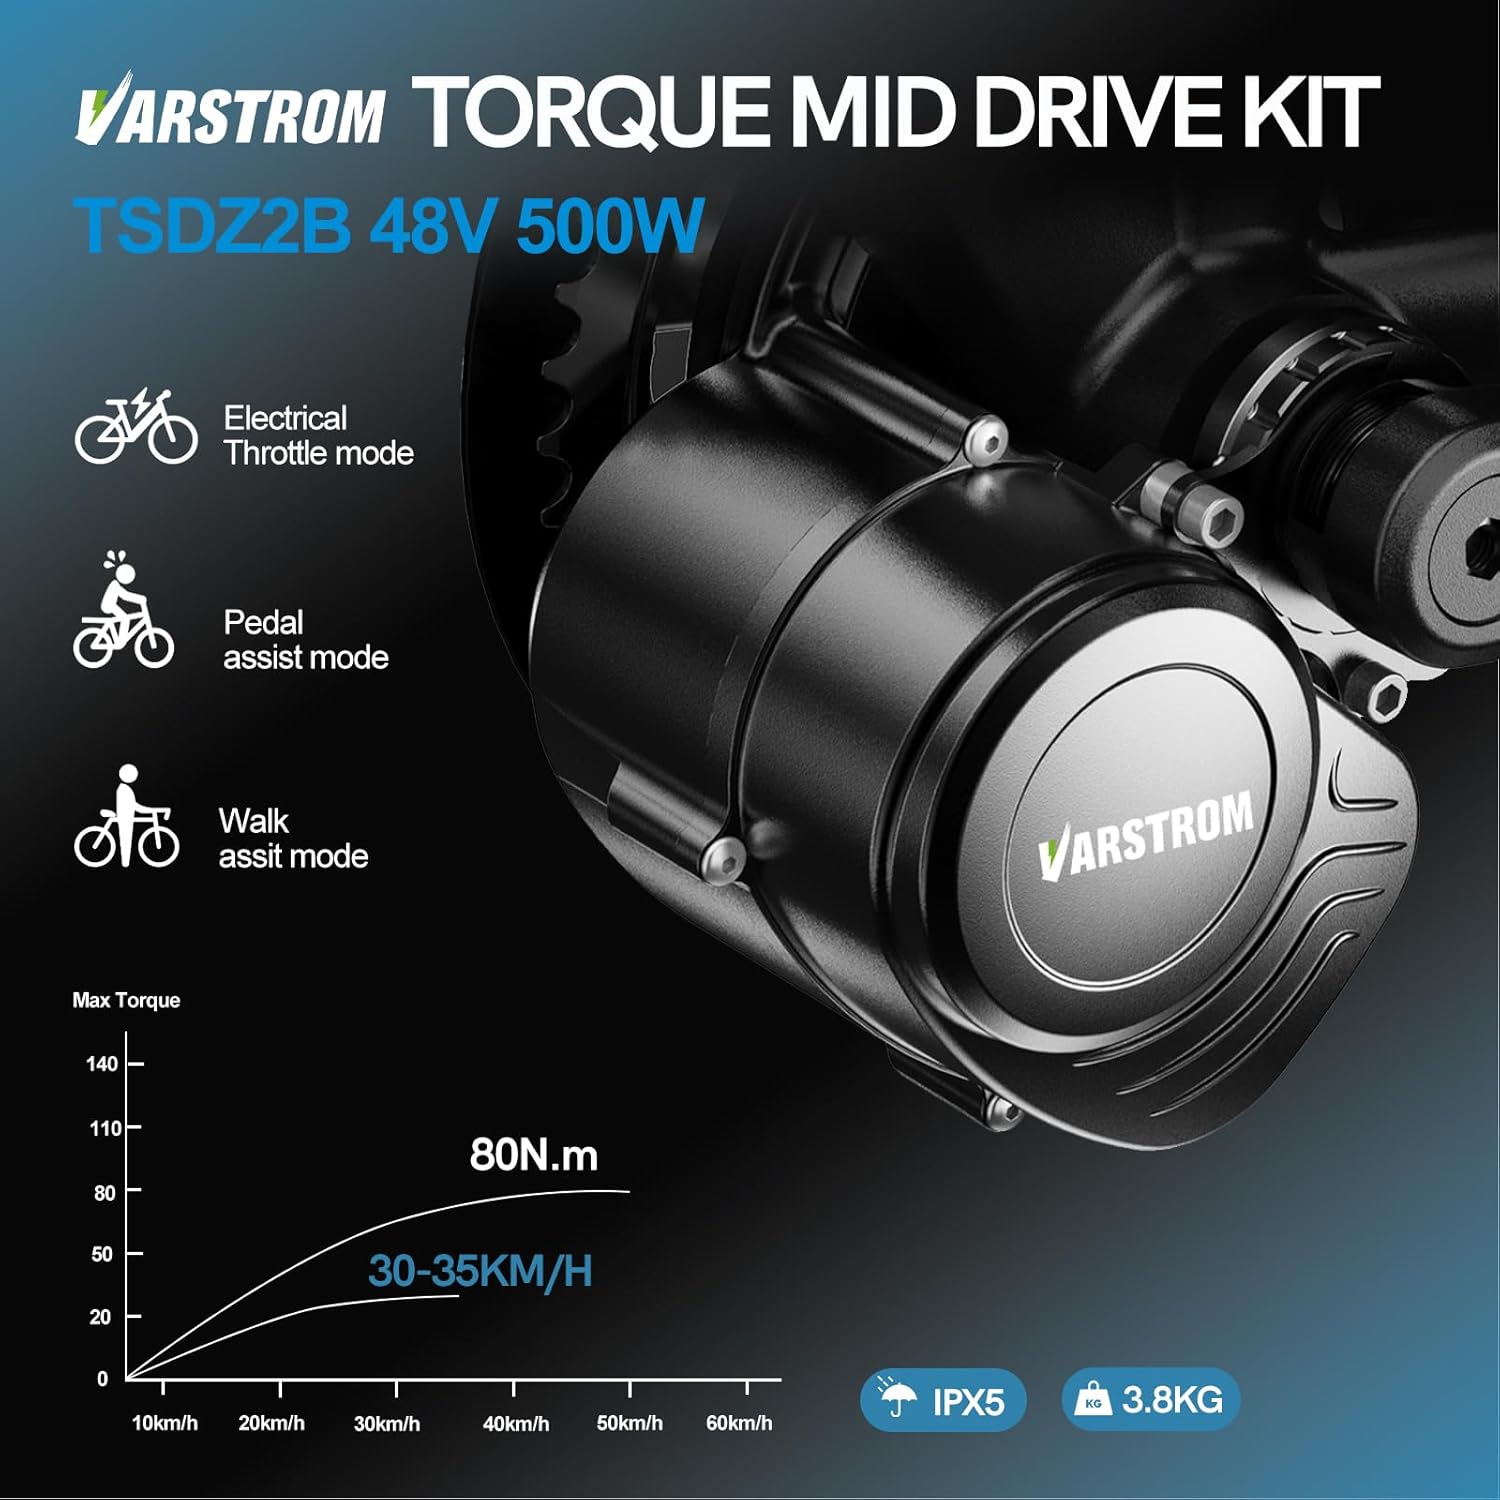
Image 5.1: Illustration of the three primary assist modes: Electrical Throttle, Pedal Assist, and Walk Assist.
- Pedal Assist Mode: The motor provides assistance proportional to your pedaling effort, detected by the torque sensor. This creates a smooth and natural riding feel. You can typically adjust the level of assistance via the display unit.
- Electrical Throttle Mode: If equipped with a thumb throttle, you can engage the motor independently of pedaling. This mode is useful for quick acceleration or maintaining speed without pedaling.
- Walk Assist Mode: This mode provides low-speed assistance, typically around 6 km/h, to help you push the bicycle when walking alongside it. Activate this feature via the display unit.
5.3 Display Functions
Your display unit provides real-time information and allows you to control various settings. Common functions include:
- Current Speed
- Battery Level Indicator
- Assist Level Selection
- Trip Distance / Odometer
- Error Codes (if any)
- Headlight Control (if connected)
Refer to your specific display's manual for detailed instructions on its features and settings.
6. Maintenance
Regular maintenance ensures the longevity and optimal performance of your Varstrom Mid Drive Motor Kit.
- Cleaning: Keep the motor unit and electrical connections clean and free from dirt and debris. Use a damp cloth; avoid high-pressure washing directly on electrical components.
- Battery Care: If using an optional battery, follow the manufacturer's guidelines for charging, storage, and temperature. Avoid fully discharging the battery and store it in a cool, dry place.
- Cable Inspection: Periodically check all cables and connectors for wear, damage, or loose connections. Ensure waterproof connections are properly sealed.
- Fastener Check: Regularly inspect all mounting bolts and nuts, especially those securing the motor to the bottom bracket, to ensure they are tight.
- Chain and Drivetrain: Maintain your bicycle's chain and drivetrain (chainwheel, cassette, derailleur) as you would a regular bike. Keep the chain lubricated and clean.
- Software Updates: Check the Varstrom website or contact support for any available firmware updates for your motor or display.
7. Troubleshooting
This section addresses common issues you might encounter. For more complex problems, contact Varstrom customer support.
7.1 No Power to Display/Motor
- Check Battery: Ensure the battery is fully charged and securely connected.
- Check Connections: Verify all electrical connections, especially the main power cable from the battery to the motor and the display cable.
- Power Button: Confirm the power button on the display is pressed correctly.
7.2 Motor Not Assisting
- Assist Level: Ensure a pedal assist level is selected on the display (not '0' or 'off').
- Speed Sensor: Check if the speed sensor is correctly installed and the magnet passes close enough to it. A loose or misaligned sensor can prevent assistance.
- Brake Levers/Sensors: Ensure brake levers are not engaged, as they cut off motor power. Check if brake sensors are properly installed and not stuck.
- Error Codes: Look for any error codes displayed on your screen and refer to your display manual for their meaning.
7.3 Unusual Noises from Motor
- Loose Components: Check for any loose bolts or components on the motor or chainwheel.
- Chain Alignment: Ensure the chain is properly aligned and not rubbing against the motor casing or chain guard.
- Internal Issue: If the noise persists and is internal to the motor, discontinue use and contact support.
8. Warranty and Support
8.1 Warranty Information
Varstrom offers a limited warranty for its products. The warranty typically includes:
- 30 days return policy.
- 365 days repair or replacement for manufacturing defects.
Please retain your proof of purchase for warranty claims. The warranty does not cover damage due to improper installation, misuse, neglect, accidents, or unauthorized modifications.
8.2 Customer Support
For technical assistance, troubleshooting beyond this manual, or warranty inquiries, please contact Varstrom customer support through the retailer where you purchased the product or visit the official Varstrom website for contact information.


