1. Introduction
This manual provides comprehensive instructions for the Poolin EOC06 Embroidery Machine and the Poolin EOC02 Sewing Machine. These machines are designed to offer a complete creative experience, combining functional sewing with decorative embroidery capabilities. The EOC06 embroidery machine features a maximum embroidery area of 7.9x11 inches, suitable for various projects including clothing, bedding, and accessories. The EOC02 sewing machine includes 200 built-in stitches for diverse sewing applications.

Figure 1.1: Poolin EOC06 Embroidery Machine (top) and EOC02 Sewing Machine (bottom) with included accessories.
2. Setup and Assembly
2.1 Unboxing and Initial Inspection
Carefully remove all components from the packaging. Verify that all listed accessories are present. Inspect both machines for any signs of damage incurred during transit. Retain the original packaging for future storage or transport.
2.2 Power Connection
Connect the power cord to the machine's power input port and then to a suitable electrical outlet. Ensure the power switch is in the OFF position before connecting. Refer to the machine's label for specific voltage requirements.
2.3 Attaching Components (Embroidery Machine)
For the EOC06 Embroidery Machine, attach the embroidery unit to the main machine body as per the instructions provided in the quick guide. Ensure it is securely fastened. Select the appropriate embroidery hoop for your project size. The machine comes with 5.5x5.5 inch (x2), 8x8 inch (x1), and 7.9x11 inch (x1) hoops.
3. Operating Instructions
3.1 Poolin EOC06 Embroidery Machine Operation
The EOC06 features a 7-inch LCD touchscreen for intuitive control. Designs can be selected, configured, and initiated directly from this interface.

Figure 3.1: The 7-inch LCD Touchscreen interface for the EOC06 Embroidery Machine.
3.1.1 Starting Embroidery (3 Steps)
- Pattern Selection: Choose your desired embroidery pattern from the machine's built-in designs or load a custom design.
- Configuration: Adjust settings such as size, rotation, and color sequence.
- Embroidery Start: Initiate the embroidery process.
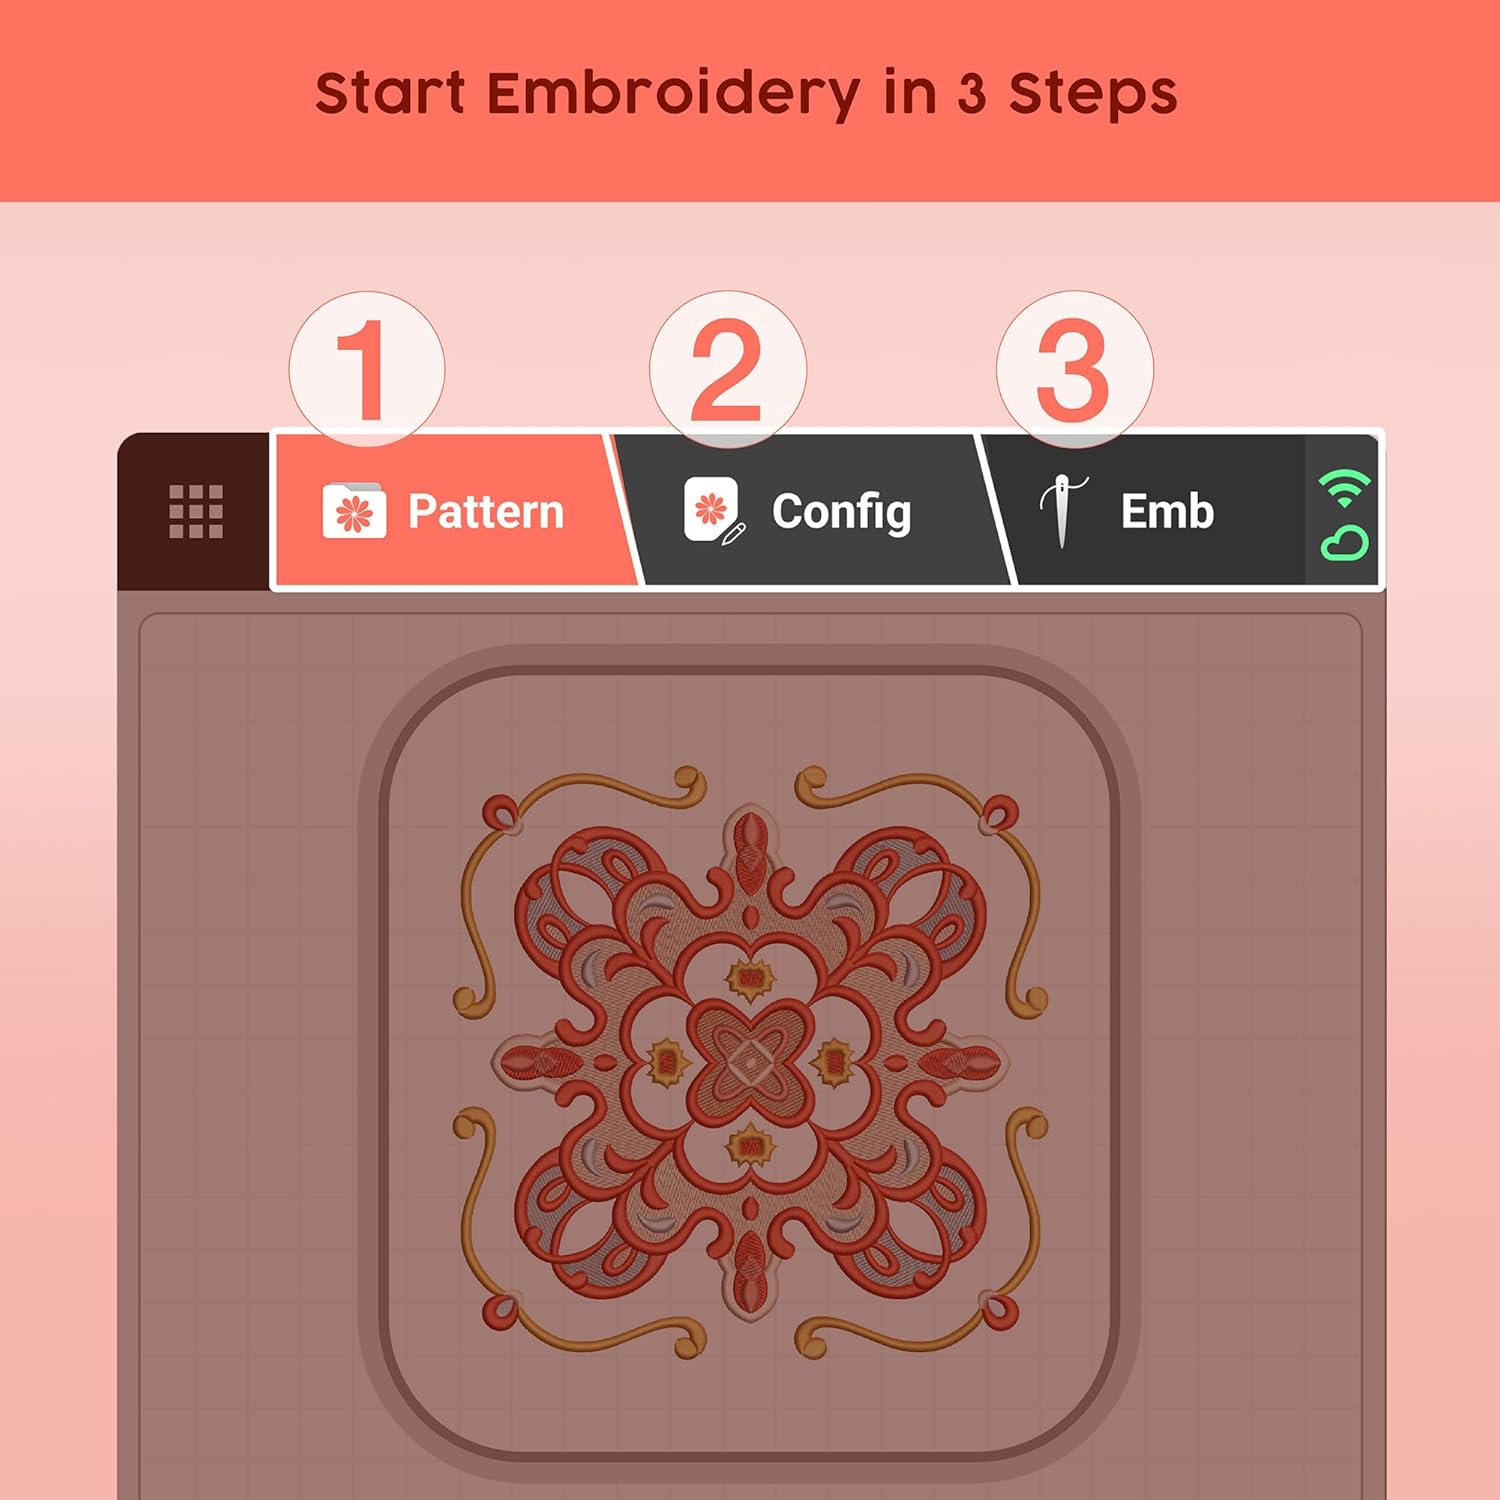
Figure 3.2: The three-step process for initiating embroidery on the EOC06.
3.1.2 Letter Embroidery
The EOC06 supports letter embroidery, allowing users to personalize projects with text. Access the alphanumeric patterns through the touchscreen interface to create custom lettering.

Figure 3.3: Interface for selecting and configuring letter embroidery.
3.1.3 Embroidery Applications
The large embroidery area and versatile features make the EOC06 suitable for various applications, including designs on bags, wallets, scarves, towels, pillowcases, napkins, sleeves, pant legs, and side panels of shirts, jackets, and hoodies.

Figure 3.4: Examples of items embellished with embroidery using the EOC06.
3.2 Poolin EOC02 Sewing Machine Operation
The EOC02 sewing machine offers 200 built-in stitches, including utility, decorative, and alphanumeric patterns. These are clearly displayed on the LCD screen for easy selection.

Figure 3.5: A sample displaying the variety of 200 built-in stitches available on the EOC02.
3.2.1 Stitch Selection and Adjustment
The LCD with stitch guide allows for easy selection of stitches and adjustment of width and length. The machine comes with 7 different presser feet, each designed for specific sewing applications, from basic straight stitching to more advanced techniques.

Figure 3.6: The LCD screen of the EOC02 showing stitch selection and adjustment options.
3.2.2 Sewing Applications
The EOC02 is suitable for sewing garments, quilts, and various crafts. Its versatility complements the embroidery capabilities of the EOC06, allowing for a seamless workflow from stitching to embellishing.

Figure 3.7: Examples of items created using the EOC02 Sewing Machine.
4. Maintenance
Regular maintenance ensures the longevity and optimal performance of your Poolin machines. Keep both the EOC06 and EOC02 clean from lint and thread debris, especially around the bobbin area and feed dogs. Use a soft brush or vacuum cleaner designed for electronics. Periodically apply sewing machine oil to designated lubrication points as indicated in the quick guide or a more detailed service manual if available. Always disconnect power before performing any cleaning or maintenance.
5. Troubleshooting
This section addresses common issues you might encounter during operation. For more complex problems, refer to the online resources or contact customer support.
5.1 Common Embroidery Machine Issues
- Thread Breakage: Check thread tension, ensure proper threading, inspect needle for damage, and verify the bobbin is correctly inserted.
- Skipped Stitches: Replace the needle, ensure it is inserted correctly, and check the fabric and stabilizer combination.
- Design Distortion: Ensure fabric is properly hooped with adequate tension and appropriate stabilizer is used.
5.2 Common Sewing Machine Issues
- Uneven Stitches: Verify correct thread tension for both upper and bobbin threads.
- Fabric Jamming: Ensure proper needle size for fabric, clean the bobbin case, and avoid pulling fabric forcefully.
- Machine Noise: Lubricate the machine as per maintenance guidelines, check for loose parts, or clean accumulated lint.
If issues persist after attempting these solutions, please contact Poolin customer support.
6. Specifications
| Feature | EOC06 Embroidery Machine | EOC02 Sewing Machine |
|---|---|---|
| Model Number | EOC06 | EOC02 |
| Max Embroidery Area | 7.9 x 11 inches | N/A |
| Included Hoops | 2x (5.5x5.5 inch), 1x (8x8 inch), 1x (7.9x11 inch) | N/A |
| Built-in Stitches | N/A (Embroidery Patterns) | 200 (Utility, Decorative, Alphanumeric) |
| Display | 7-inch LCD Touchscreen | LCD with Stitch Guide |
| Presser Feet | Standard embroidery foot | 7 different presser feet |
| ASIN | B0FFSMDYSW | |
7. Warranty and Support
Poolin provides comprehensive support for its products. For assistance, you can utilize the following resources:
- Social Media Support: Search "Poolin Embroidery Machine Groups" on Facebook to join the community. This group offers one-to-one after-sales service from engineers.
- Official YouTube Channel: Visit the official "Poolin" YouTube channel for teaching videos and real usage feedback.

Figure 7.1: Poolin's social media support channels for customer assistance.
For specific warranty details, please refer to the documentation included with your product or contact Poolin customer service directly through their official channels.


