
1. Introduction
The HIKVISION HiWatch HWD-7104MH-G4(E) is a professional 5-in-1 Digital Video Recorder (DVR) designed for advanced surveillance solutions. This DVR supports multiple video input technologies including HDTVI, HDCVI, AHD, CVBS, and IP cameras, with compatibility for cameras up to 8 MP resolution. It offers efficient recording using advanced compression formats such as H.265 Pro+/H.265+/H.264+, synchronized 4-channel playback, and intelligent features like AI 2.0-based motion detection for people and vehicles.
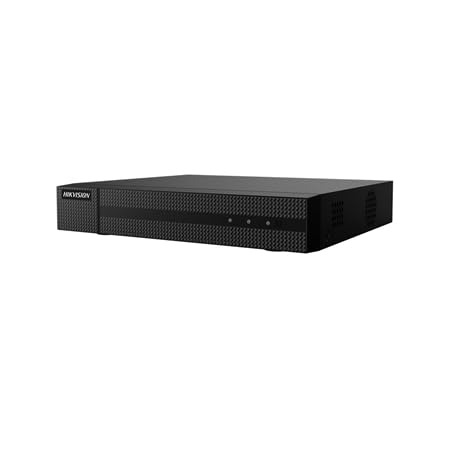
Figure 1: Front view of the HIKVISION HWD-7104MH-G4(E) DVR. This image shows the compact design of the unit.
2. Key Features
- Multi-Technology Support: Compatible with 5 video technologies: IP, HDCVI, HDTVI, AHD, and CVBS.
- High-Resolution Input: Supports up to 4 analog BNC channels, each up to 8 MP, and up to 4 additional IP channels (enhanced mode) also up to 8 MP.
- Advanced Video Compression: Utilizes H.265 Pro+, H.265 Pro, H.265, H.264+, and H.264 formats for efficient storage.
- Synchronized Playback: Allows simultaneous playback of 4 channels.
- Video Outputs: Features simultaneous HDMI and VGA outputs at 1080p resolution.
- Intelligent Motion Detection: Includes AI 2.0-based motion detection capable of distinguishing between people and vehicles.
- Audio Capabilities: Provides 1 RCA audio input and 1 RCA audio output, plus 4 coaxial audio inputs (G.711u format).
- Storage: Supports 1 SATA HDD up to 10 TB capacity (HDD not included).
- Network Connectivity: Full network connectivity with RJ45 Ethernet (10/100M), support for P2P, DDNS, Onvif, and WiFi via USB dongle.
- Remote Access: Supports remote access via web browser and Hik-Connect app for up to 32 simultaneous users.
3. Package Contents
Verify that all items are present in the package:
- HIKVISION HWD-7104MH-G4(E) DVR Unit
- External Power Supply (12 V DC, 1.5 A)
- User Manual (this document)
- Mounting Screws for HDD (if applicable, check packaging)
- SATA Cables (if applicable, check packaging)
Note: Hard Disk Drive (HDD) is not included and must be purchased separately.
4. Setup
4.1. Hard Disk Drive (HDD) Installation
The DVR requires a SATA HDD for video storage (up to 10 TB). Follow these steps to install the HDD:
- Power Off: Ensure the DVR is powered off and disconnected from the power source.
- Open Casing: Unscrew and remove the top cover of the DVR.
- Connect Cables: Connect the SATA data cable and SATA power cable to the HDD.
- Mount HDD: Align the HDD with the mounting holes in the DVR chassis and secure it with the provided screws.
- Close Casing: Replace the top cover and secure it with screws.
Important: Handle the HDD with care to avoid damage.
4.2. Physical Connections
Connect the necessary cables to the rear panel of the DVR:
- Video Inputs (BNC): Connect your analog HDTVI, HDCVI, AHD, or CVBS cameras to the BNC ports.
- Video Outputs (HDMI/VGA): Connect a monitor to either the HDMI or VGA port for local display.
- Audio Input/Output (RCA): Connect external audio devices if required.
- Network (RJ45): Connect an Ethernet cable from the DVR to your network router or switch for network access.
- USB Ports: Connect a mouse for local control and/or a USB dongle for Wi-Fi connectivity (if supported and desired).
- Power Input: Connect the external power supply to the DVR's power input port.
Ensure all connections are secure before powering on the device.
4.3. Initial Power On and Configuration
- Power On: Plug the power adapter into an electrical outlet. The DVR will start automatically.
- First-Time Wizard: Upon first boot, a setup wizard will guide you through initial configurations such as language, date/time, network settings, and password creation.
- HDD Initialization: If an HDD is installed, the system will prompt you to initialize (format) it. This step is crucial for recording.
- Camera Detection: The DVR will automatically detect connected analog cameras. For IP cameras, you may need to add them manually through the network settings.
5. Operating Instructions
5.1. Live View
After setup, the DVR will display the live view of connected cameras on the monitor. You can switch between single-channel view and multi-channel grid views using the on-screen controls or mouse.
5.2. Recording
- Continuous Recording: Configured to record 24/7.
- Motion Detection Recording: Records only when motion is detected.
- Scheduled Recording: Records during specific time periods.
- Event Recording: Records based on alarms or other triggered events.
Access the Record Settings menu to configure recording schedules and modes for each channel. The DVR supports H.265 Pro+, H.265 Pro, H.265, H.264+, and H.264 compression formats.
5.3. Playback
To review recorded footage:
- From the live view, right-click and select Playback.
- Choose the desired date and time from the calendar.
- Select the channels you wish to play back. The DVR supports synchronized 4-channel playback.
- Use the playback controls (play, pause, fast forward, rewind) to navigate through the footage.
5.4. Motion Detection 2.0
The AI 2.0-based motion detection feature can differentiate between human and vehicle movement, reducing false alarms. To configure:
- Navigate to Configuration > Event > Motion Detection.
- Enable motion detection for the desired channels.
- Adjust sensitivity and define detection areas.
- Configure linkage actions, such as recording, notification, or alarm output.
5.5. Remote Access (Hik-Connect)
The Hik-Connect app allows remote viewing and management of your DVR from a smartphone or tablet. To set up:
- Ensure the DVR is connected to the internet.
- Enable the Hik-Connect service in the DVR's network settings.
- Download the Hik-Connect app from your device's app store.
- Create an account and add your DVR by scanning the QR code or entering the serial number.
Remote access is also possible via a web browser by entering the DVR's IP address.
6. Maintenance
6.1. Hard Disk Drive (HDD) Management
Regularly check the status of your HDD. If the HDD is full, the DVR will typically overwrite the oldest recordings. You can configure this behavior in the storage settings. Periodically back up important footage to an external storage device.
6.2. Firmware Updates
Hikvision periodically releases firmware updates to improve performance, add features, and address security vulnerabilities. Check the official Hikvision website for the latest firmware for your model. Follow the provided instructions carefully when performing updates to avoid damaging the device.
6.3. Cleaning
Keep the DVR unit clean and free from dust. Use a soft, dry cloth to wipe the exterior. Do not use liquid cleaners or abrasive materials. Ensure proper ventilation around the unit to prevent overheating.
7. Troubleshooting
| Problem | Possible Cause | Solution |
|---|---|---|
| No video output on monitor. | Loose HDMI/VGA cable, incorrect input selected on monitor, DVR not powered on. | Check cable connections. Ensure monitor is set to the correct input source. Verify DVR power. |
| Cameras not displaying. | Loose BNC cable, camera power issue, incorrect video standard. | Check camera connections and power. Ensure cameras are compatible with DVR's supported technologies (HDTVI, AHD, CVI, CVBS, IP). |
| No recording. | HDD not installed or initialized, recording schedule not set, HDD full. | Install and initialize HDD. Configure recording schedules. Check HDD status and capacity. |
| Cannot access DVR remotely. | Network connection issue, Hik-Connect not enabled, incorrect network settings. | Verify DVR's network connection. Ensure Hik-Connect is enabled and configured correctly. Check router settings (port forwarding if not using P2P). |
| Motion detection not working correctly. | Sensitivity too low/high, detection area not configured, AI 2.0 settings incorrect. | Adjust motion detection sensitivity and detection areas. Review AI 2.0 settings for people/vehicle detection. |
8. Specifications
| Feature | Detail |
|---|---|
| Model | HWD-7104MH-G4(E) |
| Video Formats | H.265 Pro+, H.265 Pro, H.265, H.264+, H.264 |
| Analog Video Inputs | 4 BNC channels (convertible to IP) |
| IP Video Inputs | Standard (4+2), Enhanced (4+4) - up to 8 MP |
| Recording Resolution | Up to 8 MP |
| Coaxial Compatibility | HDCVI, HDTVI, AHD, CVBS (PAL/NTSC) |
| Audio Input/Output | 1 RCA input / 1 RCA output + 4 coaxial audio inputs (G.711u) |
| Video Outputs | HDMI and VGA (1080p simultaneous) |
| Synchronized Playback | 4 channels |
| Storage | 1 SATA interface, up to 10 TB HDD capacity (HDD not included) |
| Network Interface | RJ45 Ethernet (10/100M), WiFi via USB dongle |
| Network Protocols | TCP/IP, DHCP, Hik-Connect, DDNS, NTP, HTTPS, etc. |
| Remote Access | Browser, Hik-Connect app, up to 32 users |
| Power Consumption | ≤15 W (without HDD) |
| Power Supply | 12 V DC, 1.5 A |
| Operating Temperature | -10°C to +55°C (14°F to 131°F) |
| Operating Humidity | 10% to 90% RH (non-condensing) |
| Dimensions (W × D × H) | 260 × 222 × 45 mm (10.2 × 8.7 × 1.8 inches) |
| Weight | ≤1.16 kg (2.56 lbs) (without HDD) |
9. Warranty and Support
For warranty information, please refer to the warranty card included with your product or visit the official Hikvision website. Technical support is available through Hikvision's authorized service centers and online resources. Please have your product model number (HWD-7104MH-G4(E)) and serial number ready when contacting support.
For the latest documentation, software, and support, please visit the official Hikvision support portal.


