
1. Introduction
Thank you for choosing the MISOL HP2561 Wireless Weather Station. This device provides comprehensive environmental monitoring with a 7-in-1 outdoor sensor array and a vibrant TFT color display console. This manual will guide you through the setup, operation, and maintenance of your weather station to ensure accurate and reliable performance.
2. Package Contents
Please verify that all components are present in your package:
- Display Console
- Outdoor Sensor Array (Thermo-hygrometer, Rain Gauge, Wind Speed, Wind Direction, Transmitter)
- 5V DC Adaptor
- USB to 2.5*0.7mm DC 5V Power Plug Connector Cable
3. Product Overview
The MISOL HP2561 system consists of two main units: the Display Console and the Outdoor Sensor Array.
3.1 Display Console
The display console features a TFT color screen that shows indoor temperature, humidity, air pressure, and all data transmitted from the outdoor sensor array. It also supports WiFi connectivity for real-time data access and cloud integration.

An overview of the MISOL HP2561 Wireless Weather Station, showing the main display console and the integrated outdoor sensor array.
Display Console Components:
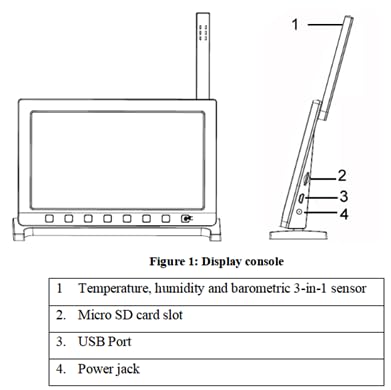
Detailed diagram of the display console, indicating its various ports and sensors.
| No. | Description |
|---|---|
| 1 | Temperature, humidity and barometric 3-in-1 sensor |
| 2 | Micro SD card slot |
| 3 | USB Port |
| 4 | Power jack |
3.2 Outdoor Sensor Array
The solar-powered 7-in-1 outdoor sensor array measures wind speed, wind direction, temperature, humidity, rainfall, UV, and light. It transmits data wirelessly to the display console.
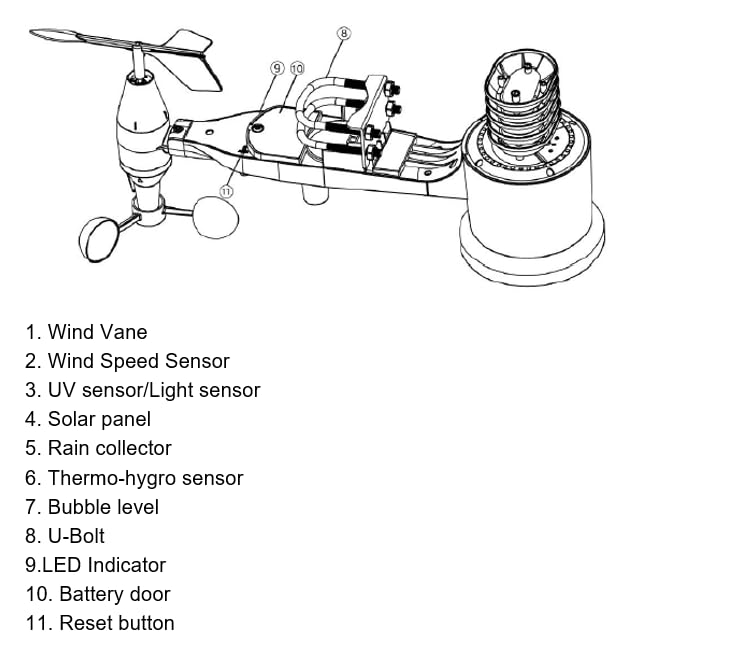
A diagram of the outdoor sensor array with numbered labels pointing to its various components.
| No. | Description |
|---|---|
| 1 | Wind Vane |
| 2 | Wind Speed Sensor |
| 3 | UV sensor/Light sensor |
| 4 | Solar panel |
| 5 | Rain collector |
| 6 | Thermo-hygro sensor |
| 7 | Bubble level |
| 8 | U-Bolt |
| 9 | LED Indicator |
| 10 | Battery door |
| 11 | Reset button |
4. Setup
4.1 Outdoor Sensor Array Installation
Proper placement of the outdoor sensor array is crucial for accurate readings. Choose an open location away from obstructions like buildings, trees, or fences that could block wind or rain. Ensure the solar panel receives adequate sunlight.
- Assembly: Assemble the wind cups, wind vane, and rain collector according to the instructions provided in the separate assembly guide (if applicable).
- Mounting: Mount the sensor array using the included U-bolts to a pole (not included). Ensure the array is level using the integrated bubble level (7).
- Orientation: Orient the wind vane correctly, typically pointing north, for accurate wind direction readings.
- Power: The outdoor sensor is solar-powered with a super capacitor and AA battery backup. Ensure batteries are installed for continuous operation during low light conditions.
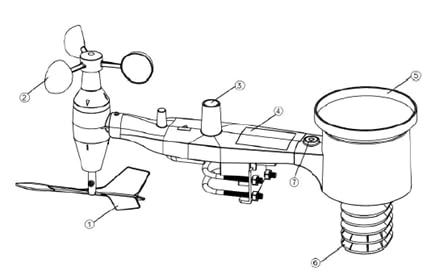
The 7-in-1 outdoor sensor array shown mounted on a pole for illustrative purposes. Please note that the mounting pole is not included with the product.
4.2 Display Console Setup
- Power On: Connect the 5V DC adaptor to the power jack (4) on the display console. The console will power on automatically.
- Sensor Pairing: The display console will automatically search for and connect to the outdoor sensor array. This may take a few minutes. Ensure the outdoor sensor is powered on and within the 100m (330ft) transmission range.
- Initial Settings: Follow the on-screen prompts to set the time, date, and preferred units of measurement (e.g., °C/°F, km/h/mph).
4.3 WiFi Connection
Connecting your display console to WiFi enables real-time data access and uploads to online weather services.
- Access WiFi Settings: Navigate to the WiFi settings menu on the display console. Refer to the on-screen interface for specific menu navigation.
- Connect to Network: Select your 2.4GHz WiFi network from the list and enter the password.
- Confirmation: Once connected, a WiFi icon will appear on the display, indicating a successful connection.
5. Operating Instructions
5.1 Understanding the Display Interface
The TFT color screen provides a clear overview of current and historical weather data. Key information displayed includes:
- Indoor/Outdoor Temperature and Humidity
- Wind Speed and Direction
- Rainfall (daily, weekly, monthly, yearly)
- UV Index and Light Intensity
- Barometric Pressure
- Time and Date
Use the buttons on the console to navigate through different display modes, view historical data, and access settings.
5.2 Data Upload to Cloud Services
The HP2561 supports uploading data to various online weather platforms, allowing you to view your weather data remotely and share it with communities.
- Supported Platforms: The station is compatible with Weathercloud, Ecowitt.net, Wunderground, and WOW.
- Configuration: Access the 'Server Settings' or 'Cloud Services' menu on your display console. You will need to enter your account credentials (e.g., Station ID, Key) for each service you wish to use.
- Third-Party Integration: The system also supports integration with third-party servers for smart home applications. Refer to the specific third-party documentation for setup details.
6. Maintenance
6.1 Sensor Cleaning
Regular cleaning ensures the accuracy and longevity of your outdoor sensor array.
- Rain Collector: Periodically check and clean the rain collector funnel for leaves, insects, or debris that could obstruct rainfall measurement.
- Wind Sensors: Ensure the wind cups and wind vane spin freely. Remove any obstructions.
- Thermo-Hygro Sensor: Keep the radiation shield clean to allow proper airflow around the temperature and humidity sensors.
6.2 Battery Replacement
The outdoor sensor array uses AA batteries as a backup power source. Replace them annually or when the low battery indicator appears on the display console.
- Locate the battery door (10) on the outdoor sensor array.
- Open the battery compartment and replace the old batteries with new, high-quality AA batteries.
- Close the battery door securely.
7. Troubleshooting
- No Outdoor Data: Check if the outdoor sensor array is powered on and within range. Press the reset button (11) on the outdoor sensor if necessary.
- Incorrect Readings: Ensure the sensor array is properly installed, level, and free from obstructions. Clean sensors as described in the maintenance section.
- WiFi Connection Issues: Verify your WiFi password and ensure the console is within range of your 2.4GHz router. Restart both the console and your router if problems persist.
- Display Not Responding: Disconnect and reconnect the power adapter to the display console to perform a restart.
8. Specifications
| Feature | Detail |
|---|---|
| Model Number | HP2561 |
| Product Dimensions | 46 x 29 x 19 cm |
| Wireless Frequency | 433MHz (Sensor to Console) |
| WiFi Frequency | 2.4GHz (Console to Router) |
| Transmission Range | 100m (330ft) line of sight |
| Outdoor Sensor Power | Solar (super capacitor) with AA battery backup |
| Display Console Power | 5V DC Adaptor |
| Data Storage | Micro SD card (up to 16GB, not included) |
| Supported Cloud Services | Weathercloud, Ecowitt.net, Wunderground, WOW |
| Included Components | Stand |
9. Optional Accessories
The MISOL HP2561 weather station can be expanded with various optional sensors to enhance its monitoring capabilities.
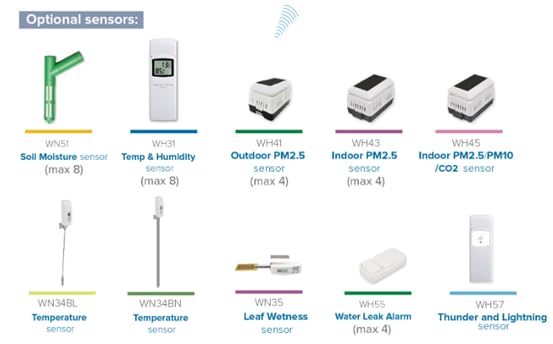
An illustration of additional sensors that can be integrated with the weather station, including soil moisture, temperature & humidity, PM2.5, leaf wetness, water leak alarm, and thunder/lightning sensors.
Compatible optional sensors include:
- Soil Moisture Sensor (WN51)
- Temperature & Humidity Sensor (WH31)
- Outdoor PM2.5 Sensor (WH41)
- Indoor PM2.5 Sensor (WH43)
- Indoor PM2.5/PM10/CO2 Sensor (WH45)
- Temperature Sensor (WN34BL, WN34BN)
- Leaf Wetness Sensor (WN35)
- Water Leak Alarm (WH55)
- Thunder and Lightning Sensor (WH57)
These sensors can be purchased separately and integrated with your HP2561 system for more specialized environmental monitoring.
10. Warranty and Support
For warranty information and technical support, please refer to the documentation provided with your purchase or contact MISOL customer service through their official website. Keep your purchase receipt as proof of purchase.
