1. Introduction
Thank you for choosing the COSTWAY Carport. This manual provides essential information for the correct assembly, safe use, and proper maintenance of your carport. Please read these instructions carefully before beginning assembly and retain them for future reference.
Product Name: COSTWAY Carport
Model Number: ZB34809NW+IT
Dimensions: 440 x 300 x 250 cm (Length x Width x Height)
Material: Galvanized Metal, Metal
Color: Black
2. Safety Information
WARNING: Failure to follow these safety instructions may result in serious injury or property damage.
- Ensure the carport is properly anchored to the ground to guarantee stability and safety, especially in strong winds or heavy snow.
- Do not use in areas with heavy snow without adequate support. The roof is designed to withstand a snow load of up to 120 kg.
- Regularly inspect all connections and anchors to ensure they remain secure.
- Keep children and pets away from the assembly area.
- Wear appropriate safety gear during assembly, including gloves and eye protection.
- Do not climb on the carport structure.
- Avoid placing heat sources or open flames near the carport.
3. Package Contents
Before assembly, verify that all components listed below are present and undamaged. If any parts are missing or damaged, please contact customer support.
- 1 x Carport Structure
- 1 x Waterproof Tape
- 2 x Rubber Strips (for edge protection)
- 1 x User Manual
- 4 x Base Anchors
- 12 x Additional Ground Anchors (Expansion Screws)
- Necessary Screws and Washers

Image: Product dimensions and included components. The diagram illustrates the overall dimensions of the carport (440cm L x 300cm W x 250cm H) and lists the rubber strips, expansion screws, and waterproof tape.
4. Setup and Assembly
Assembly requires at least two people. Follow the steps carefully to ensure proper and safe installation.
4.1 Site Preparation
- Choose a level, stable surface for installation.
- Clear the area of any debris, rocks, or obstacles.
- Ensure there is sufficient space around the carport for assembly and future use.
4.2 Frame Assembly
- Unpack all components and lay them out, identifying each part according to the parts list (refer to the included manual diagram).
- Assemble the main frame structure using the provided metal tubes and connectors. Ensure all connections are secure.
- Attach the 4 inclined legs to the main frame for enhanced structural support.
- Install the 5 reinforced beams to the roof structure, ensuring they are properly aligned to provide superior strength and pressure resistance.

Image: Structural components. This image highlights the 5 reinforced beams for pressure resistance, the 4 additional inclined legs for structural support, and the 4 base anchors with 12 ground anchors for stability.
4.3 Roof Panel Installation
- Carefully place the sprayed steel roof panels onto the assembled frame.
- Secure the roof panels using the provided screws and washers. Ensure all screws are tightened to prevent water leakage.
- Apply the waterproof tape to all joints and seams of the roof panels to enhance rain resistance.
- Install the 2 rubber strips along the curved edges of the roof for protection against accidental bumps and to increase overall durability.
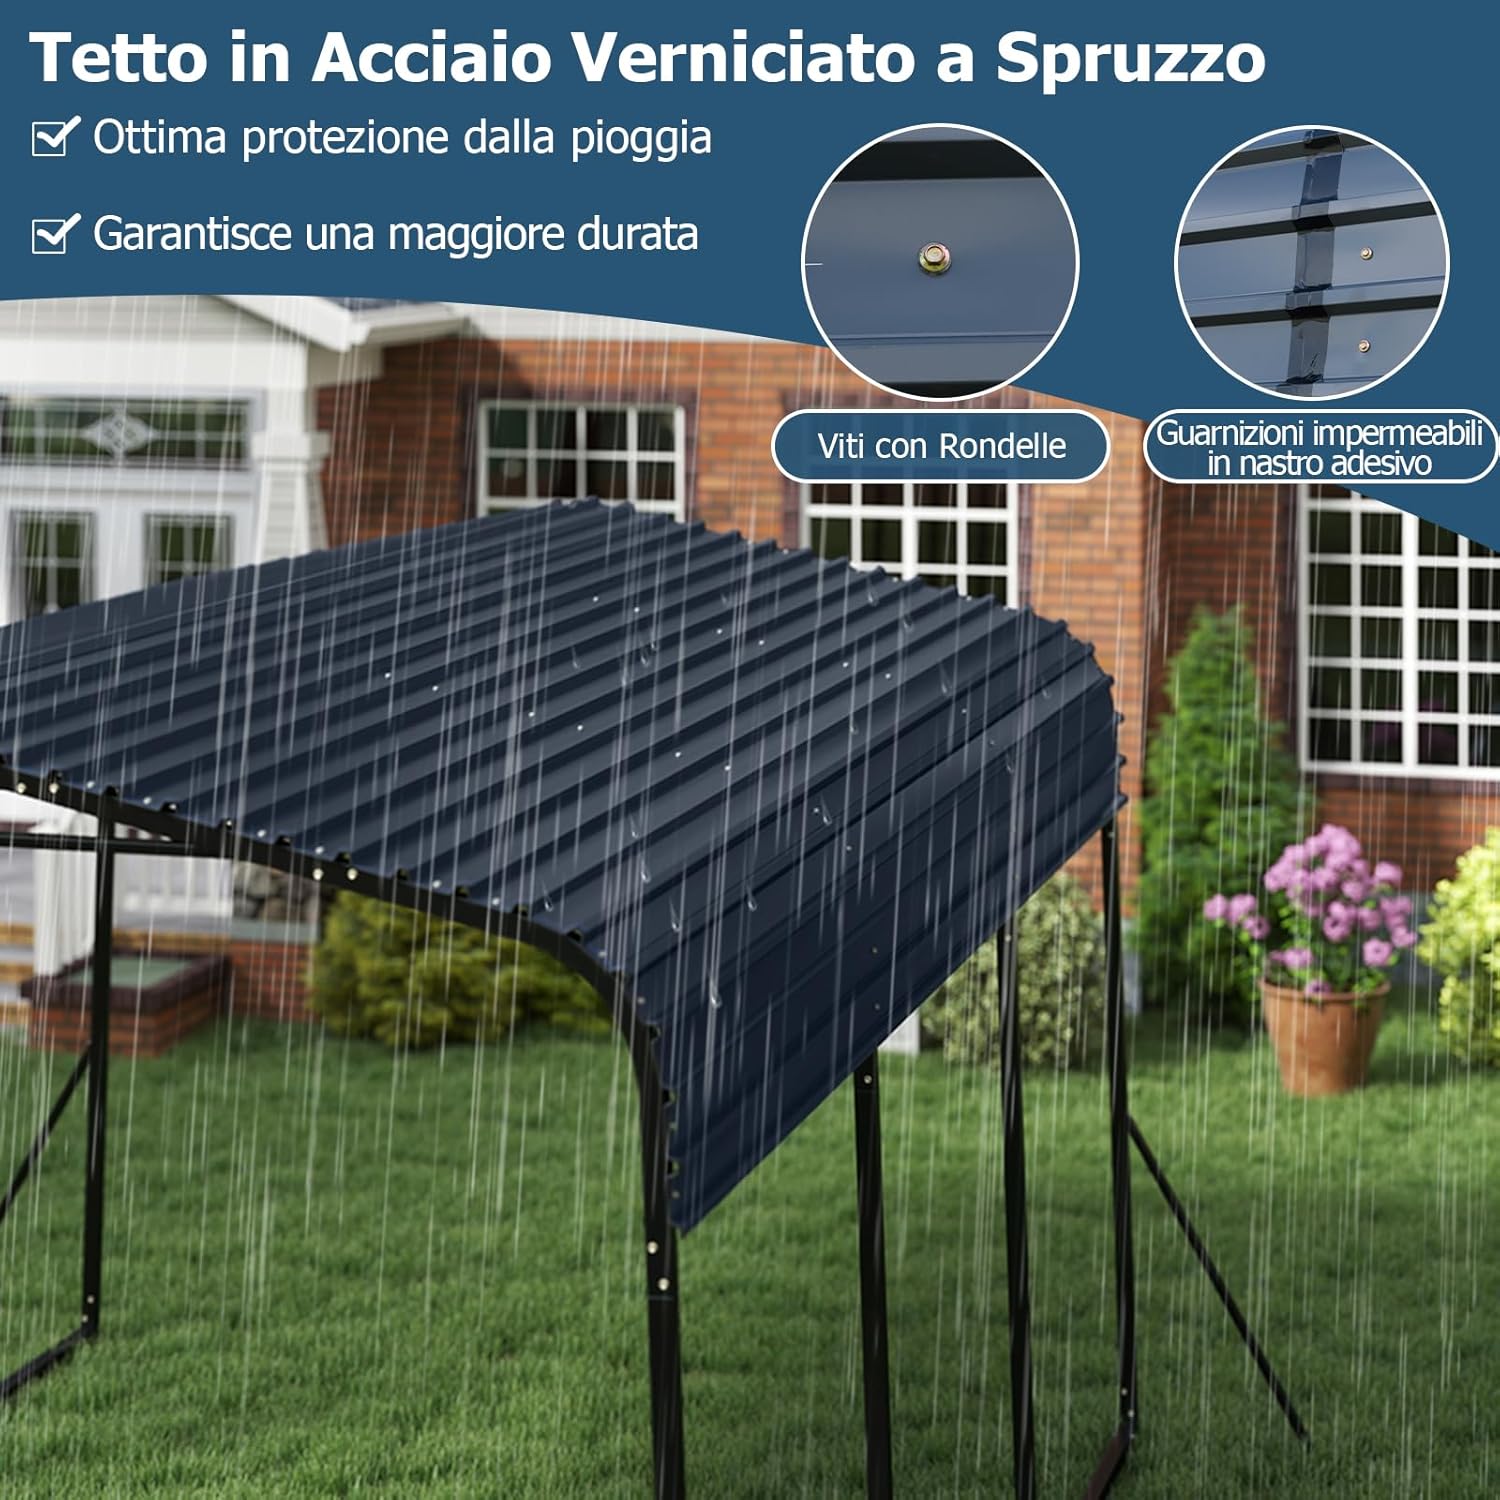
Image: Roof panel details. This close-up shows the sprayed steel roof, emphasizing the use of screws with washers for secure fastening and waterproof tape for sealing joints, ensuring excellent rain protection and durability.
4.4 Anchoring the Carport
- Once the structure is fully assembled, secure the carport to the ground using the 4 base anchors and the 12 additional ground anchors (expansion screws).
- Ensure all anchors are firmly embedded into the ground to prevent the carport from overturning, especially in windy conditions.

Image: Assembled carport. A white sedan is parked under the assembled COSTWAY carport, demonstrating its primary use as vehicle shelter.
5. Operating and Use
The COSTWAY Carport is designed for versatile outdoor use, providing shelter and storage solutions.
5.1 Intended Use
- Vehicle Shelter: Protects cars, SUVs, and other vehicles from sun, rain, and light snow.
- Outdoor Gazebo: Can be used as a shaded area for outdoor activities, parties, and barbecues.
- Garden Tool Storage: Provides a sheltered space for storing garden equipment and tools.

Image: Carport in use. An SUV is parked under the carport in a residential driveway, illustrating its function as a vehicle shelter.

Image: Carport as an outdoor gazebo. The carport is shown covering a patio area with outdoor seating, demonstrating its versatility for events and gatherings.
5.2 Additional Features
- Ceiling Hooks: Two ceiling hooks are provided for hanging decorative lanterns or other lightweight items, enhancing functionality and ambiance.
- Side Wall Extension: The design includes a side wall extension that improves visual appeal and offers additional protection.
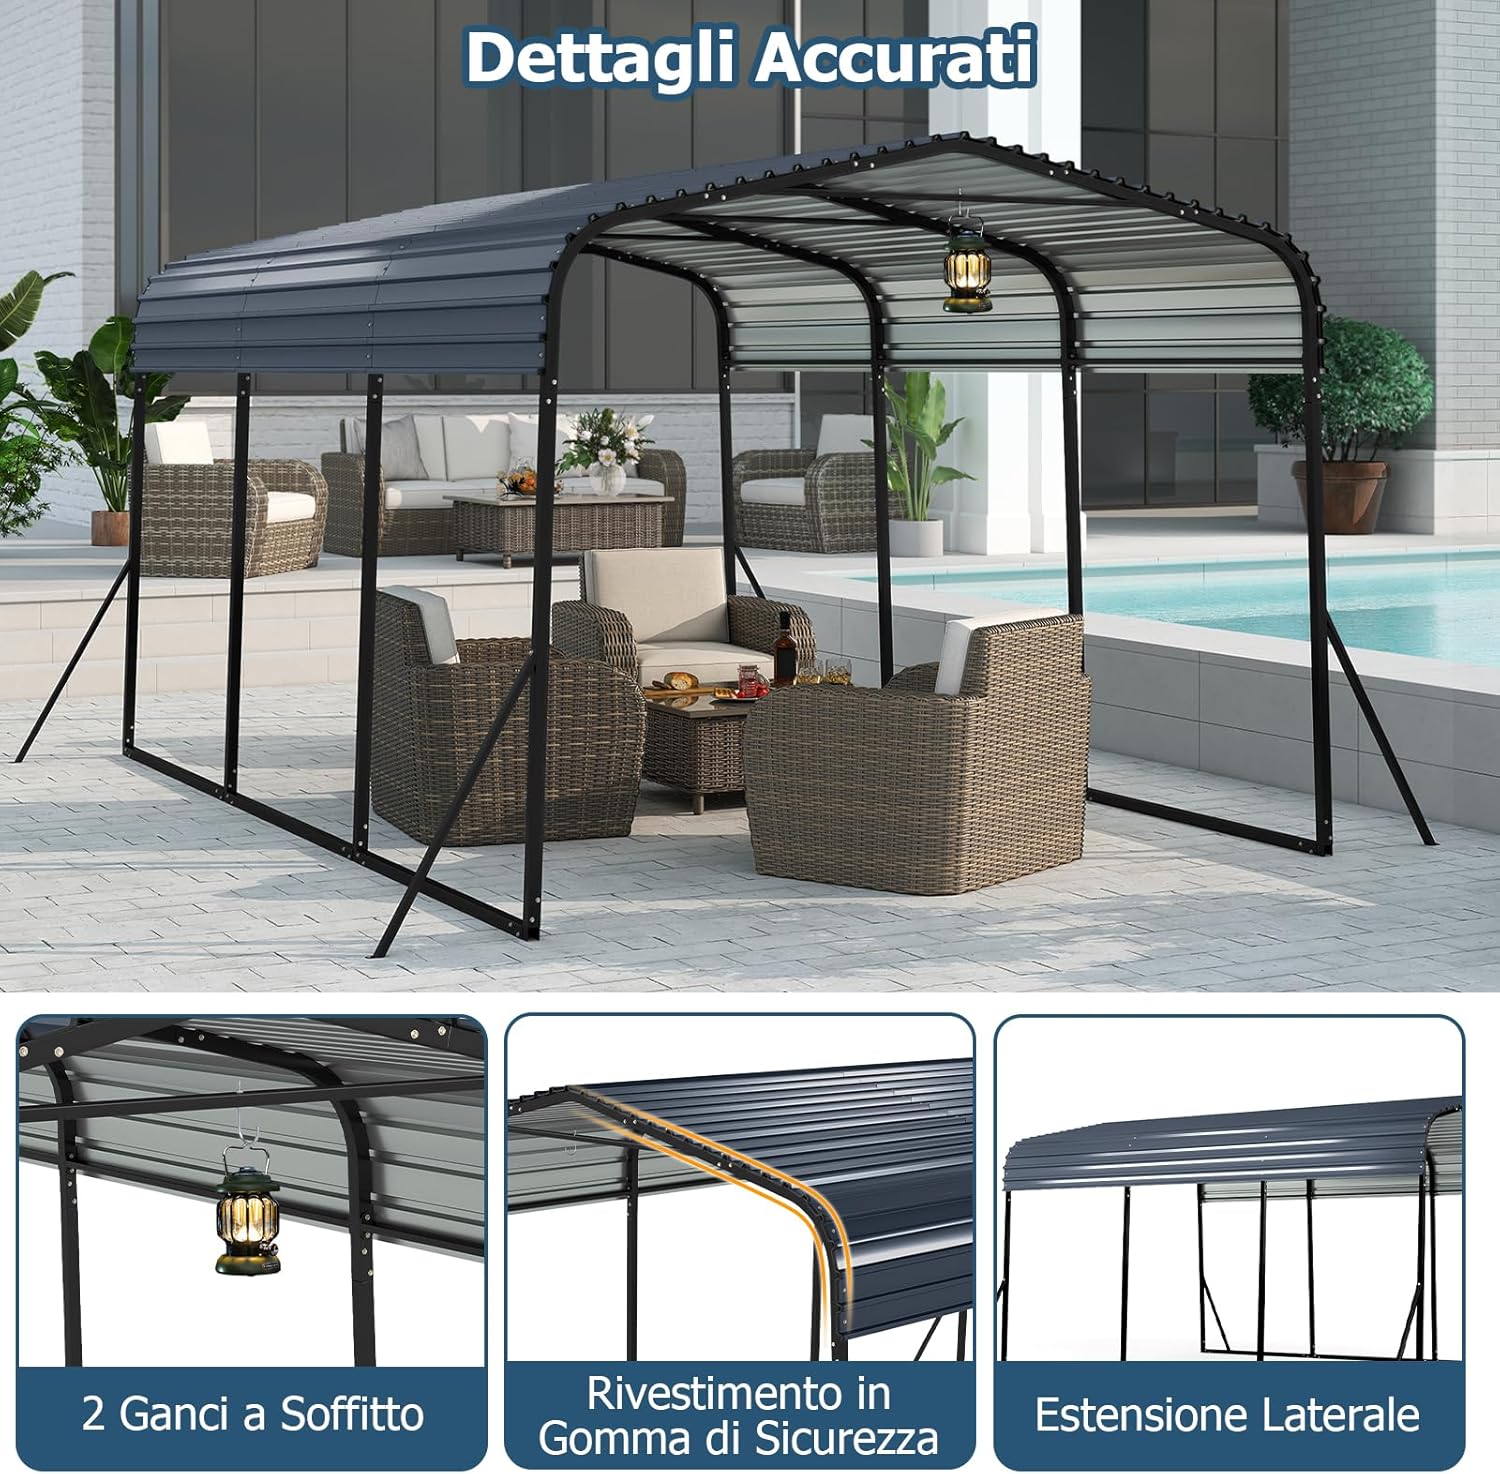
Image: Detailed features. This image highlights the two ceiling hooks for hanging, the rubber safety coating on the curved edges, and the side extension of the carport.
6. Maintenance
Regular maintenance will extend the lifespan of your COSTWAY Carport.
- Cleaning: Clean the metal frame and roof panels periodically with mild soap and water. Avoid abrasive cleaners or harsh chemicals that could damage the finish.
- Inspection: Regularly check all bolts, screws, and anchors for tightness. Re-tighten any loose fasteners.
- Snow Removal: In areas with heavy snowfall, regularly remove accumulated snow from the roof to prevent excessive load and potential damage, even though it supports up to 120 kg.
- Rust Prevention: Inspect the metal frame for any signs of rust. If rust appears, clean the area and apply a rust-inhibiting paint to prevent further corrosion.
- Rubber Strips: Ensure the rubber strips on the edges remain intact and in place for continued protection.
7. Troubleshooting
This section addresses common issues you might encounter with your carport.
- Issue: Carport feels unstable or sways in wind.
- Solution: Verify that all base anchors and ground anchors are securely fastened. Ensure the installation surface is level. Consider adding additional anchoring points in extremely windy areas.
- Issue: Water leakage from the roof.
- Solution: Check all roof panel seams and screw points. Re-apply waterproof tape or sealant if necessary. Ensure all screws are tight.
- Issue: Parts are missing or damaged upon arrival.
- Solution: Contact COSTWAY customer support immediately with your purchase details and a description of the missing or damaged parts.
8. Specifications
| Feature | Detail |
|---|---|
| Overall Dimensions (L x W x H) | 440 x 300 x 250 cm |
| Side Wall Ground Clearance | 173 cm |
| Front Ground Clearance | 228 cm |
| Net Weight | 112 kg |
| Material | Galvanized Metal, Metal |
| Color | Black |
| Snow Load Capacity | 120 kg (on roof) |
| Model Number | ZB34809NW+IT |

Image: All-season suitability. This graphic illustrates the carport's resistance to various weather conditions, including water, sun, wind, and its capacity to handle snow loads.
9. Warranty Information
COSTWAY products are manufactured to high-quality standards. For specific warranty details, including coverage period and terms, please refer to the warranty card included with your purchase or visit the official COSTWAY website. Please retain your proof of purchase for any warranty claims.
10. Customer Support
If you have any questions, require assistance with assembly, or need to report missing/damaged parts, please contact COSTWAY customer support.
- Website: Visit the official COSTWAY website for FAQs and contact information.
- Email/Phone: Refer to your purchase documentation or the COSTWAY website for specific email addresses or phone numbers.
When contacting support, please have your model number (ZB34809NW+IT) and proof of purchase readily available.


