
1. Introduction
This manual provides essential instructions for the installation, operation, and maintenance of your Anjfylque ANJ-3600W-LV-WIFI-4 Hybrid Solar Inverter. Please read this manual thoroughly before installation and use to ensure proper function and safety. Keep this manual for future reference.
1.1 Product Overview
The Anjfylque ANJ-3600W-LV-WIFI-4 is a 3600W hybrid solar inverter designed for both off-grid and on-grid applications. It features an integrated 80A MPPT solar charge controller and a 40A battery charger, providing a pure sine wave output of 120V AC from a 48V DC battery bank. The system supports parallel operation for increased power output and includes Wi-Fi monitoring capabilities.

Image 1.1: The Anjfylque ANJ-3600W-LV-WIFI-4 Hybrid Solar Inverter, shown with its external WiFi monitoring module.
1.2 Package Contents
Upon unpacking, verify that all items listed below are present and undamaged. If any components are missing or damaged, contact your supplier immediately.

Image 1.2: Contents included with the Anjfylque ANJ-3600W-LV-WIFI-4 Hybrid Solar Inverter package.
- Hybrid Solar Inverter (1 unit)
- Instruction Manual (1 copy)
- Anti-reverse Current CT (1 unit)
- WiFi Module (1 unit)
- Mounting Tool/Hardware (1 set)
- Parallel Cable (1 unit, if applicable for parallel models)
2. Safety Information
Please observe the following safety precautions during installation, operation, and maintenance of the inverter. Failure to comply may result in electric shock, fire, or severe injury.
- Qualified Personnel: All electrical work must be performed by qualified and authorized personnel.
- Disconnect Power: Before performing any work on the inverter or connected components, ensure all power sources (PV, battery, AC grid) are disconnected.
- Proper Grounding: The inverter must be properly grounded according to local electrical codes.
- Ventilation: Install the inverter in a well-ventilated area to prevent overheating. Maintain adequate clearance around the unit.
- Flammable Materials: Do not install the inverter near flammable or explosive materials.
- Water Exposure: Protect the inverter from water, rain, snow, and excessive humidity.
- Battery Safety: Handle batteries with care. Wear appropriate personal protective equipment (PPE). Ensure correct battery polarity.
- DC Voltage Hazard: Solar panels can produce high DC voltage even when disconnected. Exercise extreme caution.
- AC Voltage Hazard: The inverter produces high AC voltage. Do not touch live terminals.
3. Product Features
The Anjfylque ANJ-3600W-LV-WIFI-4 Hybrid Solar Inverter offers a range of advanced features for efficient and reliable power management:
- All-in-One Design: Integrates a 3.6KW pure sine wave inverter, an 80A MPPT solar charge controller, and a 40A battery charger.
- Pure Sine Wave Output: Provides stable 120V AC output suitable for sensitive electronics.
- High Efficiency MPPT: Dual-channel MPPT controller with a 90-260V DC range (operational 80-300V DC) for maximum solar energy harvest, achieving over 95% conversion efficiency.
- Parallel Capability: Supports parallel connection of up to 6 units for a maximum output of 21.6KW, allowing for single-phase, split-phase (120V/240V), or three-phase (208V) configurations.
- Flexible Charging Modes: Offers Hybrid (Solar+Grid), Grid-Priority, Solar-Priority, and Solar-Only charging modes.
- Versatile Output Modes: Includes Grid-Priority, Solar-Hybrid, Solar-Priority, and Inverter-Priority output modes.
- Time Slot Management: Programmable charging and discharging schedules via the app for optimizing energy costs based on Time-of-Use (TOU) rates.
- Broad Battery Compatibility: Compatible with 48V Lithium, AGM, GEL, and Flooded batteries. Features a User Mode for custom battery settings and supports battery-free operation (direct solar/grid to loads).
- Wi-Fi Monitoring: Real-time data monitoring (PV voltage, battery status) via a dedicated mobile application.
- Comprehensive Protections: Built-in safeguards against PV over-voltage/current, AC over-voltage, battery over-charge, and overload.
- Low Noise Operation: Operates at a noise level of ≤60dB.

Image 3.1: Overview of the Anjfylque Hybrid Solar Inverter's main features and specifications.
4. Installation and Setup
4.1 Physical Installation
Choose a suitable location for the inverter that is dry, well-ventilated, and protected from direct sunlight, rain, and dust. Ensure sufficient clearance around the unit for proper airflow (at least 20 cm on all sides). The inverter should be mounted vertically on a sturdy wall or surface.
4.2 Inverter Ports Overview
Familiarize yourself with the various ports and connections on the inverter before proceeding with wiring.

Image 4.1: Detailed view of the Anjfylque Hybrid Solar Inverter's ports and controls.
- Indicator light
- LCD screen
- Touch key (lightly)
- Overload protector
- Grounding screw hold
- AC output port
- WiFi port (optional)
- AC input port
- RS485-2 communication port
- RS485-1 communication port
- USB communication port
- Cooling fan
- ON/OFF rocker switch
- Dry contact port
- Current sharing port (parallel module only)
- Parallel communication port (parallel module only)
- Battery port
- PV port
4.3 Wiring Connections
Ensure all connections are secure and correctly polarized. Refer to local electrical codes for wire sizing and circuit breaker requirements.
- PV Input: Connect solar panel strings to the PV port (18). Ensure PV open circuit voltage does not exceed 300V DC.
- Battery Connection: Connect the 48V battery bank to the Battery port (17). Observe correct polarity (+ to + and - to -).
- AC Input: Connect the AC grid or generator input to the AC input port (8).
- AC Output: Connect your AC loads to the AC output port (6).
- Grounding: Connect the inverter to an earth ground using the grounding screw hold (5).
4.4 Battery Compatibility
The inverter is compatible with various 48V battery types. Select the appropriate battery type in the inverter settings during initial setup.

Image 4.2: The inverter supports various 48V battery chemistries, including GEL, Flooded, Lithium, and Sealed Lead-Acid.
4.5 Parallel Connection (Optional)
For increased power output or specific phase configurations, up to six inverters can be connected in parallel. Refer to the diagram below for common configurations.
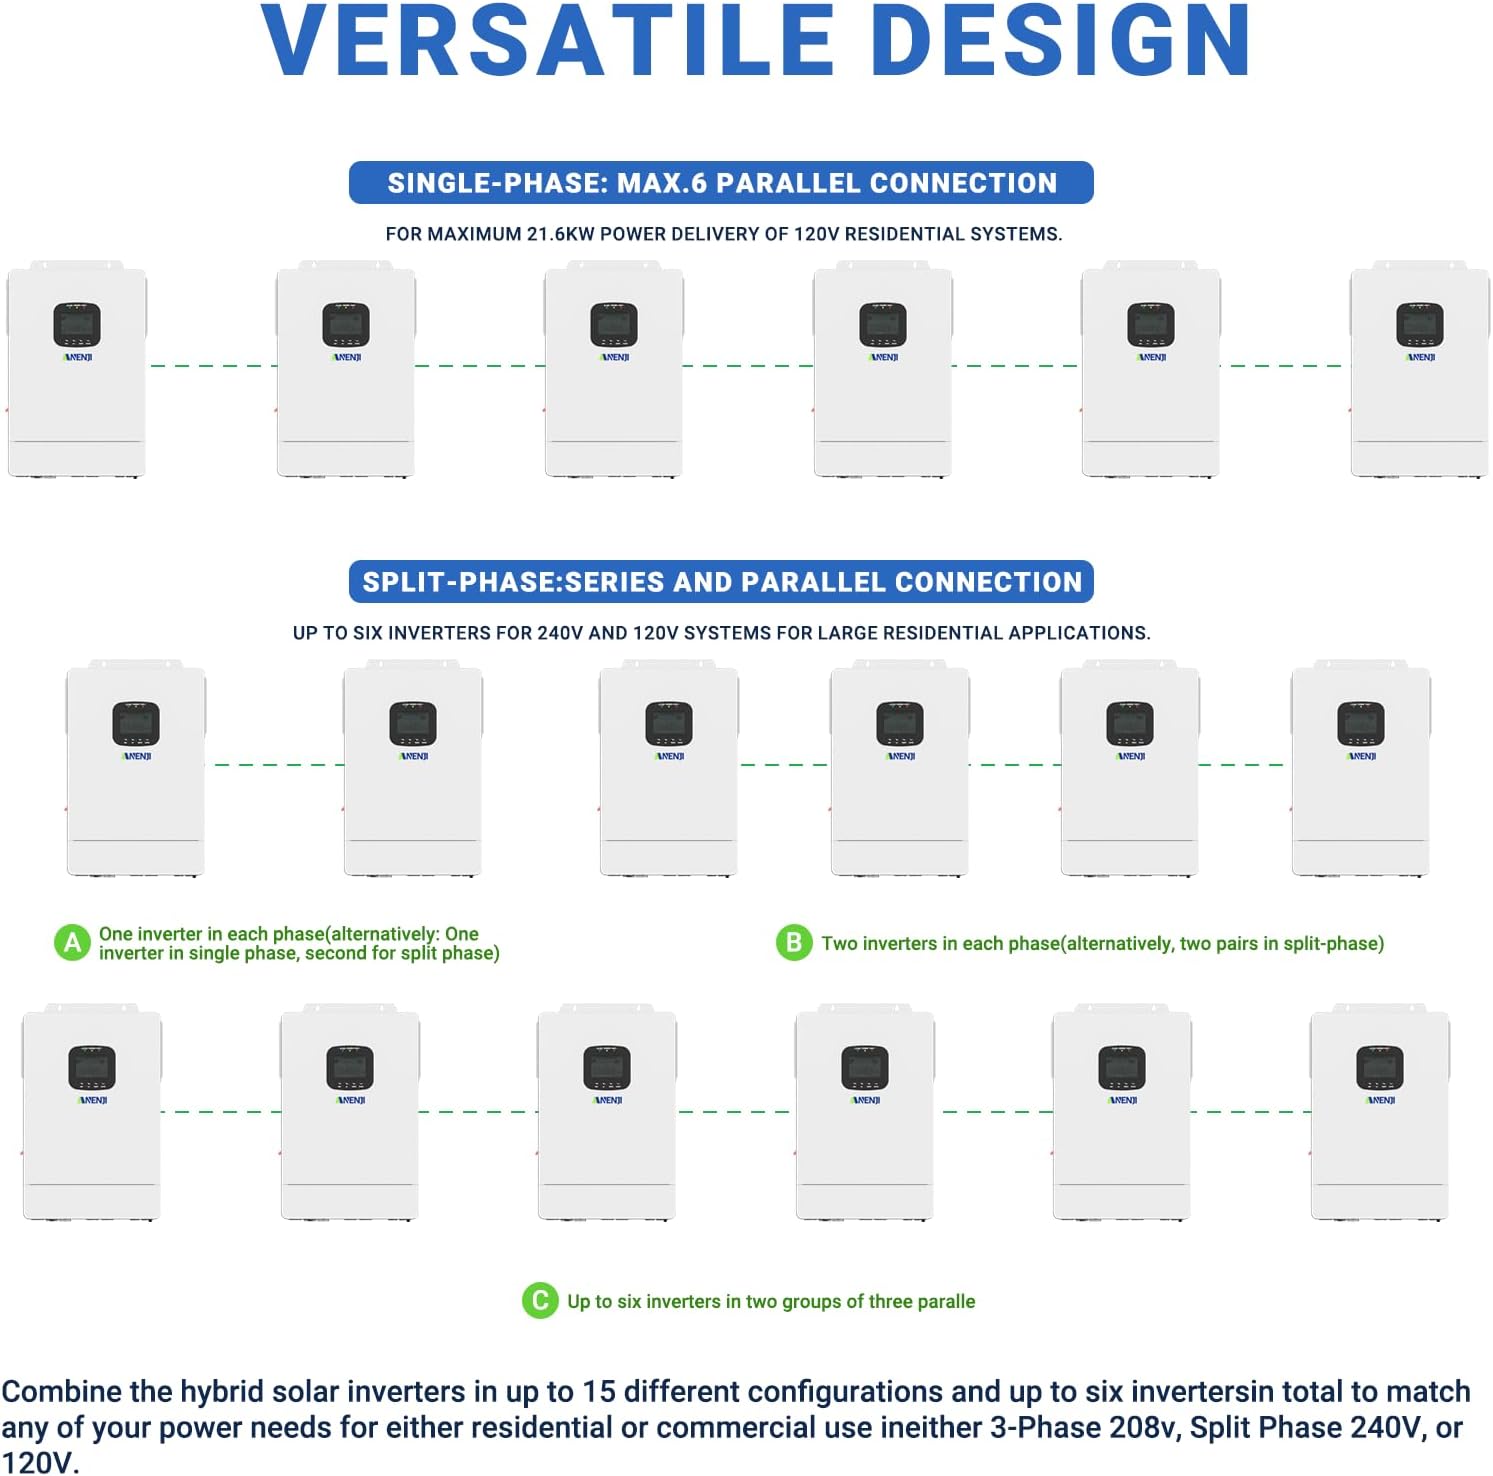
Image 4.3: Examples of parallel connection setups for single-phase and split-phase systems.
- Single-Phase: Up to 6 units for a maximum of 21.6KW at 120V.
- Split-Phase: Two units for 120V/240V output, or up to six units for larger split-phase applications.
- Three-Phase: Three units for 208V output, or up to six units for larger three-phase applications.
4.6 WiFi Module Installation and Setup
The included WiFi module allows for remote monitoring of your inverter's performance. Connect the module to the designated WiFi port (7) on the inverter. Follow the instructions provided with the WiFi module for app download, registration, and pairing.

Image 4.4: The WiFi module enables remote monitoring of the inverter via a smartphone application.
5. Operation
5.1 Initial Power-Up
After all connections are made and verified, follow these steps to power up the inverter:
- Turn on the battery breaker.
- Turn on the PV array breaker.
- Turn on the AC input breaker (if connected to grid/generator).
- Flip the ON/OFF rocker switch (13) on the inverter to the 'ON' position.
- The inverter will perform a self-test and the LCD screen (2) will illuminate.
5.2 LCD Display and Control Buttons
The LCD screen displays real-time system status and parameters. Use the touch keys (3) (ESC, UP, DOWN, ENTER) to navigate menus and adjust settings.
5.3 Charging and Output Modes
The inverter offers various configurable modes to manage power flow. These settings can be adjusted via the LCD panel or the mobile app.

Image 5.1: Configuration options for Charging Priority and Load Priority.
5.3.1 Charging Priority Modes
- Solar Priority: The inverter prioritizes solar power for charging. AC input will only charge the battery when solar power is unavailable.
- Solar + AC Input: The inverter charges the battery from both solar and AC power simultaneously.
- Solar Only: The inverter charges the battery exclusively from available solar power.
5.3.2 Load Priority Modes (Output Modes)
- Solar Priority: The inverter uses solar power to supply loads first. If solar input is insufficient, it compensates with AC input.
- AC Priority: The inverter powers all loads directly from AC input. DC sources (solar/battery) are only used when AC power is unavailable.
- DC Priority: The inverter prioritizes solar power first. If solar is insufficient, it uses battery power. AC input only powers loads when a low-battery warning is triggered.
5.4 Time Slot Charging/Discharging Function
This function allows users to program specific charging (e.g., during off-peak grid hours) and discharging (e.g., during peak solar hours) schedules via the mobile app. This optimizes energy usage and can reduce electricity costs by leveraging Time-of-Use (TOU) tariffs.
5.5 Monitoring via WiFi App
Once the WiFi module is connected and configured, you can monitor the inverter's real-time data, adjust settings, and view historical performance through the dedicated mobile application. This includes PV voltage, battery status, power flow, and error codes.
6. Maintenance
Regular maintenance ensures the longevity and optimal performance of your inverter. Always disconnect all power sources before performing any maintenance.
- Cleaning: Periodically clean the inverter's exterior with a dry cloth. Ensure ventilation openings are free from dust and debris. Do not use liquid cleaners.
- Connections: Annually check all electrical connections (PV, battery, AC input/output) for tightness and signs of corrosion.
- Ventilation: Ensure the cooling fans are operating correctly and not obstructed.
- Battery Inspection: If using lead-acid batteries, check electrolyte levels and terminal conditions as per battery manufacturer guidelines.
- Firmware Updates: Check the manufacturer's website or app for any available firmware updates for the inverter or WiFi module.
7. Troubleshooting
This section provides solutions to common issues you might encounter. If the problem persists, contact technical support.
| Problem | Possible Cause | Solution |
|---|---|---|
| Inverter not turning on | No battery power; DC switch off; loose battery connection. | Check battery voltage; ensure DC switch is ON; tighten battery terminals. |
| No AC output | Overload; short circuit; inverter fault; AC output breaker tripped. | Reduce load; check for short circuits; restart inverter; reset AC breaker. |
| Low PV charging power | Shaded panels; dirty panels; incorrect PV wiring; low sunlight. | Clear shading; clean panels; verify PV connections; wait for better sunlight. |
| WiFi monitoring not working | WiFi module not connected; network issues; app not configured. | Ensure module is connected; check home WiFi network; reconfigure app settings. |
| Error code displayed | Specific system fault. | Refer to the inverter's LCD display for the specific error code and consult the full manual for detailed solutions. |
8. Specifications
Technical specifications for the Anjfylque ANJ-3600W-LV-WIFI-4 Hybrid Solar Inverter.
| Parameter | Value |
|---|---|
| Model | ANJ-3600W-LV-WIFI-4 |
| Rated Power | 3600W / 7200VA |
| Battery Voltage | 48V DC |
| AC Output Voltage | 120V AC |
| AC Output Waveform | Pure Sine Wave |
| MPPT Solar Charge Controller Current | 80A |
| Max. PV Input Voltage | 300V DC |
| MPPT Operating Voltage Range | 90-260V DC |
| Max. PV Input Power | 4000W |
| Battery Charger Current (AC) | 40A |
| Dimensions (L x W x H) | 15 x 11 x 3.9 inches (38.1 x 27.9 x 9.9 cm) |
| Weight | 19.8 pounds (8.98 kg) |
| Communication | WiFi, USB, RS485 |
| Parallel Capability | Up to 6 units |
9. Warranty and Support
For warranty information, technical support, or service inquiries, please refer to the warranty card included with your product or contact Anjfylque customer service. Ensure you have your product model number (ANJ-3600W-LV-WIFI-4) and purchase date available when contacting support.