
K&F CONCEPT BV60
Contents
K&F CONCEPT Professional Fluid Head BV60 Instruction Manual
Model: BV60
1. Introduction
Thank you for choosing the K&F CONCEPT Professional Fluid Head BV60. This fluid head is designed to provide smooth and stable camera movements for professional video recording and photography. It features precise damping adjustments, a high load capacity, and versatile compatibility with various camera setups and tripods. Please read this manual thoroughly before use to ensure proper operation and to maximize the performance and lifespan of your equipment.

Image 1.1: K&F CONCEPT Professional Fluid Head BV60. This image displays the fluid head from a front-side angle, showcasing its black and orange design, quick release plate, and adjustable handle.
2. Package Contents
Please verify that all items listed below are included in your package:
- Fluid Head x 1
- Quick Release Plate x 1
- Instruction Manual x 1
- Hexagonal Wrench x 1

Image 2.1: Package Contents. This image shows the fluid head, quick release plate, instruction manual, and hexagonal wrench, illustrating the items included in the product package.
3. Product Overview
Familiarize yourself with the components of your K&F CONCEPT Fluid Head BV60:
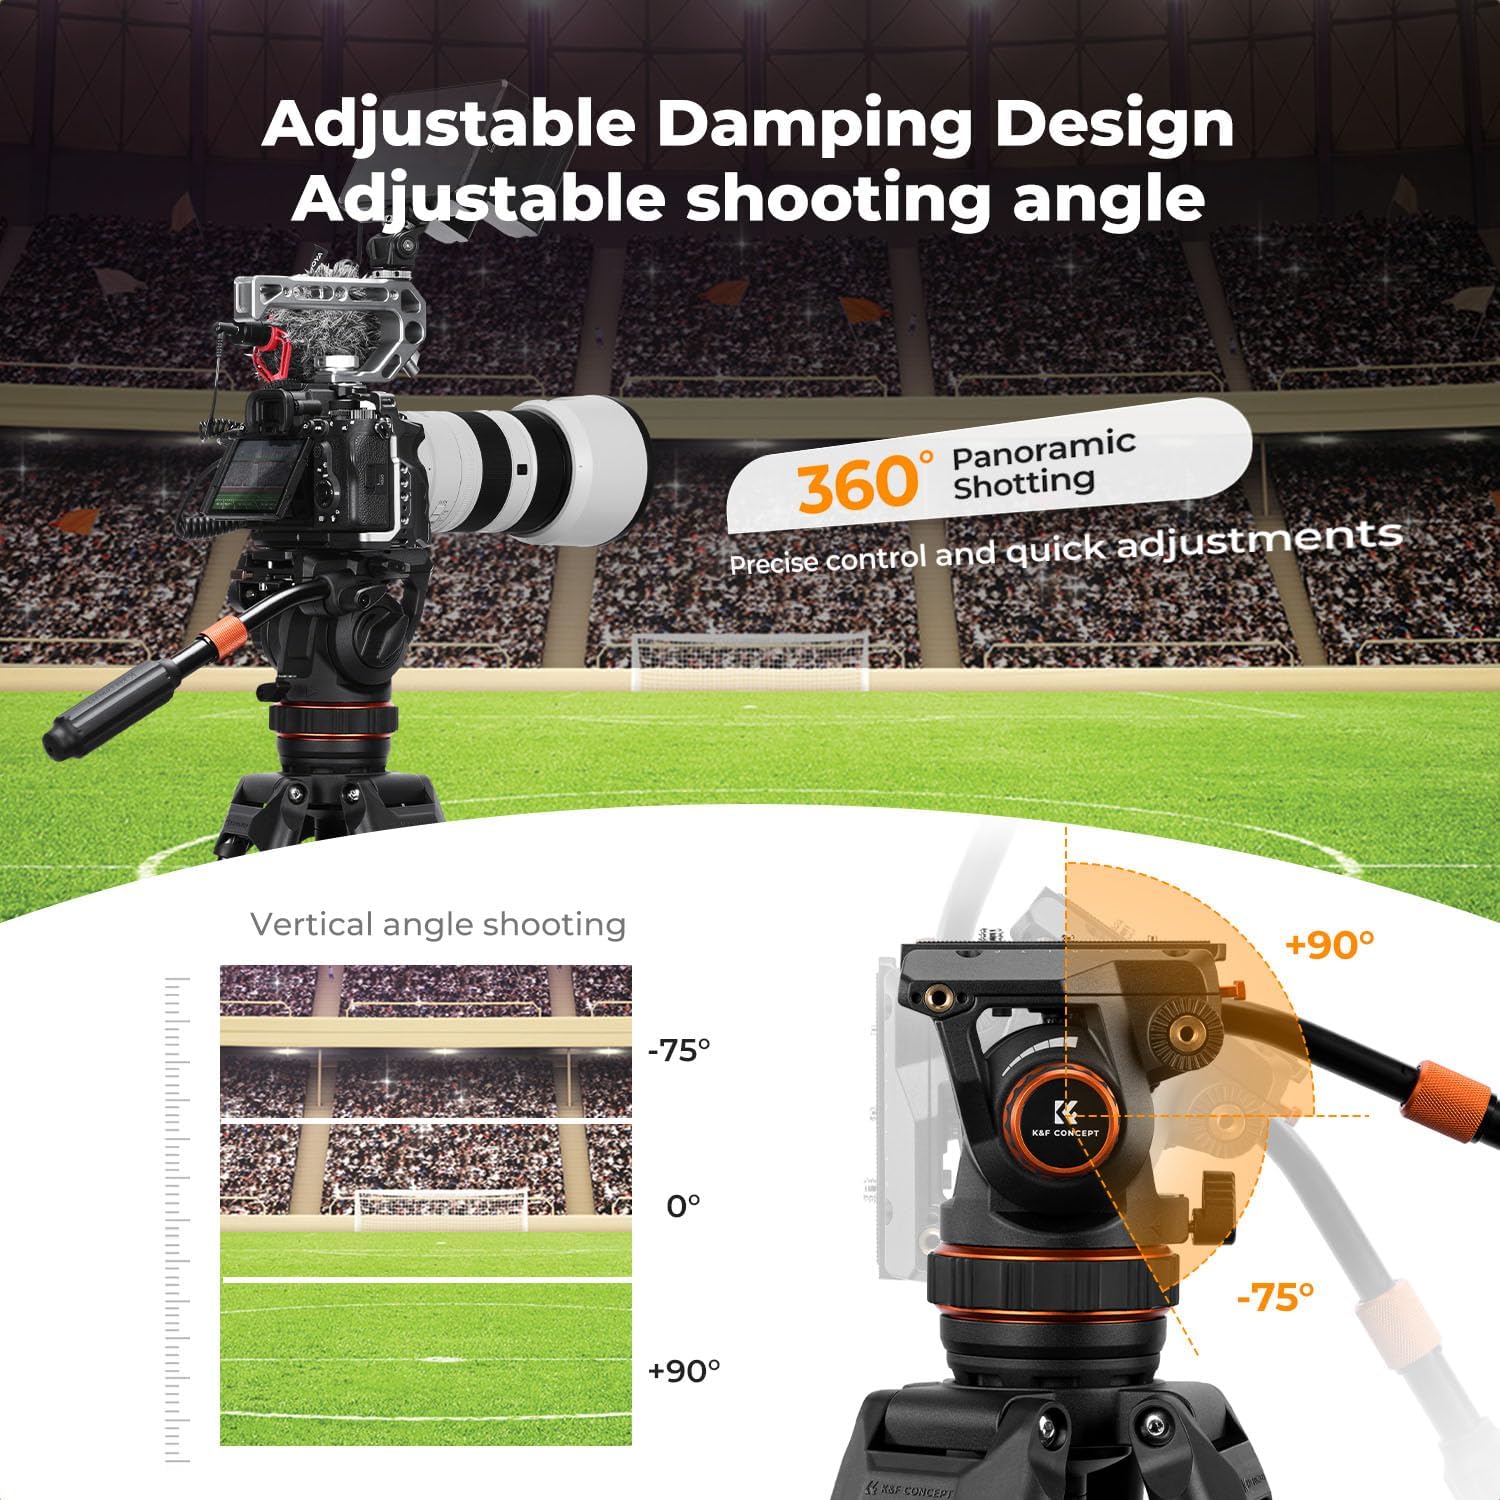
Image 3.1: Labeled Diagram of Fluid Head Components. This diagram highlights key parts such as the 1/4" screw, 3/8" screw, quick release plate locking knob, handle adjustment knob, mode change button, plate release button, pitch damping knob, bubble level, horizontal damping adjustment ring, horizontal locking knob, retractable handle, anti-deflection expansion spike, and hidden Allen wrench.
- Quick Release Plate: Mounts to your camera. Features 1/4" and 3/8" screws.
- Quick Release Plate Locking Knob: Secures the quick release plate to the fluid head.
- Plate Release Button: For quick detachment of the camera.
- Pitch Damping Knob: Adjusts the resistance for vertical (tilt) movement.
- Horizontal Damping Adjustment Ring: Adjusts the resistance for horizontal (pan) movement.
- Horizontal Locking Knob: Locks the fluid head in a horizontal position.
- Handle Adjustment Knob: Secures and adjusts the position of the operating handle.
- Retractable Handle: Provides leverage for smooth camera movements.
- Bubble Level: Assists in achieving a level setup.
- Hidden Allen Wrench: Stored within the fluid head for convenience.
- 1/4" Expansion Port: For attaching accessories.
- Anti-Deflection Expansion Spike: Prevents camera rotation on the quick release plate.
4. Setup
4.1 Attaching the Fluid Head to a Tripod
- Ensure your tripod has a 3/8" mounting screw.
- Align the 3/8" threaded hole on the base of the fluid head with the mounting screw on your tripod.
- Rotate the fluid head clockwise onto the tripod until it is securely fastened. Do not overtighten.
4.2 Attaching Your Camera to the Quick Release Plate
- Locate the quick release plate. It has both 1/4" and 3/8" screws.
- Choose the appropriate screw (1/4" for most cameras, 3/8" for larger video cameras) and align it with the tripod mount thread on the bottom of your camera.
- Use a coin or the provided hexagonal wrench to securely tighten the screw to your camera. Ensure the anti-deflection expansion spike is engaged if your camera has a compatible slot to prevent rotation.
4.3 Mounting the Camera with Quick Release Plate to the Fluid Head
- Ensure the quick release plate locking knob on the fluid head is loosened.
- Press the plate release button to open the quick release clamp.
- Slide the quick release plate (with camera attached) into the clamp until it clicks into place.
- Tighten the quick release plate locking knob to secure the camera firmly.
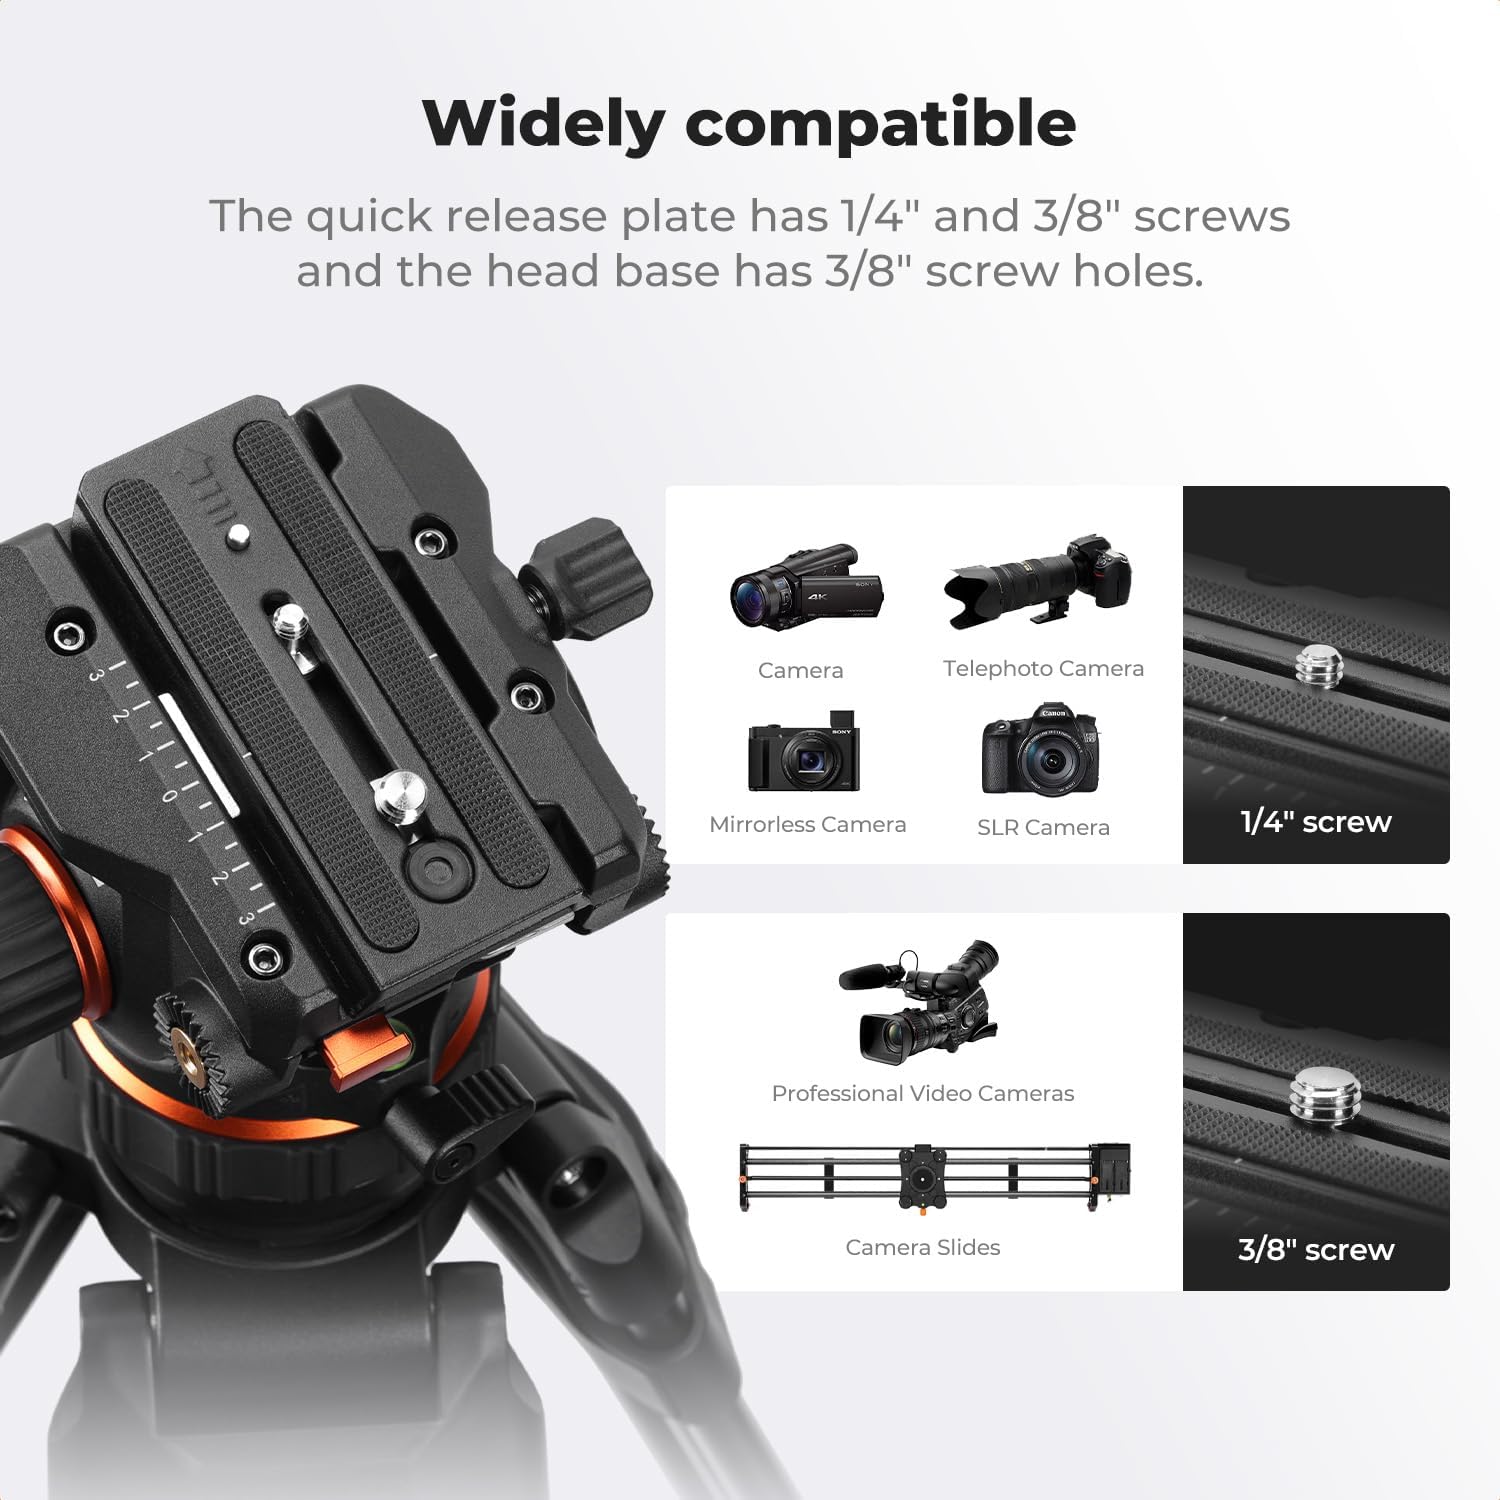
Image 4.1: Quick Release Plate Installation. This image demonstrates the process of installing the quick release plate onto the fluid head, showing the 'Press to Install One Click Release' mechanism.

Image 4.2: Quick Release Plate Screw Compatibility. This image illustrates the quick release plate's compatibility with various cameras (DSLR, mirrorless, telephoto) using 1/4" and 3/8" screws, and the fluid head's 3/8" base thread for tripods, sliders, and monopods.
5. Operating the Fluid Head
5.1 Adjusting Pan and Tilt
The BV60 fluid head offers 360° panoramic rotation and a tilt range from -75° to +90°.
- Panning (Horizontal Movement): Loosen the horizontal locking knob. Adjust the horizontal damping adjustment ring to achieve your desired resistance for smooth 360° panoramic shots. Tighten the horizontal locking knob to fix the position.
- Tilting (Vertical Movement): Loosen the pitch damping knob. Adjust the pitch damping knob to control the resistance for vertical movements between -75° and +90°. Tighten the knob to fix the tilt angle.

Image 5.1: Adjustable Damping Design. This image illustrates the fluid head's capability for 360° panoramic shooting and vertical angle shooting from -75° to +90°, highlighting the adjustable damping for precise control.
5.2 Using the Bubble Level
The integrated bubble level helps ensure your camera is perfectly horizontal, which is crucial for professional-looking shots, especially panoramic sequences.
- Adjust your tripod legs until the bubble is centered within the level indicator.
5.3 Adjusting the Operating Handle
The handle can be adjusted for optimal comfort and control.
- Loosen the handle adjustment knob.
- Extend or retract the handle to your preferred length.
- Tighten the handle adjustment knob to secure the handle in place. The handle can also be mounted on either side of the fluid head for ambidextrous use.
5.4 Dual Mode Quick Release Plate Base
The quick release plate base is compatible with DJI RS2/RS3/RS4 and Manfrotto quick release plates, allowing for quick switching between different devices without needing extra adapters.
Image 5.2: Dual Mode Quick Release Plate Base. This image illustrates the fluid head's compatibility with DJI RS2/RS3/RS4 and Manfrotto quick release plates, enabling seamless transitions between different camera setups.
6. Maintenance
- Cleaning: Use a soft, dry cloth to wipe down the fluid head after each use. For stubborn dirt, a slightly damp cloth can be used, followed by immediate drying. Avoid abrasive cleaners or solvents.
- Lubrication: The fluid damping system is sealed and does not require user lubrication. Do not attempt to disassemble the fluid head for lubrication.
- Storage: Store the fluid head in a dry, dust-free environment. If storing for extended periods, consider using a protective bag.
- Inspection: Periodically check all knobs and screws to ensure they are securely tightened.
7. Troubleshooting
7.1 Movement is Not Smooth
- Check Damping Knobs: Ensure the pitch damping knob and horizontal damping adjustment ring are not overtightened. Loosen them slightly to achieve smoother movement.
- Check Locking Knobs: Verify that the horizontal locking knob is fully disengaged.
- Load Capacity: Ensure your camera setup does not exceed the maximum load capacity of 10kg (22 lbs). Overloading can affect smoothness.
7.2 Camera Feels Unstable
- Quick Release Plate: Ensure the quick release plate is securely attached to your camera and the quick release plate locking knob on the fluid head is fully tightened.
- Tripod Connection: Verify that the fluid head is firmly attached to your tripod.
- Tripod Stability: Ensure your tripod itself is stable and on a level surface.
8. Specifications
| Feature | Specification |
|---|---|
| Model Number | BV60 |
| Item Weight | 1.46 kg (2.22 lbs) |
| Maximum Load Capacity | 10 kg (22 lbs) |
| Base Diameter | 75 mm |
| Pan Range | 360° |
| Tilt Range | -75° to +90° |
| Quick Release Plate Compatibility | DJI RS2/RS3/RS4, Manfrotto |
| Camera Mounting Screws | 1/4", 3/8" |
| Tripod Mounting Thread | 3/8" |

Image 8.1: High Load-bearing Capacity. This image highlights the fluid head's robust design, capable of supporting up to 10kg (22 lbs) of professional camera equipment with a stable 75mm base.
9. Warranty and Support
K&F CONCEPT products are manufactured to high-quality standards. For information regarding warranty coverage, technical support, or service inquiries, please refer to the warranty card included with your product or visit the official K&F CONCEPT website. Please retain your proof of purchase for warranty claims.
Ask a question about this manual
Ask about setup, troubleshooting, compatibility, parts, safety, or missing instructions. Manuals+ will review the question and use this page’s manual context to help answer it.