1. Introduction
This manual provides detailed instructions for setting up, operating, maintaining, and troubleshooting your ACEMAGICIAN Mini PC V1. Please read this guide thoroughly before using the device to ensure optimal performance and longevity.
The ACEMAGICIAN Mini PC V1 is a compact desktop computer designed for various tasks, from daily office work to entertainment. It features an Intel N150 processor, 16GB DDR4 RAM, and a 256GB M.2 SSD, offering efficient performance in a small form factor.

Image: Front and rear view of the ACEMAGICIAN Mini PC V1, showcasing its compact design and various ports.

Image: Overview of the Intel N150 processor specifications and performance benchmarks compared to other N-series processors.
2. What's in the Box
Upon unpacking, please verify that all items listed below are present:
- 1 x ACEMAGICIAN V1 Mini PC
- 1 x Power Adapter
- 1 x HDMI Cable
- 1 x Mounting Bracket (for VESA mounting)
- 1 x User Manual (this document)
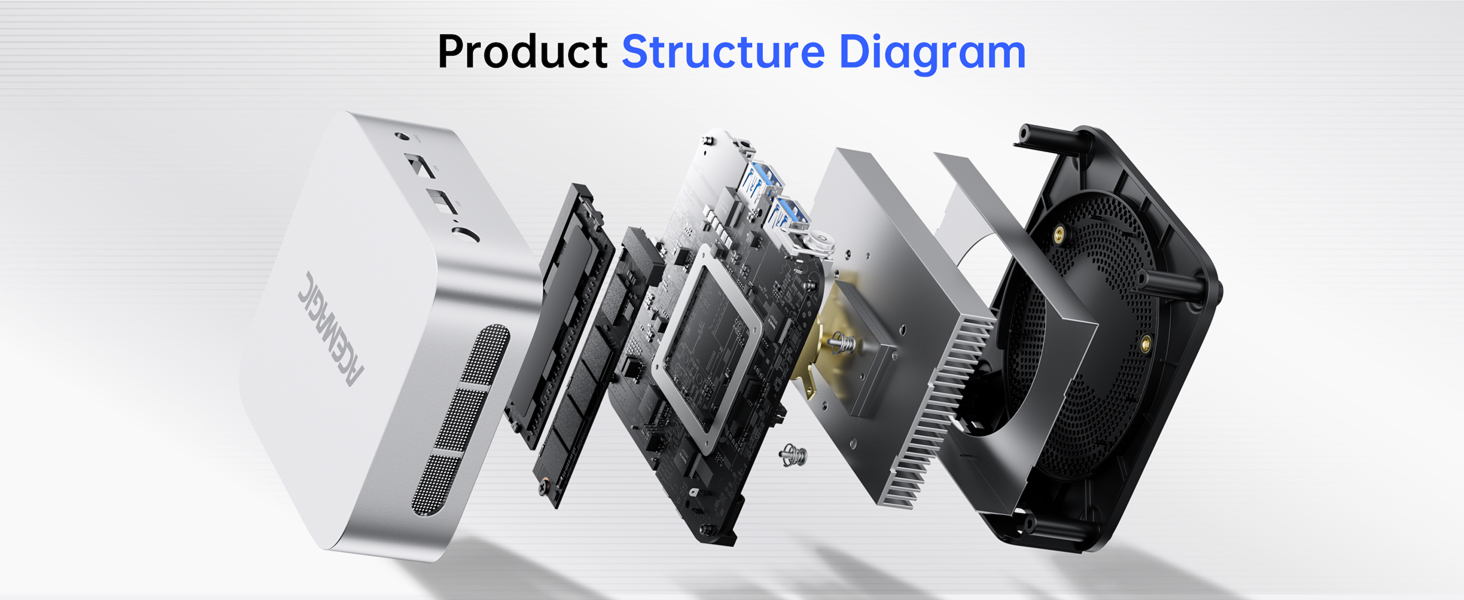
Image: Visual representation of the ACEMAGICIAN Mini PC V1 and its included accessories: power adapter, HDMI cable, and user manual.
3. Product Overview
The ACEMAGICIAN Mini PC V1 is equipped with a range of ports and features for versatile connectivity and performance.
3.1. Front Panel
- Power Button: To turn the device on or off.
- Power Light: Indicates power status.
- USB 3.2 Ports (x2): For high-speed data transfer with compatible devices.
- 3.5mm Audio Jack: For connecting headphones or external speakers.
3.2. Rear Panel
- LAN Port: Gigabit Ethernet for wired network connection.
- HDMI 2.0 Port: Supports 4K video output at 60Hz.
- DP 1.4 Port: DisplayPort, also supporting 4K video output.
- USB 2.0 Ports (x2): For connecting peripherals like keyboards and mice.
- DC Power Interface: For connecting the power adapter.

Image: Detailed diagram illustrating the location and function of all ports on the front and rear panels of the Mini PC.
4. Setup Guide
- Connect to Display: Use the provided HDMI cable to connect the Mini PC to your monitor or TV. You can also use the DP port for a second display.
- Connect Peripherals: Plug in your USB keyboard, mouse, and any other USB devices into the available USB ports.
- Connect to Network: For a wired connection, connect an Ethernet cable to the LAN port. For wireless, ensure your Wi-Fi network is available during initial setup.
- Connect Power: Plug the power adapter into the DC power interface on the Mini PC, then plug the adapter into a power outlet.
- Power On: Press the power button on the front panel. The power light will illuminate.
- Initial Windows Setup: Follow the on-screen instructions to complete the Windows 11 Pro setup, including language, region, network connection, and user account creation.
5. Operating Instructions
5.1. Power On/Off
- To Power On: Press the power button once.
- To Shut Down: Click the Windows Start button, then select Power > Shut down. Alternatively, press and hold the power button for 5 seconds to force a shutdown (not recommended for regular use).
- To Restart: Click the Windows Start button, then select Power > Restart.
- To Sleep: Click the Windows Start button, then select Power > Sleep.
5.2. BIOS Settings
The ACEMAGICIAN Mini PC V1 allows access to BIOS settings for advanced configurations such as Auto Power On and Wake on LAN. To enter BIOS, press the Delete key repeatedly during startup after pressing the power button.
5.3. Wireless Connectivity
The Mini PC supports WiFi 5 and Bluetooth 4.2 for wireless connections. Ensure drivers are installed (usually pre-installed with Windows 11 Pro) and connect to your desired network or pair Bluetooth devices through the Windows settings.
6. Storage Expansion
The Mini PC comes with 16GB DDR4 RAM and a 256GB M.2 2280 SSD. For additional storage, the device supports expansion up to 2TB by adding an extra M.2 NVMe PCIe 3.0 or M.2 SATA SSD.
Note: Opening the device to install additional components may require technical expertise. Refer to the detailed instructions provided with your expansion drive or consult professional assistance.

Image: Internal view of the Mini PC highlighting the 16GB DDR4 RAM and 256GB M.2 SSD, with space for additional storage expansion.
7. Dual Display Setup
The ACEMAGICIAN Mini PC V1 supports dual 4K display output via its HDMI 2.0 and DP 1.4 interfaces. This allows for an expanded workspace and enhanced multimedia experience.
- Connect your primary monitor to the HDMI 2.0 port.
- Connect your secondary monitor to the DP 1.4 port.
- Once both monitors are connected and the PC is powered on, Windows 11 Pro should automatically detect and configure the displays.
- To adjust display settings (e.g., extend, duplicate, resolution), right-click on the desktop and select "Display settings".

Image: The Mini PC connected to two monitors, demonstrating its dual 4K display capability for an extended desktop environment.
8. Cooling System
The Mini PC V1 incorporates an upgraded high-efficiency cooling system with an advanced axial fan and internal cooling technology. This design ensures quiet operation under light loads and maintains low noise levels even during intensive use, preventing overheating and ensuring stable performance.

Image: Diagram illustrating the internal cooling system of the Mini PC, showing airflow and fan placement for efficient heat dissipation.
9. Maintenance
- Cleaning: Regularly clean the exterior of the Mini PC with a soft, dry cloth. Use compressed air to gently clear dust from ventilation openings. Do not use liquid cleaners directly on the device.
- Software Updates: Keep your Windows 11 Pro operating system and drivers updated to ensure security and optimal performance.
- Ventilation: Ensure the Mini PC is placed in a well-ventilated area and that its air vents are not obstructed.
- Data Backup: Regularly back up important data to an external drive or cloud storage to prevent data loss.
10. Troubleshooting
| Problem | Possible Solution |
|---|---|
| No power/device does not turn on. |
|
| No display on monitor. |
|
| Slow performance. |
|
| Wi-Fi or Bluetooth connectivity issues. |
|
For further assistance, please refer to the Warranty and Support section.
11. Specifications
| Feature | Detail |
|---|---|
| Processor | Intel Twin Lake N150 (4 Cores/4 Threads, up to 3.6 GHz, 6MB Cache) |
| Graphics | Intel UHD Graphics (up to 1.0 GHz, 24 Execution Units) |
| RAM | 16GB DDR4 (Built with 1 DDR4 SO-DIMM slot, 3200MHz) |
| Storage | 256GB M.2 2280 SSD (Expandable up to 2TB via M.2 NVMe PCIe 3.0 or M.2 SATA SSD) |
| Operating System | Windows 11 Pro |
| Video Output | 1x HDMI 2.0 (4K@60Hz), 1x DP 1.4 (4K@60Hz) - Dual Display Support |
| USB Ports | 2x USB 3.2, 2x USB 2.0 |
| Network | Gigabit Ethernet, WiFi 5 |
| Bluetooth | Bluetooth 4.2 |
| Audio | 3.5mm Audio Jack |
| Dimensions | Approximately 3.9 x 3.9 x 1.3 inches (Compact metal body) |
| Weight | Approximately 1.32 pounds |
| Cooling System | Upgraded Axial Fan & Internal Cooling Technology |
12. Warranty and Support
ACEMAGICIAN offers a 2-Year quality assurance for the Mini PC V1. For any product-related questions or technical assistance, please utilize the following support channels:
- Amazon Support: Log in to your Amazon buyer account, find your order, and click "Get Help".
- Support Email: service@acemagicians.com
- Telephone Support (US): +1 800 908 1980
- 24-hour technical support is available.

Image: Contact details for ACEMAGICIAN customer support, including Amazon help, email, and phone number.
13. Important Notes
- Always use the original power adapter provided with the Mini PC.
- Avoid exposing the device to extreme temperatures, humidity, or direct sunlight.
- Do not attempt to disassemble the Mini PC unless performing a supported upgrade (e.g., SSD expansion) and are comfortable with the procedure. Unauthorized disassembly may void your warranty.


