1. Introduction
The HELLORADIOSKY HR7E is a 2.4GHz ExpressLRS (ELRS) PWM receiver specifically designed for remote control fixed-wing aircraft, drones, and model airplanes. This receiver supports up to 8 PWM output channels for servos and includes integrated features such as receiver voltage return and aircraft battery voltage return. It also provides a 4-wire CRSF interface for future sensor expansion and is equipped with dual antennas for enhanced signal reception.
2. Specifications
| Product Type | HR7E 2.4GHz ELRS PWM Receiver |
| Power Supply | DC 4.5-8.4V |
| Antenna Type | 18cm high-sensitivity dual antennas |
| Wireless Protocol | Pre-installed ExpressLRS 3.3.0 |
| Output Channels | 8CH PWM |
| Return Power | Up to 100mW (adjustable in LUA) |
| Return Battery Voltage Detection Range | DC 4.0-35V |
| Bus Interface | CRSF |
| Weight | 10 grams |
| Dimensions | 48 x 25 x 15 mm |
3. Product Overview and Components
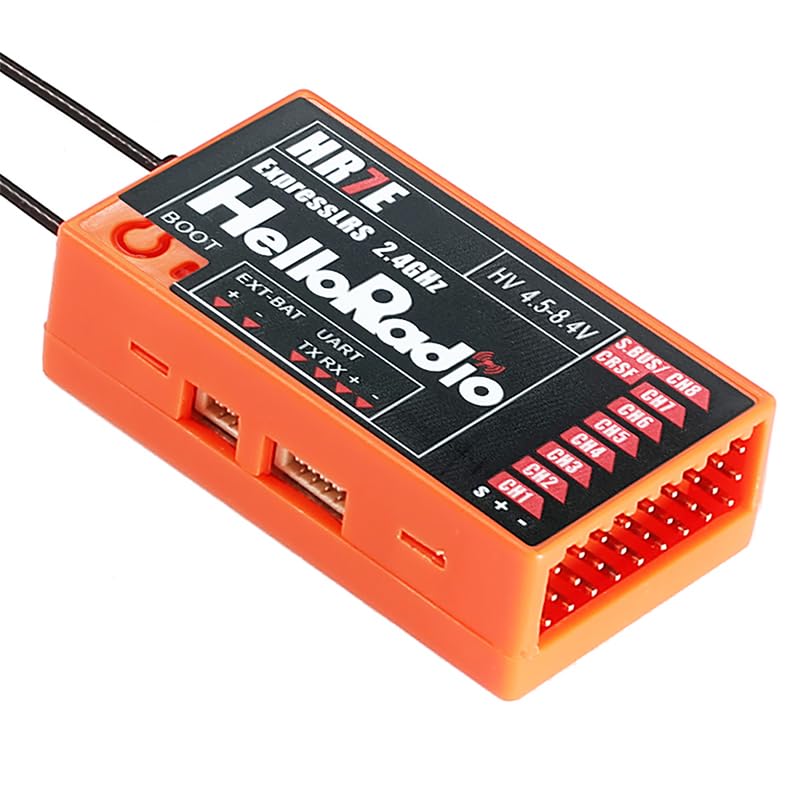
Figure 1: HELLORADIOSKY HR7E ELRS PWM Receiver. This image displays the receiver unit, highlighting its various ports and connections. Key features visible include the BOOT button, EXT-BAT port, UART (TX RX) interface, HV 4.5-8.4V power input, S.BUS/CH8 port, CRSF port, and PWM output channels CH1 through CH7. The dual antennas are also visible extending from the unit.
The HR7E receiver features several key components for connectivity and operation:
- BOOT Button: Used for entering bootloader mode, typically for firmware updates.
- EXT-BAT Port: External battery input for voltage monitoring (DC 4.0-35V).
- UART (TX RX) Interface: Serial communication port for data transmission and reception.
- HV 4.5-8.4V Input: Main power input for the receiver.
- S.BUS/CH8 Port: Supports S.BUS protocol or serves as an 8th PWM channel.
- CRSF Port: A 4-wire interface for Crossfire protocol, facilitating expansion with additional sensors.
- CH1-CH7 PWM Outputs: Standard Pulse Width Modulation channels for connecting servos and other control surfaces.
- Dual Antennas: For robust 2.4GHz signal reception.
4. Setup: Frequency Alignment (Binding)
To establish communication between your remote control and the HR7E receiver, follow these steps for frequency alignment (binding):
- Step 1: Power on the receiver. Observe the LED light.
- Step 2: Immediately cut off the power to the receiver.
- Step 3: Repeat Steps 1 and 2 two more times. This means you will power on and off the receiver a total of three times.
- Step 4: On the third power-on, the receiver's LED light will flash twice, indicating that it has successfully entered the frequency synchronization (binding) mode.
- Step 5: On your remote control, select the BIND operation. Refer to your remote control's manual for specific instructions on initiating the binding process.
Once the binding process is complete, the receiver's LED should indicate a successful connection (e.g., solid light or a specific flash pattern, refer to ExpressLRS documentation for exact LED states).
5. Operating Instructions
After successful binding, the HR7E receiver is ready for operation.
- Servo Connections: Connect your servos to the appropriate PWM output channels (CH1-CH7) on the receiver. Ensure correct polarity (Signal, Positive, Negative).
- Power Supply: Ensure the receiver is powered within the specified DC 4.5-8.4V range. Incorrect voltage can damage the unit.
- External Battery Monitoring: If you wish to monitor the aircraft's main battery voltage, connect it to the EXT-BAT port. The receiver supports a detection range of DC 4.0-35V.
- CRSF Interface: Utilize the CRSF interface for connecting compatible sensors or modules for expanded functionality.
- LUA Script Adjustments: The return power of the receiver can be adjusted up to 100mW using LUA scripts on your compatible remote control. Refer to your remote control's documentation for LUA script usage.
- Pre-flight Checks: Always perform thorough pre-flight checks to ensure all control surfaces respond correctly to remote control inputs and that signal strength is adequate.
6. Maintenance
Proper maintenance ensures the longevity and reliable performance of your HR7E receiver.
- Keep Clean: Regularly inspect the receiver for dust, dirt, or debris. Use a soft, dry brush or compressed air to clean it.
- Avoid Moisture: Protect the receiver from water and excessive humidity. If it gets wet, disconnect power immediately and allow it to dry completely before re-applying power.
- Inspect Connections: Periodically check all wire connections (servos, power, antennas) for secure fit and signs of wear or damage. Replace any damaged wires.
- Antenna Placement: Ensure antennas are positioned correctly and are not kinked or damaged. Optimal antenna placement is crucial for signal reception.
- Storage: When not in use, store the receiver in a dry, cool environment, away from direct sunlight and extreme temperatures.
7. Troubleshooting
If you encounter issues with your HR7E receiver, consider the following troubleshooting steps:
- No Power/LED Off:
- Check power supply voltage (DC 4.5-8.4V).
- Verify power connections are secure and correct polarity.
- Test with a different power source if possible.
- Binding Failure:
- Ensure the binding procedure (power cycling three times) is followed precisely.
- Confirm your remote control is in BIND mode and transmitting ExpressLRS protocol.
- Check for firmware compatibility between receiver and transmitter.
- Ensure the receiver is not too close to the transmitter during binding (maintain a small distance).
- No Control/Intermittent Signal:
- Verify successful binding (receiver LED status).
- Check antenna placement and ensure they are not obstructed or damaged.
- Ensure no strong interference sources are nearby.
- Confirm servo connections are correct and secure.
- Check for proper configuration in your flight controller or remote control settings.
- Incorrect Voltage Readings:
- Ensure the external battery is connected correctly to the EXT-BAT port.
- Verify the battery voltage is within the DC 4.0-35V detection range.
- Check for loose connections or damaged wires to the EXT-BAT port.
If issues persist after attempting these steps, consult the HELLORADIOSKY support resources or relevant ExpressLRS community forums for further assistance.
8. Warranty and Support
For specific warranty information regarding your HELLORADIOSKY HR7E receiver, please refer to the documentation provided at the time of purchase or visit the official HELLORADIOSKY website.
For technical support, firmware updates, or additional resources, please consult the manufacturer's official support channels or the ExpressLRS community.

