Introduction
Thank you for choosing the VIOPUMPO Egg Incubator. This manual provides essential information for the safe and effective operation, maintenance, and troubleshooting of your incubator. Please read these instructions thoroughly before use to ensure a successful hatching experience.
Safety Instructions
- Always place the incubator on a stable, level surface away from direct sunlight, drafts, or extreme temperature fluctuations.
- Ensure the power supply matches the voltage requirements specified on the incubator.
- Do not immerse the incubator or its electrical components in water or any other liquid.
- Keep the incubator out of reach of children and pets.
- Unplug the incubator from the power outlet before cleaning or performing any maintenance.
- Do not operate the incubator if the power cord or plug is damaged.
- Use only the accessories provided or recommended by VIOPUMPO.
Package Contents
Verify that all items are present in your package:
- VIOPUMPO Egg Incubator Unit (for 48 Chicken Eggs) x1
- Adjustable Egg Tray x1
- Egg Tray Card Strips x10
- Spare Hose Accessory Kit x1
- 300ml Water Bottle x1
- Charger x1
- User Manual x1

This image displays all items included in the VIOPUMPO Egg Incubator package: the incubator unit, an egg tray, egg tray card strips (x10), a spare hose accessory kit, a charger, a 300ml water bottle, and the user manual.
Product Overview
The VIOPUMPO Egg Incubator is designed for efficient and reliable hatching of various poultry eggs. It features automatic egg turning, intelligent humidity and temperature control, and a transparent lid for observation.
Key Components:
- High-Quality Insulation Cover: Transparent for observation.
- Digital Display Panel: Shows incubation days, temperature, humidity, and egg turning interval.
- Smart Button Control: For easy adjustment of settings.
- Auto Egg Turning Rotating Shaft: Ensures even heating.
- Built-in Smart Fan: For intelligent airflow circulation.
- Adjustable Egg Trays and Card Strips: Accommodate various egg sizes.
- Water Tank + Bottom Tray: For humidity management.
- External A+B Water Inlets: For convenient water addition.
- Built-in LED Egg Candler: For embryo development observation.

This image displays the VIOPUMPO Egg Incubator, showcasing its transparent top cover for easy observation. The digital control panel is visible, along with different sizes of eggs, including chicken and quail eggs, placed within the adjustable trays.

An exploded diagram detailing the various components of the VIOPUMPO 48 Egg Incubator. Key parts shown include the high-quality insulation cover, digital display panel, smart button control, auto egg turning rotating shaft, built-in smart fan, long egg tray card strips, egg frame, eggs grid support plate, water tank, bottom tray, and adjustable egg tray clips.
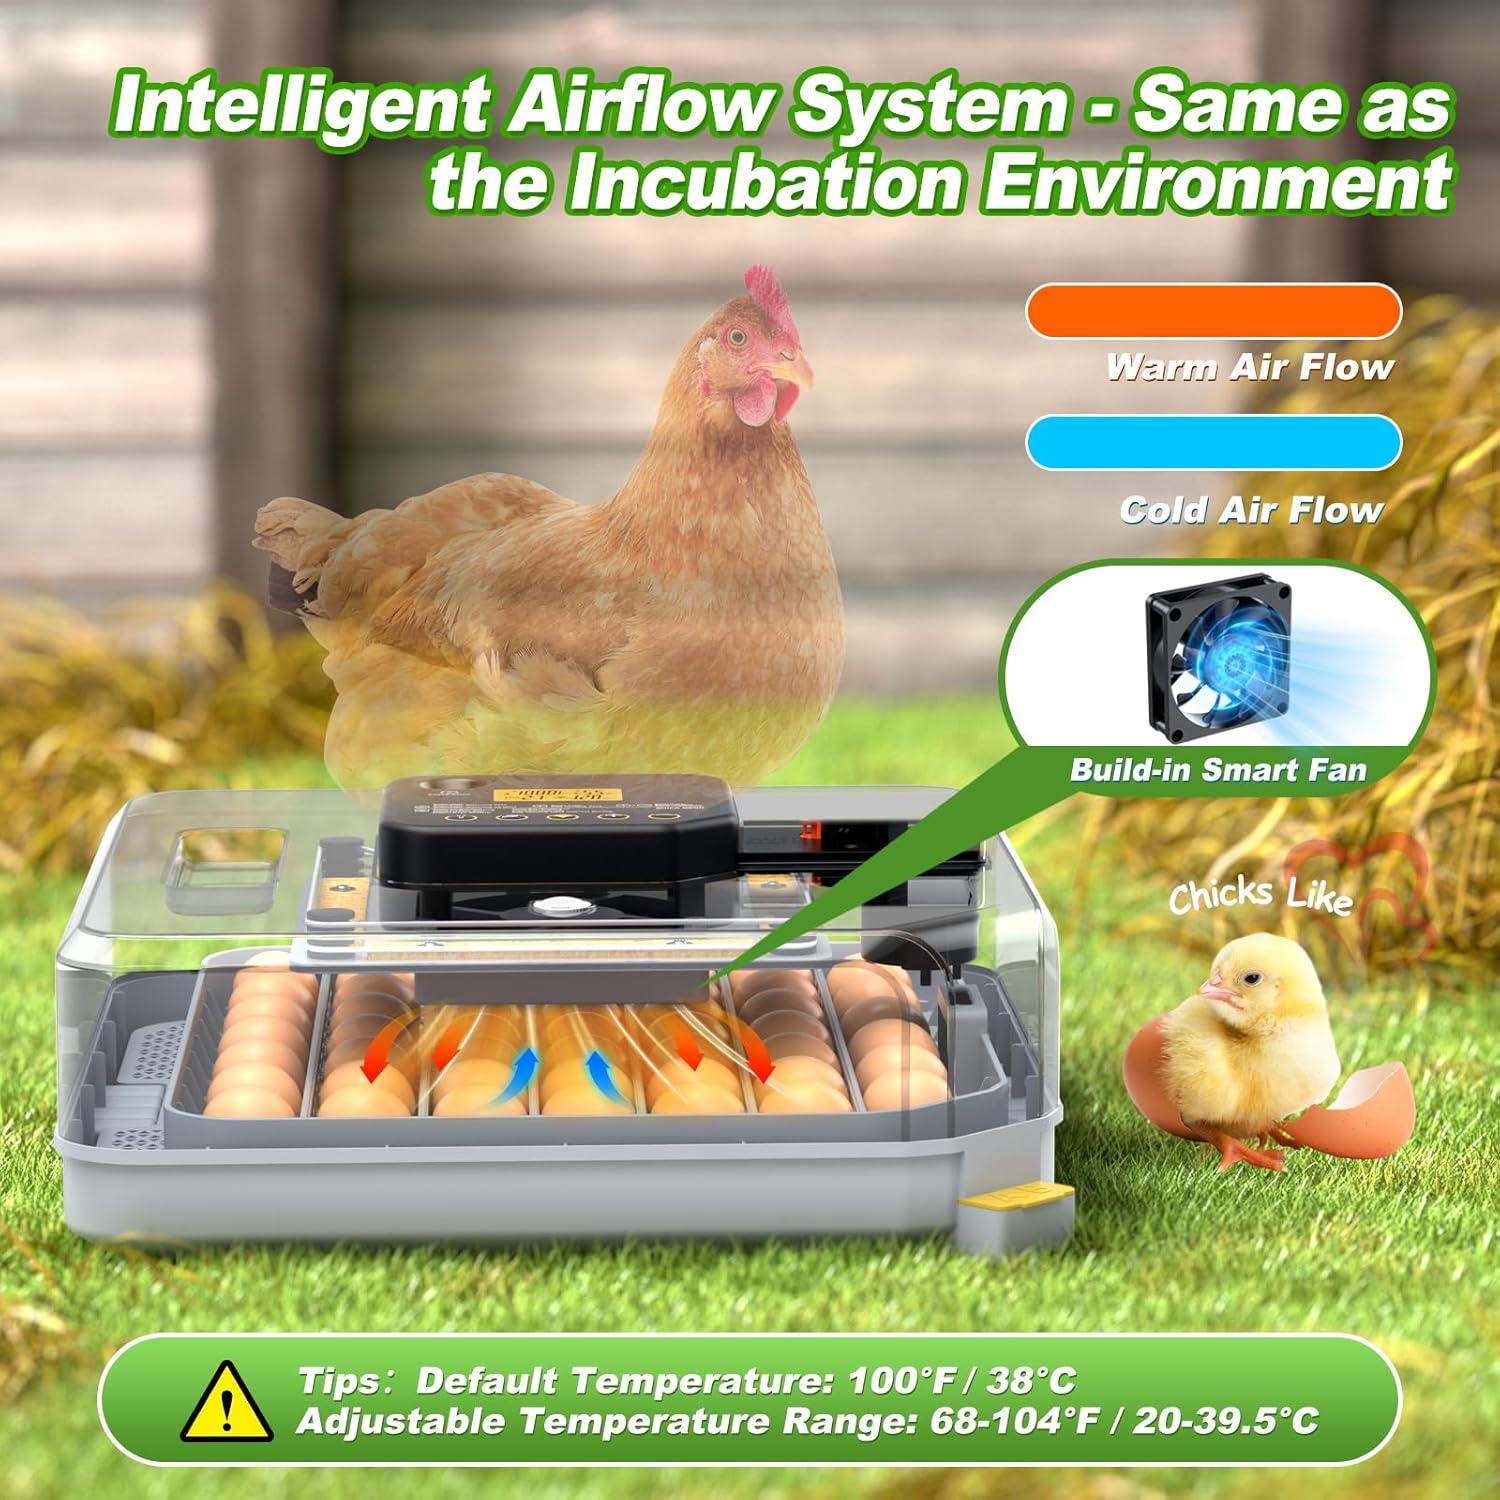
This diagram illustrates the intelligent airflow system within the incubator. It shows a built-in smart fan circulating warm and cold air to maintain a consistent and optimal incubation environment, mimicking natural conditions.
Setup
- Unpack: Carefully remove all components from the packaging.
- Assemble Trays: Place the adjustable egg trays and card strips into the incubator base according to the size of eggs you plan to hatch. The incubator can accommodate 48 chicken eggs, 36 duck eggs, 16 goose eggs, 32 turkey eggs, 132 quail eggs, or 132 bird eggs.
- Water Filling (Initial): Fill the provided 300ml water bottle with distilled water. Connect the spare hose accessory kit to the external water inlet (usually marked 'A' or 'B') and place the other end into the water bottle. Ensure the water bottle is positioned lower than the incubator for gravity feed.
- Placement: Position the incubator on a flat, stable surface in a room with a consistent ambient temperature (ideally between 68-77°F / 20-25°C) and away from direct sunlight or drafts.
- Power Connection: Connect the charger to the incubator and then plug it into a suitable power outlet. The digital display should illuminate.
- Pre-heating: Allow the incubator to run for at least 2-4 hours (preferably 24 hours) before placing eggs inside. This allows the temperature and humidity to stabilize.
Operating Instructions
1. Control Panel Overview

A detailed view of the incubator's control panel, featuring an LED display that shows incubation days, temperature, humidity, and egg turning interval. The smart buttons for 'Egg Candler', 'Add Water', 'Setting', 'Increase', and 'Decrease' are clearly labeled, providing intuitive control over the incubation process.
The LED display shows current incubation parameters. Use the smart buttons for adjustments:
- Setting Button: Press to cycle through settings (incubation days, humidity, egg turning interval).
- '+' / '-' Buttons: Adjust values up or down.
- Egg Candler Button: Activates the built-in egg candler.
- Add Water Button: Initiates automatic water addition (if connected to external bottle).
2. Temperature Control
The incubator features an advanced digital temperature control system. The default temperature is 100°F (38°C), with an adjustable range of 68-104°F (20-39.5°C).
- Press the 'Setting' button until the temperature display flashes.
- Use the '+' or '-' buttons to adjust the desired temperature.
- Press 'Setting' again to confirm and move to the next parameter, or wait a few seconds for the setting to save automatically.
3. Humidity Control
The incubator maintains humidity through an automatic water addition system. The external water bottle provides 5-7 days of use per refill.
- Automatic Water Addition: Ensure the external water bottle is connected and filled with distilled water. The system will automatically add water as needed to maintain humidity.
- Adjusting Humidity: Press the 'Setting' button until the humidity display flashes. Use the '+' or '-' buttons to set the desired humidity level.
- Emergency Water Addition (A+B Ports): If humidity drops significantly during mid-to-late incubation, water can be manually added through the external A+B water inlets without opening the lid. This prevents heat loss.
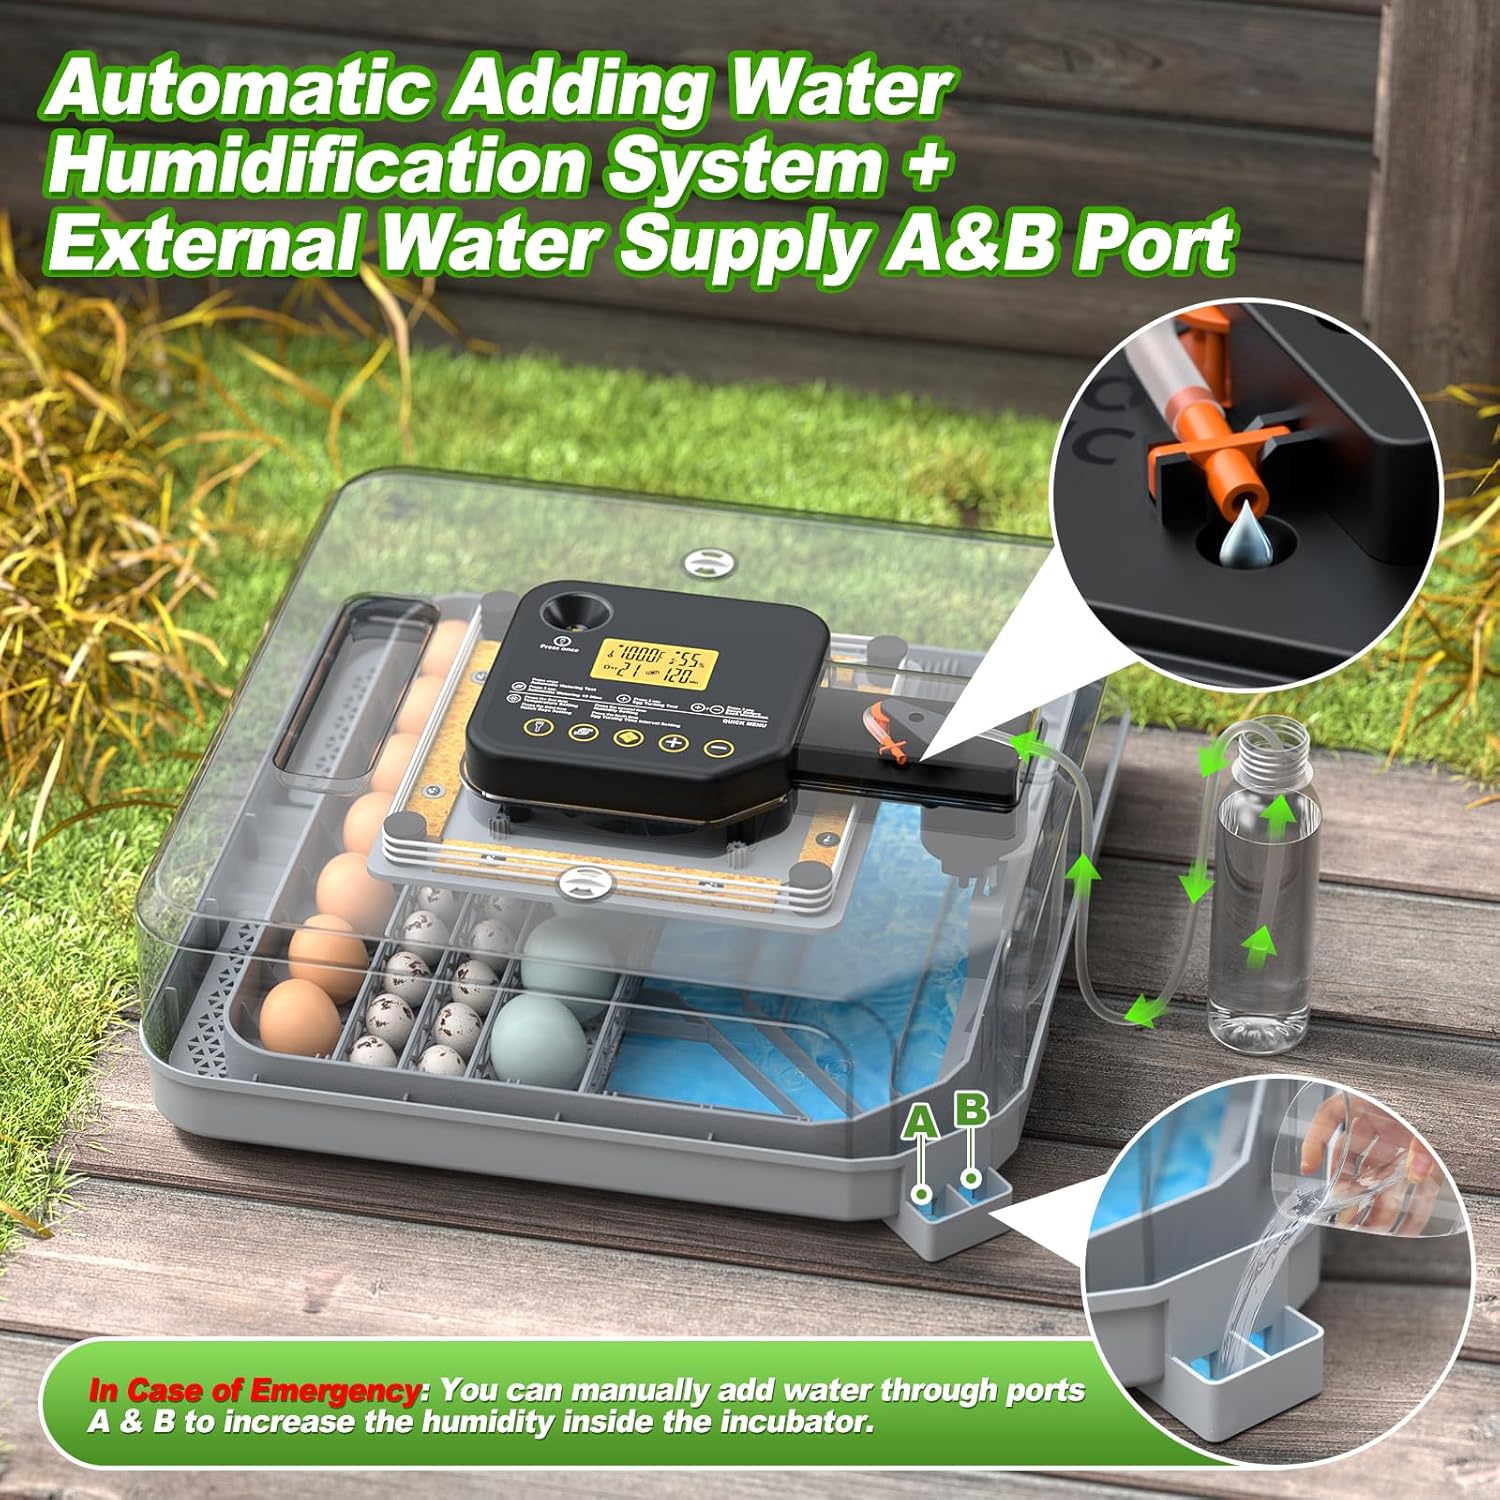
This image demonstrates the incubator's automatic humidification system. It shows an external water bottle connected to the incubator, providing a continuous water supply. Insets illustrate the A+B external water inlets, which allow for manual water addition without opening the lid, crucial for maintaining humidity during critical incubation stages.
4. Automatic Egg Turning
The incubator automatically turns eggs to prevent embryo adhesion and ensure even heating. The egg-turning function automatically pauses 3 days before the expected hatch date.
- Setting Turning Interval: Press the 'Setting' button until the egg turning interval display flashes.
- Use the '+' or '-' buttons to select the desired interval (60, 90, 120, 150, 180, or 210 minutes).
- The incubator will automatically rotate the eggs at the set interval.

This image highlights the automatic egg-turning feature of the incubator. It shows the central turning mechanism and indicates adjustable turning intervals ranging from 60 to 210 minutes, ensuring eggs are rotated consistently for optimal development. The graphic also notes that for chick eggs, auto-turning stops on day 18 for a day 21 hatch.
5. Egg Candling
The built-in LED egg candler allows for visual observation of embryo development.
- Press the 'Egg Candler' button to activate the light.
- Gently place an egg over the candler light to observe the embryo.
- Typical observation stages are Days 5-7, 11-13, and 16-18.

This image shows a user utilizing the incubator's built-in LED egg candler. The candler allows for visual inspection of egg development at different stages (Days 5-7, 11-13, 16-18), providing insight into embryo viability without disturbing the incubation process.
6. Incubation Guidelines for Various Eggs
The incubator is suitable for a wide range of poultry eggs. Optimal temperature and humidity may vary slightly by species.

This image illustrates the versatility of the incubator, showing different types of eggs it can accommodate. It also provides a guide to typical incubation periods for chicken (21 days), duck (28 days), goose (28 days), quail (17 days), turkey (28 days), and peacock (28 days) eggs.
| Egg Type | Incubation Days |
|---|---|
| Chicken | 21 days |
| Quail | 17 days |
| Duck | 28 days |
| Turkey | 28 days |
| Goose | 28-32 days |
| Pigeon | 18 days |
| Peacock | 28 days |
Note: Always research specific temperature and humidity requirements for the particular species you are incubating. The automatic egg turning function will stop 3 days before the expected hatch date.
Maintenance
Regular cleaning and maintenance ensure the longevity and hygiene of your incubator.
- Cleaning: After each hatch, unplug the incubator and allow it to cool. The top control unit can be separated from the base for easier cleaning. Remove the egg trays and wash them with mild soap and water. The PVC shell can be wiped clean with a damp cloth. Ensure all parts are completely dry before reassembly or storage.
- Water System: Regularly clean the water tank and hoses to prevent algae or bacterial growth. Use distilled water to minimize mineral buildup.
- Storage: Store the incubator in a clean, dry place away from direct sunlight and extreme temperatures when not in use.
Troubleshooting
If you encounter issues with your incubator, refer to the following common problems and solutions:
| Problem | Possible Cause | Solution |
|---|---|---|
| No power/Display off | Power cord loose or unplugged; Power outage. | Check power connections; Verify power outlet functionality. |
| Temperature too high/low | Incorrect temperature setting; Room temperature fluctuations; Sensor issue. | Adjust temperature setting; Ensure stable room temperature; Contact support if sensor is suspected. |
| Humidity too high/low | Insufficient water; Too much water; Water system blockage; Incorrect humidity setting. | Refill water bottle; Check for blockages in hoses; Adjust humidity setting; Use A+B ports for emergency water. |
| Eggs not turning | Egg turning function paused (last 3 days); Motor malfunction; Obstruction. | Verify incubation day; Check for obstructions; Contact support if motor issue. |
| Alarm sounding | Temperature or humidity outside set range. | Check temperature and humidity levels and adjust as needed. |
If the problem persists after attempting these solutions, please contact VIOPUMPO customer support for assistance.
Specifications
| Feature | Detail |
|---|---|
| Brand | VIOPUMPO |
| Model Number | Egg Incubator |
| ASIN | B0FFB6WP9F |
| Capacity | 48 Chicken Eggs, 36 Duck Eggs, 16 Goose Eggs, 32 Turkey Eggs, 132 Quail Eggs, 132 Bird Eggs |
| Material | Acrylonitrile Butadiene Styrene (ABS) |
| Product Dimensions (LxWxH) | 19 x 18.5 x 8 inches |
| Item Weight | 8.4 Pounds |
| Temperature Range | Adjustable from 68-104°F (20-39.5°C) |
| Egg Turning | 360° Automatic Egg Turning with 6 adjustable intervals (60, 90, 120, 150, 180, 210 minutes) |
| Humidity Control | Automatic water addition system, external A+B water inlets, humidity adjustable, alarm function |
| Special Features | LED Screen, Built-in LED Egg Candler, Easy to Clean, Separable Control Unit |
Warranty and Support
VIOPUMPO stands behind the quality of its products.
- Money-Back Guarantee: Enjoy a 30-day money-back guarantee.
- Limited Warranty: The product comes with a 2-year limited warranty.
- Technical Support: Lifetime technical support is provided.
For any questions, concerns, or technical assistance, please contact VIOPUMPO customer service. Refer to the contact information provided with your purchase or on the official VIOPUMPO website.


