Introduction
Thank you for choosing the Blukar K9129 Rechargeable Headlamp. This manual provides essential information for the safe and efficient use of your headlamp. Please read it thoroughly before operation and retain it for future reference.
Product Overview
Key Features
- Dual Color Temperatures: Features both white and warm light options for various environments.
- Multiple Lighting Modes: Offers 12 modes, including standard and motion sensor modes, with XPG White, XPG Warm, COB White, XPG+COB White, COB Red, and COB Red Strobe.
- Motion Sensor Control: Allows hands-free operation by waving your hand within 15cm.
- USB-C Rechargeable: Built-in 1200mAh battery provides up to 30 hours of runtime on a single charge.
- Dimmable Brightness: Stepless dimming from 100% to 30% with memory function.
- Adjustable & Comfortable: 45° adjustable lamp head and a comfortable, washable elastic headband.
- IPX5 Waterproof: Designed to resist water splashes from all angles.
Package Contents
- Blukar K9129 Headlamp
- USB-C Charging Cable
- Helmet Clips (4x)
- User Manual (this document)
Setup
1. Initial Charging
Before first use, fully charge the headlamp. Connect the provided USB-C charging cable to the headlamp's charging port and to a USB power source (e.g., AC charger, power bank, computer). The 4 battery indicators will show charging progress. A full charge typically takes 2-3 hours.
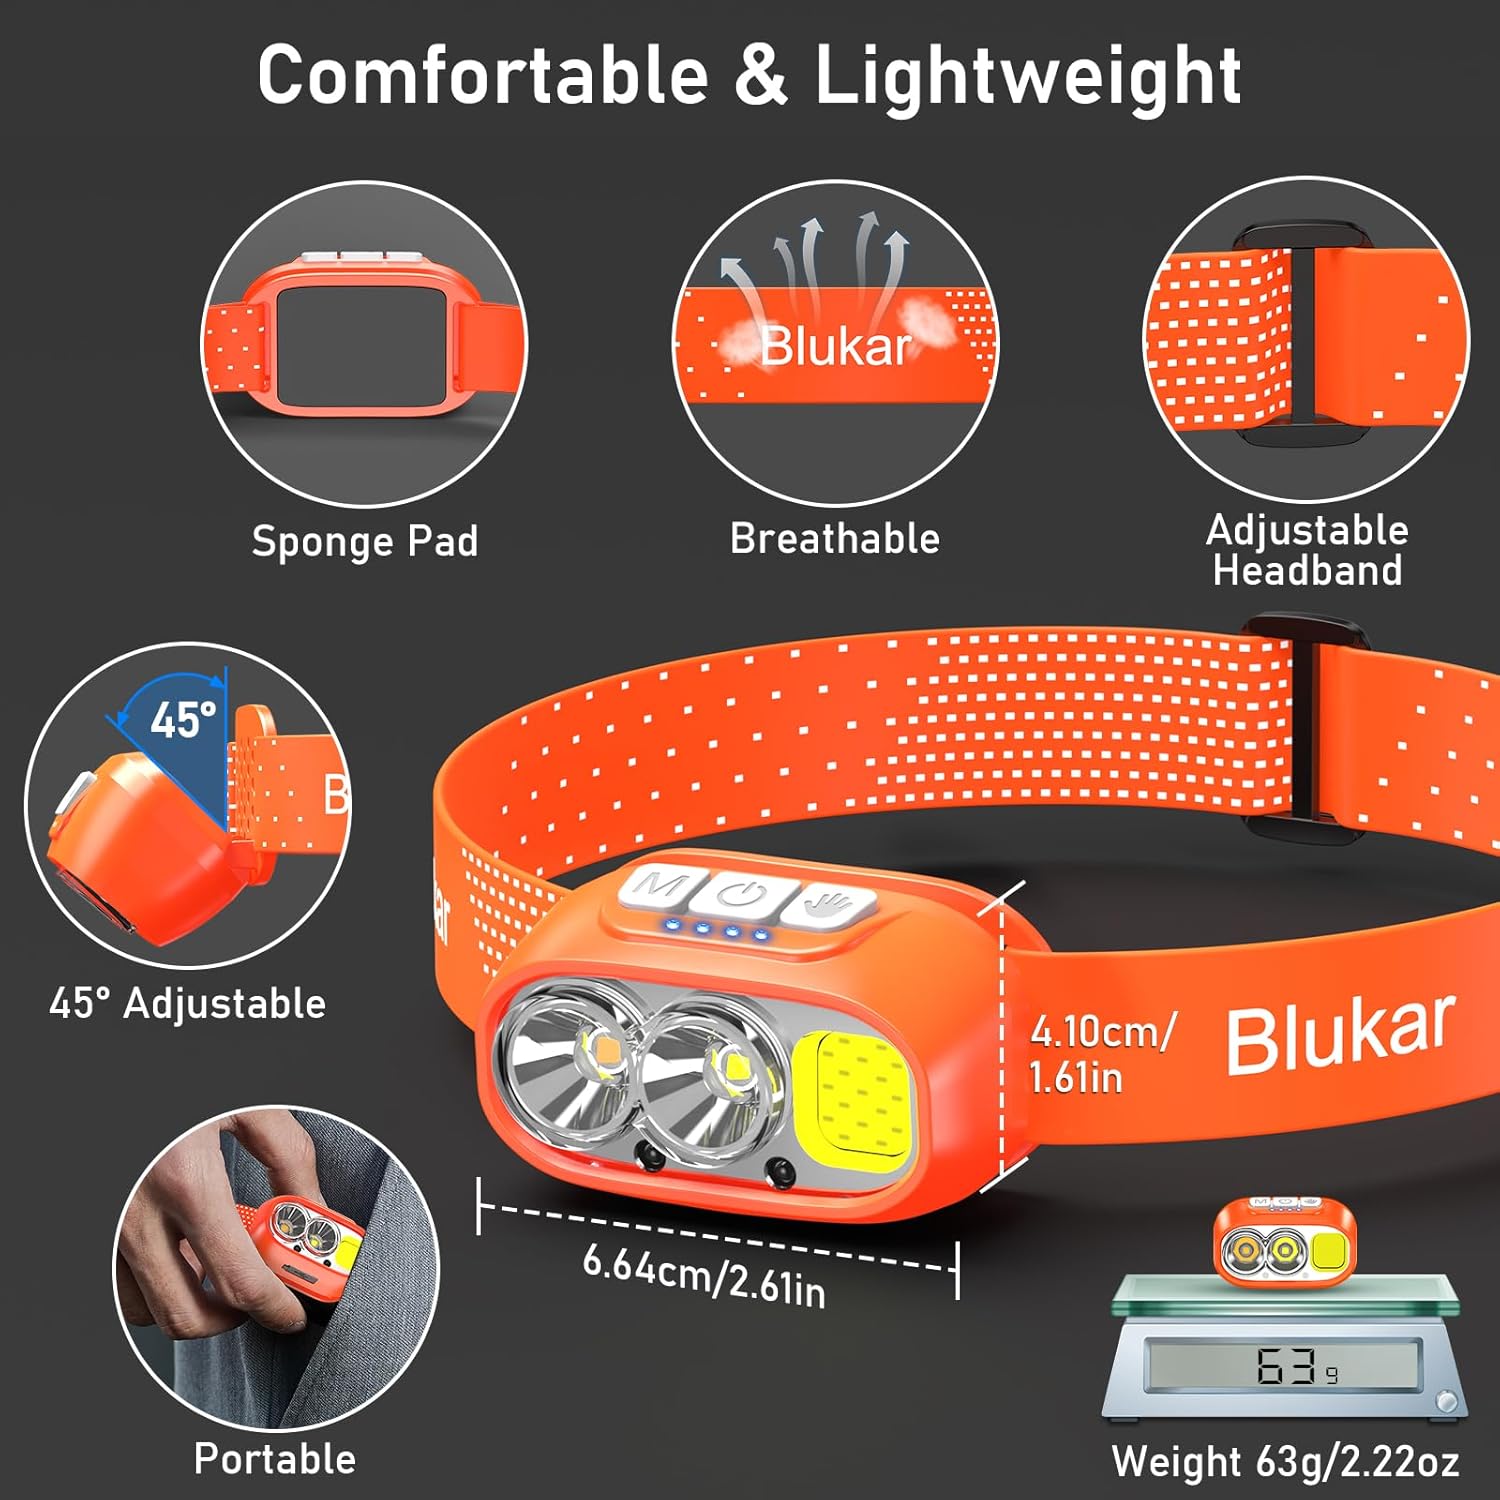
Image: The headlamp being charged via its USB-C port. It can be connected to various USB power sources like an AC adapter, power bank, or computer.
2. Adjusting the Headband
The elastic headband is adjustable to fit various head sizes. Adjust the length for a comfortable and secure fit. The headband is also removable and washable for hygiene.

Image: Details of the headlamp's comfortable and lightweight design, showing the adjustable headband, sponge pad, and 45-degree tilt capability.
3. Attaching to a Helmet (Optional)
Use the included 4 helmet clips to securely attach the headlamp to a helmet for a stable fit during activities.
Operating Instructions
Button Functions

Image: Close-up of the headlamp's top panel, highlighting the three independent control buttons: 'M' for Normal Mode, a hand icon for Sensor Mode, and a power icon for Power & Dimmer.
- Normal Mode Button (M): Short press to cycle through standard lighting modes.
- Sensor Mode Button (Hand Icon): Short press to activate motion sensor mode (green light indicates activation). Once active, wave your hand within 15cm to turn the light on/off.
- Power & Dimmer Button (Power Icon):
- Short press to turn the light on/off.
- Long press to adjust brightness steplessly (100%-30%).
- Features a memory function for the last used brightness and mode.
Lighting Modes
The headlamp offers 12 lighting modes, accessible via the Normal Mode button and Sensor Mode button.

Image: Visual representation of the 12 lighting modes available, including various white light combinations, red light, and sensor modes. It also illustrates the stepless dimming function.
- Standard Modes (6): XPG White Light, XPG Warm Light, COB White Light, XPG+COB White Light, COB Red Light, COB Red Light Strobe.
- Sensor Modes (6): The same 6 modes as above, activated by the Sensor Mode button.
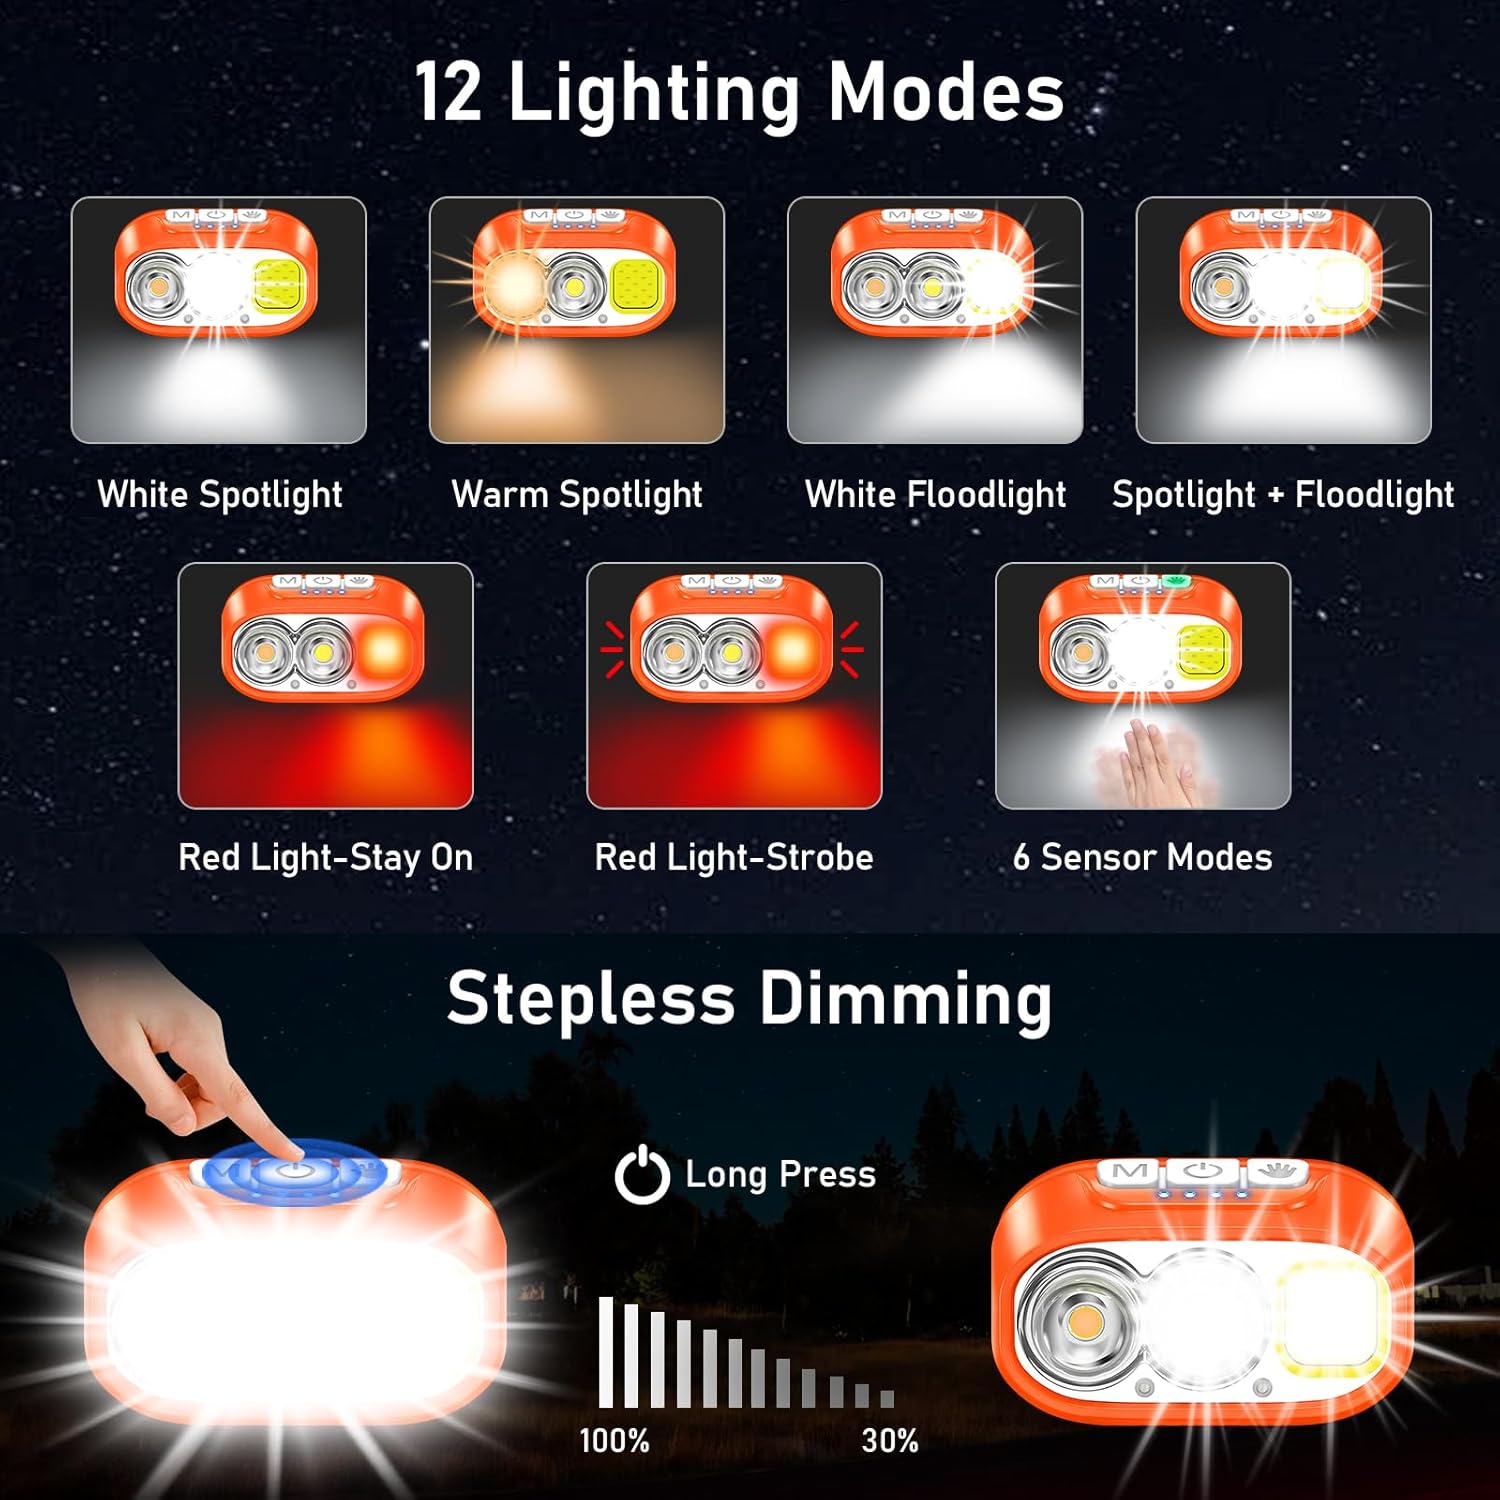
Image: Illustration of the three main light sources: White Light for general use, Warm Light for challenging weather conditions like fog or snow, and Red Light for specialized uses like night fishing or emergency signaling.
Motion Sensor Operation
To use the motion sensor, press the Sensor Mode button. A green indicator light will illuminate. Once active, simply wave your hand within 15cm (approximately 6 inches) in front of the headlamp to toggle the light on or off without touching the buttons.
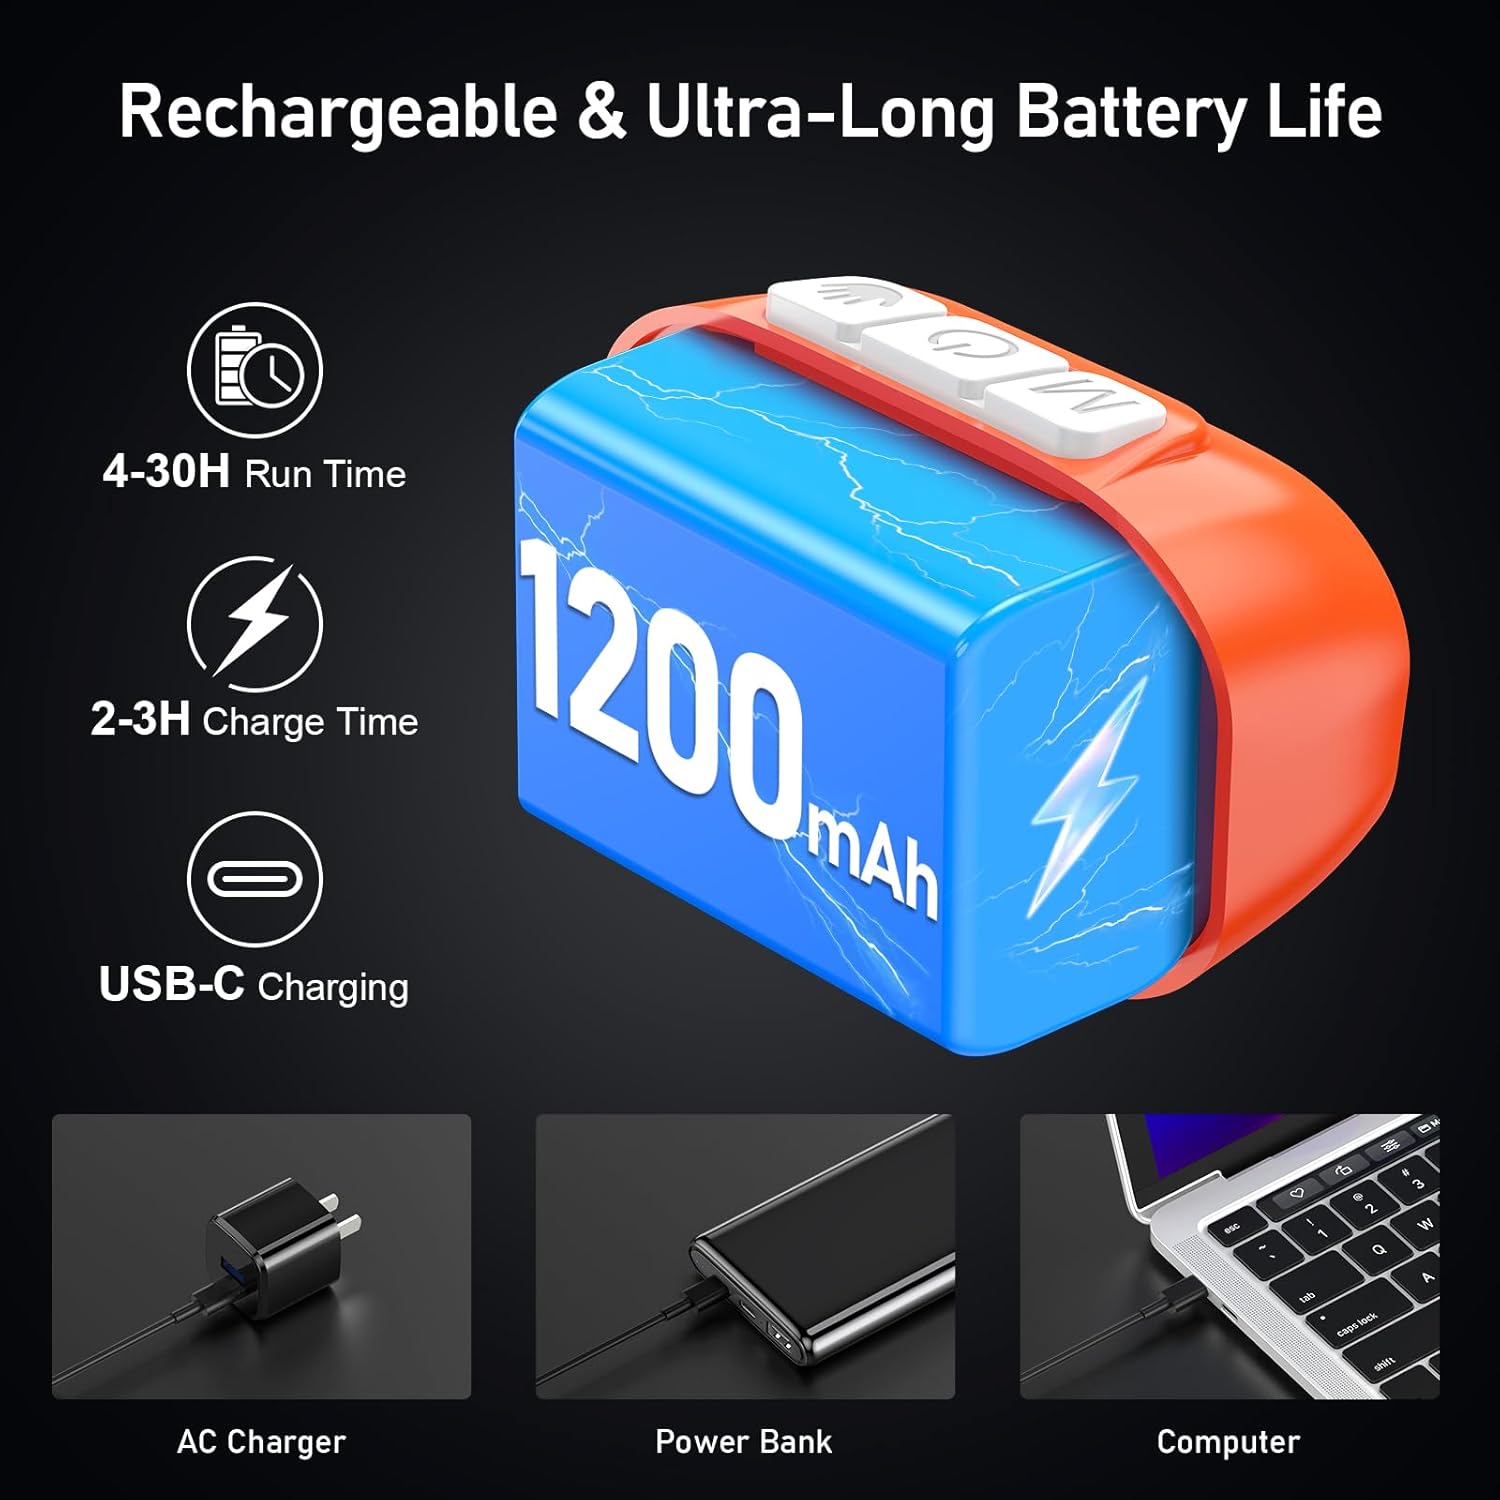
Image: A person demonstrating the motion sensor mode, turning the headlamp on and off with a hand wave while working on a car engine, highlighting the 15cm sensing distance.
Adjusting Beam Angle
The headlamp unit can be tilted up or down by 45° to direct the light precisely where needed.
Image: The headlamp unit is shown with an arrow indicating its 45-degree adjustable tilt capability.
Maintenance
- Cleaning: The elastic headband is removable and washable. Clean the headlamp body with a soft, damp cloth. Do not use abrasive cleaners or solvents.
- Battery Care: To prolong battery life, charge the headlamp regularly, even if not in frequent use. Avoid fully discharging the battery for extended periods.
- Storage: Store the headlamp in a cool, dry place away from direct sunlight and extreme temperatures.
- Water Resistance: The headlamp is IPX5 waterproof, meaning it can resist water splashes. Do not submerge the headlamp in water.
Image: The headlamp is shown with water splashing over it, illustrating its IPX5 waterproof capability, which protects against water jets from any direction.
Troubleshooting
| Problem | Possible Cause | Solution |
|---|---|---|
| Headlamp turns off unexpectedly in sensor mode. | Sensor reacting to unintended movement or objects. | Switch off the sensor mode if not needed, or ensure no objects are passing within 15cm of the sensor. |
| Headlamp does not turn on. | Battery is depleted. | Charge the headlamp fully using the provided USB-C cable. |
| Light output is dim. | Low battery or dimming function activated. | Recharge the battery. Long press the Power & Dimmer button to increase brightness. |
| Headlamp not charging. | Faulty cable or power source. | Try a different USB-C cable or a different USB power source. Ensure the cable is securely connected. |
Specifications
| Model Number | K9129 |
| Brand | Blukar |
| Material | ABS |
| Color | Orange |
| Product Dimensions | 2.61"D x 1.61"W x 1.38"H |
| Item Weight | 84 Grams (2.96 ounces) |
| Battery Capacity | 1200mAh |
| Battery Type | Lithium Polymer |
| Charging Time | 2-3 hours |
| Runtime | Up to 4 hours (ultra-bright mode), up to 30 hours (soft light mode) |
| Waterproof Rating | IPX5 |
| Included Components | USB Cable |
Warranty and Support
Blukar products are designed for reliability and performance. For any questions, technical support, or warranty inquiries, please contact Blukar customer service through the retailer where the product was purchased or visit the official Blukar website.
Please retain your proof of purchase for warranty claims.


