1. Introduction
This manual provides essential information for the proper installation, operation, and maintenance of your Acegeek Stratus Mesh Mid-Tower Gaming PC Case. Please read these instructions carefully before beginning assembly to ensure optimal performance and longevity of your system. This case is designed for gaming PC builds, focusing on airflow and component visibility.
2. Product Overview
The Acegeek Stratus Mesh is a Mid-Tower PC case featuring a mesh front panel for superior airflow and a tempered glass side panel to showcase your internal components. It supports various motherboard form factors and offers extensive cooling options.
2.1 Key Features
- Excellent Airflow: Designed with a mesh front panel for optimal ventilation, ideal for high-performance systems.
- Tempered Glass Side Panel: A clear tempered glass panel allows for an unobstructed view of your PC's interior.
- Motherboard Compatibility: Supports Micro-ATX, Mini-ITX, and ATX motherboards, offering versatility for various builds.
- Advanced Cooling Support: Accommodates water coolers up to 240mm on the top and up to 360mm on the front.
- Extensive Fan Capacity: Supports up to 8 x 120mm fans for enhanced thermal efficiency. Note: Fans are not included with the case.
- Optimized Internal Space: Provides dedicated bays for 1x HDD and 2x SSDs for storage.
- Durable Construction: Built with SPCC metal, ABS, tempered glass, and metallic mesh for resistance and durability.
- Efficient Cable Management: Features 20mm of space behind the motherboard tray to keep your setup clean and organized.
2.2 Case Components
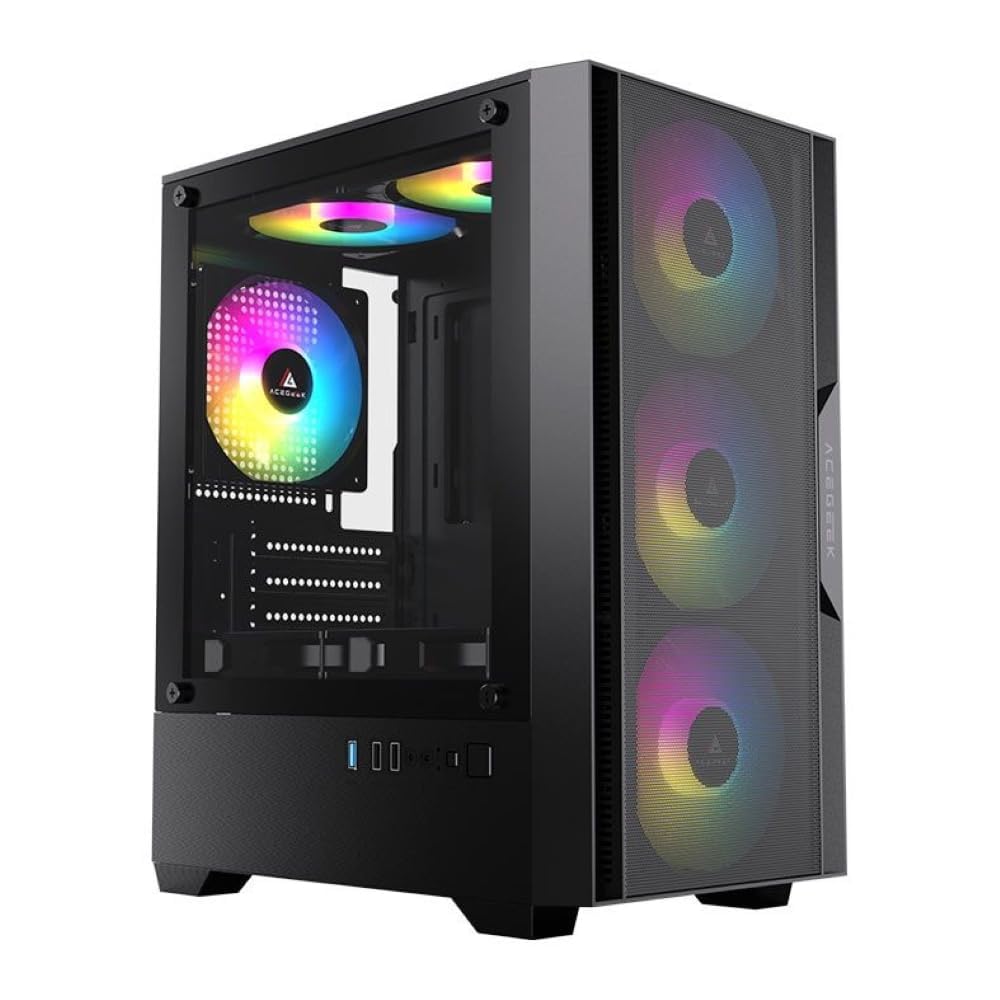
Figure 2.2.1: Front-left view of the Acegeek Stratus Mesh case, illustrating its mesh front and tempered glass side panel. RGB fans are shown for visual reference, but are not included with the product.
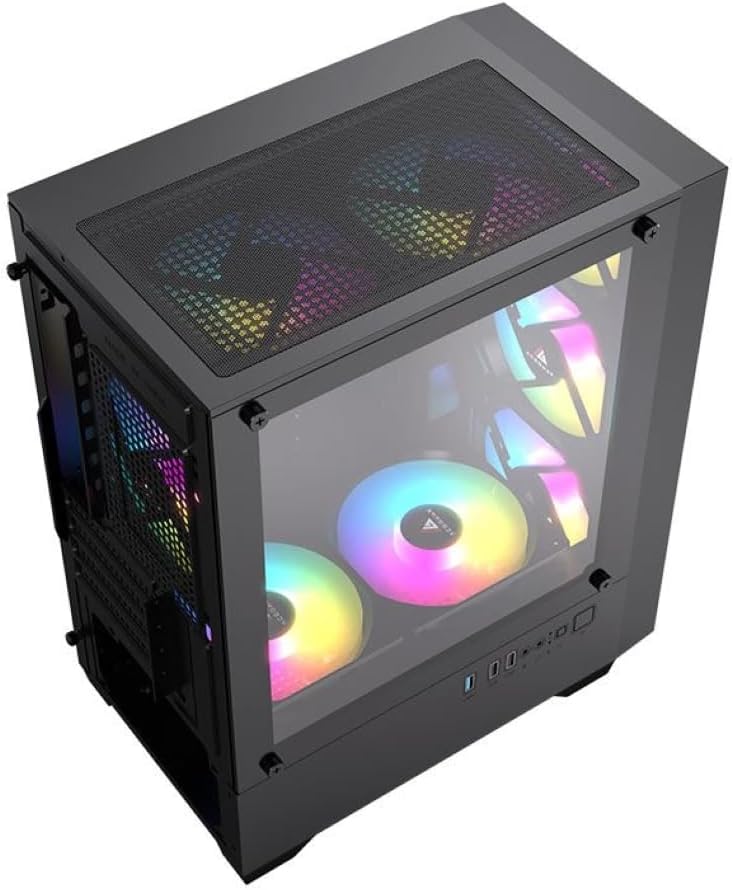
Figure 2.2.2: Top-right interior view of the case, showing the top mesh panel and internal layout for component installation.

Figure 2.2.3: Rear-right view of the case, highlighting the rear fan mount, expansion slots, and the power supply shroud area.

Figure 2.2.4: Direct front view of the case, emphasizing the mesh design for optimal airflow.

Figure 2.2.5: Interior view of the case, showing the motherboard tray, various fan mounting points, and the power supply shroud.
3. Setup Instructions
Follow these steps to assemble your PC components within the Acegeek Stratus Mesh case.
3.1 Preparing the Case
- Carefully remove the tempered glass side panel by unscrewing the thumb screws. Place it on a soft, flat surface to prevent scratches.
- Remove the rear side panel to access the cable management area.
3.2 Motherboard Installation
- Install the I/O shield (if not pre-installed on your motherboard) into the rear opening of the case.
- Align your ATX, Micro-ATX, or Mini-ITX motherboard with the standoffs inside the case. Ensure all screw holes align.
- Secure the motherboard using the provided screws.
3.3 Power Supply Installation
- Slide your power supply unit (PSU) into the dedicated compartment at the bottom rear of the case.
- Secure the PSU from the rear of the case using screws. The case supports PSUs up to 190mm in length.
3.4 Storage Drive Installation
- Install 3.5" HDDs in the drive cage located under the PSU shroud.
- Install 2.5" SSDs on the dedicated mounting points behind the motherboard tray. The case supports 1x HDD and 2x SSDs.

Figure 3.4.1: Rear interior view, illustrating the cable management space and mounting locations for storage drives.
3.5 Graphics Card (VGA) and Expansion Card Installation
- Remove the necessary expansion slot covers from the rear of the case.
- Insert your graphics card or other expansion cards into the appropriate PCIe slots on your motherboard.
- Secure the cards with screws. The case supports VGA cards up to 280mm in length.
3.6 Cooling System Installation (Fans and Water Coolers)
- Install 120mm fans in the designated positions: 3x front, 2x top, 1x rear, and 2x bottom.
- For water cooling, install a 240mm radiator on the top (ensure memory height is within 28mm) or a 360mm radiator on the front.
- Secure all fans and radiators with appropriate screws.
3.7 Cable Management
Utilize the 20mm cable management space behind the motherboard tray to route and tie down cables. This improves airflow and maintains a clean aesthetic.
3.8 Final Assembly
- Connect all necessary power and data cables to your components.
- Reattach the rear side panel and the tempered glass side panel.
4. Operating Instructions
Once all components are installed and secured, connect your peripherals and power cable. Press the power button on the front I/O panel to start your system. The mesh front and multiple fan mounts ensure efficient cooling during operation.
5. Maintenance
Regular maintenance helps preserve the performance and appearance of your PC case.
- Dust Filters: The case includes dust filters on the mesh panels. Periodically remove and clean these filters with compressed air or a soft brush to maintain optimal airflow and prevent dust buildup inside your system.
- Tempered Glass Panel: Clean the tempered glass panel with a microfiber cloth and a non-abrasive glass cleaner. Avoid harsh chemicals that could damage the glass or coating.
- Exterior Cleaning: Wipe the exterior surfaces with a soft, damp cloth. Avoid direct water contact with electronic components.
6. Troubleshooting
If you encounter issues, consider the following common troubleshooting steps:
- No Power: Ensure all power cables are securely connected to the power supply, motherboard, and wall outlet. Check the power button connection to the motherboard.
- Overheating: Verify that all fans are spinning correctly and are oriented for proper airflow. Ensure dust filters are clean and not obstructing air intake. Check CPU cooler installation.
- Component Not Detected: Recheck all component connections (motherboard, GPU, RAM, storage drives). Ensure they are seated correctly in their respective slots.
- Loose Cables: Inspect all internal cables for secure connections, especially front panel connectors.
7. Specifications
| Feature | Specification |
|---|---|
| Brand | Acegeek |
| Model Name | AG-STRATUS-MESH-BK |
| Case Type | Mid Tower |
| Material | SPCC (metal) + ABS + Tempered Glass + Metallic Mesh |
| Color | Black |
| Motherboard Compatibility | ATX, Micro-ATX, Mini-ITX |
| Expansion Slots | 5 |
| Drive Bays | 1 x HDD + 2 x SSD |
| Max CPU Cooler Height | 165 mm |
| Max VGA Length | 280 mm |
| PSU Length Support | 190 mm |
| Cable Management Space | 20 mm |
| Fan Support (Front) | 3 x 120 mm |
| Fan Support (Top) | 2 x 120 mm |
| Fan Support (Rear) | 1 x 120 mm |
| Fan Support (Bottom) | 2 x 120 mm |
| Water Cooler Support (Front) | Up to 360 mm |
| Water Cooler Support (Top) | Up to 240 mm (with memory height < 28mm) |
| Product Dimensions (L x W x H) | 37 x 21 x 47 cm |
| Product Weight | 3.66 kg |
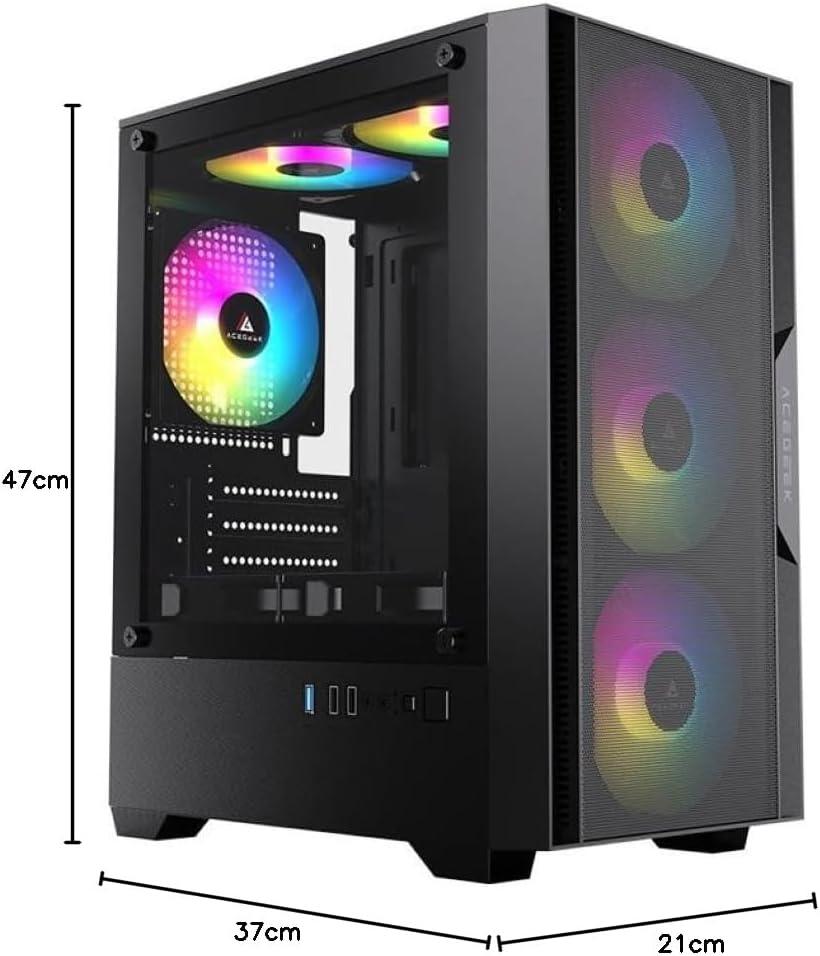
Figure 7.1: Diagram illustrating the physical dimensions of the Acegeek Stratus Mesh PC case.
8. Warranty and Support
The Acegeek Stratus Mesh PC Case comes with a manufacturer's warranty of 12 months. For warranty claims or technical support, please contact your retailer or the official Acegeek support channels. Keep your proof of purchase for warranty validation.


