1. Product Overview
The BITIWEND Wireless Signal Transmitter is designed to extend the functionality of existing wired intercoms and doorbell chime systems. It converts the signal from your wired doorbell into a wireless signal, allowing it to activate a wireless receiver. This enables you to hear your doorbell in various locations throughout your home or property, ensuring you never miss a visitor.
The system includes a radio converter (transmitter) and a wireless receiver, offering flexibility with 58 selectable polyphonic ringtones and 5 adjustable volume levels.

Figure 1: System Overview - Expanding Wireless Doorbell Chime
2. Safety Information
- Transmitter Connection Voltage: The transmitter operates with a connection voltage of 3-24V AC/DC.
- High Voltage Warning: Ensure not to connect the transmitter to high-voltage circuits. If your existing doorbell system operates above 24V, you must use a suitable transformer to reduce the voltage. Failure to do so may result in a short-circuit and damage to the device or pose a safety risk.
- Professional Installation: If you are unsure about the voltage or wiring of your existing doorbell system, consult a qualified electrician.
3. Package Contents
The BITIWEND Wireless Signal Transmitter package includes:
- 1 x Wireless Receiver
- 1 x Radio Converter (Transmitter)
4. Product Features
- Wide Compatibility: Integrates with electronic, electromechanical, and mechanical wired doorbell systems.
- Easy Installation: Simple connection to existing doorbell power and button connectors.
- Flexible Power Input: Transmitter supports 3-24V AC/DC.
- Extended Wireless Range: Up to 200 meters (656 feet) in open field between the transmitter and receiver.
- Customizable Chime: Choose from 58 polyphonic ringtones.
- Adjustable Volume: 5 levels of volume adjustment, ranging from 0 dB to 110 dB.
- Multiple Receivers: Supports adding multiple receivers for wider coverage.
5. Setup and Installation
5.1 Radio Converter (Transmitter) Installation
- Identify the power and button connectors within your existing wired doorbell system.
- Connect the two antennas of the wireless transmitter to the power connector and the button connector of your doorbell system. For cables marked with (+/-), it is not necessary to distinguish between positive and negative poles.
- Ensure the connection voltage is within the 3-24V AC/DC range. If the voltage exceeds 24V, use a transformer to prevent damage.

Figure 2: Radio Converter Installation Diagram
5.2 Connection Method for Specific Doorbell Models
Refer to the table below for common doorbell models and their corresponding connection points:
| Model | Connection Method |
|---|---|
| Sied** HTS 611 | Connections 7 and C |
| Sied** HTS 711 | Connections 15 and 16 |
| Sied** HTS 811 | Connections 1 and ERT |
| Inde** GmbH VT36M | Connections 1R and 4Y |
| elvo* Giot** | Connections 3 and 4 |
| Ur**met 1131 | Connections 6 and AC |
| Ur**met 1130/16 | Connections 6 and 7 |
| Terran** 600 | Connections 6 and 11 |
5.3 Receiver Placement
Plug the wireless receiver into a standard electrical outlet in your desired location. The receiver has an effective range of up to 200 meters (656 feet) in open areas. Multiple receivers can be added to cover larger spaces.
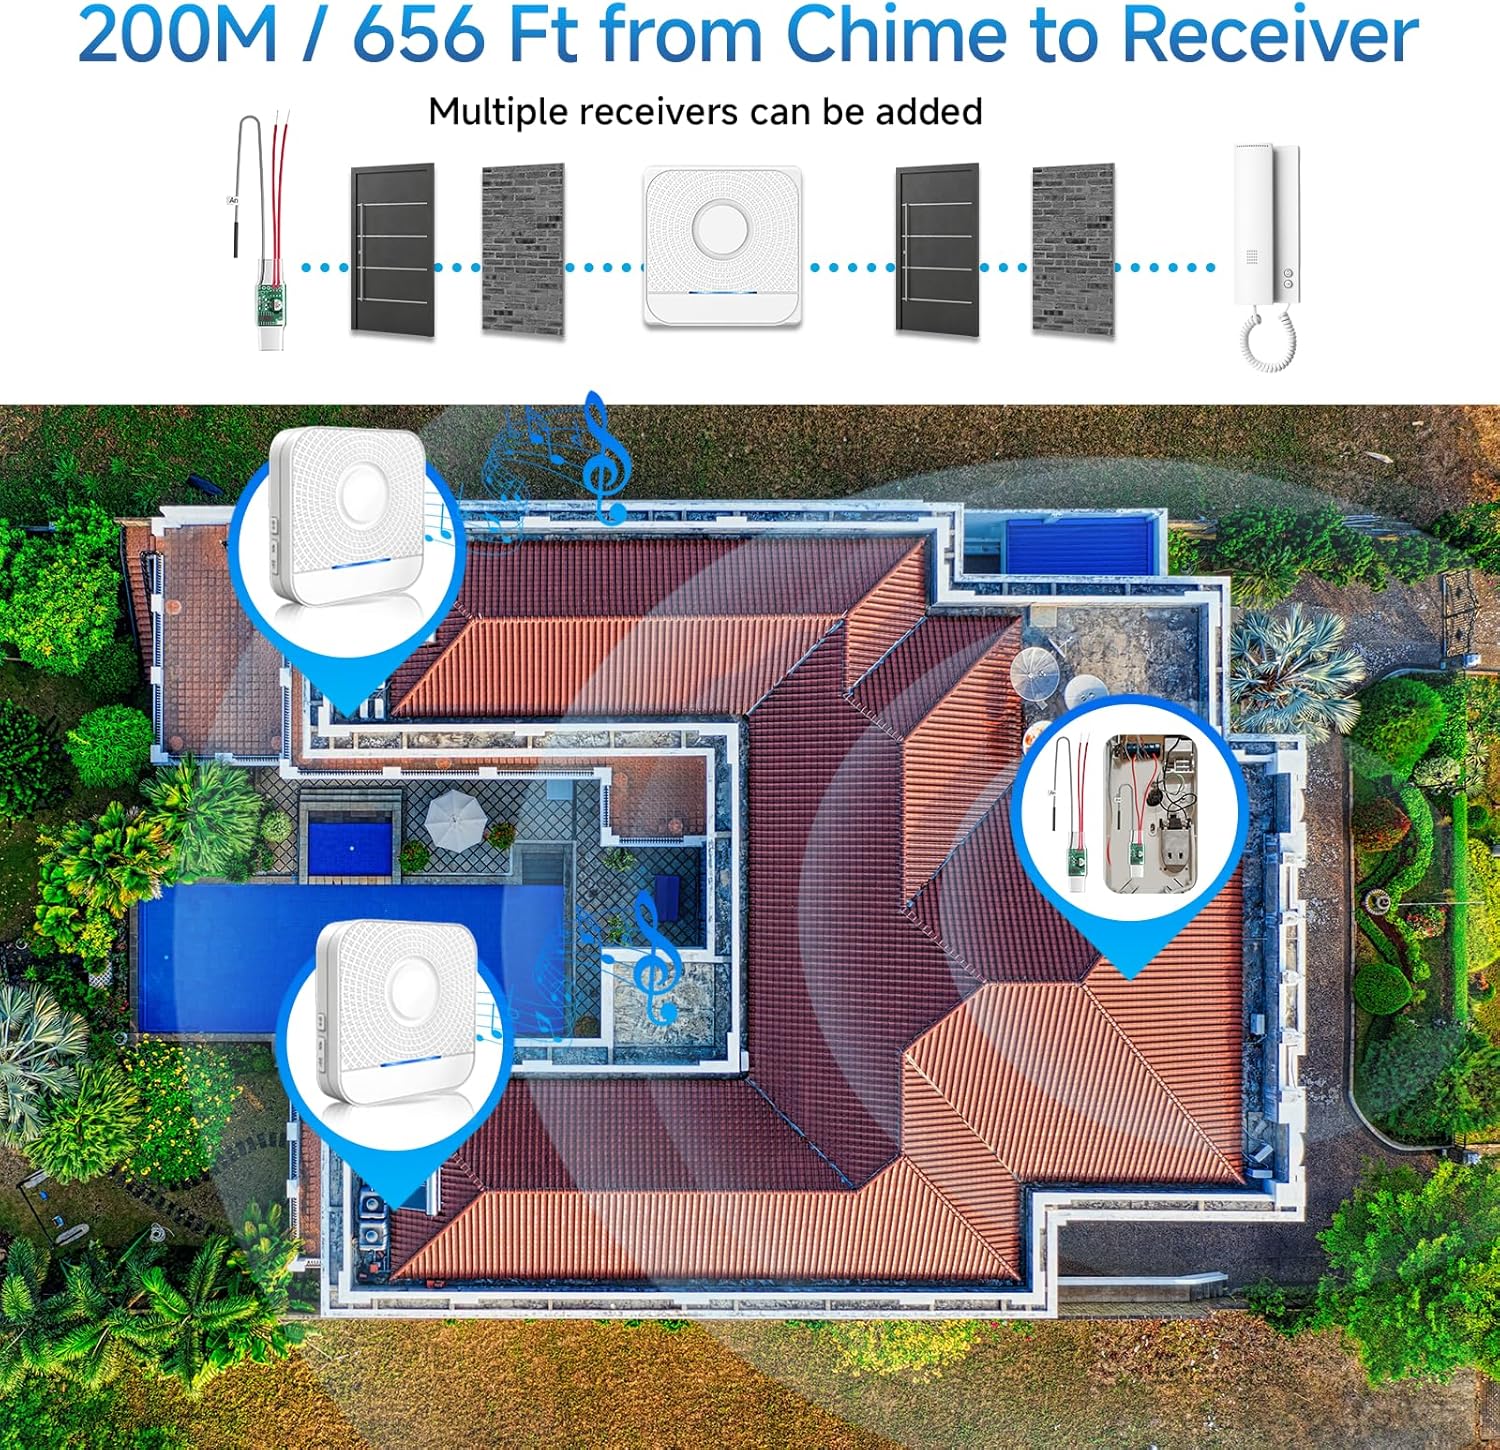
Figure 3: Wireless Range and Multiple Receiver Setup
6. Operation
6.1 Adjusting Volume
The receiver offers 5 levels of adjustable volume, from 0 dB (mute) to 110 dB (maximum). Use the volume buttons on the receiver to select your preferred sound level.

Figure 4: 5 Levels of Adjustable Volume
7. Pairing Instructions
Follow these steps to pair the wireless receiver with the radio converter:
- Select Ringtone: Plug the receiver into an outlet. Briefly press the 'Up' or 'Down' (Music) button on the receiver to cycle through and select your preferred ringtone.
- Enter Pairing Mode: Press and hold the 'Down' (Volume) button on the receiver for approximately 5-7 seconds. The receiver's LED indicator will flash rapidly, and you may hear a 'ding' sound, indicating it has entered pairing mode.
- Activate Doorbell: Quickly activate your wired doorbell button. The indicator light on the transmitter (radio converter) will light up, and the transmitter will send a signal to the receiver. When you hear the ringtone you selected in Step 1, the pairing operation is successful.
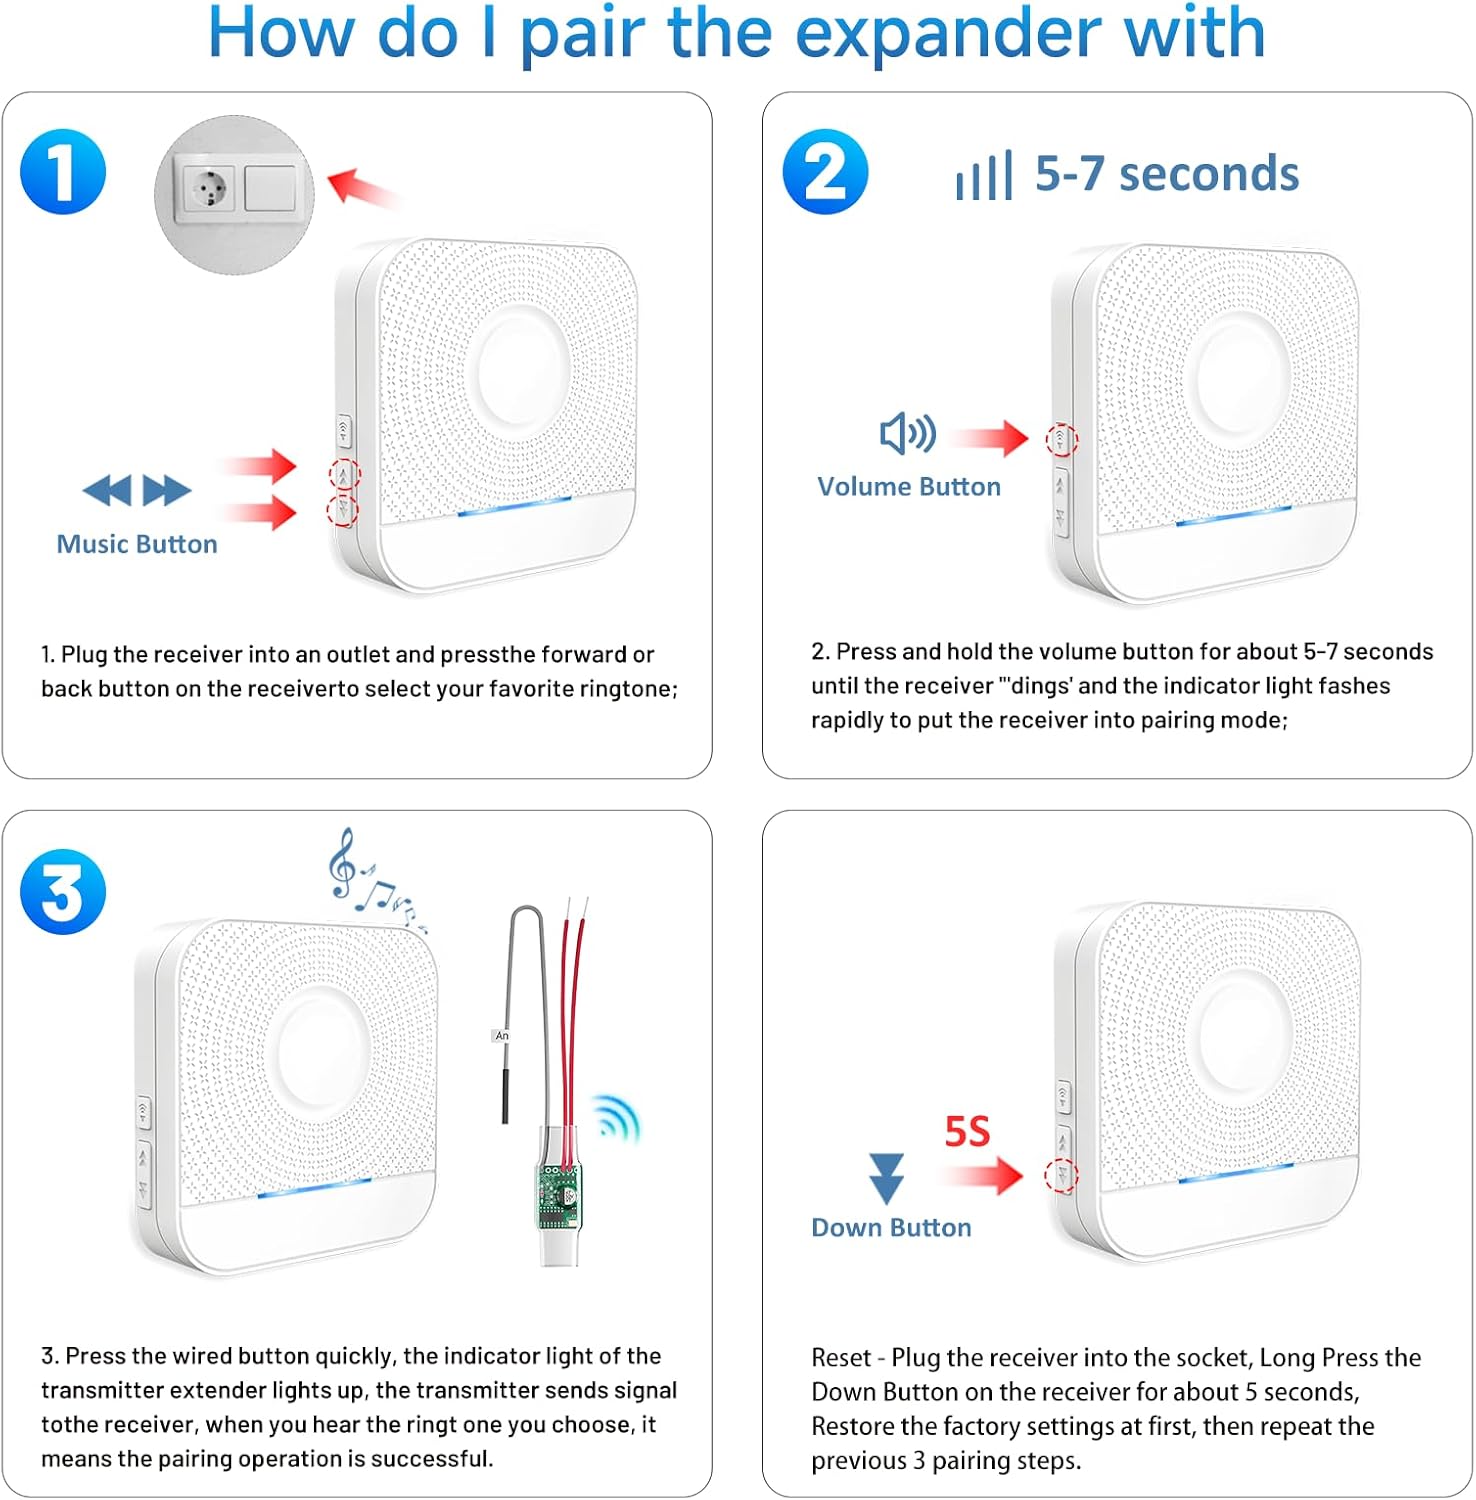
Figure 5: Pairing the Expander with the Receiver
7.1 Resetting Pairing
If you need to reset the pairing or encounter issues, follow these steps:
- Plug the receiver into an electrical socket.
- Press and hold the 'Down' (Music) button on the receiver for approximately 5 seconds.
- If the receiver emits a "ding-dong" sound and the LED flashes, the reset is successful. This restores factory settings.
- After resetting, repeat the pairing steps (7.1) to re-pair the devices.
If the receiver makes a strange noise or no sound, try this reset process.
8. Troubleshooting
If you experience issues with your BITIWEND Wireless Signal Transmitter, consider the following troubleshooting steps:
Environmental Sweep: The first step is to perform an environmental sweep to identify potential interference or issues with the installation environment.
Common Issues and Solutions:
- Doorbell Buzzing/Humming or No Sound:
- Check Doorbell Button: Briefly remove the doorbell wires and touch them together. If the doorbell rings, the button may need replacement or inspection. A stuck button or short in the wiring can cause issues.
- Check Wiring: If the push button(s) are removed and the buzzing continues, the wiring is likely faulty and needs replacement. Ensure the correct wires are connected to the chime.
- Receiver Not Functioning or Ringing Without Activation:
- Reset Pairing: Try resetting the pairing code (refer to Section 7.1) and then re-pair the transmitter and receiver.
- Contact Support: If the issue persists after resetting and re-pairing, please contact customer support.
- Expander Not Lighting Up:
- Check Transformer: Test the transformer with a voltmeter. If the transformer produces less than 16 volts when the ringer is playing, or less than 18 volts when the ringer is not playing, the transformer may need replacement. For smart doorbells (e.g., R*ng Pro), a stronger transformer (e.g., 16V/30VA instead of standard 16V/10VA) might be required.
- Test Voltage Fuse: Use a voltage fuse to test the doorbell. If there is current when the doorbell button is pressed and the transmitter lights up red, but the doorbell does not ring, the doorbell itself may need replacement.
- Check Expander Power: If the expander does not light up, determine if the chime is energized. If it is normally energized, the expander may need replacement.

Figure 6: Troubleshooting Guide
9. Specifications
| Feature | Specification |
|---|---|
| Manufacturer | BITIWEND |
| Model Number | WET01+B8 |
| Product Dimensions (L x W x H) | 9.5 x 9 x 7.7 cm |
| Product Weight | 130 grams |
| Transmitter Voltage Input | 3-24V AC/DC |
| Wireless Frequency | 433 MHz (+/- 40 kHz) |
| Wireless Range | Up to 200 meters (656 feet) in open field |
| Number of Ringtones | 58 polyphonic |
| Volume Levels | 5 (0-110 dB) |
| Batteries Required | No |
10. Support
If you encounter any issues that cannot be resolved using the troubleshooting guide, or if you require further assistance, please contact BITIWEND customer support. Refer to your product packaging or purchase documentation for contact details.


