1. Introduction
This manual provides detailed instructions for setting up, operating, and maintaining your PELADN WI6 N150 Mini PC. Please read this manual thoroughly before using the device to ensure proper functionality and longevity.
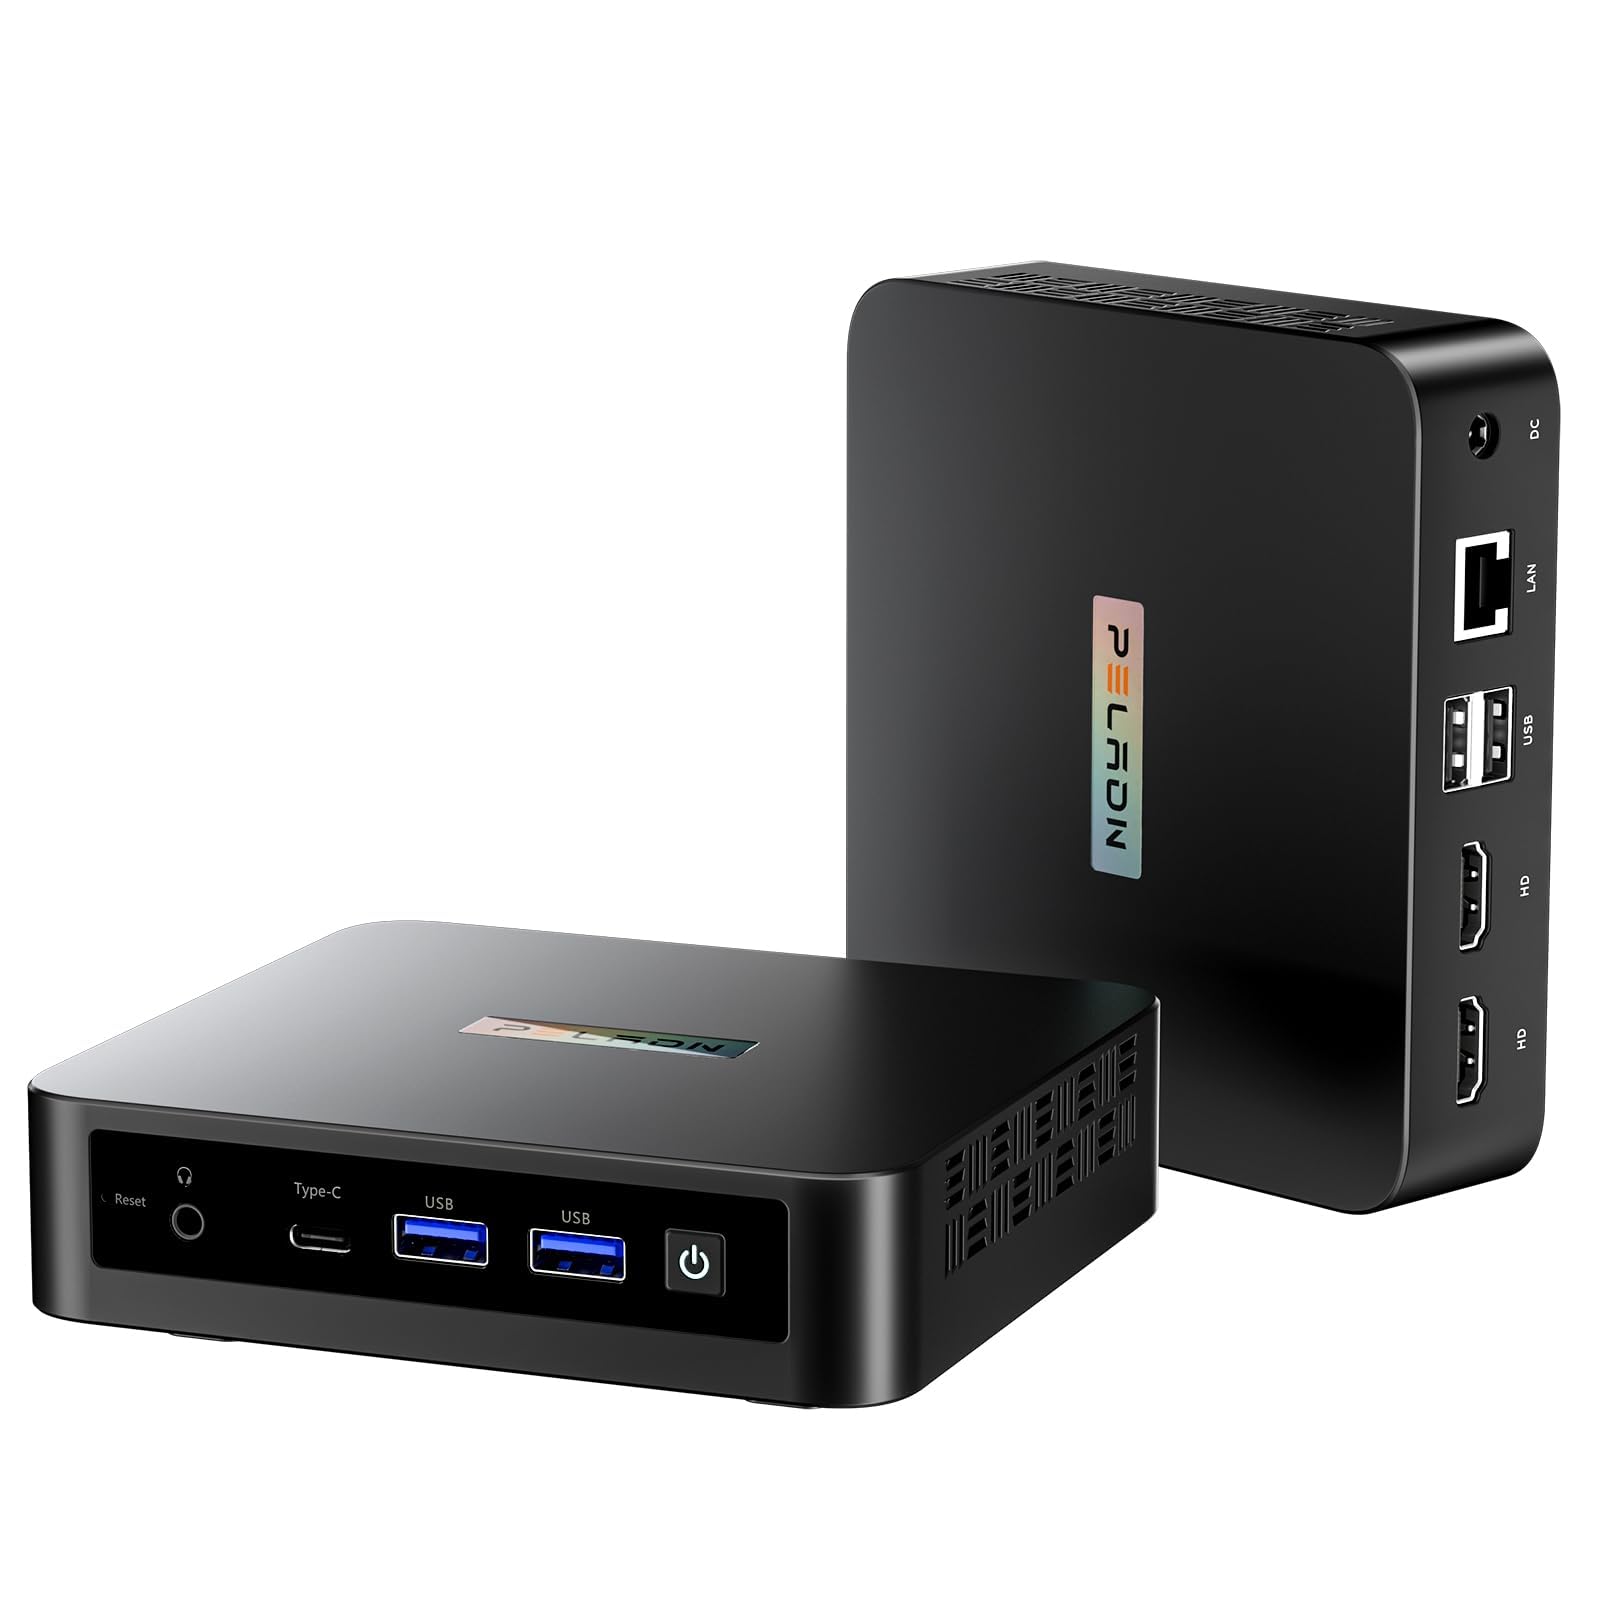
Figure 1: PELADN WI6 N150 Mini PC
2. What's in the Box
Verify that all items are present in the package:
- Mini PC
- Power Adapter & Cable
- User Manual
- HD Cable
- VESA Mount with Screws

Figure 2: Retail Boxed Packaging and Contents
3. Product Overview
3.1 Key Features
- Processor: 13th Twin Lake N150 Processor (up to 3.6GHz burst speed, 4 Cores, 6-15W TDP, 6MB L3 Cache) with 1000 MHz UHD Graphics.
- Memory: 16GB DDR4 3200MHz RAM (expandable up to 32GB).
- Storage: 512GB M.2 2280 SSD (compatible with PCIe3.0/SATA, expandable up to 4TB).
- Display: Supports 4K Triple-Screens Display via 2 HDMI 2.0 ports (max 4K 60Hz) and 1 Type-C port (10Gbps, supports USB3.2/DP1.4 output and PD power input).
- Connectivity: Dual-band WiFi 5 (5GHz/2.4GHz), Bluetooth 4.2, and 1000Mbps RJ45 LAN port.
- Ports: USB 3.2 x 2 (up to 10Gbps/S), USB 2.0 x 2, HDMI (4K@60Hz) x 2, Type-C, 3.5mm Audio Jack.
- Operating System: Compatible with Windows (11 Pro, 11, 10 Pro, 10), Ubuntu, Linux, Firewall Server.
- Additional Features: Supports LAN wake-up, PXE boot, RTC wake-up, and auto power-on.
3.2 Component Details

Figure 3: N150 CPU Processor Performance Overview
The N150 processor offers enhanced performance for daily computing tasks.

Figure 4: RAM and SSD Upgrade Capabilities
The Mini PC comes with 16GB DDR4 RAM and a 512GB SSD, both upgradeable for increased performance and storage capacity.

Figure 5: All-in-One Type-C Port for Display, Data, and Power
The versatile Type-C port supports display output, high-speed data transfer, and power delivery.

Figure 6: 4K Triple-Screens Display Capability
Connect up to three 4K displays simultaneously for enhanced multitasking.

Figure 7: USB 3.2 and USB 2.0 Ports for Peripheral Connections
Multiple USB ports allow for easy connection of various peripherals.

Figure 8: Multiple Interfaces for Connectivity and Expansion
A comprehensive set of ports ensures broad compatibility with external devices.

Figure 9: Stable Network Connections via Dual-Band WiFi and Gigabit Ethernet
Enjoy fast and reliable internet access through both wireless and wired connections.

Figure 10: VESA Mount for Space-Saving Installation
The included VESA mount allows for discreet installation behind a monitor.
4. Setup
4.1 Connecting Peripherals
- Connect your USB mouse and keyboard to the available USB-A ports on the front or rear of the Mini PC.
- If using a wireless mouse/keyboard with a dongle, insert the dongle into any available USB-A port.
- For audio, connect headphones or speakers to the 3.5mm audio jack on the front.
4.2 Connecting Displays
- Connect your monitor(s) using the HDMI ports on the rear of the Mini PC. The device supports up to two HDMI displays.
- For a third display, use the Type-C port with a compatible USB-C to DisplayPort cable or adapter.
- Ensure your monitors are powered on and set to the correct input source.
4.3 Powering On
- Connect the power adapter to the DC-in port on the rear of the Mini PC, then plug it into a power outlet.
- Press the power button located on the front of the Mini PC. The power indicator light will illuminate.
- The system will boot up and display the operating system setup screen on your connected monitor(s).
4.4 Initial Windows Setup
Upon first boot, you will be guided through the Windows 11 setup process. Follow the on-screen instructions to configure your language, region, keyboard layout, and user account.
Video 1: PELADN Mini PC Online Activation Steps. This video demonstrates the initial setup process for Windows 11, including language selection, network connection, and account setup.
If you prefer to activate Windows without an internet connection, refer to the following video for offline activation steps:
Video 2: PELADN Mini PC Quick Activation Without Internet Connection. This video provides instructions for bypassing online activation during Windows setup.
5. Operating
5.1 Basic Usage
The PELADN WI6 N150 Mini PC is designed for general computing tasks, including web browsing, office applications, and multimedia consumption. Its compact size makes it suitable for various environments.
5.2 Multi-Display Setup
To utilize the triple-screen display feature, connect your monitors to the available HDMI and Type-C ports. Windows will automatically detect the displays. You can configure display settings (e.g., extend, duplicate) via the Display Settings in your operating system.
5.3 Network Connectivity
- Wi-Fi: The Mini PC supports dual-band Wi-Fi 5 (5GHz/2.4GHz). Connect to your preferred wireless network through the operating system's network settings.
- LAN: For a stable wired connection, plug an Ethernet cable into the RJ45 LAN port on the rear of the device.
- Bluetooth: Bluetooth 4.2 allows for wireless connection to compatible devices such as mice, keyboards, and headphones. Enable Bluetooth in your operating system settings to pair devices.
6. Maintenance
6.1 RAM and SSD Upgrade
The Mini PC is designed for easy upgrades of its RAM and SSD. To upgrade:
- Power off the device and disconnect all cables.
- Carefully open the chassis (refer to the product's detailed disassembly guide if available).
- Locate the SO-DIMM DDR4 slot for RAM and the M.2 2280 SSD slot.
- Install the new components, ensuring they are properly seated.
- Close the chassis and reconnect all cables.
6.2 Cleaning
Regularly clean the exterior of the Mini PC with a soft, dry cloth. Ensure the cooling vents are free from dust and obstructions to maintain optimal airflow and prevent overheating.
6.3 Software Updates
Keep your operating system and drivers updated to ensure system stability, security, and performance. Check for updates regularly through your operating system's settings.
7. Troubleshooting
7.1 No Display Output
- Ensure all display cables (HDMI, Type-C) are securely connected to both the Mini PC and the monitor.
- Verify that the monitor is powered on and set to the correct input source.
- Try connecting to a different display port or using a different cable to rule out faulty components.
- Restart the Mini PC.
7.2 Network Connectivity Issues
- Wi-Fi: Check if Wi-Fi is enabled in your operating system settings. Ensure you are connected to the correct network and have entered the password correctly. Restart your router/modem.
- LAN: Verify the Ethernet cable is securely connected. Check the network adapter status in your operating system.
7.3 Slow Performance
- Close unnecessary applications running in the background.
- Check for and install any pending operating system or driver updates.
- Ensure adequate ventilation around the Mini PC to prevent thermal throttling.
- Run a disk cleanup or defragmentation tool (for HDD, not typically needed for SSD).
7.4 Device Not Powering On
- Ensure the power adapter is correctly connected to both the Mini PC and a working power outlet.
- Try a different power outlet.
- If the power indicator light does not turn on, the power adapter or the device itself may be faulty. Contact support.
8. Specifications
| Feature | Specification |
|---|---|
| Processor | Intel 13th Twin Lake N150 (2 GHz Celeron, up to 3.6 GHz) |
| Cores / Threads | 4 Cores / 4 Threads |
| Graphics | Intel UHD Graphics 630 (1000 MHz) |
| RAM | 16 GB DDR4 3200MHz (expandable to 32GB) |
| Storage | 512 GB SSD (M.2 2280 PCIe3.0/SATA, expandable to 4TB) |
| Operating System | Windows 11 Pro OS (compatible with Windows 10, Ubuntu, Linux) |
| Wireless Connectivity | Dual-band Wi-Fi 5 (802.11a/b/g/n/ac), Bluetooth 4.2 |
| Wired Connectivity | 1000Mbps RJ45 LAN |
| Video Output | 2 x HDMI 2.0 (4K@60Hz), 1 x Type-C (USB3.2/DP1.4 output) |
| USB Ports | 2 x USB 3.2 (10Gbps), 2 x USB 2.0 |
| Audio Port | 3.5mm Audio Jack |
| Dimensions (LxWxH) | 4.88 x 4.41 x 1.38 inches |
| Weight | 1.43 pounds |
| Color | Black |
9. Warranty and Support
PELADN provides a 12-month limited warranty for each Mini PC, starting from the purchase date. This warranty covers defects in design and workmanship. For technical assistance or warranty claims, please contact PELADN customer support. A dedicated after-sales team is available to assist you.


