1. Introduction
The Portta HDMI Video Capture Card (Model HCC101-BK) is designed to capture and stream HDMI video signals up to 1080p at 60Hz via a USB 3.0 connection. It supports 4K HDMI input and loop-out, and includes 3.5mm audio output and microphone input ports. This device is ideal for various applications including gaming, live broadcasts, and content creation, offering ultra-low latency for a smooth experience.
2. Package Contents
Please verify that all items listed below are included in your package:
- Portta HDMI Video Capture Card x1
- USB-C Male to USB 3.0 Female Adapter x1
- USB-A to USB-A 3.0 Data Cable x1
- HDMI Cable x1
- User Manual x1
3. Product Overview
The Portta HDMI Video Capture Card features a compact design with clearly labeled ports for easy connectivity. Below is a diagram illustrating the various components and their functions.

Image 3.1: Portta HDMI Video Capture Card Port Layout
This image displays the capture card with its various ports labeled. On the front, from left to right, are the USB 3.0 port, a power indicator light, a 3.5mm audio output jack, and a 3.5mm microphone input jack. On the rear, from left to right, are the HDMI loop output port, an IN/OUT indicator light, and the HDMI input port.
Port Descriptions:
- USB 3.0 Port: Connects to your computer for data transfer and power.
- Power Indicator: Illuminates when the device is powered on.
- 3.5mm Audio Output: Connect headphones or speakers for audio monitoring. Note: Headphones (TRS Only)/Speaker and HDMI OUT cannot receive microphone audio.
- Mic In: Connect an external microphone for audio input.
- HDMI Loop Output: Connects to a display (monitor, TV) to view the HDMI input signal without latency.
- IN/OUT Indicator: Indicates the status of HDMI input and output.
- HDMI Input: Connect your HDMI source device (e.g., game console, camera).
4. Setup Instructions
Follow these steps to connect your Portta HDMI Video Capture Card:
- Connect HDMI Source: Use an HDMI cable to connect your source device (e.g., game console, camcorder, PC) to the HDMI Input port on the capture card.
- Connect Display (Optional): If you wish to monitor your source signal on a separate display, use another HDMI cable to connect your monitor or TV to the HDMI Loop Output port on the capture card. This provides a pass-through signal without additional latency.
- Connect to Computer: Connect the provided USB-A to USB-A 3.0 Data Cable to the USB 3.0 port on the capture card and to an available USB 3.0 port on your computer. If your computer only has USB-C ports, use the included USB-C Male to USB 3.0 Female Adapter. The device is plug-and-play and does not require driver installation.
- Connect Audio Devices (Optional): For audio monitoring, connect headphones or speakers to the 3.5mm Audio Output. To use an external microphone, connect it to the Mic In port.

Image 4.1: Typical Connection Setup
This image illustrates a common setup where the Portta HDMI Video Capture Card is connected between a gaming console (HDMI source) and a laptop (for capture/streaming). An HDMI cable connects the console to the capture card's input, and a USB 3.0 cable connects the capture card to the laptop. An optional HDMI loop-out to a separate display is also implied.
5. Operating Instructions
Once the hardware is connected, the Portta HDMI Video Capture Card will be recognized by your computer as a standard UVC (USB Video Class) and UAC (USB Audio Class) compliant device. You will need compatible software to capture or stream your video and audio.
Key Features:
- 4K HDMI Input & Loop-Out: Supports resolutions up to 4K@60Hz (YUV 4:2:0), 3D, and HDCP 1.4 (input only). Compatible with devices like PS4, PS5, Xbox Series X, and PC. Note: Does not support HDR or CEC.
- 1080p 60Hz Capture Quality: Records and streams video at 1080p resolution and 60 frames per second via USB 3.0, ensuring smooth and high-quality output.
- Ultra-Low Latency: Designed for minimal delay between the source and the captured signal, crucial for live streaming and gaming.

Image 5.1: Simultaneous Play and Capture
This image demonstrates the capability of the capture card to allow a user to play a video game on a large display via the HDMI loop-out, while simultaneously capturing the gameplay footage to a connected laptop for recording or live streaming.
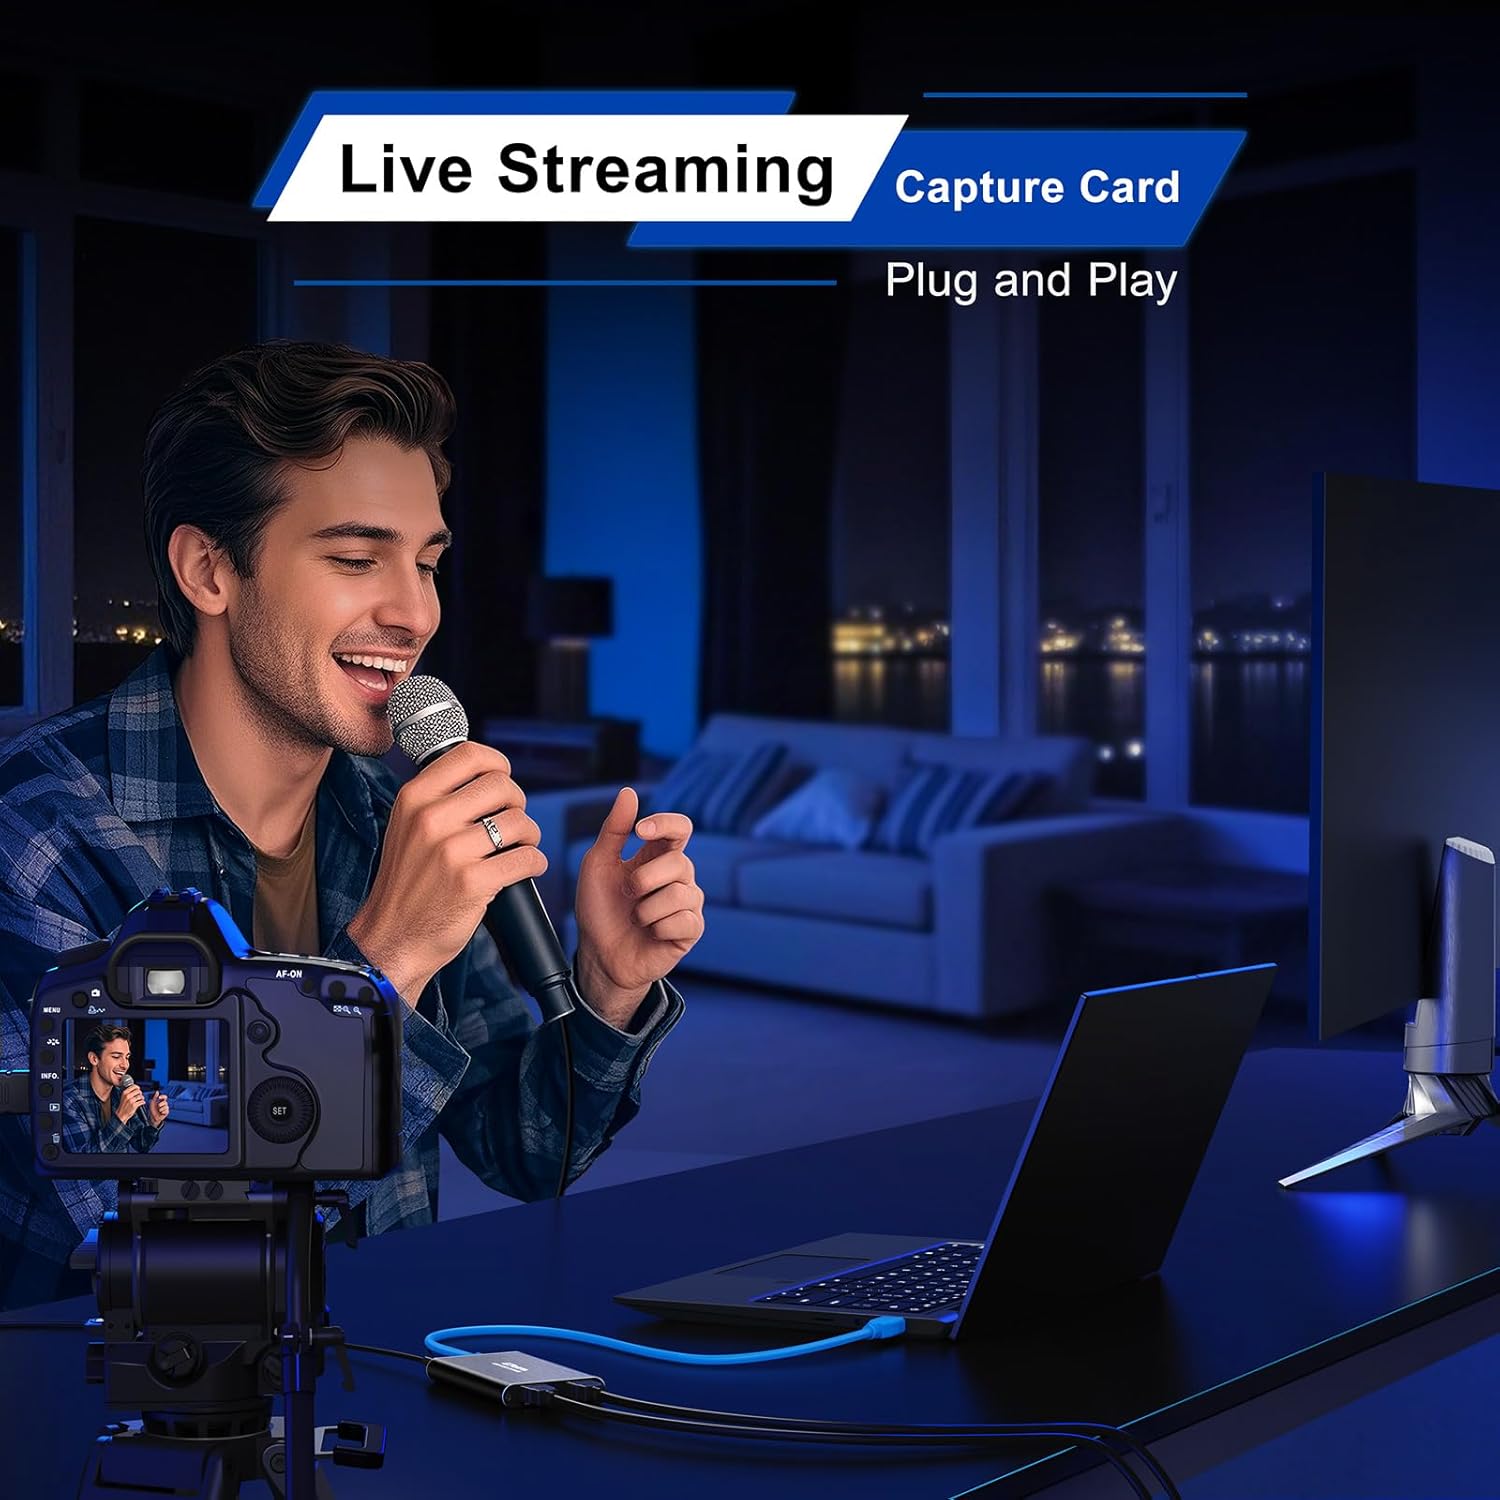
Image 5.2: Live Streaming Setup
This image shows a content creator using the Portta HDMI Video Capture Card to facilitate a live stream. A camera is connected to the capture card, which then feeds the video signal to a laptop running streaming software. A microphone is also in use, indicating comprehensive audio-visual capture.
6. Software Compatibility and OBS Studio Setup
The Portta HDMI Video Capture Card is compatible with various UVC/UAC-compliant applications. OBS Studio is a popular free and open-source software for video recording and live streaming. Below are instructions for setting up the capture card with OBS Studio.

Image 6.1: Adding Video/Audio Sources in OBS Studio
This image provides a four-step visual guide for adding the capture card as a video or audio source in OBS Studio. It shows clicking the '+' button in the 'Sources' panel, selecting 'Video Capture Device', creating a new device, and then selecting 'USB3 Video' or 'USB3 Digital Audio' from the device list.
6.1. Adding Video or Audio Sources in OBS Studio:
- In the 'Sources' panel, click the '+' button in the lower left corner.
- Select 'Video Capture Device' for video or 'Audio Input Capture' for audio.
- Choose to 'Create new' and give it a name, then click 'OK'.
- In the properties window, select 'USB3 Video' for video or 'USB3 Digital Audio' for audio from the 'Device' dropdown menu. Configure resolution and FPS as needed (e.g., 1920x1080, 60 FPS). Click 'OK'.

Image 6.2: Adjusting Advanced Audio Properties in OBS Studio
This image illustrates the process of configuring advanced audio settings in OBS Studio. It shows clicking the left dot of an audio input capture source, selecting 'Advanced Audio Properties', and then setting 'Audio Monitoring' to 'Monitor and Output' to hear the audio while streaming or recording.
6.2. Adjusting Advanced Audio Properties:
- In the 'Audio Mixer' panel, click the gear icon next to your audio source (e.g., 'USB3 Digital Audio').
- Select 'Advanced Audio Properties'.
- For 'Audio Monitoring', select 'Monitor and Output' if you want to hear the audio while it's being recorded/streamed.
- Once configured, click 'Start Streaming' or 'Start Recording' in the 'Controls' panel to begin.

Image 6.3: macOS OBS Operation Notes - Enabling Permissions
This image provides a guide for macOS users to enable necessary permissions for OBS Studio. It shows navigating to OBS Studio's 'Settings', then 'Review App Permissions', and granting access for 'Screen Recording', 'Camera', and 'Microphone' until 'Access Granted' appears for each.
6.3. macOS OBS Operation Notes:
On macOS, you may need to grant OBS Studio specific permissions to access your screen, camera, and microphone. Follow these steps:
- Open OBS Studio.
- Go to 'OBS Studio' > 'Settings...' > 'Review App Permissions'.
- Follow the system prompts to grant required access for 'Screen Recording', 'Camera', and 'Microphone' until 'Access Granted' appears for each.

Image 6.4: Wide Compatibility Overview
This image visually summarizes the broad compatibility of the Portta HDMI Video Capture Card. It lists compatible software such as OBS, Zoom, Microsoft Teams, VLC Media Player, and Google Meet. It also shows various input devices like PS5, Xbox Series X, STB, Phone, and DSLR Camera, and supported operating systems including macOS, Windows, and Linux.
7. Maintenance
To ensure the longevity and optimal performance of your Portta HDMI Video Capture Card, please follow these maintenance guidelines:
- Keep Dry: Avoid exposing the device to moisture or liquids.
- Clean Gently: Use a soft, dry cloth to clean the exterior of the device. Do not use harsh chemicals or abrasive cleaners.
- Avoid Extreme Temperatures: Store and operate the device within recommended temperature ranges.
- Handle with Care: Avoid dropping or subjecting the device to strong impacts.
8. Troubleshooting
If you encounter issues with your Portta HDMI Video Capture Card, refer to the following common problems and solutions:
- No Signal / Black Screen:
- Ensure all HDMI cables are securely connected to both the source device and the capture card.
- Verify that your HDMI source device is powered on and outputting a signal.
- Check if the source device's resolution is supported by the capture card (up to 4K@60Hz input).
- Confirm that the HDMI source is not protected by HDCP 2.2, as the capture card supports HDCP 1.4 only.
- Ensure the capture software (e.g., OBS Studio) is correctly configured to select the 'USB3 Video' device.
- No Audio:
- Check that your headphones or speakers are properly connected to the 3.5mm Audio Output port.
- In your capture software, ensure 'USB3 Digital Audio' is selected as the audio input device and that audio monitoring is enabled (e.g., 'Monitor and Output' in OBS Studio).
- Verify the audio settings on your source device.
- Note: Microphone audio is not routed to the 3.5mm Audio Output or HDMI Loop Output.
- Lag or Stuttering Video:
- Ensure the capture card is connected to a USB 3.0 port on your computer. USB 2.0 ports may not provide sufficient bandwidth.
- Check your computer's system requirements: Quad-core Intel Core i5 / Ryzen 5 or higher CPU, 8 GB RAM or more, DirectX 10.1 or OpenGL 3.3 compatible GPU (DirectX 11 / Metal recommended).
- For high-bitrate recording, an SSD (Solid State Drive) is recommended for storage.
- Close unnecessary applications running in the background to free up system resources.
- Device Not Recognized:
- Try connecting the capture card to a different USB 3.0 port on your computer.
- Restart your computer.
- Ensure your operating system is up to date (Windows 7/8/10/11+, macOS 10.8+, Linux kernel 2.6.38+).
9. Specifications
| Feature | Specification |
|---|---|
| Model Number | HCC101-BK |
| Product Dimensions (L x W x H) | 4.02 x 2.72 x 0.49 inches |
| Item Weight | 2.4 ounces |
| Color | Black |
| Compatible Devices | Gaming Console, PC, Television |
| Connector Type | HDMI, USB 3.0 |
| HDMI Input Resolution | Up to 4K@60Hz (YUV 4:2:0) |
| Capture Resolution | 1080p@60Hz via USB 3.0 |
| HDCP Support | HDCP 1.4 (input only) |
| Audio Ports | 3.5mm Audio Out, 3.5mm Mic In |
| Operating System Compatibility | Windows 7/8/10/11+, macOS 10.8+, Linux (kernel 2.6.38+) |
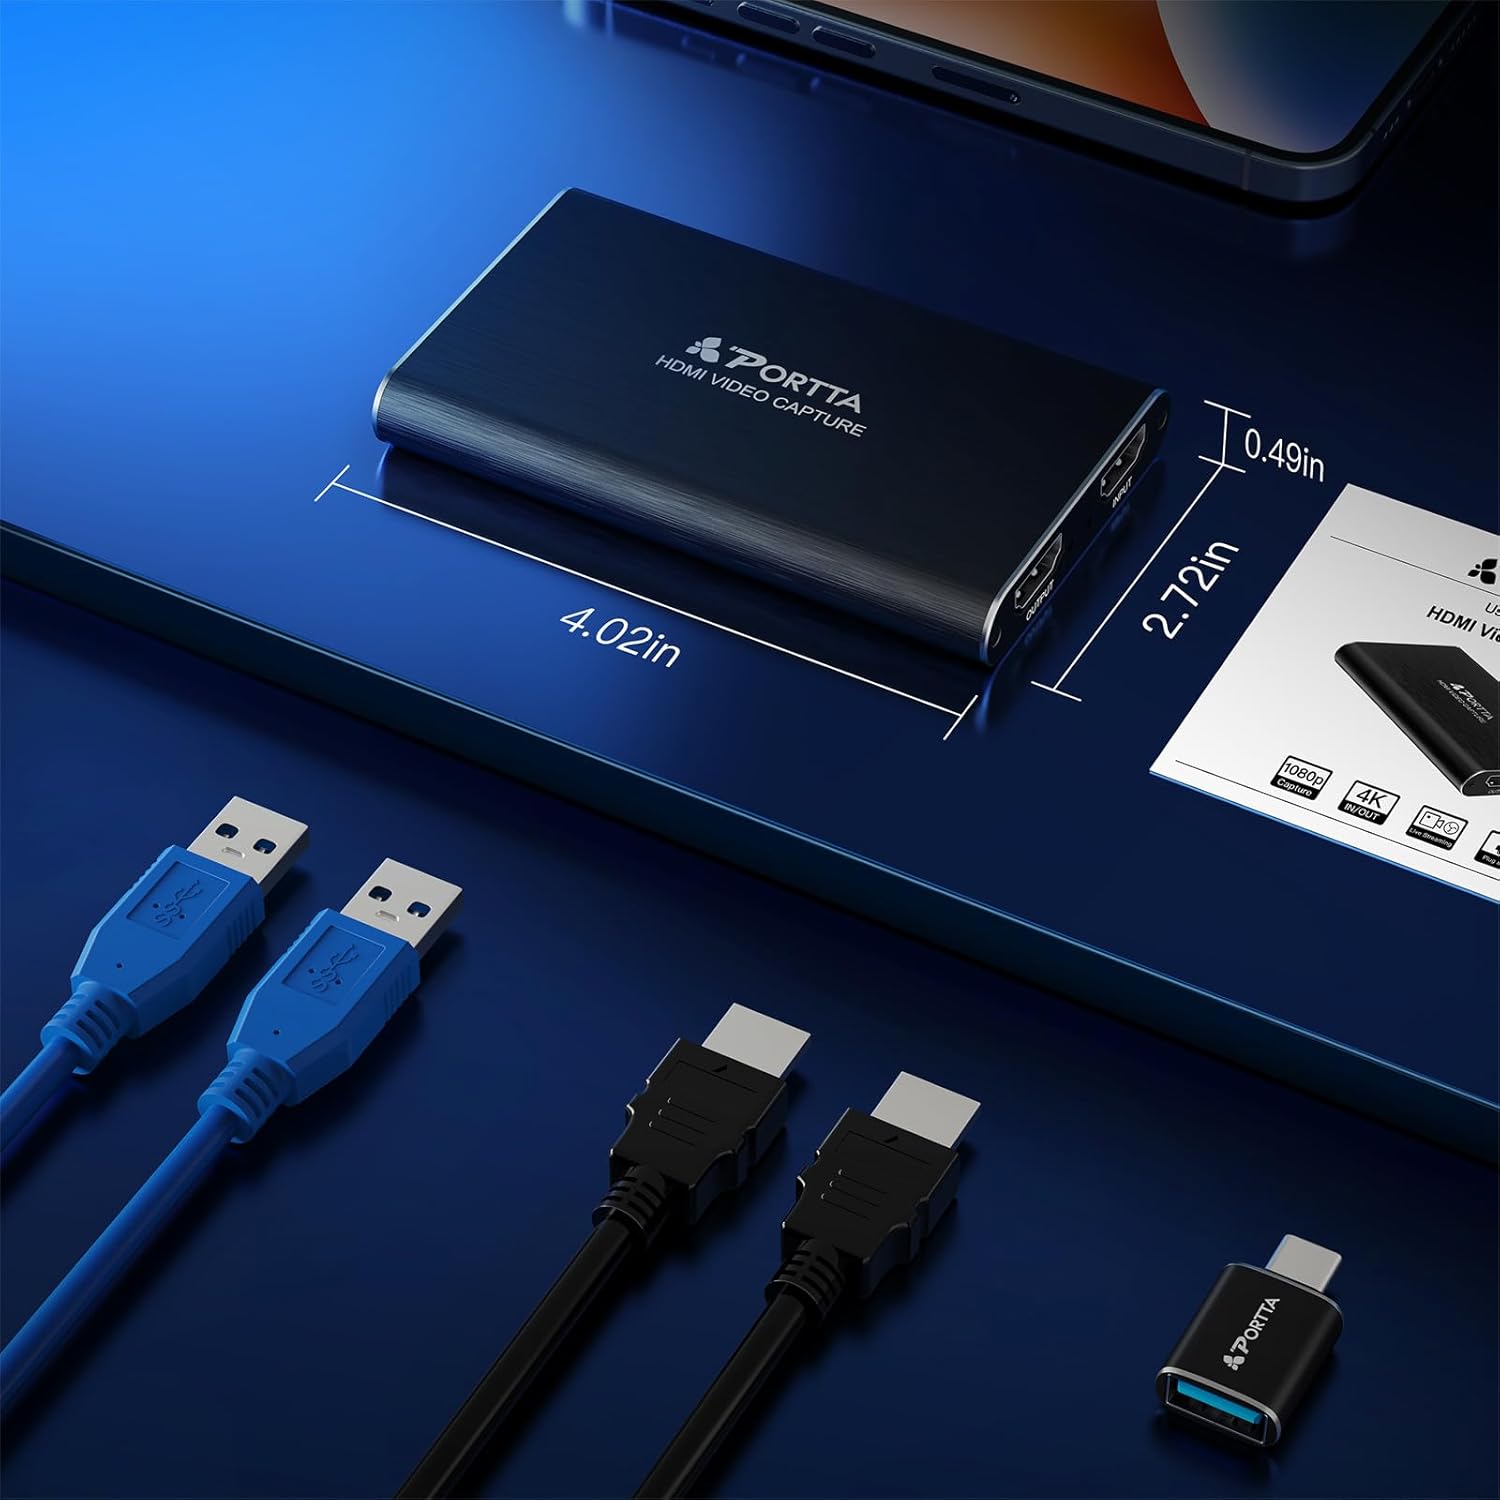
Image 9.1: Product Dimensions
This image provides a visual representation of the Portta HDMI Video Capture Card's physical dimensions, indicating its length as 4.02 inches, width as 2.72 inches, and height as 0.49 inches.
10. Warranty and Technical Support
Portta stands behind the quality of its products. The Portta HDMI Video Capture Card comes with a 2-year warranty, covering manufacturing defects and ensuring reliable performance.
Additionally, we offer lifetime technical support to assist you with any questions or issues you may encounter during the setup or operation of your device. Our friendly customer service team is available to provide guidance and solutions.
For technical assistance or warranty claims, please contact Portta customer service through the official website or your purchase platform.


