Introduction
This manual provides essential information for the safe operation and maintenance of your Suangrc K600GPS-B Drone. Please read this manual thoroughly before operating the drone to ensure proper usage and to prevent damage or injury. Keep this manual for future reference.
Package Contents

The Suangrc K600GPS-B drone package includes the following items:
- Drone x1
- Remote Control x1
- Battery x1
- Propeller x4 (spare)
- Screwdriver x1
- USB Cable x1
- Carrying Case x1
- SD Card (8GB) x1
Product Overview

The Suangrc K600GPS-B is a GPS-enabled drone featuring a 1080P HD camera and a dedicated remote control with a 4.5-inch LCD screen for live FPV (First Person View) transmission. It is designed for both beginners and experienced users, offering intelligent flight modes and stable performance.
Drone Components
- Foldable Arms: For compact storage and transport.
- 1080P HD Camera: Dual camera system with 110° FOV and 90° adjustable angle for capturing photos and videos.
- Brushless Motors: Provides powerful thrust and stable flight with low noise.
- GPS Module: Enables precise positioning, intelligent return functions, and advanced flight modes.
- Optical Flow Positioning: Assists with stable hovering, especially in environments where GPS signal may be weak.
- Battery Compartment: Houses the 2200mAh Li-Ion battery.
Remote Control
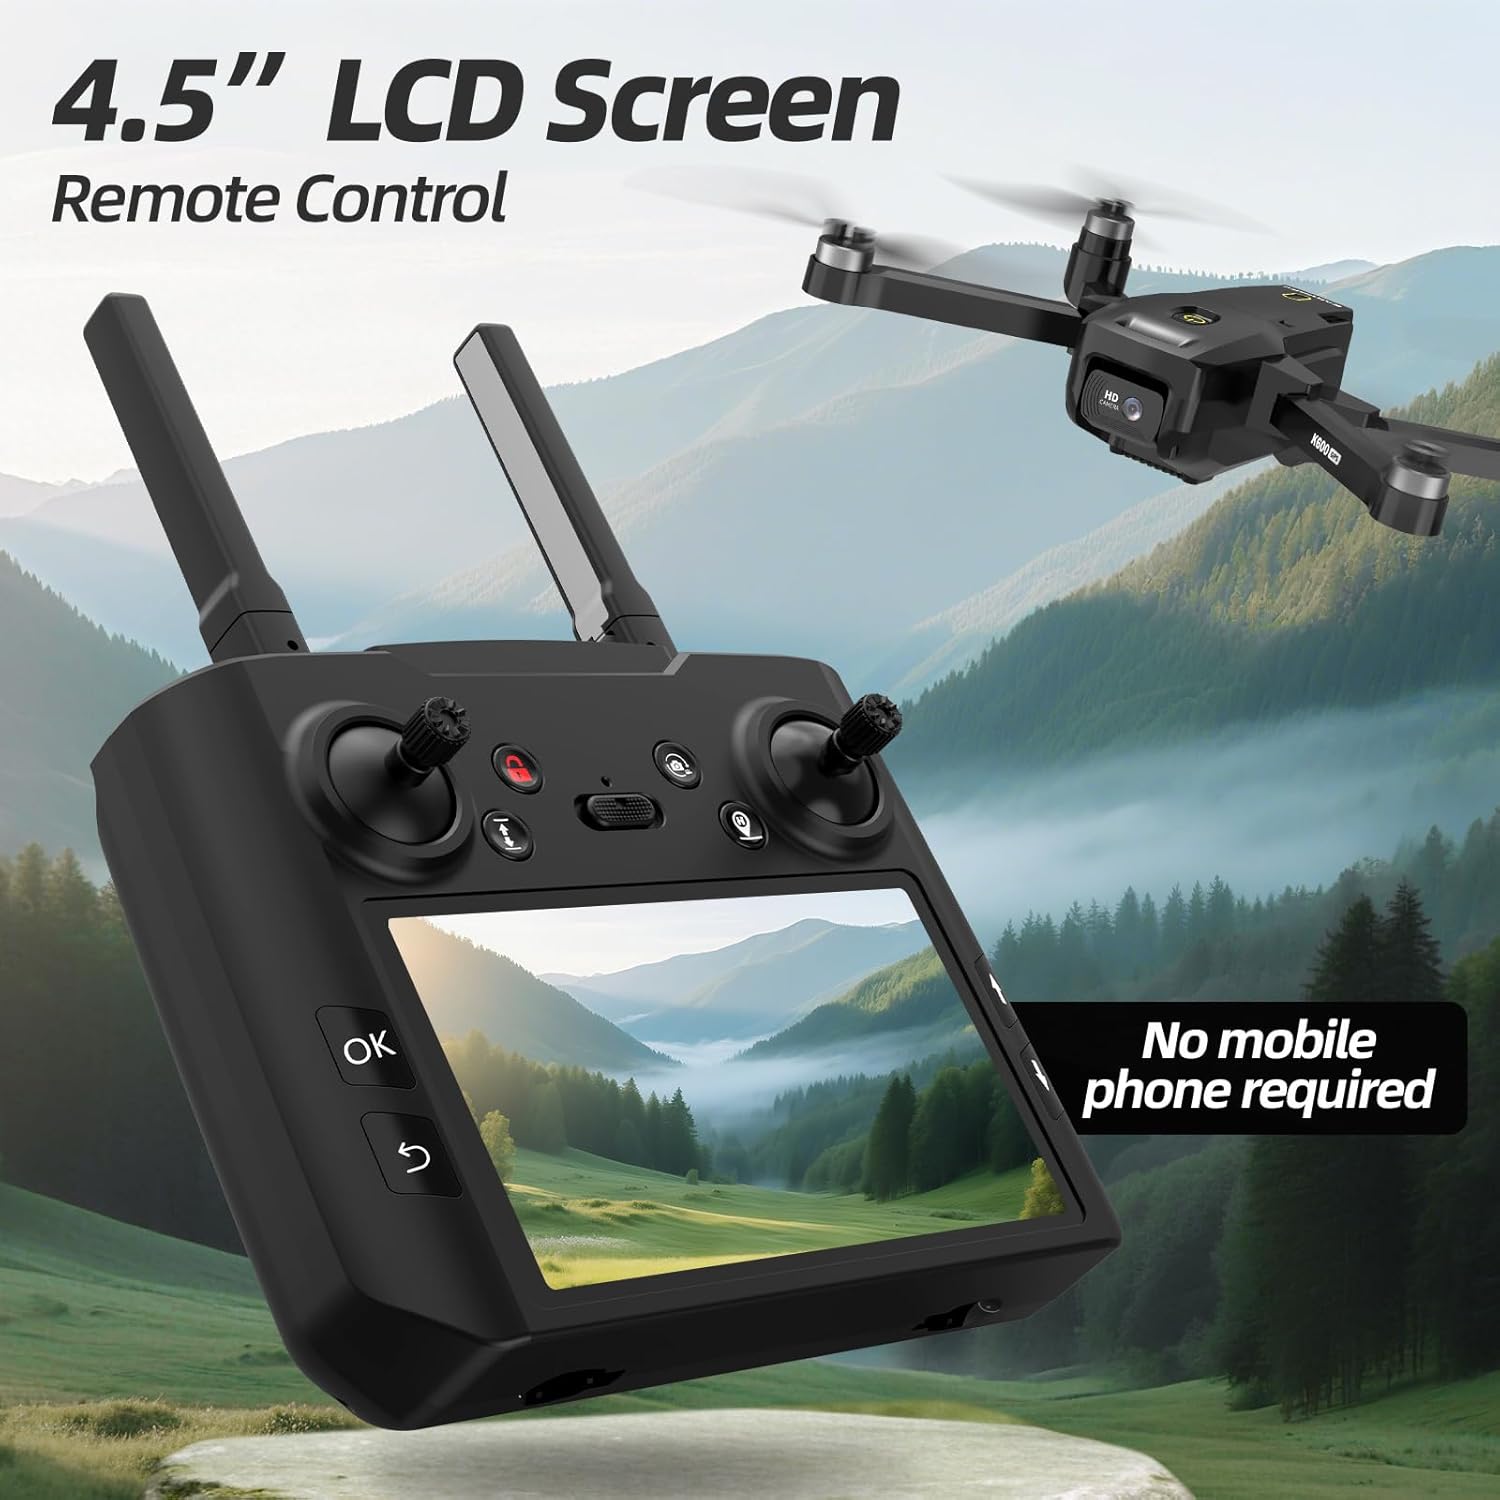
The remote control features a built-in 4.5-inch LCD screen, eliminating the need for a smartphone during flight. It provides real-time FPV transmission and displays critical flight data. The controller operates on 5GHz FPV transmission for a stable video feed.
- 4.5-inch LCD Screen: For live video feed and flight information.
- Control Sticks: For drone movement and altitude.
- Function Buttons: For various flight modes, photo/video capture, and return-to-home.
- Antennas: For stable signal transmission.
Setup Guide
1. Charging the Battery
Ensure the drone battery is fully charged before each flight. Use the provided USB cable to connect the battery to a suitable power source. The charging indicator will show the charging status.
2. Installing Drone Battery
Insert the charged battery into the drone's battery compartment. Ensure it clicks securely into place to prevent dislodgement during flight.
3. Installing Propellers
Attach the propellers to the drone's motors. Ensure each propeller is correctly oriented and securely fastened. Refer to the markings on the propellers and motor arms for correct installation (e.g., A to A, B to B).
4. Inserting SD Card

Locate the SD card slot on the drone. Insert the provided 8GB SD card (or a compatible card up to 32GB) into the slot until it clicks. This card is essential for storing photos and videos captured by the drone's camera.
5. Remote Control Preparation
Install the required batteries into the remote control. Extend the antennas for optimal signal range. Power on the remote control.
6. Calibration
Before the first flight and after any significant impact, calibrate the drone's gyroscope and compass. Follow the instructions in the quick start guide or on-screen prompts on the remote control's LCD for precise calibration. Proper calibration ensures stable flight and accurate GPS functions.
Operating Instructions
1. Basic Flight Controls
Familiarize yourself with the remote control sticks:
- Left Stick: Controls altitude (up/down) and yaw (rotate left/right).
- Right Stick: Controls forward/backward movement and left/right strafing.
2. Takeoff and Landing
Place the drone on a flat, open surface. Power on the drone, then the remote control. Pair the devices. Use the one-key takeoff/landing button or manually control the left stick to ascend/descend.
3. Speed Modes

The drone offers three speed modes (low, medium, high) to suit different flying conditions and skill levels. Adjust the speed using the dedicated button on the remote control.
4. GPS Functions

The K600GPS-B drone utilizes GPS for enhanced stability and intelligent flight features. Ensure a strong GPS signal before activating these modes.
- Return to Home (RTH): The drone will automatically return to its takeoff point if the signal is lost, battery is low, or the RTH button is pressed.
- Follow Me:

In Follow Me mode, the drone will track your movement, maintaining a set distance and capturing footage. This is ideal for hands-free recording during outdoor activities.
- Point of Interest: The drone will orbit a designated point, capturing a circular video or series of photos.
- Tap Fly (Waypoint Flight): Draw a desired flight path on the remote's screen, and the drone will follow it automatically.
5. Camera Operation
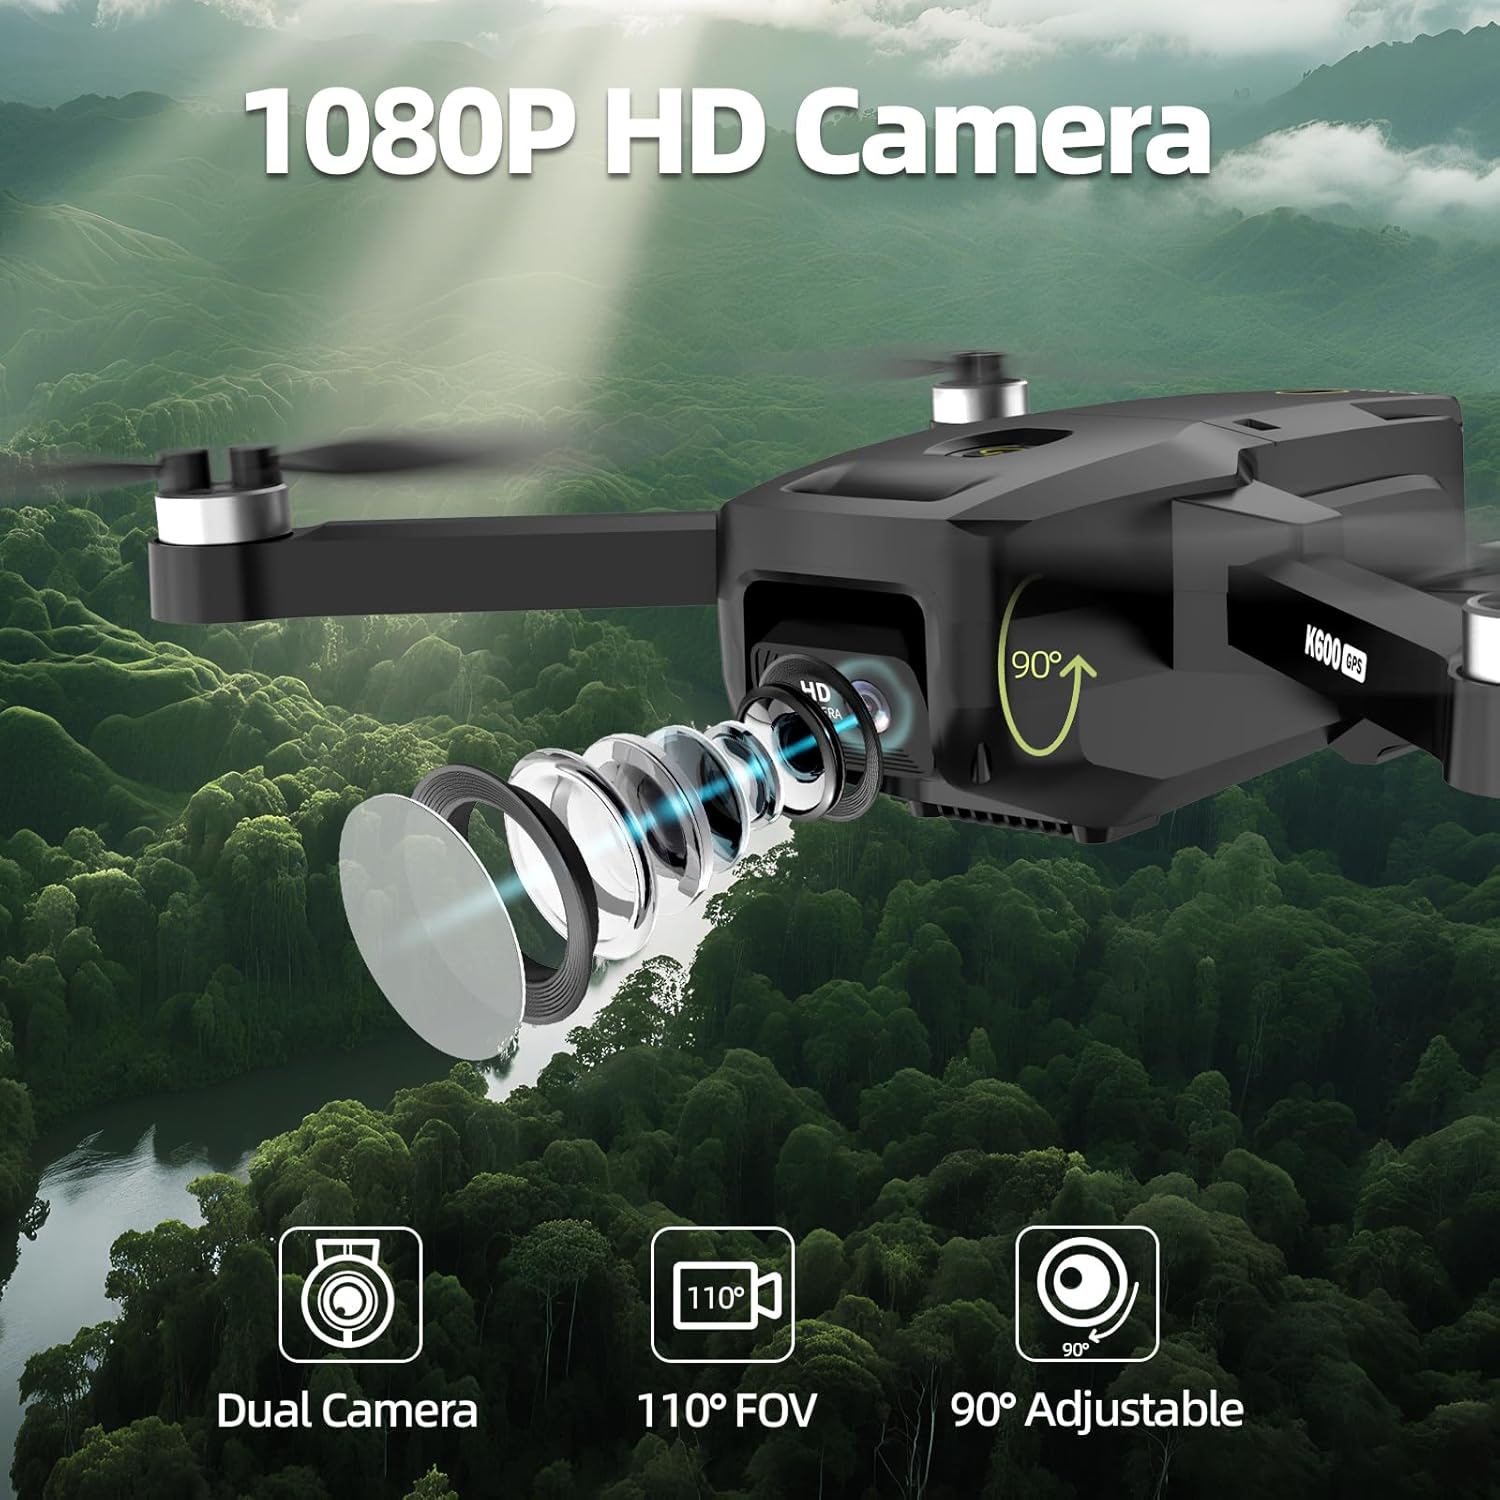
The drone is equipped with a 1080P HD camera. Use the dedicated buttons on the remote control to:
- Capture Photos: Press the photo button to take still images.
- Record Videos: Press the video button to start/stop recording.
- Adjust Camera Angle: Use the gimbal control on the remote to adjust the camera's vertical angle by 90 degrees during flight.
6. FPV Transmission

The 5GHz FPV transmission provides a clear, real-time video feed directly to the remote control's LCD screen. This allows for immersive flight experience and precise framing of shots.
Maintenance
1. Battery Care
- Always use the original charger and cable.
- Do not overcharge or over-discharge the battery.
- Store batteries in a cool, dry place away from direct sunlight.
- If not used for an extended period, charge the battery to approximately 50% capacity.
2. Cleaning
- Use a soft, dry cloth to clean the drone and remote control.
- Avoid using solvents or harsh chemicals.
- Ensure the camera lens is clean for optimal image quality.
3. Propeller Replacement
Inspect propellers for damage before each flight. If a propeller is bent, cracked, or chipped, replace it immediately using the spare propellers and screwdriver provided. Ensure correct propeller orientation (A/B) during installation.
Troubleshooting
| Problem | Possible Cause | Solution |
|---|---|---|
| Drone drifts during flight | Improper calibration; windy conditions | Recalibrate the drone; fly in calmer conditions. |
| Loss of signal/control | Out of range; interference; low battery | Fly within range; ensure clear line of sight; check drone and remote battery levels. Drone should initiate RTH. |
| Poor camera image/video quality | Dirty lens; insufficient lighting; no SD card; low light conditions | Clean the camera lens; ensure adequate lighting; insert SD card; avoid flying in very low light. |
| Drone does not take off | Low battery; propellers not installed correctly; drone not paired | Charge battery; check propeller installation; ensure drone and remote are paired. |
| GPS functions not working | Weak GPS signal; indoor flight | Fly in an open outdoor area with clear sky; wait for sufficient GPS satellites to connect. |
Specifications
Drone
- Model: K600GPS-B
- Weight: 205.8 g
- Dimensions (folded): 22.5 x 18.5 x 5.5 cm
- Flight Time: Approximately 20 minutes
- Battery: 2200mAh Lithium Ion
- Motors: Brushless (16277RPM/V)
- Positioning: GPS, Optical Flow
- Material: Plastic
Camera
- Resolution: 1080P HD
- Type: Dual Camera
- Field of View (FOV): 110°
- Adjustable Angle: 90°
- Storage: Supports SD Card (8GB included, up to 32GB)
Remote Control
- Screen: 4.5-inch LCD
- Transmission Frequency: 5GHz FPV
- Connectivity: Wi-Fi
- Batteries: Not included (requires 1 non-standard battery type)
Safety Guidelines
- Always fly in open areas, away from people, animals, and obstacles.
- Maintain a safe distance from power lines, buildings, and airports.
- Do not fly in strong winds, rain, or other adverse weather conditions.
- Keep the drone within your line of sight at all times.
- Ensure all propellers are securely attached and undamaged before flight.
- Do not operate the drone under the influence of alcohol or drugs.
- Respect local regulations and privacy laws regarding drone operation.
Support & Warranty

Suangrc is committed to providing professional after-sales service and technical support with an official warranty. For any inquiries, technical assistance, or warranty claims, please contact our support team.
- Email Support: suangrc@gmail.com
- Warranty: Official technical support and warranty are provided. Please refer to your purchase documentation for specific warranty terms and duration.


