1. Introduction
The JAXTIN G9 Pro is an advanced multi-functional detector designed to identify hidden cameras, GPS trackers, listening devices, and other covert surveillance equipment. Utilizing upgraded chip architecture and multimodal scanning, this device offers enhanced privacy protection in various environments such as hotels, cars, offices, and personal spaces. This manual provides detailed instructions for the proper use, maintenance, and troubleshooting of your G9 Pro detector.
2. Product Overview
2.1 Package Contents
- JAXTIN G9 Pro Hidden Camera Detector x1
- Type-C Charging Cable x1
- User Manual (English Version) x1
- Exquisite Packaging Box x1
2.2 Key Features
- Next-Gen Detection: Upgraded chip architecture for faster, smarter detection of hidden cameras, GPS trackers, and listening devices.
- Ultra-Precision AI Chip: 40% faster response and 3000 scans/sec for identifying bug devices, microphones, and wireless trackers.
- Compact and Portable: Weighs less than 30g, pen-shaped design, ideal for travel and daily use.
- Long Battery Life: 300 mAh battery provides 72 hours of continuous working time and 30 days standby after a 60-minute charge.
- User-Friendly Interface: Refined button layout and clear multi-sensory alerts (sound, vibration, LED).
- Multimodal Scanning: Includes Wireless Signal Detection, Infrared (IR) Detection, and Magnetic Field Detection.
2.3 Device Components
Refer to the image below for an overview of the JAXTIN G9 Pro detector and its primary functions.

Figure 1: JAXTIN G9 Pro Detector. This image displays the compact, pen-shaped design of the G9 Pro, highlighting its LED indicators and control buttons.

Figure 2: Overview of Detection Modes. This image visually represents the three core detection capabilities of the G9 Pro: wireless signal, laser (infrared), and magnetic field detection.
3. Setup
3.1 Initial Charging
Before first use, fully charge the JAXTIN G9 Pro detector. Connect the provided Type-C charging cable to the device's charging port and plug the other end into a compatible USB power source (e.g., adapter, power bank, laptop). The charging indicator lights will provide feedback on the charging status. A full charge typically takes approximately 60 minutes.

Figure 3: Charging and Battery Life. This image shows the G9 Pro being charged via a Type-C cable and highlights its 72-hour working time and 30-day standby capability.
3.2 Powering On/Off
- To Power On: Press and hold the power button (usually the top button) for a few seconds until the indicator lights illuminate.
- To Power Off: Press and hold the power button again until the indicator lights turn off.
4. Operating Instructions
4.1 Understanding Detection Modes
The JAXTIN G9 Pro features multiple detection modes to identify various types of hidden devices.
4.1.1 Wireless Signal Detection (RF Detection)
This mode detects radio frequency (RF) signals emitted by wireless cameras, listening devices, and GPS trackers. It scans a frequency range of 1MHz to 8.5GHz.
- Activation: Press the mode button to select the wireless signal detection mode.
- Usage: Slowly sweep the detector around the area of concern. The LED indicators will light up, and an audible or vibratory alert will increase in intensity as you approach a signal source.
- Application: Ideal for detecting active wireless devices in rooms, offices, or vehicles.

Figure 4: Wireless Signal Detection. The detector is shown in a professional setting, illustrating its use for detecting hidden wireless devices and preventing eavesdropping.
4.1.2 Infrared (IR) Hidden Camera Detection
This mode uses a powerful infrared beam to locate the lenses of hidden cameras, regardless of whether they are active or passive.
- Activation: Press the mode button to select the IR detection mode. The red IR lights on the detector will activate.
- Usage: Look through the detector's viewing window while sweeping the area. Hidden camera lenses will appear as bright red dots due to the reflection of the IR light.
- Detection Steps:
- Fast Flash: Expands the detection range.
- Slow Flash: Gradually reduces and helps locate the reflection.
- Constant Light: Pinpoints the exact location of the camera.
- Application: Effective for finding pinhole cameras, night vision cameras, and other hidden optical lenses in hotel rooms, bathrooms, or changing rooms.

Figure 5: Infrared Hidden Camera Detection. The detector emits a red light to reveal hidden camera lenses, shown in a hotel room setting.
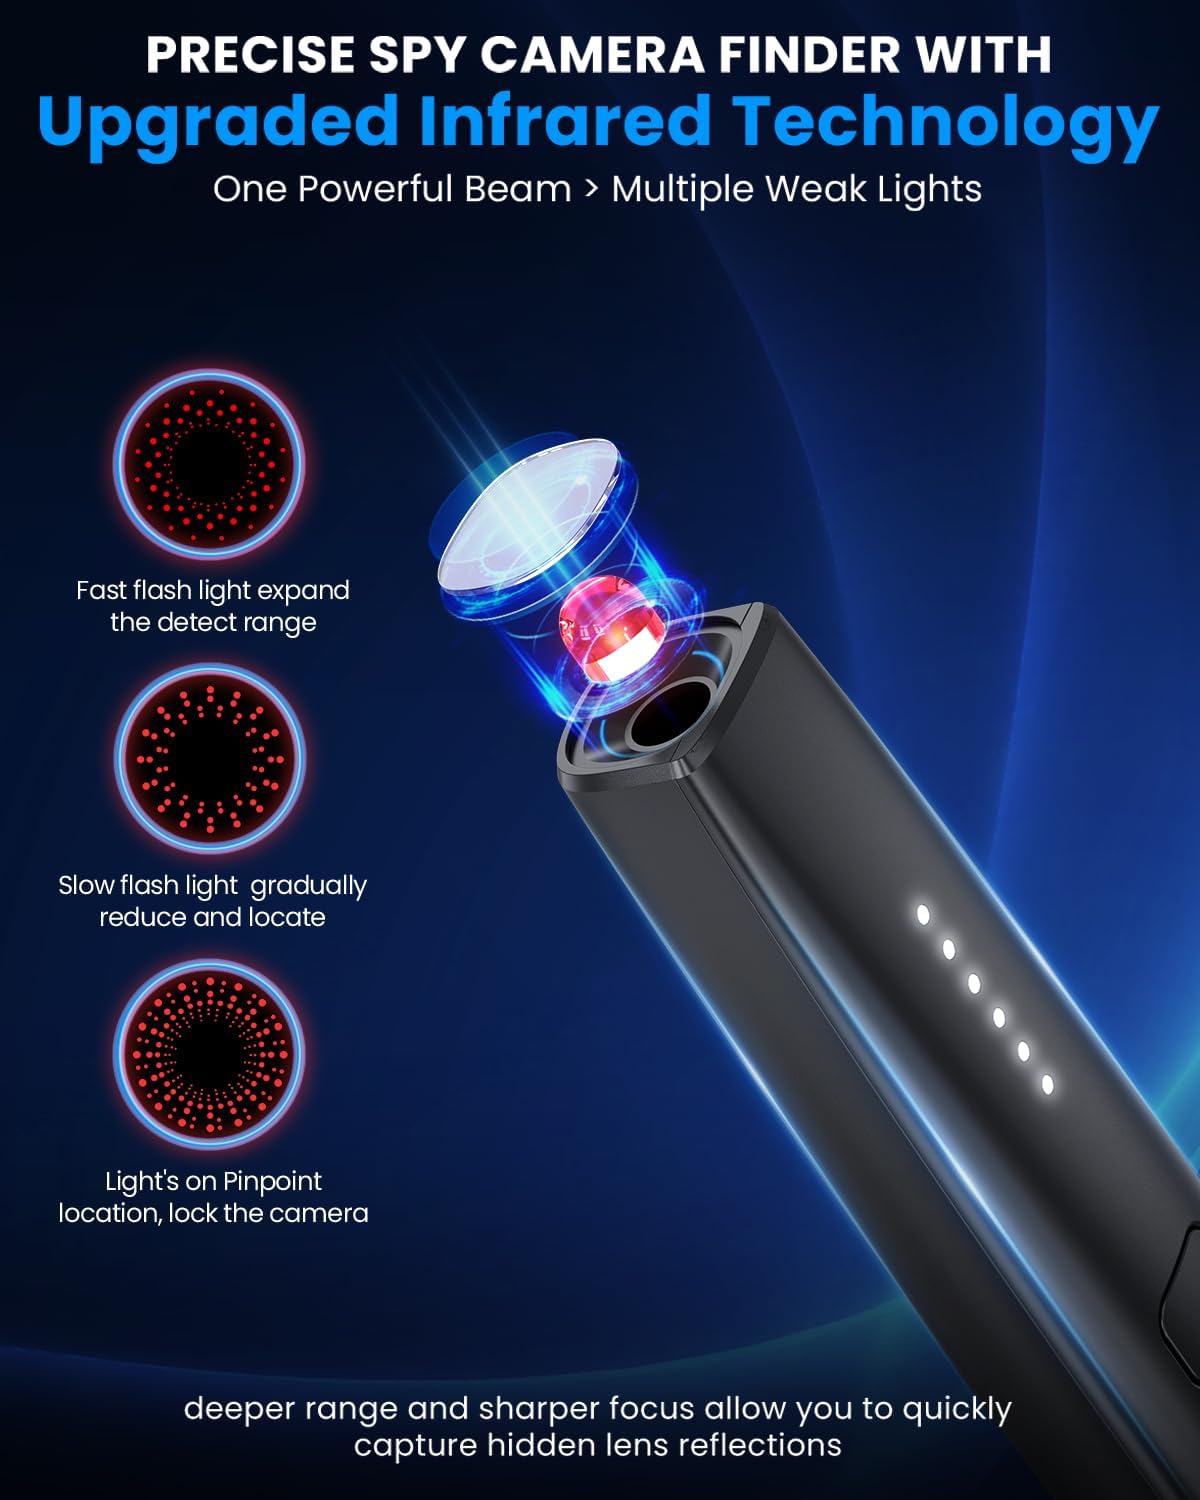
Figure 6: Infrared Detection Steps. This graphic explains the three stages of IR detection: expanding range, gradual reduction, and pinpointing the camera.
4.1.3 Magnetic Field Detection (GPS Tracker Detection)
This mode is specifically designed to detect magnetic GPS trackers and other magnetic bug devices often attached to vehicles or metallic surfaces.
- Activation: Press the mode button to select the magnetic field detection mode.
- Usage: Sweep the detector close to surfaces where magnetic devices might be hidden, such as under car seats, wheel wells, or metallic furniture. The device will alert you to the presence of magnetic fields.
- Application: Essential for checking vehicles for hidden GPS trackers or other magnetic surveillance devices.

Figure 7: GPS Tracker Detection. The detector is shown scanning a car, illustrating its capability to find various types of GPS and magnetic locators.
4.2 Adjusting Sensitivity
The JAXTIN G9 Pro features adjustable sensitivity levels to fine-tune detection. Higher sensitivity allows for detection of weaker signals or devices further away, while lower sensitivity helps pinpoint closer devices and reduce false positives in areas with high ambient RF noise.
- Adjustment: Use the sensitivity control buttons (usually the bottom button or a dedicated slider/button) to increase or decrease the detection range and responsiveness.
- Recommendation: Start with a higher sensitivity in open areas, then gradually decrease it as you narrow down the search area to locate the precise source.
4.3 Interpreting Alerts
The G9 Pro provides multi-sensory alerts:
- LED Indicators: A series of LED lights will illuminate, indicating the strength of the detected signal or the proximity to a hidden device. More lights indicate a stronger signal.
- Audible Alarm: The device will emit beeping sounds. The frequency and intensity of the beeps will increase as you get closer to a detected device.
- Vibration Alert: For discreet detection, the device can be set to vibrate, with vibration intensity increasing with signal strength.
5. Maintenance
5.1 Cleaning
To maintain optimal performance, keep the device clean. Use a soft, dry cloth to wipe the exterior. Avoid using abrasive cleaners, solvents, or harsh chemicals, as these can damage the device's finish or internal components.
5.2 Storage
When not in use, store the JAXTIN G9 Pro in a cool, dry place, away from direct sunlight and extreme temperatures. Keep it in its original packaging or a protective case to prevent damage.
5.3 Battery Care
The device contains a built-in Lithium-Ion battery. To prolong battery life:
- Avoid fully discharging the battery frequently.
- Charge the device regularly, even if not in frequent use, to maintain battery health.
- Do not expose the device to high temperatures, as this can degrade battery performance and safety.
6. Troubleshooting
| Problem | Possible Cause | Solution |
|---|---|---|
| Device does not power on. | Low battery or no charge. | Charge the device fully using the provided Type-C cable. |
| No detection or weak detection. | Low sensitivity setting. Device too far from source. Interference from other devices. | Increase sensitivity. Move closer to the suspected area. Temporarily turn off other wireless devices if possible. |
| Frequent false alarms. | High sensitivity setting. Presence of legitimate wireless signals (Wi-Fi, Bluetooth, cell phones). | Decrease sensitivity. Move away from known signal sources. Confirm the nature of the detected signal. |
| IR detection not working. | IR lights not activated. Viewing angle incorrect. | Ensure IR mode is selected. Sweep slowly and look through the viewing window from different angles. |
| Magnetic detection not working. | Magnetic mode not activated. Device not close enough to magnetic object. | Ensure magnetic mode is selected. Sweep the device directly over or very close to suspected magnetic surfaces. |
7. Specifications
| Feature | Detail |
|---|---|
| Model Name | G9 Pro |
| Brand | JAXTIN |
| Indoor/Outdoor Usage | Indoor, Outdoor |
| Compatible Devices | Hidden cameras, listening devices, GPS trackers, and more privacy threats |
| Controller Type | Button control |
| Color | Black |
| Number of Items | 1 |
| Included Components | Detector, Instructions (English), Type-C Charging cable, Packaging box |
| Wireless Communication Technology | C-Type |
| Material | Acrylonitrile Butadiene Styrene (ABS) |
| Batteries Required? | Yes (1 Lithium Ion battery included) |
| Item Weight | 5 ounces (0.14 Kilograms) |
| Room Type | Office, Car, Hotel, Bathroom, Restroom, Locker room, Travel, Private environments |
| Package Dimensions | 6.3 x 3.43 x 1.85 inches |
| Special Feature | Upgraded signal detection, infrared detection, strong magnetic detection, laser induction detection, Compact and lightweight, 72 hours long battery life, fast charging |
8. Warranty and Support
8.1 Warranty Information
The JAXTIN G9 Pro Hidden Camera Detector comes with a one-year warranty from the date of purchase. This warranty covers manufacturing defects and ensures the product functions as intended under normal use. Please retain your proof of purchase for warranty claims.
8.2 Customer Support
For any questions, technical assistance, or warranty claims, please contact JAXTIN customer support. Our dedicated team is available to assist you with any issues or inquiries regarding your G9 Pro detector.
Contact information can typically be found on the product packaging or the official JAXTIN website.
9. Product Videos
No official product video URLs were provided in the product data for embedding. Please refer to the manufacturer's official website or product page for any available video demonstrations or tutorials.