1. Introduction
This manual provides essential information for the setup, operation, and maintenance of the Waveshare ESP32-S3 7inch LCD Development Board, Model ESP32-S3-LCD-7B. This board is designed for embedded applications requiring a high-quality display and robust processing capabilities, featuring a 1024x600 resolution LCD without touch functionality.
The ESP32-S3-LCD-7B integrates an Xtensa 32-bit LX7 dual-core processor, operating at up to 240 MHz, and offers comprehensive wireless connectivity with Wi-Fi 802.11 b/g/n (2.4GHz) and Bluetooth 5.0 (LE). It is equipped with 512KB SRAM, 8MB Flash, and 8MB PSRAM, providing ample memory for complex projects. Multiple interface options such as I2C, SPI, and UART ensure adaptability with various sensors and peripherals.
2. Package Contents
Verify that all items listed below are present in your package. If any components are missing or damaged, please contact Waveshare support.
- 1x ESP32-S3-LCD-7B Development Board
- 2x HY2.0 2PIN to 2PIN male cable (10cm)
- 1x HY2.0 3PIN to 3PIN male cable (10cm)
- 2x HY2.0 4PIN to 4PIN male cable (10cm)
- 1x Screws pack

3. Product Features
The ESP32-S3-LCD-7B offers a robust set of features for embedded development:
- 7-inch LCD Display: Features a 1024x600 resolution screen for high-quality visual output. This version does not include touch functionality.
- Dual-Core Processor: Powered by an Xtensa 32-bit LX7 dual-core processor, clocked at up to 240 MHz for efficient processing.
- Wireless Connectivity: Integrated Wi-Fi 802.11 b/g/n (2.4GHz) and Bluetooth 5.0 (LE) with an onboard antenna.
- Memory Capacity: Equipped with 512KB SRAM, 8MB Flash, and 8MB PSRAM to support diverse applications.
- Multiple Interface Options: Includes I2C, SPI, and UART for flexible integration with various sensors and peripherals.
- IPS Display Panel: Provides excellent display performance with a wide 178-degree viewing angle.


4. Hardware Overview
This section details the main components and interfaces of the ESP32-S3-LCD-7B development board. Refer to the diagram below for component identification.
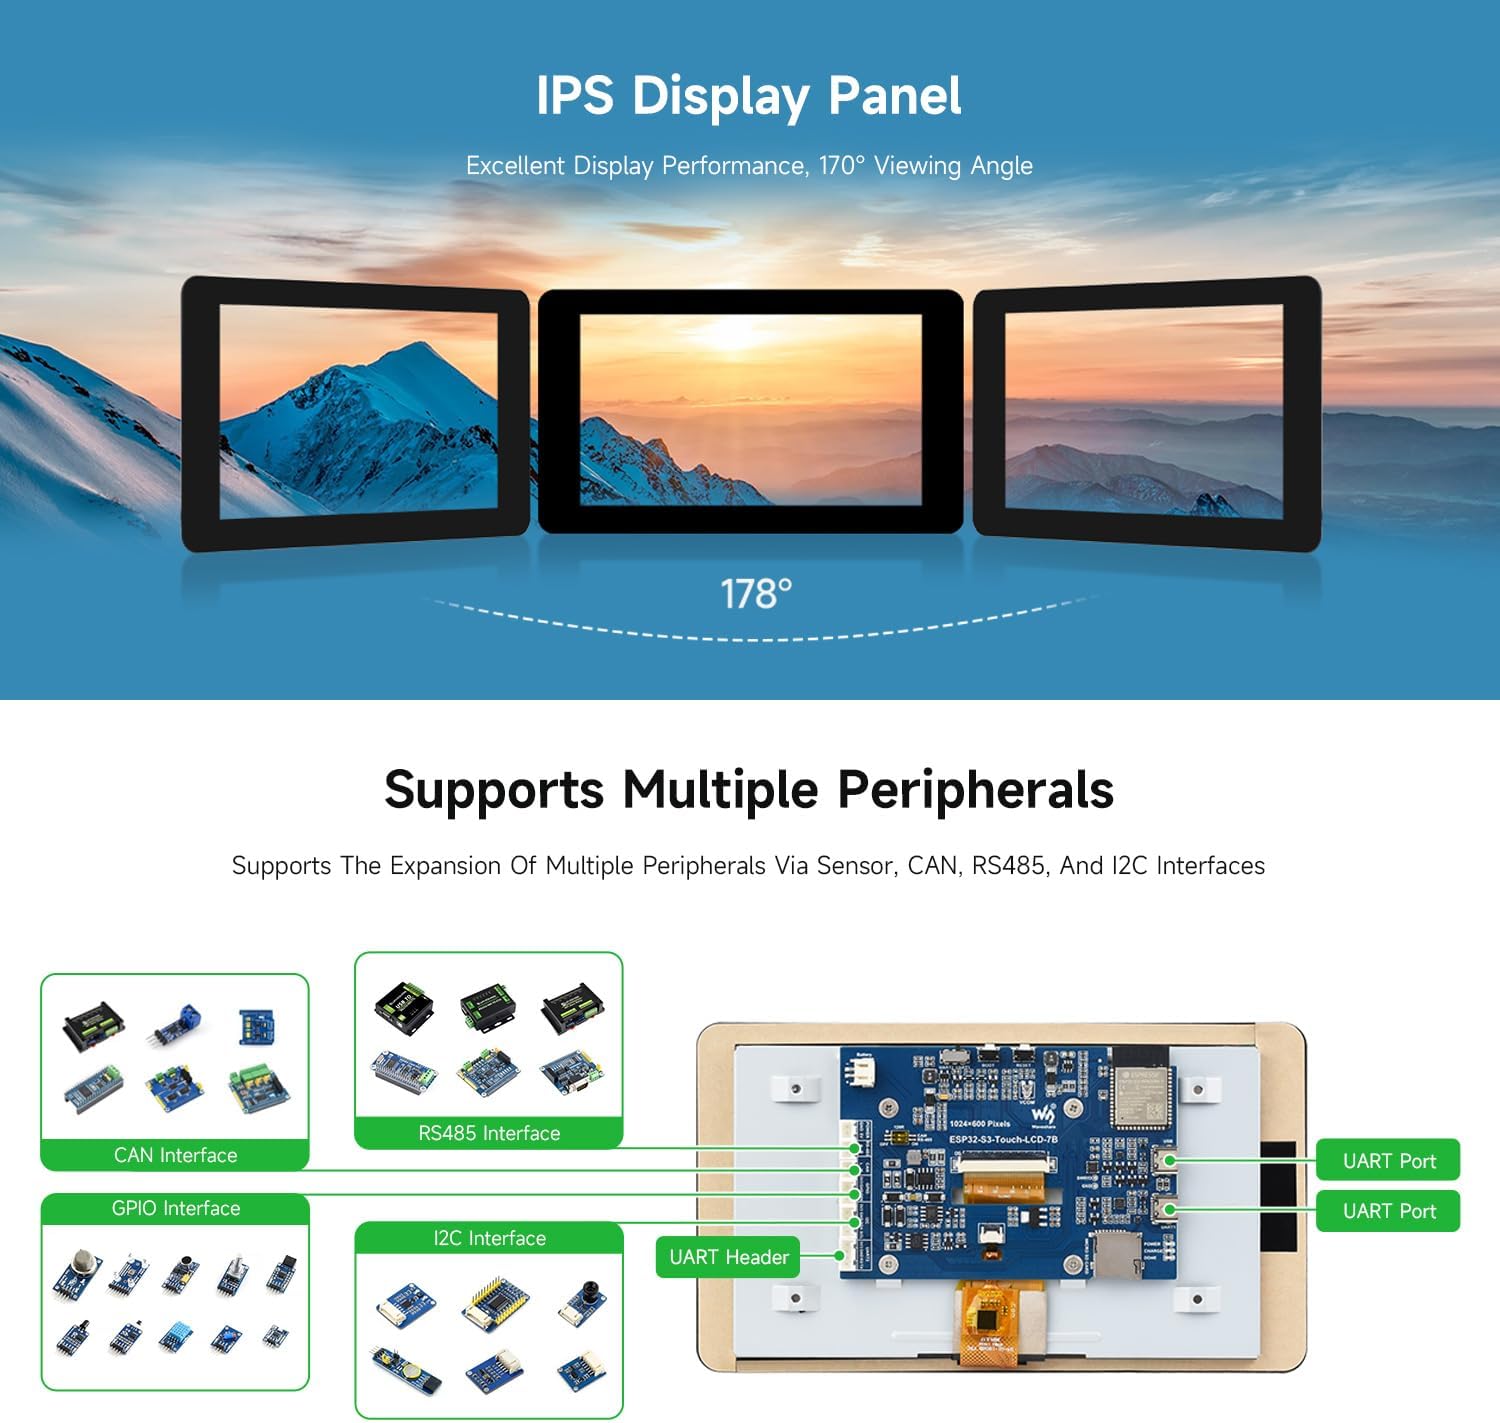
- ESP32-S3-WROOM-1-N16R8 module: The core SoC with Wi-Fi and Bluetooth, up to 240MHz operating frequency, integrated 8MB PSRAM and 16MB Flash.
- Display panel connector: For connecting the 7-inch LCD panel.
- TF card slot: For external storage.
- USB Type-C port: For power supply and USB to UART communication.
- UART1 Port: USB to UART Type-C port.
- UART2 header: UART1 and UART2 are the same UART, selected by switch.
- I2C header: For I2C communication.
- Sensor header: General purpose sensor interface.
- CAN header: For CAN bus communication.
- RS485 header: For RS485 communication.
- 5V output: 5V power output.
- 3.7V Lithium battery PH2.0 header: For connecting a 3.7V Lithium battery.
- CAN terminal resistor selection: Jumper for CAN bus termination resistor.
- RS485 terminal resistor selection: Jumper for RS485 bus termination resistor.
- UART selection: Switch to select between UART1 or UART2.
- BOOT button: Press and hold while powering on for program burning.
- RESET button: Resets the board.
- DONE indicator: Lithium battery charging completed indicator.
- CHARGE indicator: Lithium battery charging indicator.
- POWER indicator: Power supply indicator.

5. Setup Guide
Follow these steps to set up your Waveshare ESP32-S3 7inch LCD Development Board:
- Connect the LCD Panel: Carefully connect the provided 7-inch LCD panel to the display panel connector (2) on the main board. Ensure the ribbon cable is inserted correctly and securely.
- Power Supply: Connect the board to a power source using the USB Type-C port (4). You can use a standard 5V USB power adapter or connect it to your computer. The POWER indicator (21) should light up.
- Initial Programming Environment Setup:
- For detailed software setup, including driver installation and IDE configuration (e.g., Arduino IDE, ESP-IDF), refer to the official Waveshare Wiki resources. A link to the Wiki can typically be found on the product page or by searching for "Waveshare ESP32-S3-LCD-7B Wiki".
- Ensure you have the correct board definition installed for the ESP32-S3 series.
- When uploading firmware, you may need to press and hold the BOOT button (17) while initiating the upload process in your IDE, then release it once the upload begins.
- Peripheral Connections (Optional): If you plan to use external sensors or modules, connect them to the appropriate headers (I2C, SPI, UART, CAN, RS485, Sensor) using the provided cables or compatible connectors.
- TF Card (Optional): Insert a formatted TF card into the TF card slot (3) if your application requires external storage.
6. Operating Instructions
Once the board is set up and programmed, its operation will depend on the specific firmware loaded onto it. Here are general operating guidelines:
- Power On/Off: The board powers on automatically when connected to a USB power source or a charged 3.7V Lithium battery. Disconnect the power source to turn it off.
- Firmware Upload: To upload new firmware, connect the board via the USB Type-C port to your computer. Use your chosen development environment (e.g., Arduino IDE, ESP-IDF) to compile and upload your code. Follow the specific instructions for your development environment, which may involve using the BOOT and RESET buttons.
- Display Output: The 7-inch LCD will display content as programmed by your application. The 1024x600 resolution provides a clear visual interface.
- Wireless Communication: Utilize the integrated Wi-Fi and Bluetooth capabilities as defined in your application code for network connectivity or device communication.
- Peripheral Interaction: Interact with connected peripherals through the programmed interfaces (I2C, SPI, UART, etc.).
7. Application Scenarios
The ESP32-S3-LCD-7B is suitable for a variety of applications:
- Human-Machine Interface (HMI): Ideal for creating custom user interfaces for smart home devices, industrial control panels, or other embedded systems where a visual display is required.
- IoT Device Development: Its Wi-Fi and Bluetooth capabilities make it suitable for connected IoT projects requiring a display for data visualization or user interaction.
- Educational Projects: A versatile platform for learning about ESP32-S3 programming, embedded systems, and display integration.
- Data Monitoring: Can be used to display real-time data from sensors or network sources.

8. Dimensions
The following diagrams provide the outline dimensions of the ESP32-S3-LCD-7B development board and its LCD panel. All measurements are in millimeters (mm).

For reference, the dimensions of the touch version are also provided, though this manual is for the non-touch model:

9. Specifications
| Feature | Detail |
|---|---|
| Model Name | ESP32-S3-LCD-7B |
| Processor | Xtensa 32-bit LX7 Dual-core, up to 240MHz |
| Display | 7-inch LCD, 1024x600 resolution, No Touch Function |
| Wireless Connectivity | Wi-Fi 802.11 b/g/n (2.4GHz), Bluetooth 5.0 (LE) |
| Memory | 512KB SRAM, 8MB Flash, 8MB PSRAM |
| Interfaces | I2C, SPI, UART, CAN, RS485, USB Type-C |
| Storage | TF card slot |
| Power Supply | USB Type-C (5V), 3.7V Lithium battery header |
| Operating System Support | Linux (for development environment) |
| Item Weight | 9.2 ounces (approx. 260g) |
| Package Dimensions | 8.43 x 6.02 x 1.54 inches |
10. Maintenance
Proper maintenance ensures the longevity and reliable operation of your development board:
- Handling: Handle the board by its edges to avoid touching components, especially the display surface and sensitive connectors.
- Cleaning: Use a soft, dry, anti-static cloth to clean the board. For the LCD screen, use a specialized screen cleaner and a microfiber cloth. Avoid abrasive materials or harsh chemicals.
- Storage: Store the board in a cool, dry environment, away from direct sunlight, extreme temperatures, and high humidity. If not in use for extended periods, store it in its original anti-static packaging.
- Power: Always ensure the correct voltage and current are supplied to the board. Using an incorrect power supply can cause damage.
- Firmware Updates: Regularly check the Waveshare Wiki for firmware updates and security patches to ensure optimal performance and stability.
11. Troubleshooting
If you encounter issues with your ESP32-S3-LCD-7B, consider the following troubleshooting steps:
- Board Not Powering On:
- Check the USB Type-C cable and power adapter. Ensure they are functioning correctly and providing 5V.
- Verify that the POWER indicator LED (21) is lit.
- If using a battery, ensure it is charged and correctly connected to the PH2.0 header (13).
- Display Not Working:
- Ensure the LCD panel's ribbon cable is securely and correctly seated in its connector (2).
- Verify that your firmware includes display initialization code and is correctly configured for the 1024x600 resolution.
- Confirm that the backlight is enabled in your software.
- Firmware Upload Failure:
- Ensure the correct USB drivers are installed on your computer.
- Select the correct COM port in your development environment.
- Try pressing and holding the BOOT button (17) while initiating the upload, then releasing it.
- Verify that the correct board definition (e.g., "Waveshare ESP32-S3-Touch-LCD-7" or similar ESP32-S3 board) is selected in your IDE.
- Wi-Fi/Bluetooth Connectivity Issues:
- Check your application code for correct Wi-Fi/Bluetooth initialization and credentials.
- Ensure the onboard antenna is not obstructed.
- Test in an environment with minimal wireless interference.
- Peripheral Communication Errors:
- Verify wiring connections to the respective headers (I2C, SPI, UART, etc.).
- Check your code for correct pin assignments and communication protocols.
- Ensure any necessary jumpers (e.g., for terminal resistors on CAN/RS485) are correctly set.
For more in-depth troubleshooting and specific code examples, consult the Waveshare Wiki and community forums.
12. Support & Resources
Waveshare provides extensive resources to assist you with your development board:
- Official Wiki: The Waveshare Wiki is the primary source for detailed documentation, tutorials, code examples, and software tools. Visit the Waveshare website and navigate to the product page for the ESP32-S3-LCD-7B to find the Wiki link.
- Technical Support: If you encounter issues that cannot be resolved using the Wiki or troubleshooting guide, please contact Waveshare technical support through their official website.
- Community Forums: Engage with other users and developers in online forums dedicated to ESP32 and Waveshare products for shared knowledge and solutions.
13. Warranty Information
Specific warranty terms and conditions for the Waveshare ESP32-S3 7inch LCD Development Board are typically provided at the point of purchase or on the official Waveshare website. Please refer to these sources for detailed warranty coverage, duration, and claims process. Generally, warranty covers manufacturing defects under normal use conditions.