
1. Introduction
This manual provides detailed instructions for the BIGTREETECH Octopus Pro V1.1 H723 Klipper Upgrade Kit. This comprehensive kit is designed to enhance your 3D printing experience with high-speed capabilities and advanced features. It includes the Octopus Pro V1.1 H723 motherboard, BTT Pi V1.2 core control board, TMC5160T and TMC2209 stepper motor drivers, an HDMI5 touchscreen, an Eddy Duo auto bed leveling sensor, and an SFS V2 smart filament sensor.
Please read this manual thoroughly before installation and operation to ensure proper usage and optimal performance of all components.
2. Components Overview
The BIGTREETECH Klipper Upgrade Kit includes the following key components:
2.1. Octopus Pro V1.1 H723 Control Board
The Octopus Pro V1.1 H723 is a powerful 32-bit control board featuring an ARM Cortex-M7 series STM32H723ZET6 chip. It offers a main frequency of up to 550MHz and 512KB Flash memory, providing robust performance for 3D printer control. It supports popular firmware like Klipper and Marlin, and operating systems such as Raspberry Pi and Octoprint.

Image: BIGTREETECH Octopus Pro V1.1 H723 Control Board. This image displays the main control board, highlighting its ARM Cortex-M7 series STM32H723ZET6 chip with a main frequency of 550MHz and 512KB Flash. Below the board, logos indicate support for Klipper and Marlin firmware, and Raspberry Pi and Octoprint operating systems.
2.2. BTT Pi V1.2 Core Control Board
The BTT Pi V1.2 is a core control board designed for high-speed and stability, optimized to run Linux and support Debian/Programmable environments. It features a 64-bit Quad-Core Architecture with an ARM Cortex-A53 1.5GHz processor and 1GB DDR3L SDRAM. Connectivity options include Fast Ethernet+ 100Mbps WiFi, 40-pin GPIO, HDMI Output, USB 2.0, CAN bus, ADXL345 SPI, and DC12-24V power via screw terminals.

Image: BIGTREETECH BTT Pi V1.2 Core Control Board. This image shows the BTT Pi V1.2 board with its various ports and components. Key features like 64-bit 1GB DDR3L, Fast Ethernet+ 100Mbps WiFi, 40-pin GPIO, HDMI Output, USB 2.0, CAN bus, ADXL345 SPI, and DC12-24V power are visually represented.
2.3. HDMI5 V1.2 Touchscreen
The HDMI5 V1.2 Touchscreen is a 5-inch display designed specifically for Klipper. It features an 800x480 resolution, 160° viewing angle, capacitive touch screen, and 5-points touch capability. It includes an HDMI Display Port, Type-C Touch Port, and 3.5mm Audio Output, along with a 4pin XH2.54 Break Out Port for connectivity.

Image: BIGTREETECH HDMI5 V1.2 Touch Screen. The image shows the 5-inch touchscreen displaying a typical Klipper interface with temperature readings, homing, actions, configuration, and print options. Icons below illustrate its 5-inch size, 800x480 resolution, 160° viewing angle, capacitive touch, 5-points touch, HDMI, Type-C, 3.5mm audio, and XH2.54 ports.
2.4. Eddy Duo Auto Bed Leveling Sensor
The Eddy Duo Auto Bed Leveling Sensor utilizes millisecond-level eddy current scanning for precise identification of microscopic defects on the print bed. It automatically adjusts the print height for fast and precise leveling, offering high precision (0.5µm) and high-speed leveling (20 seconds).

Image: Eddy Duo Auto Bed Leveling Sensor. This image depicts the Eddy Duo sensor mounted on a 3D printer's print head, actively scanning the print bed with an eddy current pattern. Text overlays highlight its lightning-fast and ultra-precise capabilities, including 20-second high-speed leveling and 0.5µm high precision.
2.5. SFS V2 Smart Filament Sensor
The SFS V2 Smart Filament Sensor is designed to detect various filament issues, including nozzle clogging, filament runout, filament tying, and extruder malfunctions. Upon detection, it promptly issues error alerts on the screen and automatically pauses printing, preventing unnecessary resource wastage and failed prints.

Image: SFS V2 Smart Filament Sensor. This image illustrates the SFS V2 sensor's capabilities by showing four scenarios: nozzle clogging, filament runout, filament tying, and extruder trouble. Each scenario is depicted with a visual representation of the problem and how the sensor detects it.
2.6. TMC5160T V1.0 Stepper Motor Drivers
The kit includes two TMC5160T V1.0 stepper motor drivers. These drivers are ultra-quiet and designed for driving 57 stepper motors. They feature external power MOS for large current handling and reduced heat generation. Key specifications include a TMC5160-TA driver chip, dimensions of 15.3 x 20.4 mm, a power supply voltage (VM) range of 8-35V, a maximum current of 3A (2.54mm single-row pins support up to 3A), and a maximum microstepping of 256. They operate in SPI mode.
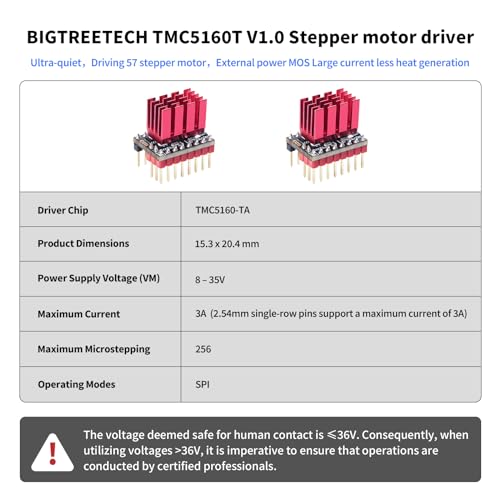
Image: BIGTREETECH TMC5160T V1.0 Stepper Motor Driver. This image displays two TMC5160T drivers with red heatsinks and a table detailing their specifications: Driver Chip (TMC5160-TA), Product Dimensions (15.3 x 20.4 mm), Power Supply Voltage (8-35V), Maximum Current (3A), Maximum Microstepping (256), and Operating Modes (SPI). A warning about voltages >36V is also present.
2.7. TMC2209 V1.3 Stepper Motor Drivers
The kit includes five TMC2209 V1.3 stepper motor drivers. These drivers are ultra-quiet, designed to avoid losing steps and jittering, and feature good heat dissipation with an immersion gold process. Key specifications include operating modes of STEP/DIR or UART, a power voltage (VM) range of 4.75V-28V DC, peak current of 2.8A, current RMS of 2A, max microsteps of 256, and microstep settings of 2, 4, 8, 16 (can be divided into 256).
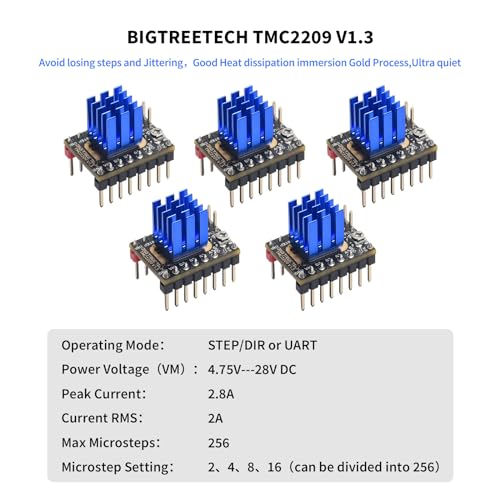
Image: BIGTREETECH TMC2209 V1.3 Stepper Motor Driver. This image shows five TMC2209 drivers with blue heatsinks and a table outlining their specifications: Operating Mode (STEP/DIR or UART), Power Voltage (4.75V-28V DC), Peak Current (2.8A), Current RMS (2A), Max Microsteps (256), and Microstep Setting (2, 4, 8, 16, divisible into 256).
3. Setup and Installation
This section provides general guidelines for setting up your BIGTREETECH Klipper Upgrade Kit. Specific wiring diagrams and detailed configuration steps for Klipper firmware are typically found in the official BIGTREETECH documentation and GitHub repositories for each component.
3.1. Pre-installation Checklist
- Ensure your 3D printer is powered off and disconnected from the mains.
- Gather necessary tools: screwdrivers, wire cutters/strippers, multimeter (optional), and a computer with internet access.
- Download the latest Klipper firmware and configuration files relevant to your printer model and the Octopus Pro board from the official BIGTREETECH GitHub.
- Familiarize yourself with the pinouts of the Octopus Pro V1.1 H723 and BTT Pi V1.2 boards.
3.2. Motherboard and Core Board Installation
- Mount the Octopus Pro V1.1 H723 control board securely within your printer's electronics enclosure. Ensure proper ventilation.
- Connect the BTT Pi V1.2 core control board to the Octopus Pro V1.1 H723 using the appropriate communication interface (e.g., USB or UART, refer to specific documentation).
- Connect the stepper motor drivers (TMC5160T and TMC2209) to their respective sockets on the Octopus Pro board. Pay attention to driver orientation.
- Connect your printer's stepper motors, heaters, thermistors, endstops, and fans to the Octopus Pro board according to the wiring diagrams for your specific printer model and the Octopus Pro.
3.3. Sensor and Touchscreen Installation
- Install the Eddy Duo Auto Bed Leveling Sensor onto your print head. Ensure it is securely mounted and its sensing area is clear. Connect it to the designated port on the Octopus Pro board.
- Install the SFS V2 Smart Filament Sensor in a suitable location along the filament path, typically before the extruder. Connect it to the designated port on the Octopus Pro board.
- Connect the HDMI5 V1.2 Touchscreen to the BTT Pi V1.2 board via HDMI and the Type-C touch port. Mount the touchscreen in an accessible location on your printer.
3.4. Power Connection
- Connect the main power supply to the Octopus Pro V1.1 H723 board. Ensure correct polarity and voltage (DC12-24V).
- The BTT Pi V1.2 board typically draws power from the Octopus Pro or a separate power source as per its design.
- Important Safety Note: The TMC5160T drivers have a voltage range of 8-35V. When utilizing voltages greater than 36V, operations must be conducted by certified professionals. Always ensure safe voltage levels.
4. Operating Instructions
This section outlines the general operational flow for the Klipper-based system. Detailed Klipper configuration and usage are extensive and should be referenced from the official Klipper documentation.
4.1. Klipper Firmware Configuration
- Install Klipper: Follow the official Klipper installation guide to set up Klipper on your BTT Pi V1.2 board. This typically involves flashing the Klipper firmware to the Octopus Pro V1.1 H723.
- Configure printer.cfg: Create or modify the
printer.cfgfile on the BTT Pi V1.2 to match your specific printer's hardware, including motor steps, thermistor types, endstop locations, and the configuration for the Eddy Duo and SFS V2 sensors. - Driver Configuration: Configure the TMC5160T and TMC2209 stepper drivers within Klipper, setting current, microstepping, and other parameters.
4.2. Using the HDMI5 Touchscreen
- Once Klipper is running and the BTT Pi V1.2 is connected to the touchscreen, the Klipper interface (e.g., Mainsail or Fluidd) should be displayed.
- Navigate the interface using the capacitive touch functionality to control printer movements, monitor temperatures, start/stop prints, and access settings.
4.3. Auto Bed Leveling with Eddy Duo
- Ensure the Eddy Duo sensor is correctly calibrated in your
printer.cfg. - Initiate the bed leveling process through your Klipper interface (e.g., G29 command or a dedicated button in Mainsail/Fluidd). The sensor will rapidly scan the bed surface.
- Klipper will then apply mesh compensation during printing to account for any bed irregularities.
4.4. Filament Monitoring with SFS V2
- Ensure the SFS V2 sensor is enabled and configured in your
printer.cfg. - During printing, the sensor continuously monitors the filament path.
- If a filament issue (runout, clog, tangle, extruder malfunction) is detected, the printer will automatically pause, and an alert will be displayed on the touchscreen or web interface.
- Address the issue and resume printing from the interface.
5. Maintenance
Regular maintenance ensures the longevity and optimal performance of your BIGTREETECH Klipper Upgrade Kit components.
- Dust Removal: Periodically clean the control boards (Octopus Pro, BTT Pi) and stepper drivers with compressed air or a soft brush to prevent dust buildup, which can lead to overheating.
- Cable Management: Ensure all wiring is neatly routed and secured to prevent strain, accidental disconnections, or interference.
- Firmware Updates: Regularly check the official BIGTREETECH and Klipper GitHub repositories for firmware updates for the Octopus Pro, BTT Pi, and Klipper itself. Updates often include bug fixes and new features.
- Sensor Calibration: Re-calibrate the Eddy Duo Auto Bed Leveling Sensor periodically or if you notice inconsistencies in your first layer adhesion.
- Filament Sensor Check: Ensure the SFS V2 Smart Filament Sensor's path is clear and free of debris. Test its functionality occasionally by manually triggering a filament runout.
- Heatsink Integrity: Verify that the heatsinks on the stepper motor drivers are securely attached and free from obstructions.
6. Troubleshooting
This section addresses common issues you might encounter. For more in-depth troubleshooting, refer to the official Klipper documentation and BIGTREETECH community forums.
6.1. General Issues
- Printer not connecting to Klipper:
- Check USB/UART connection between BTT Pi and Octopus Pro.
- Verify Klipper firmware is correctly flashed to the Octopus Pro.
- Ensure
printer.cfghas the correct serial port defined.
- Stepper motors not moving or moving erratically:
- Check motor wiring and connections to the drivers.
- Verify driver orientation and current settings in
printer.cfg. - Ensure correct microstepping settings.
- HDMI5 Touchscreen not displaying:
- Check HDMI and Type-C connections to the BTT Pi.
- Ensure the BTT Pi is powered on and operating correctly.
- Verify display configuration settings on the BTT Pi.
6.2. Sensor Specific Issues
- Eddy Duo ABL sensor errors or inconsistent leveling:
- Ensure the sensor is securely mounted and not obstructed.
- Check wiring to the Octopus Pro.
- Recalibrate the sensor in Klipper.
- Verify
printer.cfgsettings for the ABL sensor.
- SFS V2 Filament Sensor not detecting issues:
- Ensure filament passes smoothly through the sensor.
- Check wiring to the Octopus Pro.
- Verify sensor configuration in
printer.cfg. - Clean any debris from the sensor's internal mechanism.
7. Specifications
7.1. Octopus Pro V1.1 H723 Control Board
- Microcontroller: ARM Cortex-M7 series STM32H723ZET6
- Main Frequency: Up to 550MHz
- Flash Memory: 512KB
- Supported Firmware: Klipper, Marlin
- Supported OS: Raspberry Pi, Octoprint
7.2. BTT Pi V1.2 Core Control Board
- Architecture: 64-bit Quad-Core
- Processor: ARM Cortex-A53 1.5GHz
- RAM: 1GB DDR3L SDRAM
- Connectivity: Fast Ethernet+ 100Mbps WiFi, 40-pin GPIO, HDMI Output, USB 2.0, CAN bus, ADXL345 SPI
- Power Input: DC12-24V (via screw terminals)
7.3. HDMI5 V1.2 Touchscreen
- Screen Size: 5-inch
- Resolution: 800x480
- Viewing Angle: 160°
- Touch Type: Capacitive, 5-points touch
- Ports: HDMI Display Port, Type-C Touch Port, 3.5mm Audio Output, 4pin XH2.54 Break Out Port
7.4. Eddy Duo Auto Bed Leveling Sensor
- Sensing Method: Millisecond-level eddy current scanning
- Precision: 0.5µm
- Leveling Speed: 20 seconds (High Speed Leveling)
7.5. SFS V2 Smart Filament Sensor
- Detection Capabilities: Nozzle clogging, filament runout, filament tying, extruder malfunctions
- Action: Automatic print pause, on-screen alerts
7.6. TMC5160T V1.0 Stepper Motor Driver
- Driver Chip: TMC5160-TA
- Dimensions: 15.3 x 20.4 mm
- Power Supply Voltage (VM): 8-35V
- Maximum Current: 3A (2.54mm single-row pins support up to 3A)
- Maximum Microstepping: 256
- Operating Modes: SPI
7.7. TMC2209 V1.3 Stepper Motor Driver
- Operating Mode: STEP/DIR or UART
- Power Voltage (VM): 4.75V-28V DC
- Peak Current: 2.8A
- Current RMS: 2A
- Max Microsteps: 256
- Microstep Setting: 2, 4, 8, 16 (can be divided into 256)
8. Warranty and Support
For warranty information and technical support, please refer to the official BIGTREETECH website or contact their customer service directly. Keep your purchase receipt as proof of purchase for any warranty claims.
Official BIGTREETECH Website: www.bigtree-tech.com
For Klipper-specific support and community resources, visit the official Klipper documentation: www.klipper3d.org