1. Important Safety Instructions
Please read and understand all instructions before assembly and use. Failure to follow these instructions may result in product damage, personal injury, or property damage.
- Proper Assembly: Always assemble and secure the shelter properly to prevent collapse. Ensure all connections are tight and stable.
- Environmental Conditions: Avoid prolonged exposure to extreme sunlight and high winds. In severe weather conditions, consider disassembling or reinforcing the shed.
- Condensation: Be aware of potential condensation buildup inside the shed, especially in humid conditions. Ensure adequate ventilation if storing moisture-sensitive items.
- Heat Sources: Do not use or place the shed near open flames, heaters, or any other heat sources. The PE fabric is flammable.
- Anchoring: Always use the provided ground stakes and windproof ropes to securely anchor the shed to the ground.
2. Product Components
Before beginning assembly, ensure all parts are present and undamaged. Refer to the packing list included with your product for a complete inventory.
- Canopy Fabric: 140G PE fabric (Gray), waterproof and UV-resistant.
- Frame Tubes: Galvanized metal tubes (Gray) for the structural framework.
- Connectors: Various connectors to join frame tubes.
- Spring Buckles: For securing pole connections.
- Steel Base Plates: With pre-drilled holes for ground stakes.
- Ground Stakes: For anchoring the shed to the ground.
- Windproof Ropes: For additional stability against wind.
- Roll-Up Zipper Door: Front panel with heavy-duty zippers and velcro tapes.
- Assembly Instructions: Detailed guide for step-by-step assembly.

Figure 2.1: Ultimate Stability Features. This image highlights key structural components: spring buckles for secure pole connections, steel base plates with pre-drilled holes for ground stakes, and a heavy-duty framework designed to resist bending.
3. Setup and Assembly
Assembly typically requires two people and can be completed in approximately 45-60 minutes. Follow the included assembly instructions carefully.
- Prepare the Site: Choose a level, clear area for the shed. Ensure adequate space around the shed for assembly and access.
- Unpack Components: Lay out all frame tubes, connectors, and the canopy fabric. Verify all parts against the packing list.
- Assemble the Frame: Connect the metal tubes according to the assembly diagram. Ensure all spring buckles snap into place for secure connections.
- Attach Base Plates: Secure the steel base plates to the bottom frame poles.
- Drape the Canopy: Carefully drape the PE fabric canopy over the assembled frame. Ensure it is centered and aligned correctly.
- Secure the Canopy: Fasten the canopy to the frame using any integrated straps or ties. Ensure the roll-up zipper door is positioned correctly.
- Anchor the Shed: Drive the ground stakes through the pre-drilled holes in the base plates and into the ground. Attach the windproof ropes to the designated points on the frame and secure them to the ground using additional stakes.
- Final Checks: Inspect all connections, anchors, and fabric tension to ensure the shed is stable and secure.

Figure 3.1: Anchoring and Access Features. This image illustrates the wind ropes and stakes for added anchoring, efficient velcro tapes to eliminate flapping covers, and heavy-duty zippers for quick and easy access to the shed.
4. Operating Instructions
The Outopee storage shed is designed for straightforward use.
- Accessing the Shed: Use the heavy-duty zippers on the roll-up door for easy entry and exit. The door can be rolled up and secured at the top to keep it open for extended periods.
- Securing the Door: When not in use, ensure the zipper door is fully closed and secured with any velcro tapes to protect contents from weather and dust.
- Ventilation: While the shed is designed to be waterproof, occasional ventilation by opening the door can help reduce condensation buildup, especially during humid conditions.

Figure 4.1: Storage Capacity. This image shows the Outopee 6ft x 6ft Outdoor Storage Shed in use, accommodating a bicycle and firewood, illustrating its practical storage capabilities for various items.
5. Maintenance
Regular maintenance will extend the lifespan of your storage shed.
- Cleaning: Clean the PE fabric canopy periodically with mild soap and water. Avoid harsh chemicals or abrasive cleaners that could damage the material. Rinse thoroughly.
- Frame Inspection: Regularly check the metal frame for any signs of rust, bending, or loose connections. Tighten any loose bolts or connections as needed.
- Anchoring Check: Periodically inspect the ground stakes and windproof ropes to ensure they remain securely anchored, especially after strong winds or heavy rain. Re-secure if necessary.
- Fabric Condition: Inspect the canopy fabric for tears, punctures, or excessive wear. Small tears can often be repaired with appropriate fabric repair kits.
- Snow Removal: In areas with heavy snowfall, regularly remove accumulated snow from the roof to prevent structural damage from excessive weight.
6. Troubleshooting
Here are solutions to common issues you might encounter:
- Shed Instability:
Cause: Loose frame connections or inadequate anchoring.
Solution: Ensure all spring buckles are engaged and frame tubes are fully inserted. Re-check and tighten all ground stakes and windproof ropes. Consider adding more anchoring points in very windy conditions. - Water Pooling on Roof:
Cause: Improper canopy tension or frame sag.
Solution: Adjust the canopy tension to ensure a taut surface. Check the frame for any signs of bending or incorrect assembly that might cause sagging. - Zipper Malfunction:
Cause: Dirt in zipper teeth or misalignment.
Solution: Clean zipper teeth with a small brush. Apply a silicone-based lubricant if the zipper is stiff. Ensure the fabric is not caught in the zipper path. - Condensation Inside:
Cause: Lack of ventilation, high humidity.
Solution: Open the roll-up door periodically to allow for air circulation. Avoid storing wet items inside without proper drying.
7. Specifications
Detailed specifications for your Outopee 6ft x 6ft Outdoor Storage Shed.
| Feature | Specification |
|---|---|
| Overall Dimensions (L x W x H) | 6ft x 6ft x 6.7ft (180cm x 180cm x 205cm) |
| Floor Area | 36 Square Feet |
| Material (Canopy) | 140G Polyethylene (PE) Fabric |
| Material (Frame) | Galvanized Alloy Steel |
| Color | Gray |
| Item Weight | 24.4 lbs / 11 kg |
| Water Resistance Level | Waterproof |
| UV Protection | UV-resistant |
| Assembly Required | Yes |
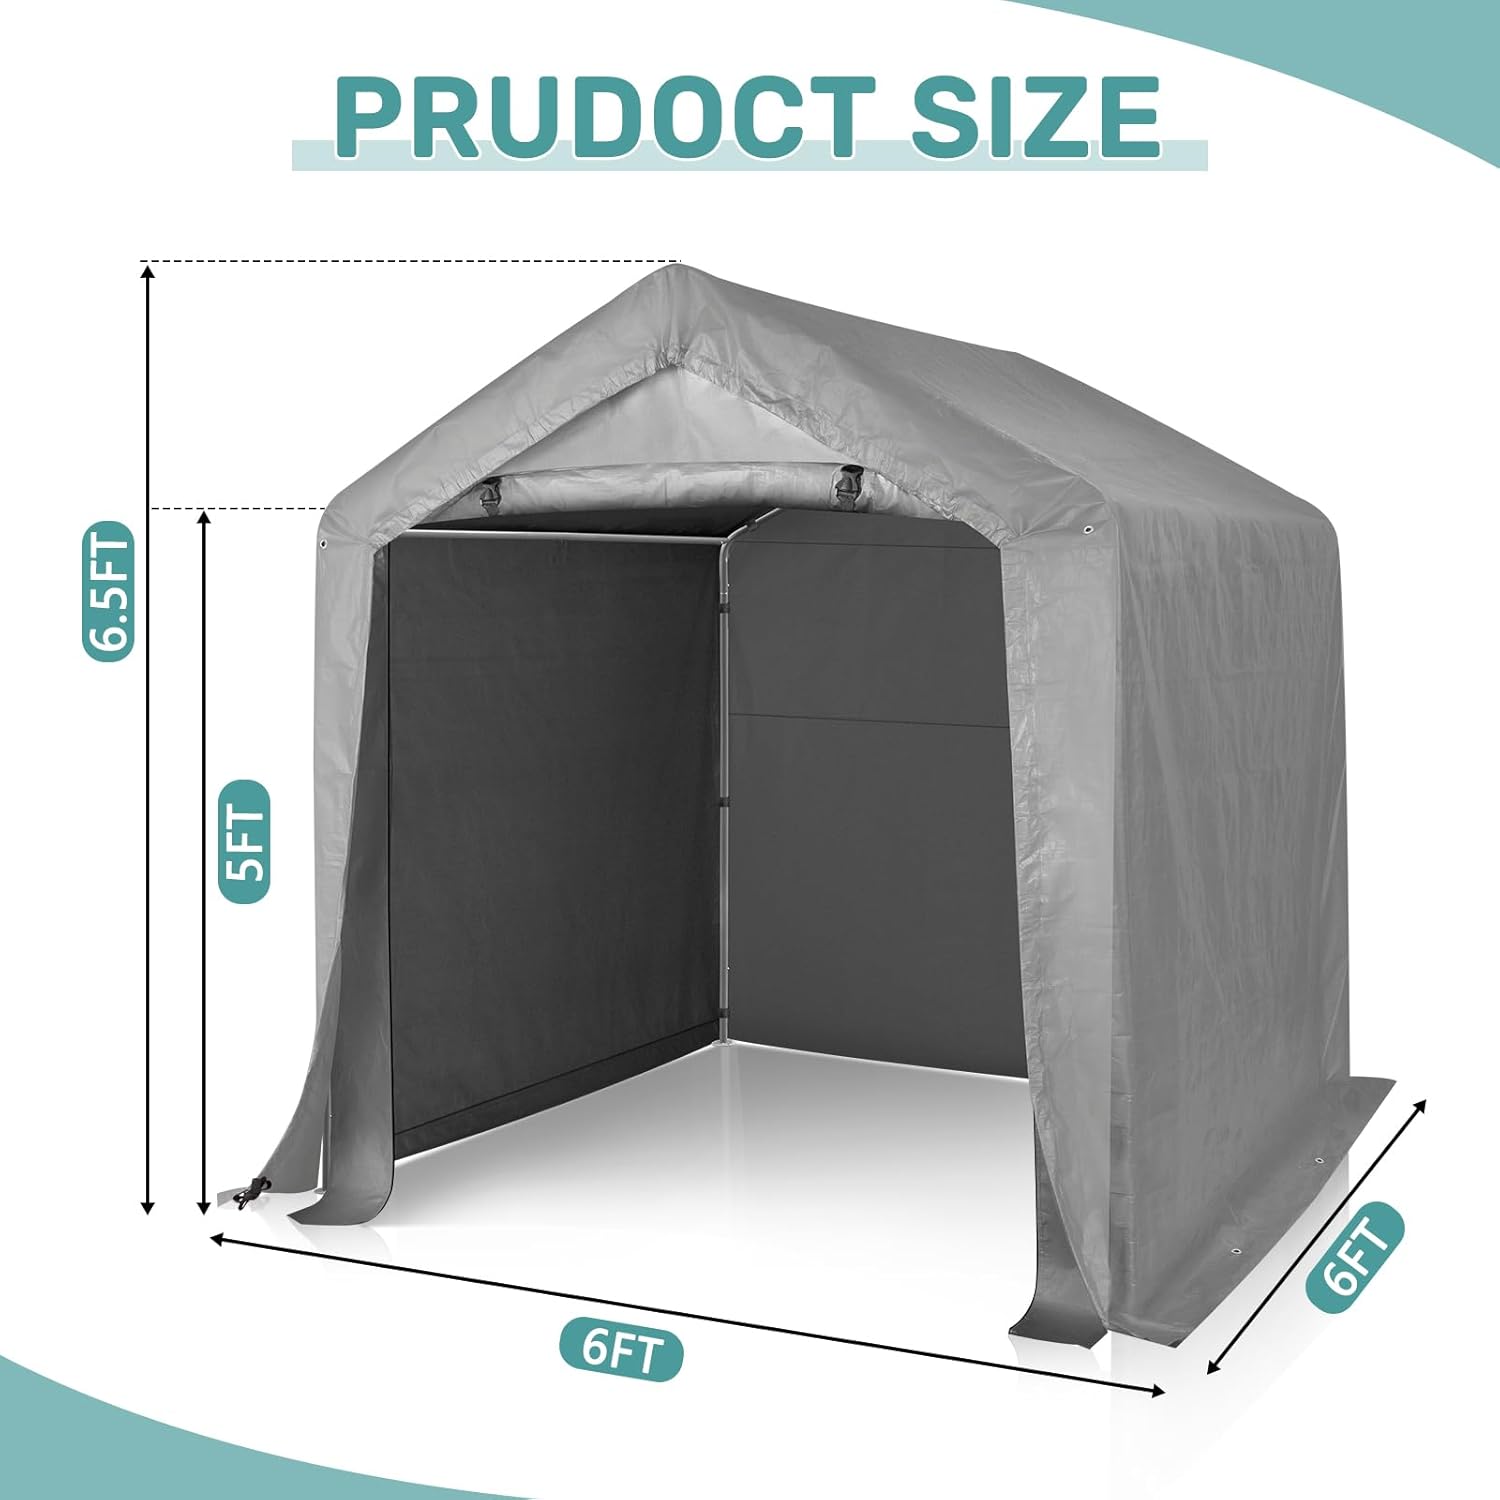
Figure 7.1: Product Dimensions. This diagram illustrates the overall size of the storage shed, indicating a length of 6ft, a width of 6ft, and a peak height of 6.7ft (6.5ft to the top of the side wall).
8. Warranty and Support
Information regarding product warranty and customer support was not provided in the product details. For warranty claims, technical assistance, or replacement parts, please contact the manufacturer, Outopee, directly through their official website or the retailer where the product was purchased.