1. Introduction
Thank you for choosing the Riflewell 7.0 Cu Ft Large Fingerprint Safe Box. This manual provides essential information for the safe and efficient operation of your new security safe. Please read these instructions carefully before use and retain them for future reference.
This safe is designed to protect your valuables, including documents, cash, pistols, and jewelry, with advanced fingerprint and password locking mechanisms, dual alarm systems, and robust construction.
2. What's Included
Upon unpacking, please verify that all the following components are present:
- 1 x Riflewell 7.0 Cu Ft Safe Box
- 4 x Emergency Keys
- 1 x USB Type-C Cable (for external power)
- 4 x Anti-slip Foot Pads
- 6 x Expansion Screws (for mounting)
- 1 x User Manual (this document)

3. Product Features
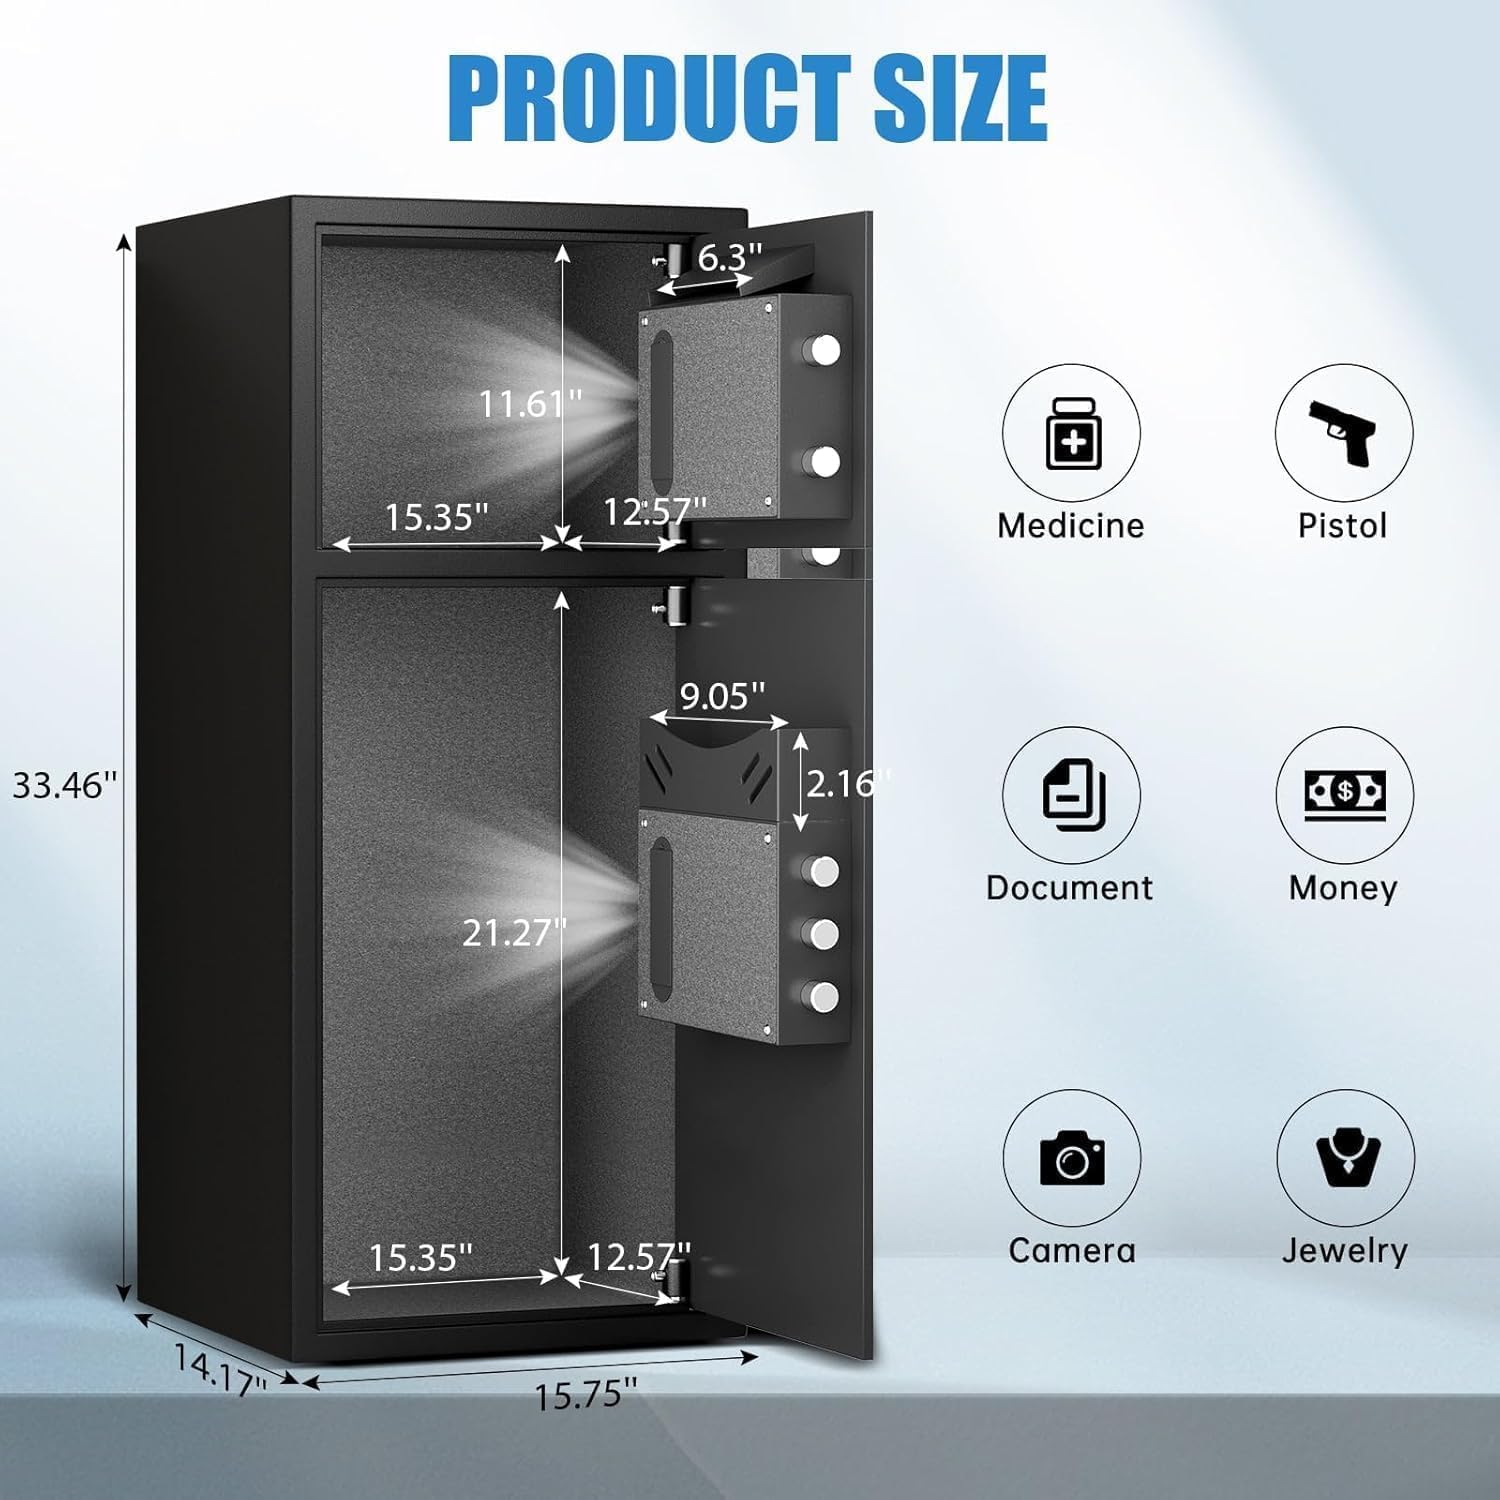
- Extra Large Capacity: External size 14.17"D x 15.75"W x 33.5"H, with a 7.0 cubic feet capacity. Features a double-door design for separate access.
- Enhanced Security: Equipped with a fingerprint and password lock system. Features 3D glowing digital buttons and a unique embedded fingerprint design (US appearance patent).
- Deposit Slot: A convenient front slot allows for easy deposit of money or coins without opening the main door.
- Internal Organization: Includes a metal storage box for smaller items and soft flannel lining to protect valuables from scratches. Internal LED lights illuminate the interior.
- Anti-Theft Construction: Made of reinforced low carbon alloy steel with micro-slit laser cutting precision. Features a pry-resistant thickened door and five solid live bolts.
- Dual Alarm System: Activates an alarm (up to 70 decibels) after three consecutive incorrect password attempts or violent vibrations. Includes a mute function for silent operation.
- Emergency Power: Universal emergency power jack (USB Type-C) ensures access even if internal batteries are depleted.


4. Setup
4.1 First Time Opening (Using Emergency Key)
Before initial use, you must open the safe using the emergency key to install batteries and set up your access methods.
- Locate the emergency keyhole, usually concealed behind a cover on the keypad panel.
- Insert an emergency key and turn it counter-clockwise to its limit.
- Rotate the knob clockwise to open the door.
4.2 Battery Installation
The electronic lock requires 4 AA alkaline batteries (not included). Do not use lithium or rechargeable batteries.
- With the safe door open, locate the battery compartment on the inside of the door.
- Remove the battery cover.
- Insert 4 AA alkaline batteries, ensuring correct polarity.
- Replace the battery cover.
4.3 Setting Up Fingerprint
You can program multiple fingerprints for convenient access.
- With the safe door open, short press the red 'SETTING BUTTON' located inside the door.
- Place your finger on the fingerprint collector. When you hear a short beep, remove your finger.
- Repeat placing and removing your finger four times until the safe confirms successful registration.
4.4 Setting Up Password
You can set a 3-8 digit user password.
- With the safe door open, short press the red 'SETTING BUTTON' located inside the door.
- Input your desired 3-8 digit user code on the keypad.
- Press '#' to confirm your password.
4.5 Mounting the Safe
For added security, the safe can be mounted to a wall or floor using the provided expansion screws.
- Identify a suitable location for mounting. The safe has 4 pre-drilled holes on the back and 2 on the bottom.
- Mark the drilling points on the wall or floor through the pre-drilled holes.
- Drill holes at the marked positions.
- Align the safe with the drilled holes and secure it using the expansion screws.

5. Operating the Safe
5.1 Opening with Fingerprint or Password
- To open with fingerprint: Place your registered finger on the fingerprint collector until the lock disengages.
- To open with password: Input your 3-8 digit user code and press '#'. The lock will disengage.
- Rotate the knob clockwise to open the door.
5.2 Opening with Emergency Key
The emergency key provides manual access in case of forgotten codes or battery failure.
- Locate the emergency keyhole.
- Insert an emergency key and turn it counter-clockwise to its limit.
- Rotate the knob clockwise to open the door.
5.3 Opening with USB Cable (External Power)
If the internal batteries are dead and you don't have the emergency key, you can use a USB Type-C cable for temporary external power.
- Connect the USB Type-C cable to the port on the keypad panel and to an external power source (e.g., power bank).
- Once powered, use your registered fingerprint or password to open the safe as usual.
- Rotate the knob clockwise to open the door.
6. Security Features
6.1 Dual Alarm Function
The safe is equipped with a dual alarm system to deter unauthorized access:
- Incorrect Password Alarm: If three consecutive incorrect passwords are entered, the alarm will sound for 20 seconds.
- Vibration Alarm: In standby mode, press and hold "4" until you hear two beeps to activate the vibration alarm. If the safe is shaken or hit violently, the alarm will sound for 20 seconds.
The alarm can only be deactivated by removing the batteries.
6.2 Mute Function
The safe features an upgraded mute function, suitable for various scenarios where silent operation is preferred. Refer to the quick start guide for specific instructions on activating/deactivating the mute mode.

7. Maintenance
- Battery Replacement: Replace batteries promptly when the low battery indicator appears to ensure continuous functionality.
- Cleaning: Clean the safe's exterior with a soft, damp cloth. Avoid abrasive cleaners or solvents that could damage the finish.
- Key Storage: Store emergency keys in a secure location away from the safe, but easily accessible to you.
8. Troubleshooting
- Safe not opening: Ensure batteries are correctly installed and charged. Try using the emergency key or external USB power. Verify the correct password or fingerprint is being used.
- Alarm sounding unexpectedly: Check if the vibration alarm is activated. Ensure no unauthorized attempts have been made to open the safe. Deactivate by removing batteries.
- Keypad unresponsive: Replace batteries. If using external power, ensure the USB cable is securely connected and the power source is active.
9. Specifications
| Feature | Specification |
|---|---|
| Brand | Riflewell |
| Product Dimensions | 14.17"D x 15.75"W x 33.5"H |
| Lock Type | Electronic Combination Lock (Fingerprint & Password) |
| Capacity | 7 Cubic Feet |
| Material | Reinforced Low Carbon Alloy Steel |
| Special Features | Alarm System, LED Light, Deposit Slot, Double Door, Soft Lining |
| Mounting Type | Floor Mount / Wall Mount |
| Item Weight | 49.5 Pounds |
| Item Model Number | KL-85W-shao |
10. Warranty and Support
Riflewell is committed to customer satisfaction. If you encounter any problems with your safe, please contact us directly. We offer:
- Lifetime Warranty
- 24-Hour Online Customer Service
- 90-Day Unconditional Returns
- Lifetime Key Matching Service
To find seller support on Amazon:
- Log in to your Amazon buyer's account.
- Find your order.
- Click "Get help" to contact the seller for product support.


