1. Introduction
This manual provides comprehensive instructions for the safe and effective use of the AMPBANK H128 Handheld Thermal Camera. The H128 is designed for precise temperature measurement and thermal imaging, suitable for various applications including electrical inspections, HVAC diagnostics, building energy audits, and automotive maintenance. Please read this manual thoroughly before operating the device and retain it for future reference.

Figure 1.1: The AMPBANK H128 Handheld Thermal Camera, showcasing its ergonomic design and integrated display.
2. Safety Information
Always observe the following safety precautions to prevent injury and damage to the device.
- Do not point the camera directly at extremely high-intensity energy sources, such as the sun or lasers, as this may damage the infrared detector.
- Avoid dropping the device or subjecting it to severe impact, despite its robust design.
- Do not immerse the device in water or other liquids. While it has an IP65 rating for dust and water jet protection, it is not designed for submersion.
- Use only the specified charging cable (USB-C) and power adapter to charge the device.
- Do not attempt to disassemble or modify the camera. Repairs should only be performed by authorized service personnel.
- Keep the lens clean and free from dust and debris. Use a soft, lint-free cloth for cleaning.
- Operate the device within the specified environmental conditions (temperature and humidity).
3. Product Overview
3.1. Components
The AMPBANK H128 thermal camera includes the following main components:
- Infrared Lens: Captures thermal radiation.
- Display Screen: Shows thermal images, temperature readings, and menu options.
- Control Buttons: For navigation and selection (OK, Up, Down, Return/Power).
- Trigger Button: To capture images.
- USB-C Port: For charging and data transfer.
- Tripod Mount: Standard 1/4-inch thread for stable positioning.
3.2. Key Features
The H128 thermal camera offers a range of advanced features for efficient and accurate thermal inspections:
- Enhanced Clarity with TISR Resolution: The camera utilizes TISR (Thermal Image Super Resolution) technology to achieve an effective display resolution of 240x240 pixels from a 128x128 infrared sensor, providing clearer thermal images.
- Extended 24-Hour Battery Life: Equipped with a built-in 2900mAh rechargeable battery, the H128 provides up to 24 hours of continuous operation, minimizing downtime during extended inspections.
- Precise Temperature Measurement: The device offers high accuracy with a temperature resolution of 0.1°C and readings within ±3%, covering a wide temperature range from -4°F to 842°F (-20°C to 450°C). Users can adjust emissivity for various materials to improve accuracy.
- Temperature Alarm for Anomaly Detection: A built-in alarm system quickly identifies abnormal heat sources, automatically tracking and displaying maximum, minimum, and center temperatures on the screen.
- Durable and Robust Design: The H128 is built to withstand demanding environments, featuring a 6.56-foot (2-meter) drop protection and an IP65 ingress protection rating against dust and water jets.
- High Frame Rate: A 25Hz frame rate ensures smooth, real-time thermal imagery, crucial for dynamic inspections.
- Multiple Thermal Palettes: Choose from 5 different color palettes (Iron Red, Black Hot, Rainbow, White Hot, Red Hot) to best visualize temperature differences for specific applications.

Figure 3.1: Comparison of thermal image clarity with and without TISR technology, demonstrating the enhanced 240x240 resolution.

Figure 3.2: Illustration of the H128's long-lasting 24-hour battery life and Type-C charging port.

Figure 3.3: The H128 in use, demonstrating its capability for accurate temperature measurement in an electrical panel.

Figure 3.4: The H128 display highlighting hot, center, and cold spots with an integrated high/low temperature alarm.
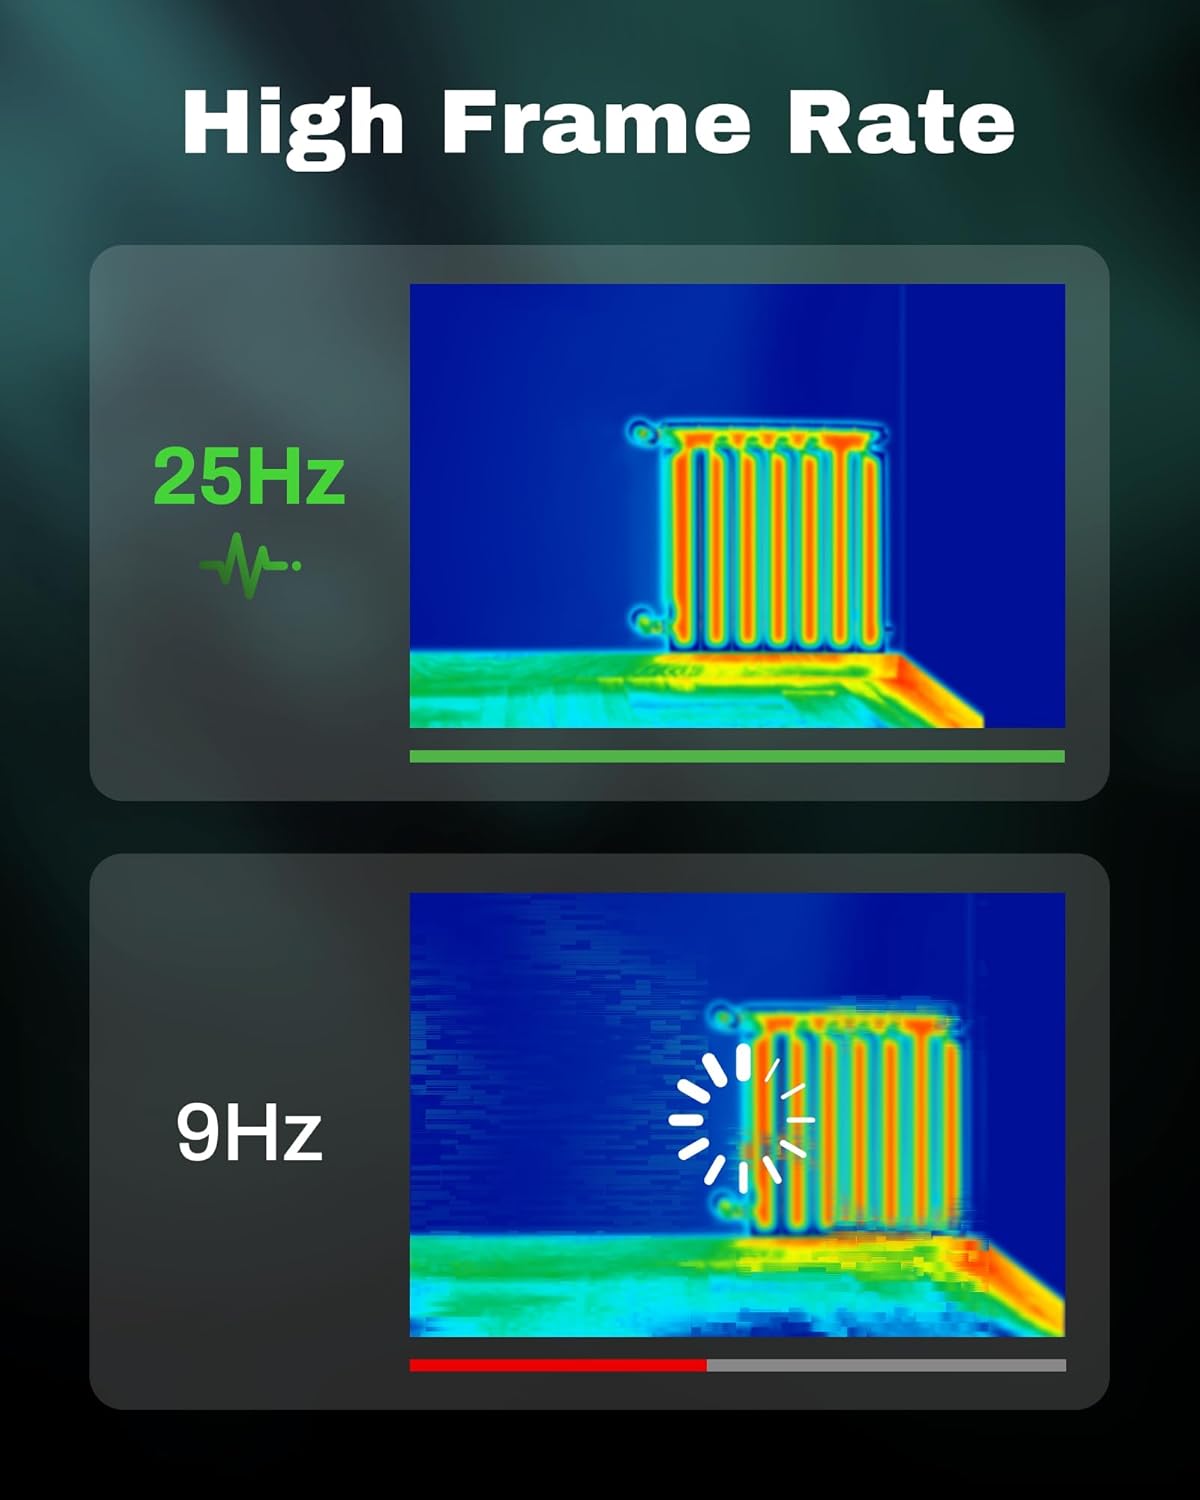
Figure 3.5: Visual comparison of thermal image fluidity at 25Hz versus 9Hz frame rates.

Figure 3.6: Display of the five available thermal color palettes for varied visualization of heat signatures.
4. Setup
4.1. Unpacking
Carefully remove all items from the packaging. The box should contain:
- AMPBANK H128 Thermal Imaging Camera
- USB-C Cable
Inspect the camera for any signs of damage. If any components are missing or damaged, contact customer support immediately.
4.2. Charging the Battery
Before first use, fully charge the camera's built-in battery.
- Connect the supplied USB-C cable to the USB-C port on the top of the camera.
- Connect the other end of the USB-C cable to a compatible USB power adapter (not included) or a computer's USB port.
- The charging indicator on the screen will show the charging status. A full charge typically takes several hours.
- Once fully charged, disconnect the cable.
4.3. Initial Power On and Basic Settings
- Power On: Press and hold the power button (often integrated with the Return button) for approximately 8 seconds until the screen illuminates.
- Language Selection: Upon first power-on, you may be prompted to select your preferred language. Use the Up/Down buttons to navigate and the OK button to confirm.
- Date and Time: Set the correct date and time for accurate timestamping of captured images. Navigate to the settings menu using the OK button, then find the Date/Time option.
5. Operation
5.1. Basic Operation
- Power On/Off: Press and hold the power button for 8 seconds to turn on. Press and release the power button to turn off or enter sleep mode.
- Navigating Menus: Use the OK button to enter the menu. Use the Up and Down arrow buttons to scroll through options. Press OK to select an option. Press the Return button to exit a menu or go back.
- Capturing Images: Aim the camera at the target. Press the trigger button (located on the handle) to capture a thermal image. Images are saved internally.
5.2. Measurement Modes and Settings
- Temperature Spot Measurement: The H128 automatically displays the maximum, minimum, and center temperatures on the screen.
- Emissivity Adjustment: For accurate temperature readings, adjust the emissivity setting based on the material being inspected. Access this setting through the menu. Common emissivity values can be found in reference tables.
- Distance Setting: Inputting the approximate distance to the target can further refine temperature accuracy.
- Thermal Palettes: Change the color scheme of the thermal image to highlight temperature differences more effectively. Navigate to the palette settings in the menu and choose from Iron Red, Black Hot, Rainbow, White Hot, or Red Hot.
5.3. Data Management
The H128 can store over 8000 images internally. To transfer images to a computer:
- Connect the camera to your computer using the supplied USB-C cable.
- The camera will appear as a removable storage device.
- Browse to the image folder and copy the desired files to your computer.

Figure 5.1: Connecting the H128 thermal camera to a laptop via USB-C for image transfer.
6. Maintenance
6.1. Cleaning
- Camera Body: Wipe the camera body with a soft, damp cloth. Do not use abrasive cleaners or solvents.
- Infrared Lens: The infrared lens is a delicate optical component. Use a lens cleaning cloth or a soft, lint-free cloth specifically designed for optics. Gently wipe the lens to remove dust or smudges. Do not apply excessive pressure or use harsh chemicals.
6.2. Storage
When not in use, store the H128 in a cool, dry place, away from direct sunlight and extreme temperatures. Ensure the battery is partially charged (around 50%) before long-term storage to preserve battery health.
6.3. Battery Care
To maximize battery lifespan:
- Avoid fully discharging the battery frequently.
- Avoid leaving the battery fully charged for extended periods.
- Charge the battery at room temperature.
7. Troubleshooting
| Problem | Possible Cause | Solution |
|---|---|---|
| Camera does not power on. | Battery is depleted. | Charge the battery using the USB-C cable. |
| Image is blurry or unclear. | Lens is dirty. / Incorrect focus (if applicable). | Clean the infrared lens with a soft, lint-free cloth. The H128 has fixed focus, ensure you are within the optimal measurement distance. |
| Temperature readings seem inaccurate. | Incorrect emissivity setting. / Distance to target is too far. | Adjust the emissivity setting in the menu to match the material being measured. Ensure you are within the recommended measurement distance. |
| Cannot transfer images to computer. | Loose USB-C connection. / Driver issue. | Ensure the USB-C cable is securely connected to both the camera and the computer. Try a different USB port or cable. Restart both devices. |
| Battery life is shorter than expected. | Frequent use of high-brightness settings. / Battery degradation over time. | Reduce screen brightness if possible. Ensure proper charging and storage practices. If battery life significantly degrades, contact support. |
If the problem persists after attempting these solutions, please contact AMPBANK customer support.
8. Specifications
| Parameter | Value |
|---|---|
| Model | H128 |
| Infrared Resolution | 128x128 pixels |
| TISR Display Resolution | 240x240 pixels |
| Temperature Range | -4°F to 842°F (-20°C to 450°C) |
| Accuracy | ±3% or ±3°C (whichever is greater) |
| Thermal Sensitivity (NETD) | 40mk |
| Frame Rate | 25Hz |
| Battery Type | Built-in Rechargeable Lithium Ion (2900mAh) |
| Battery Life | Up to 24 hours continuous use |
| Charging Port | USB-C |
| Drop Protection | 6.56 feet (2 meters) |
| IP Rating | IP65 |
| Storage Capacity | 8000+ images |
| Dimensions | 9.33 x 4.76 x 3.86 inches (approximate) |
| Weight | 1.06 Pounds (approximate) |
9. Warranty & Support
For detailed warranty information, please refer to the warranty card included with your product or visit the official AMPBANK website. Warranty terms and conditions may vary by region and product.
If you require technical assistance, have questions about your product, or need to initiate a warranty claim, please contact AMPBANK customer support through their official channels:
- Manufacturer: AMPBANK
- Online Store: Visit the AMPBANK Store on Amazon
- Please refer to the official AMPBANK website or product packaging for the most current contact information (email, phone, service centers).


