1. Product Overview
The JONSBO T7 is a Micro ATX PC case designed for compact desktop computer builds. It features a combination of aluminum alloy and North American black walnut solid wood, offering both durability and a distinctive aesthetic. The case includes a multifunctional handle for portability and offers flexible side panel options, allowing users to choose between a standard aluminum panel or a high-transparency tempered glass panel for display.

Image 1.1: JONSBO T7 Micro ATX PC Case, available in Black and Silver versions, highlighting its aluminum and wood construction.
2. Key Features
- Premium Construction: Crafted from 3mm thick aluminum alloy and North American black walnut solid wood for enhanced durability and aesthetic appeal.
- Interchangeable Side Panels: Includes both an aluminum side panel and a high-transparency tempered glass panel, allowing customization for internal component display.
- Multifunctional Handle: Features a solid wood handle designed to support up to 15kg, facilitating short-distance transportation.
- Optimized Cooling: Supports front 120mm*2 and rear 120mm*1 fans, with multiple mesh holes for effective heat dissipation.
- Versatile Component Support: Compatible with Micro-ATX/ITX motherboards, GPUs up to 280mm, ATX PSUs up to 220mm, and CPU coolers up to 165mm.
- Flexible Storage Options: Accommodates 1x 3.5" HDD and 2x 2.5" SSDs, or 3x 2.5" SSDs.
- Convenient Front I/O: Equipped with 1x Type-C, 1x USB 3.0, and a combined Audio/Mic port.

Image 2.1: Illustration of the dual side-panel design, allowing users to switch between aluminum and tempered glass.

Image 2.2: Detail of the solid wood handle, designed for convenient and flexible placement.
3. Specifications
| Feature | Specification |
|---|---|
| Model | T7 |
| Dimensions (W x D x H) | 210mm x 305mm x 403mm (including feet) |
| Material | 3mm Aluminum Alloy, 1mm Steel Plate, North American Walnut |
| Motherboard Compatibility | Micro ATX, Mini ITX |
| GPU Max Length | 255mm - 280mm (255mm if 2x 120mm front fans are installed) |
| PSU Max Length | ATX ≤ 220mm |
| CPU Cooler Max Height | ≤ 165mm |
| Drive Bays | 1x 3.5" HDD / 2x 2.5" SSD or 3x 2.5" SSD |
| Fan Support | Front: 2x 120mm (Optional), Rear: 1x 120mm (Optional) |
| Front I/O Ports | 1x Type-C, 1x USB 3.0, 1x Audio + 1x Mic (combined) |
| Expansion Slots | 4 |
| Case Net Weight | 5.85 kg (approx. 12.9 lbs) |

Image 3.1: Visual representation of the JONSBO T7's key specifications.
4. Setup and Installation
This section provides guidance for installing components into your JONSBO T7 PC case. Always ensure your system is powered off and unplugged before beginning installation.
4.1 Motherboard Installation
The JONSBO T7 supports Micro ATX and Mini ITX motherboards. Install the necessary standoffs in the appropriate positions for your motherboard size. Carefully align your motherboard with the standoffs and I/O shield, then secure it with screws.
4.2 Power Supply Unit (PSU) Installation
The case supports ATX PSUs up to 220mm in length. The PSU mounts at the bottom of the case. Slide the PSU into its designated bay and secure it with screws from the rear of the case.
Video 4.1: An official JONSBO video demonstrating the features and internal layout of the T7 Micro ATX case, including component installation areas.
4.3 Graphics Processing Unit (GPU) Installation
The case supports GPUs with a maximum length of 280mm. If two 120mm front fans are installed, the GPU length should not exceed 255mm. Install your GPU into the appropriate PCIe slot on your motherboard and secure it with the retention mechanism and screws.
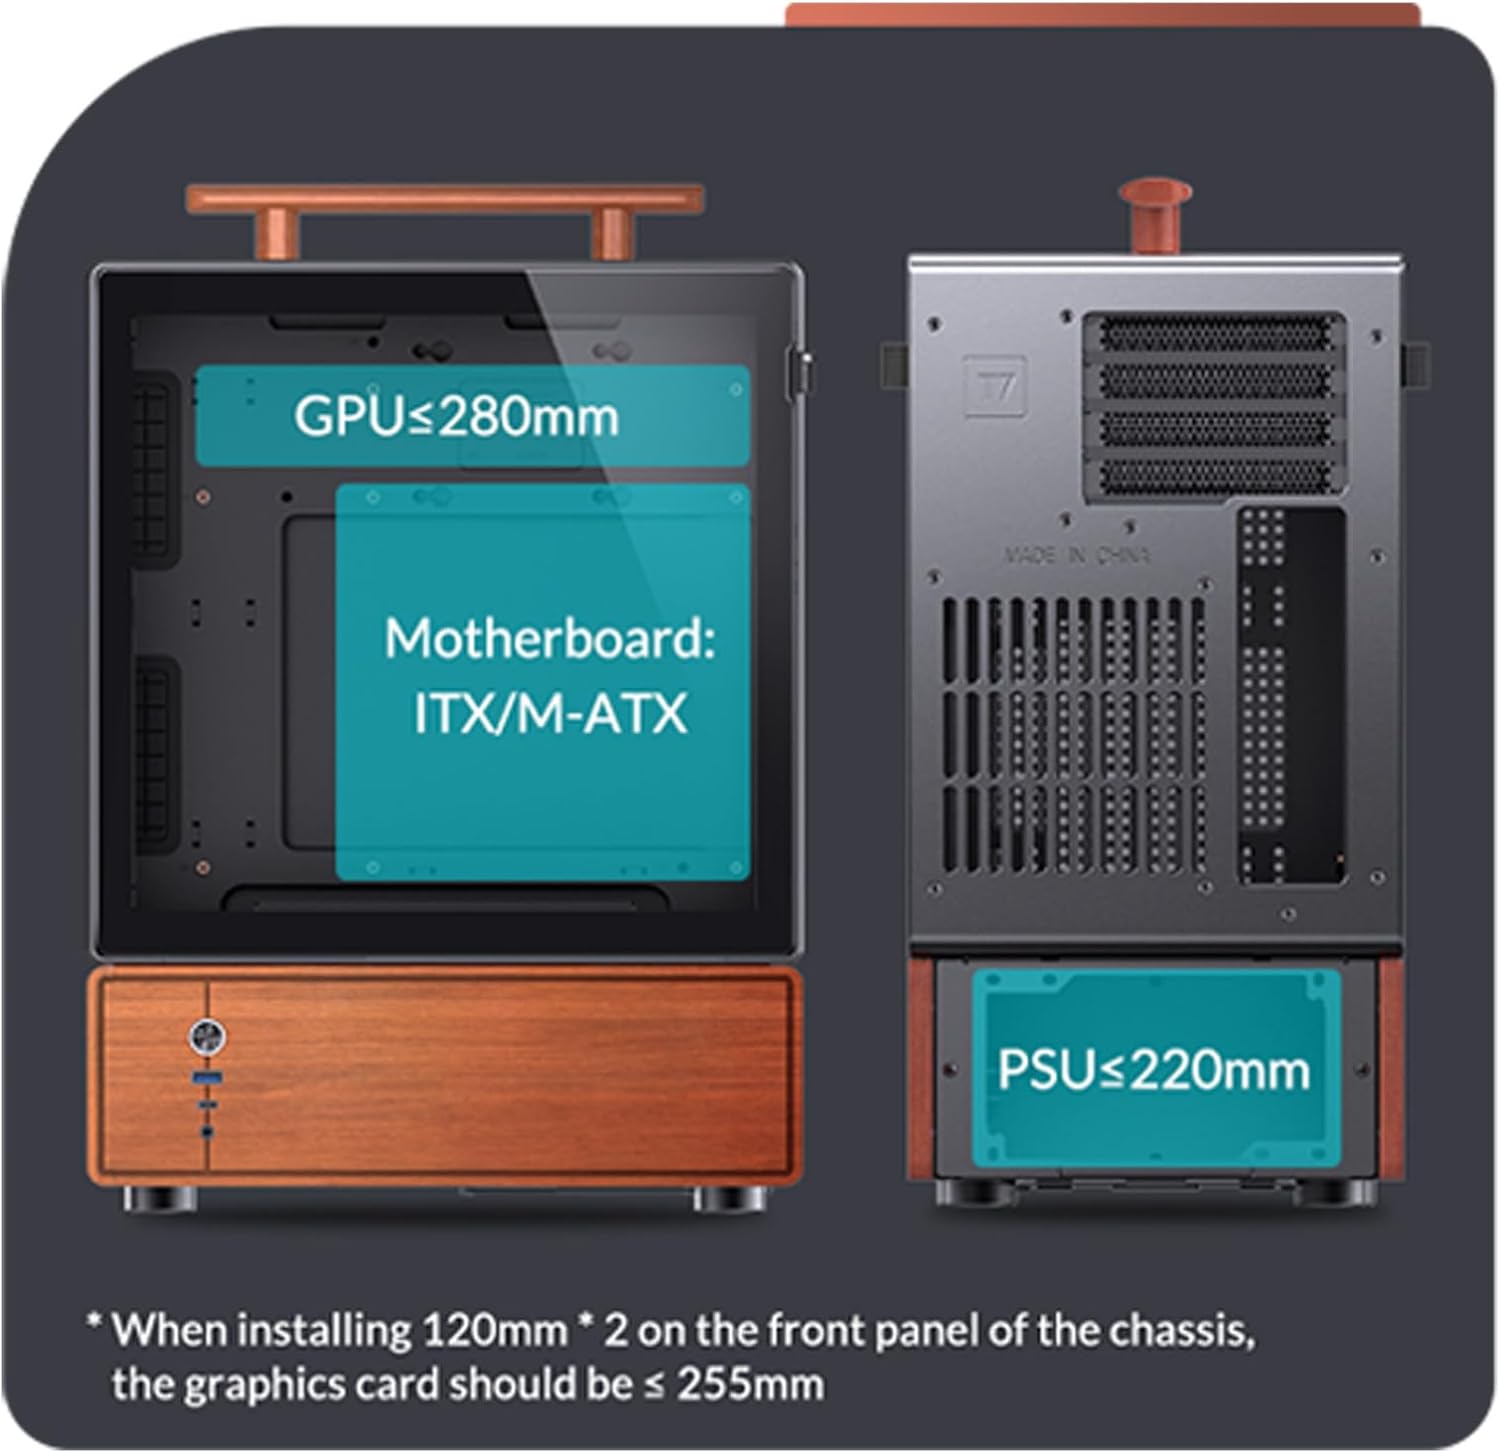
Image 4.2: Internal layout diagram indicating maximum GPU length (255-280mm), Motherboard compatibility (ITX/M-ATX), and PSU length (≤220mm).
4.4 Storage Drive Installation
The case offers flexible storage options: 1x 3.5" HDD and 2x 2.5" SSDs, or 3x 2.5" SSDs. Refer to the internal diagrams for specific mounting locations and secure your drives using the provided screws.

Image 4.3: Visual guide for installing 3.5" HDDs and 2.5" SSDs within the case.
4.5 Cooling Fan Installation
The case supports two 120mm fans at the front and one 120mm fan at the rear. Install fans in desired locations, ensuring proper airflow direction for optimal cooling. The maximum CPU cooler height is 165mm.

Image 4.4: Internal view showing component placement and fan locations.
4.6 Front Panel Connections
Connect the front panel cables (Power Button, USB 3.0, Type-C, Audio/Mic) to the corresponding headers on your motherboard. Refer to your motherboard manual for exact header locations.

Image 4.5: Front interface details for connecting to the motherboard.
5. Operating Instructions
Once all components are correctly installed and secured, and all cables are connected:
- Connect your monitor, keyboard, mouse, and other peripherals to your computer.
- Plug the power cable into the PSU and then into a wall outlet.
- Press the power button on the front panel of the case to start your computer.
- To power off, use the operating system's shutdown function. A short press of the power button can also initiate a soft shutdown (configurable in OS settings), while a long press (5-10 seconds) will force a hard shutdown.
6. Maintenance
Regular maintenance helps ensure optimal performance and longevity of your JONSBO T7 PC case and its components.
- Dust Cleaning: Periodically clean dust from the case, especially from the mesh panels and fan filters. Use compressed air or a soft brush.
- Fan Filters: The case includes magnetic mesh filters for the front and top. Remove and clean these filters regularly to maintain good airflow.
- Exterior Cleaning: Wipe the aluminum and wood surfaces with a soft, dry cloth. Avoid abrasive cleaners or solvents that could damage the finish.
- Cable Management: Ensure internal cables are neatly managed to prevent obstruction of airflow and to facilitate future component upgrades or maintenance.

Image 6.1: Heat dissipation support diagram, highlighting mesh areas and fan locations for maintenance reference.
7. Troubleshooting
If you encounter issues with your PC build within the JONSBO T7 case, consider the following general troubleshooting steps:
- No Power: Ensure the PSU is switched on, the power cable is securely connected, and the front panel power button cable is correctly attached to the motherboard.
- No Display: Verify that your GPU is properly seated in its PCIe slot and that the monitor cable is connected to the GPU (not the motherboard integrated graphics, unless intended).
- Overheating: Check that all fans are spinning correctly and are oriented for optimal airflow. Ensure CPU cooler is properly installed and making good contact. Clean any dust buildup from filters and internal components.
- Component Not Detected: Re-seat the component (e.g., RAM, GPU, storage drive) and check its power and data connections.
- Front Panel I/O Issues: Confirm that the front panel cables are correctly connected to the motherboard headers.
For more specific issues, consult the manuals for your individual components (motherboard, GPU, PSU, etc.) or seek assistance from a qualified technician.
8. Warranty and Support
For warranty information and technical support regarding your JONSBO T7 PC case, please refer to the official JONSBO website or contact their customer service directly. Keep your proof of purchase for warranty claims.
JONSBO Customer Service: Please visit the official JONSBO website for contact details and support resources.


