1. Introduction
The S.M.S.L PL150 is a high-fidelity CD player designed to deliver exceptional audio performance. It features a CS43198 decoding chip, supports standard and mini CDs, and offers versatile output options including RCA, 3.5mm, 4.4mm headphone jacks, optical, and coaxial digital outputs. This manual provides detailed instructions for setting up, operating, and maintaining your PL150 CD player.

Figure 1: Front view of the S.M.S.L PL150 CD Player.
2. Safety Information
- Do not expose this unit to rain or moisture.
- Do not disassemble the unit. Refer all servicing to qualified personnel.
- Ensure proper ventilation around the unit to prevent overheating.
- Use only the specified power supply (DC 5V/2A).
- Avoid placing the unit near heat sources or in direct sunlight.
- Handle CDs by their edges to prevent scratches and smudges.
3. Package Contents
Please check that all items are present in the package:
- S.M.S.L PL150 CD Player
- Infrared Remote Control
- Instruction Manual
- USB Power Cable (Note: A 5V/2A power adapter is required and sold separately.)

Figure 2: Retail packaging of the S.M.S.L PL150 CD Player.
4. Product Overview
4.1 Front Panel
The front panel features the CD loading slot, control buttons, a full-lamination IPS display, and dual headphone outputs.
Figure 3: Front panel layout with controls and display.
- CD Slot: For inserting standard (12cm) and mini (8cm) CDs.
- Control Buttons: Eject/Load, Play/Pause, Previous Track, Next Track, Volume Down, Volume Up.
- IPS Display: Shows track number, playback time, volume level, and other status indicators.
- Headphone Outputs: 3.5mm single-ended and 4.4mm balanced headphone jacks for direct audio output.
4.2 Rear Panel
The rear panel provides various connectivity options for integrating the PL150 into your audio system.

Figure 4: Rear panel with input/output ports.
- RCA Output (L/R): Analog stereo output for connecting to an amplifier or receiver.
- Coaxial Output: Digital audio output for connecting to an external DAC or digital amplifier.
- Optical Output: Digital audio output for connecting to an external DAC or digital amplifier.
- DC 5V/2A Power Input: For connecting the power supply.
4.3 Key Features
- Equipped with a high-performance CS43198 decoding chip for superior audio quality.
- Supports playback of standard (12cm) and mini (8cm) CDs, including MP3 CDs.
- Features optical and coaxial digital outputs for flexible system integration.
- Includes 3.5mm single-ended and 4.4mm balanced headphone outputs with 75-level precise volume adjustment.
- Full-lamination color IPS display for clear information display.
- Anti-vibration design suitable for various usage scenarios, including car environments.

Figure 5: The PL150 supports both standard and mini CD formats.

Figure 6: The integrated CS43198 decoding chip.
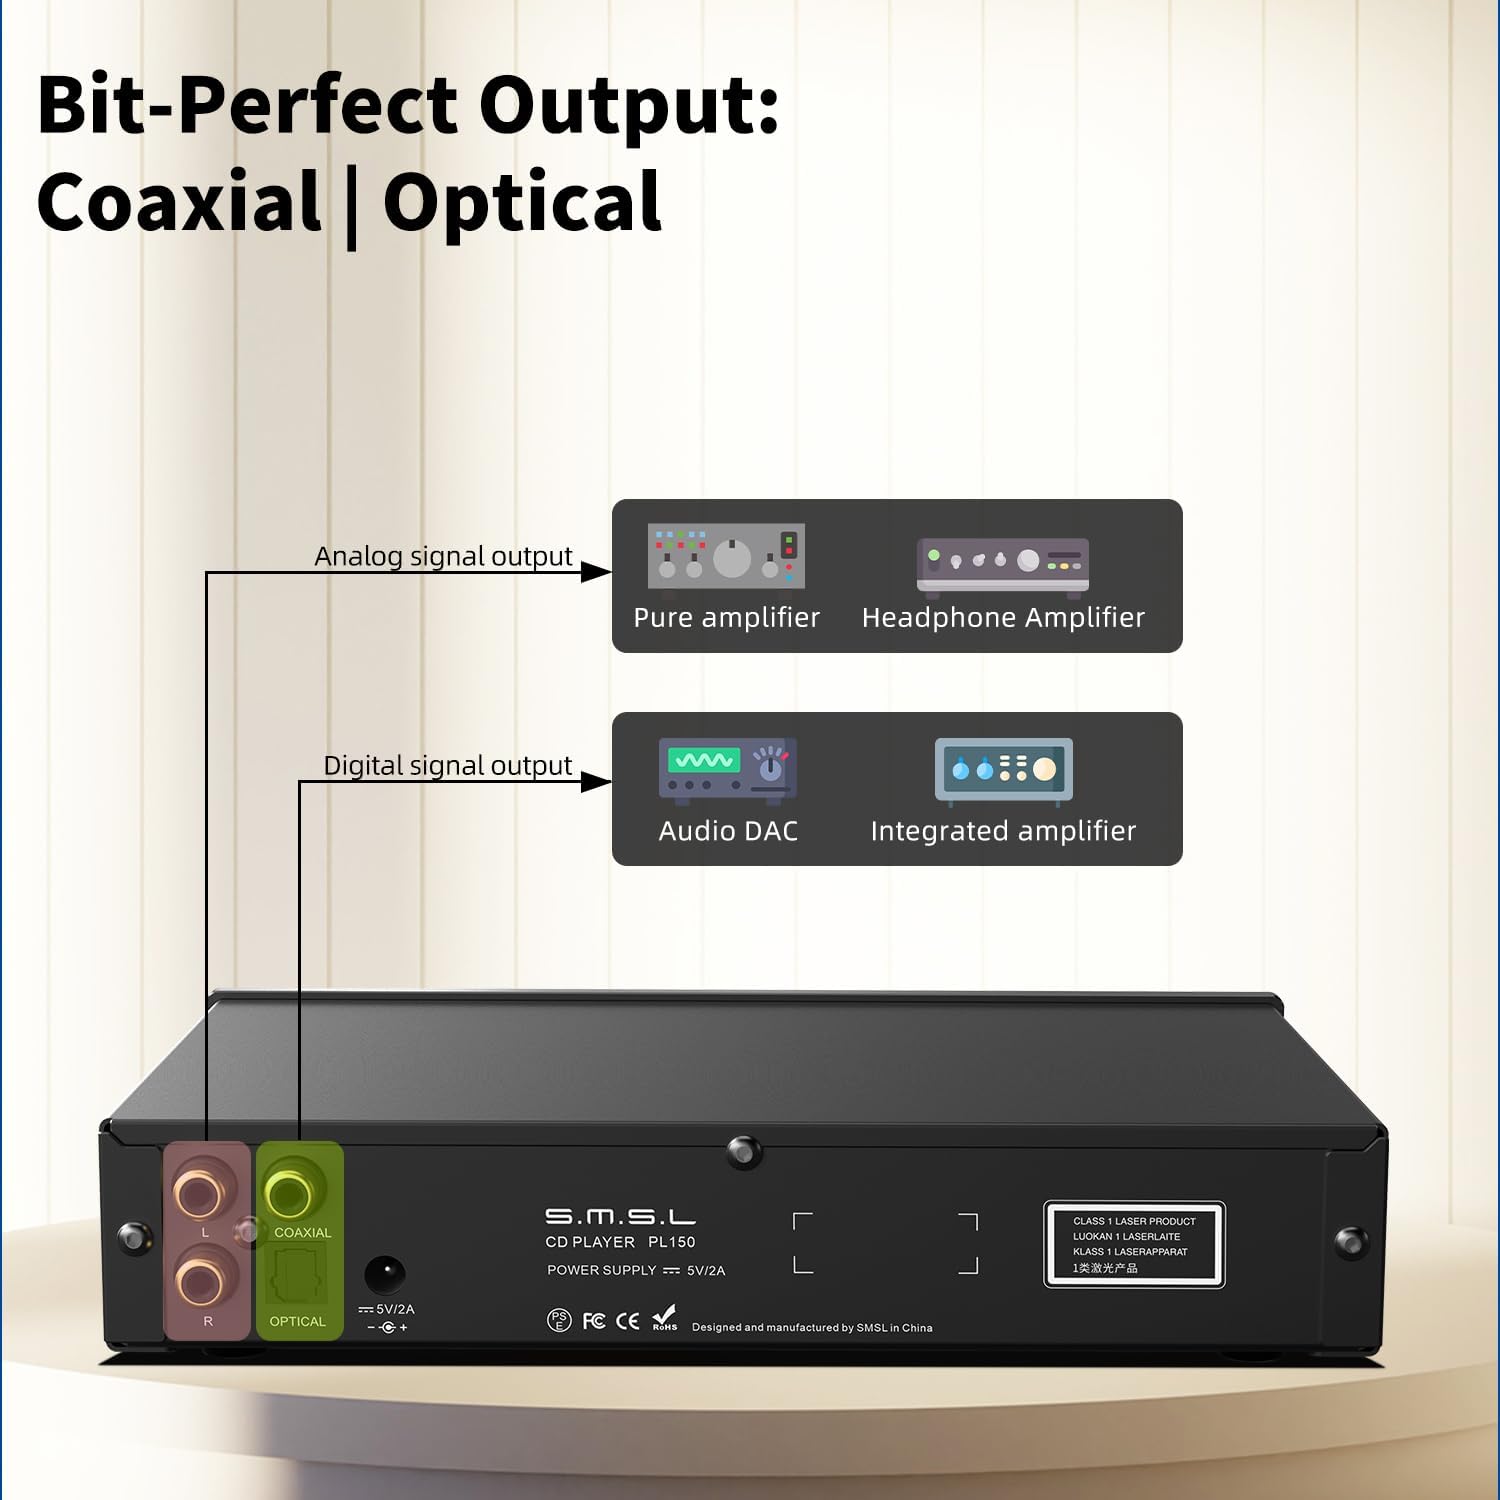
Figure 7: Analog and digital output connection options.
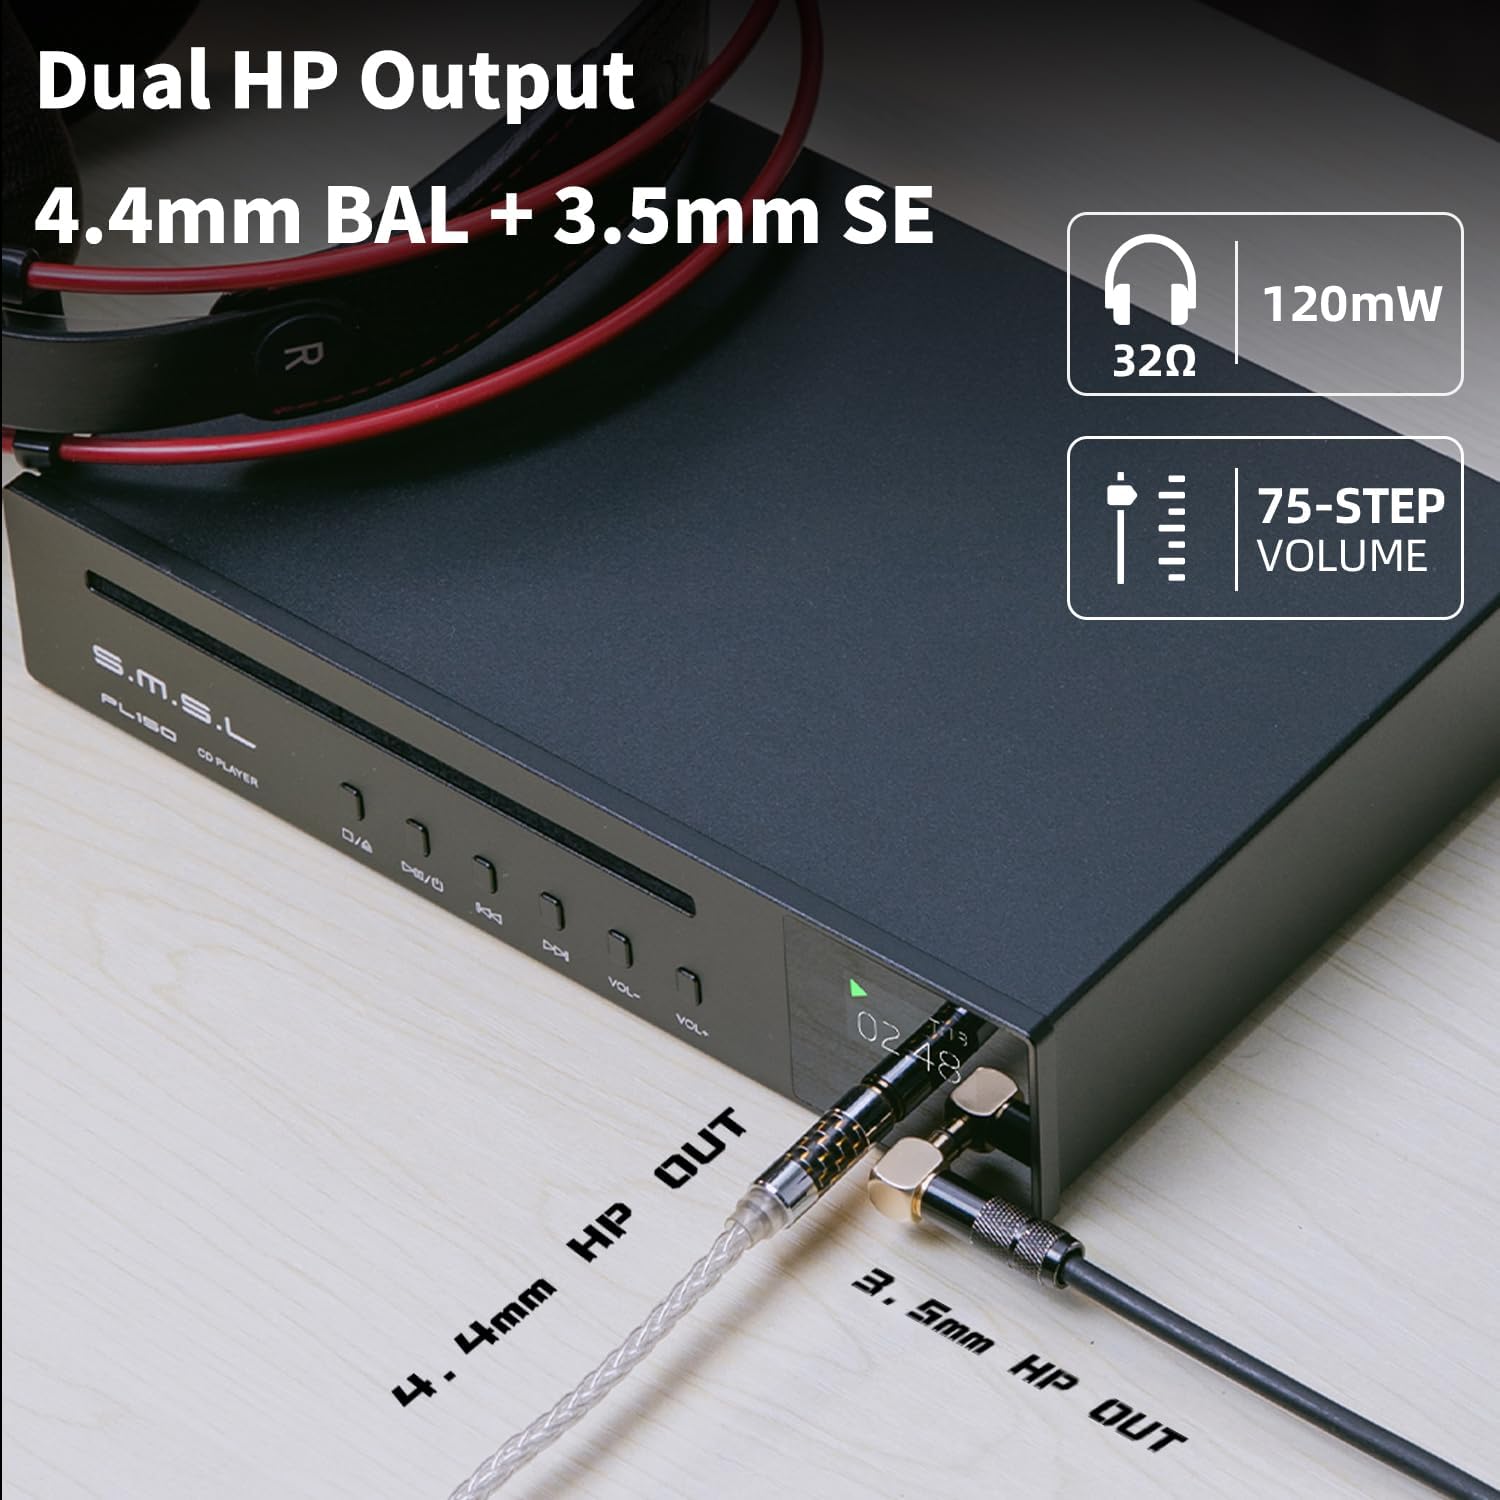
Figure 8: Dual headphone outputs (3.5mm and 4.4mm).
5. Setup
5.1 Power Connection
- Connect the provided USB power cable to the DC 5V/2A input port on the rear of the PL150.
- Connect the other end of the USB power cable to a compatible 5V/2A USB power adapter (not included). Ensure the adapter provides stable power.
5.2 Audio Connections
Choose the appropriate audio connection method based on your existing audio system:
- RCA Analog Output: Use RCA cables to connect the L/R RCA output ports on the PL150 to the analog input ports of your amplifier or receiver.
- Coaxial Digital Output: Use a coaxial cable to connect the Coaxial output port on the PL150 to the coaxial digital input of an external DAC or digital amplifier.
- Optical Digital Output: Use an optical fiber cable to connect the Optical output port on the PL150 to the optical digital input of an external DAC or digital amplifier.
- Headphone Output: Plug your 3.5mm or 4.4mm headphones directly into the corresponding jacks on the front panel.
Figure 9: Connection diagram for analog and digital outputs.
6. Operating Instructions
6.1 Loading a CD
- Press the Eject/Load button (▶/□) on the front panel or remote control to open the CD slot.
- Carefully insert a standard (12cm) or mini (8cm) CD into the slot with the label side facing up.
- The player will automatically pull the CD in and begin reading it.
Figure 10: Inserting a CD into the player.
6.2 Basic Playback
- Play/Pause (▶/□): Press to start or pause playback.
- Previous Track (◀◀): Press to go to the beginning of the current track or the previous track.
- Next Track (▶▶): Press to skip to the next track.
- Volume Up (VOL+): Increase the headphone output volume.
- Volume Down (VOL-): Decrease the headphone output volume.
6.3 Remote Control
The included infrared remote control allows for convenient operation from a distance. Insert two AA batteries (not included) into the remote control before use.
Figure 11: Infrared remote control for the PL150.
6.4 Display Information
The IPS display provides real-time information about the playback status:
- Track Number: Indicates the currently playing track.
- Playback Time: Shows elapsed or remaining time for the current track.
- Volume Level: Displays the current headphone output volume (0-75).
- Playback Status: Icons for Play, Pause, Stop.

Figure 12: Examples of display information.
7. Maintenance
- Cleaning the Unit: Use a soft, dry cloth to wipe the exterior of the player. Do not use abrasive cleaners or solvents.
- Cleaning CDs: Use a soft, lint-free cloth to wipe CDs from the center outwards. Avoid circular motions.
- Storage: Store CDs in their cases to prevent dust and scratches. When not in use, keep the PL150 in a clean, dry environment.
8. Troubleshooting
| Problem | Possible Cause | Solution |
|---|---|---|
| No power | Power cable not connected; Power adapter faulty; No power from outlet. | Ensure power cable is securely connected. Check power adapter and outlet. Try a different 5V/2A power adapter. |
| Disc not playing or skipping | CD is dirty or scratched; CD inserted incorrectly; Unsupported disc format. | Clean the CD. Reinsert the CD correctly. Ensure it is a standard audio CD or MP3 CD. |
| No sound from headphones | Headphones not connected properly; Volume too low; Incorrect output selected (if applicable). | Ensure headphones are fully plugged in. Increase volume using VOL+ button or remote. |
| No sound from RCA/Optical/Coaxial outputs | Cables not connected properly; Amplifier/DAC input not selected; Volume on connected device too low. | Check all cable connections. Select the correct input on your amplifier/DAC. Increase volume on the connected device. |
| Remote control not working | Batteries depleted or inserted incorrectly; Obstruction between remote and player; Remote sensor blocked. | Replace batteries. Ensure correct polarity. Remove any obstructions. Point remote directly at the player. |
9. Specifications
| Feature | Specification |
|---|---|
| Model Name | S.M.S.L PL150 |
| Decoding Chip | CS43198 |
| Supported Disc Types | Standard CD, Mini CD, MP3 CD |
| Analog Output | RCA L/R |
| Digital Outputs | Optical, Coaxial |
| Headphone Outputs | 3.5mm (Single-Ended), 4.4mm (Balanced) |
| Volume Adjustment | 75-level precise adjustment |
| Power Input | DC 5V/2A |
| Special Feature | Anti-Skip Protection |
| Package Dimensions | 11.5 x 7.4 x 2.83 inches |
| Item Weight | 3.15 pounds |
10. Warranty and Support
S.M.S.L products are manufactured with high standards and undergo strict quality control. For warranty information, technical support, or service inquiries, please refer to the warranty card included with your product or visit the official S.M.S.L website. You can also visit the S.M.S.L Store on Amazon for additional product information and support resources.
Note on Videos: No official product videos with 'Seller' as creator type were provided in the product data for embedding in this manual.


