1. Overview
The MINISFORUM N5 Pro is a high-performance 5-Bay Desktop AI NAS designed for robust data storage and advanced computing tasks. Featuring an AMD Ryzen AI 9 HX PRO 370 processor, it offers significant processing power for multi-user access, media decoding, and AI applications. This device supports massive data storage capacity, high-speed networking, and flexible expansion options, making it suitable for both business and home environments.

Image: Front view of the MINISFORUM N5 Pro 5-Bay Desktop AI NAS.
2. Safety Information
Please read and follow all safety instructions carefully to prevent damage to the device or injury to yourself. Keep this manual for future reference.
- Ensure the device is placed on a stable, flat surface to prevent accidental falls.
- Do not expose the device to water, moisture, or extreme temperatures.
- Use only the provided power adapter and cables. Using unauthorized accessories may cause damage or fire.
- Avoid blocking ventilation openings to prevent overheating.
- Do not attempt to open or repair the device yourself. Refer all servicing to qualified personnel.
- Disconnect the power supply before performing any maintenance or hardware installation.
3. Package Contents
Verify that all items listed below are included in your package:
- 1x US Power Adapter
- 1x N5 PRO P370 NAS Unit
- 1x HDMI cable
- 1x Network cable
- 1x M.2 to U.2 Adapter
Video: This video demonstrates the accessories included with the MINISFORUM N5/N5 Pro NAS.
4. Setup and Installation
This section guides you through the initial setup and hardware installation for your MINISFORUM N5 Pro NAS.
4.1 Initial Power-on and Software Setup
- Place the NAS on a flat, stable surface.
- Connect the included power adapter, Ethernet cable, and HDMI cable to the NAS.
- Press the power button briefly to turn on the device. The status light and network light will illuminate.
- Wait until the monitor displays the MINISFORUM logo and an IP address, indicating boot completion.
- After obtaining the IP address, download the MinisCloud client from the official MINISFORUM website.
- Install the MinisCloud client on your computer.
- Open the client and bind the NAS. If device scanning takes too long, you can enter its local IP address to bind it manually.
- After binding, you may choose to update the client if an update is available.
- Select "Administrator initialization" to register an administrator account and log in.
- The first login requires a system pool setup. This process will wipe all storage drives. Follow the on-screen prompts to create a storage pool (e.g., select Simple Mode, choose disks, confirm RAID settings, and enter your password).
- Once the storage pool is created, you will enter the MinisCloud desktop interface.
Video: Detailed guide on initial power-on and software setup for the NAS.
4.2 Hardware Installation (Memory, SSDs, HDDs)
The N5 Pro features a slide-out motherboard design for easy hardware upgrades. Always ensure the device is powered off and disconnected from the power source before performing any internal hardware installations.
Video: Step-by-step instructions for installing DDR5 memory, expansion cards, U.2 SSDs, and HDDs.
4.2.1 Install the Memory (DDR5 SO-DIMM, supports up to 96GB)
- Remove the front panel of the NAS.
- Turn the case upside down and unscrew the two screws on the bottom.
- Turn the case upright and slide out the motherboard.
- Turn the motherboard upside down.
- Disconnect the CPU fan power cable.
- Unscrew the three screws and take out the CPU fan.
- Install two memory modules into the available SO-DIMM slots.
- Reinstall the CPU fan and reconnect its power cable.
4.2.2 Install the PCIe x16 Expansion Card (Supports single-slot low-profile cards, ≤200mm length, ≤75W power)
- Unscrew the bracket screw on the rear panel.
- Remove the bracket.
- Insert the discrete GPU into the PCIe slot.
- Put the screw back in to secure the GPU.
4.2.3 Install the Hard Drive (M.2 SSD - Supports 2230/2280/22110 sizes)
- Unscrew the M.2 SSD screw.
- Insert the M.2 SSD into the slot.
- Put the screw back in to secure the M.2 SSD.
4.2.4 Install the Hard Drive (U.2 SSD - 7mm thickness only)
- Remove all M.2 SSDs from the motherboard.
- Remove the U.2 port covers from the M.2 to U.2 adapter.
- Insert the U.2 SSDs into the adapter.
- Flip the adapter to the other side and secure the U.2 SSDs with screws.
- Reinstall the OS SSD into the adapter's M.2 slot.
- Remove all screws near the adapter area on the motherboard.
- Connect the adapter's power cable.
- Align the three M.2 slots and insert the adapter.
- Secure the adapter with two screws at the rear.
- Reinstall the SSD fan.
4.2.5 Install the Hard Drive (3.5-inch HDD)
- Pull out the drive tray handle from an empty drive bay.
- Pinch the top of the tray to remove it.
- Remove the fastening panels from the sides of the tray.
- Place the 3.5-inch HDD in the tray with screw holes facing down.
- Align the screw holes on both sides and insert the fastening panels.
- Reinstall the loaded drive tray into the empty drive bay.
- Press the tray handle to lock it.
4.2.6 Install the Hard Drive (2.5-inch HDD)
- Pull out the drive tray handle from an empty drive bay.
- Remove the fastening panel from the bottom side of the tray.
- Place the 2.5-inch HDD in the tray.
- Align the four screw holes at the bottom.
- Secure with the included 2.5-inch HDD screws.
- Reinstall the loaded drive tray into the empty drive bay.
- Press the tray handle to lock it.
After all hardware installations are complete, reinsert the motherboard into the case and secure it with the screws removed earlier. Reattach the front panel.
5. Operating Instructions
The MINISFORUM N5 Pro runs on MinisCloud OS, an all-in-one smart platform designed for ease of use across various devices.
5.1 MinisCloud OS Features
- Cross-Platform Compatibility: Seamlessly supports Windows, macOS, iOS, and Android with a zero learning curve.
- ZFS Snapshots: Built-in enterprise ZFS file system safeguards your data at every level, offering automatic integrity checks and instant rollback to any point in time for guaranteed data recovery. Supports RAID 0/1/5/6.
- LZ4 Compression: Ultra-fast compression engine delivering single-core compression speeds exceeding 500 MB/s and decompression speeds up to several GB/s, optimizing storage efficiency.
- Multi-User Isolation: New accounts authorized instantly via QR code for secure, hassle-free access, ensuring user data privacy.
- Docker Apps: Effortlessly deploy hundreds of Docker applications for various uses, from AI training to remote downloads.
- AI Photo Albums: Effortlessly organize photos with AI recognition, smart search, and access control.
- One-Click Remote Access: Fully managed and ready to use for convenient access from anywhere.

Image: MinisCloud OS desktop interface with various applications.
5.2 Connectivity and Performance
- Network Ports: Equipped with 1x 10GbE and 1x 5GbE network ports. Supports link aggregation for speeds up to 15 Gbps, ideal for high-speed transfers and parallel multitasking.
- USB4 Ports: Dual USB4 ports, each supporting up to 20Gbps Thunderbolt Ethernet.
- OCuLink Port: Native OCuLink interface (PCIe4.0 x4 = 64G) for connecting external discrete graphics cards to enhance gaming and AI capabilities. Note: This interface does not support hot-swapping; plug and unplug only when the NAS is powered off.
- Video Outputs: 1x HDMI (8K@60Hz/4K@144Hz) and 2x USB4 (8K@60Hz/4K@144Hz) Ports, allowing up to 3 displays simultaneously.
- PCIe x16 Slot: Supports 10GbE NICs, GPU expansion, and SSD cache arrays for ultra-low latency storage.
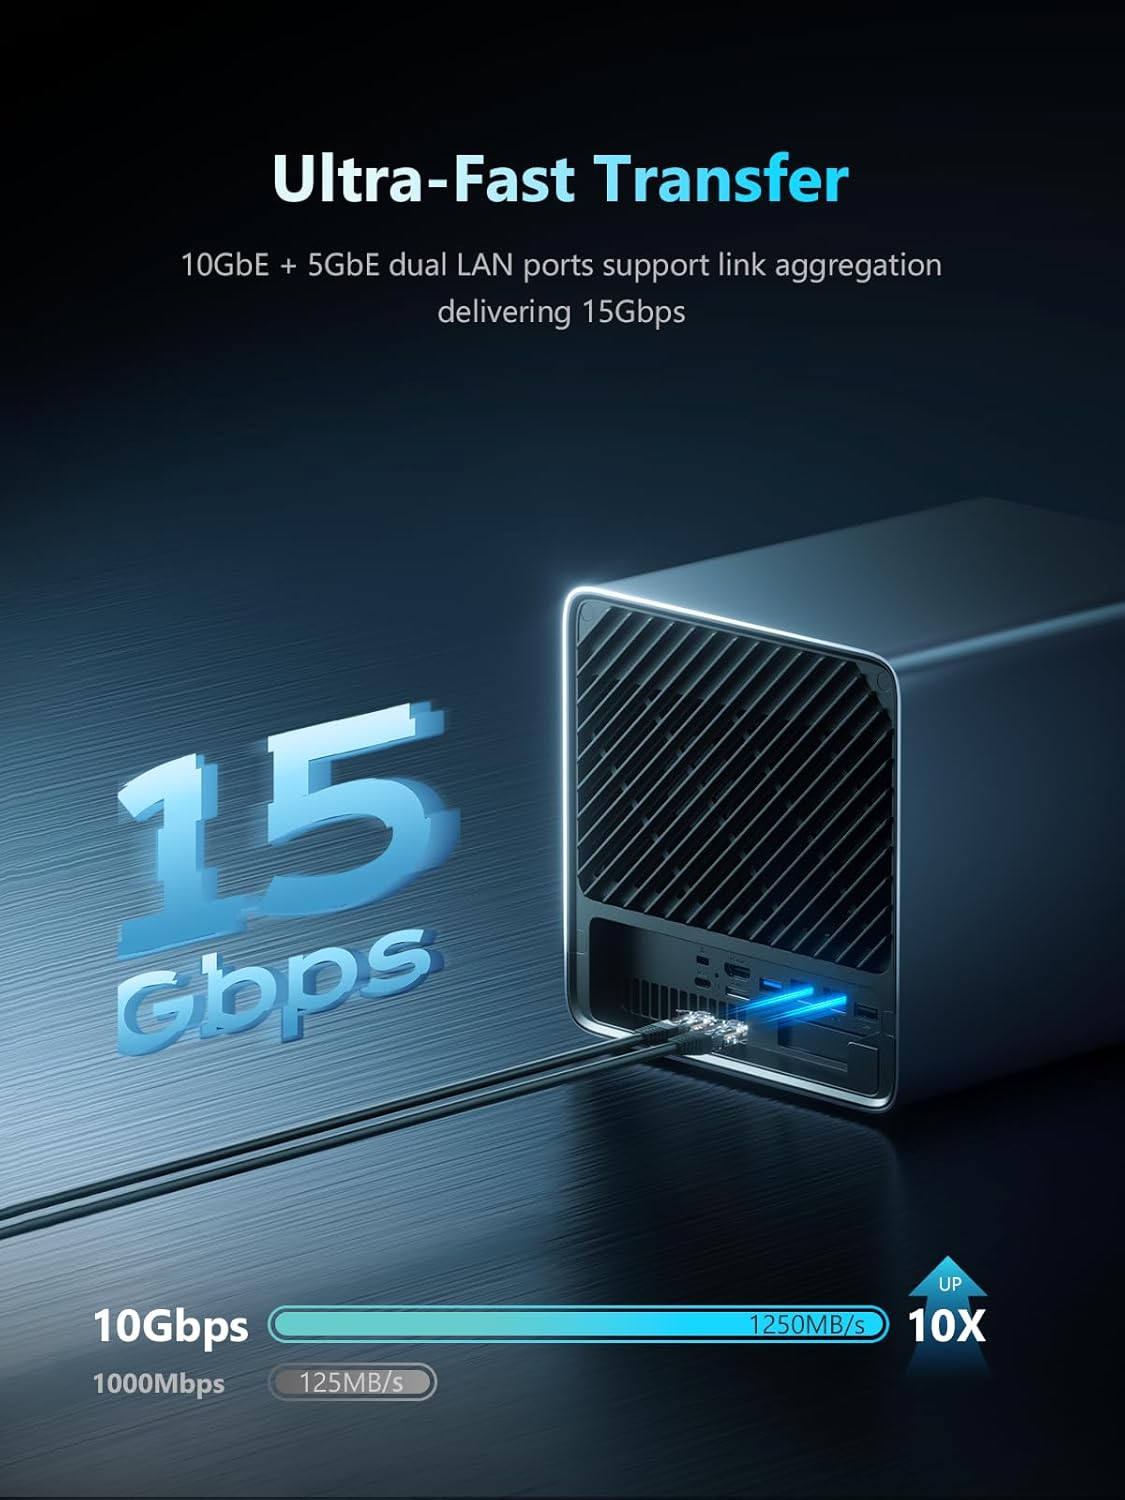
Image: Rear panel connectivity options of the N5 Pro NAS.
5.3 Storage Management
The N5 Pro supports various RAID modes for data security and optimized storage strategies:
- RAID0 (Striping): Offers 100% utilization and 2x Read/Write performance. No data protection; if any one disk fails, all data will be lost.
- RAID1 (Mirror Device): Offers 50% utilization and 2x Read, 1x Write performance. Supported if any one disk fails, no data will be lost.
- RAID5/RAIDZ1: Requires at least three disks or partitions. Supported if any one disk fails, no data will be lost.
- RAID6/RAIDZ2: Requires at least four disks or partitions. Supported if any two disks fail, no data will be lost.
- Mixed Drive Strategies: Allows for hot data and cold backup, speeding reads and cutting storage costs.

Image: Visual representation of multiple RAID modes for data security.
6. Maintenance
Regular maintenance ensures optimal performance and longevity of your N5 Pro NAS.
- Software Updates: Regularly check for and install updates for MinisCloud OS and client software to ensure security and access to new features.
- Physical Cleaning: Keep the device free from dust. Use a soft, dry cloth to clean the exterior. For ventilation areas, use compressed air to gently remove dust. Ensure the device is powered off before cleaning.
- Data Backup: While RAID provides data redundancy, it is always recommended to maintain external backups of critical data.
- Drive Health Monitoring: Utilize the Device Monitor feature in MinisCloud OS to regularly check the health and status of your installed drives.
7. Troubleshooting
If you encounter issues with your N5 Pro NAS, refer to the following common troubleshooting steps:
- Device Not Powering On: Ensure the power adapter is securely connected to both the NAS and a working power outlet. Try a different power outlet.
- No Network Connection: Verify that the Ethernet cable is properly connected to both the NAS and your router/switch. Check network settings in MinisCloud OS. Restart your router and the NAS.
- Cannot Access MinisCloud OS: Ensure the NAS is powered on and connected to the network. Try accessing the NAS via its IP address directly in a web browser. If the issue persists, restart the NAS.
- Storage Drive Issues: Check the drive status indicators on the front panel. Use the Device Monitor in MinisCloud OS to check drive health. If a drive is reported as failed, consult the MinisCloud OS documentation for drive replacement procedures.
- System Disk Note: The MinisCloud OS is installed on a built-in 128GB SSD, occupying one M.2 slot. If you need all three M.2 slots for other purposes, you must uninstall the system disk and install a third-party OS via a USB flash drive. This will disable MinisCloud OS functions.
For further assistance, please refer to the official MINISFORUM support resources or contact customer service.
8. Specifications
| Feature | Specification |
|---|---|
| Brand | MINISFORUM |
| Model Number | N5-PRO-P370 |
| Processor | AMD Ryzen AI 9 HX PRO 370 (12-Core/24T CPU, up to 5.1GHz) |
| GPU | AMD Radeon 890M |
| Memory | 2x DDR5 SO-DIMM slot (5600 MT/s), expandable up to 96GB ECC memory |
| Internal Storage | 5x SATA HDD slots (up to 22TB each), 3x M.2 NVMe SSD slots (or 1x M.2 NVMe + 2x U.2 NVMe SSD slots) |
| Max Digital Storage Capacity | 144 TB |
| Network Connectivity | 1x 10GbE Ethernet, 1x 5GbE Ethernet |
| Video Outputs | 1x HDMI (8K@60Hz/4K@144Hz), 2x USB4 (8K@60Hz/4K@144Hz) |
| Expansion Slots | PCIe x16 slot, OCuLink port |
| Operating System | MinisCloud OS (pre-installed on 128GB SSD) |
| Dimensions (LxWxH) | 7.95 x 7.83 x 9.92 inches |
| Item Weight | 15 pounds |

Image: Key features and specifications of the N5 Pro NAS.
9. Warranty and Support
For warranty information, technical support, or service inquiries, please visit the official MINISFORUM website or contact their customer support team. Keep your purchase receipt and product serial number handy when contacting support.
- Online Support: Visit the MINISFORUM official website for FAQs, driver downloads, and user manuals.
- Customer Service: Contact MINISFORUM customer service for direct assistance with product issues.


