1. Introduction
This manual provides detailed instructions for the safe installation, operation, and maintenance of your LEDIARY 22 Inch Ceiling Fan with Lights and Remote. Please read this manual thoroughly before installation and retain it for future reference. This ceiling fan features a low-profile design, integrated LED lighting with adjustable color temperature and dimming, a reversible DC motor, and dual control options via remote and Bluetooth app.

Image 1.1: The LEDIARY 22 Inch Ceiling Fan with its remote control and smartphone app interface.
2. Important Safety Information
Always follow basic safety precautions when installing and operating electrical appliances to reduce the risk of fire, electric shock, and personal injury.
- Electrical Safety: Ensure power is disconnected at the circuit breaker before installation or servicing. All wiring must comply with national and local electrical codes.
- Qualified Electrician: If you are unfamiliar with electrical wiring, consult a qualified electrician.
- Mounting: The mounting structure must be capable of supporting the weight of the fan (approximately 9.23 lbs).
- Blade Clearance: Maintain a minimum clearance of 7 feet from the floor to the fan blades.
- Do Not Bend Blades: Avoid bending the fan blades during installation or cleaning.
- No Foreign Objects: Do not insert fingers or any objects into the fan blades while the fan is operating.
- Voltage: This fan operates on 120 Volts. Verify your power supply matches this requirement.
3. Package Contents
Before beginning installation, ensure all components are present and undamaged. If any parts are missing or damaged, contact customer support.
- Ceiling Fan Unit (with integrated LED light)
- Remote Control
- Mounting Bracket
- Hardware Pack (screws, wire nuts, washers)
- User Manual
4. Installation Guide
Installation should be performed by a qualified individual. Ensure power is OFF at the circuit breaker before starting.
- Prepare the Installation Site:
- Turn off power at the main circuit breaker.
- Remove any existing light fixture or ceiling fan.
- Ensure the junction box is securely mounted and capable of supporting the fan's weight.
- Attach the Mounting Bracket:
- Secure the mounting bracket to the ceiling junction box using the provided screws and washers.
- Ensure the bracket is firmly attached and level.
- Perform Electrical Wiring:
- Connect the fan's electrical wires to the household wiring according to local codes. Typically, this involves connecting:
- Black (Live) to Black (Live)
- White (Neutral) to White (Neutral)
- Green or Bare Copper (Ground) to Green or Bare Copper (Ground)
- Use wire nuts to secure all connections.
- Carefully tuck all wires into the junction box.
- Connect the fan's electrical wires to the household wiring according to local codes. Typically, this involves connecting:
- Mount the Fan Unit:
- Lift the fan unit and align it with the mounting bracket.
- Secure the fan unit to the mounting bracket using the designated screws.
- Final Checks:
- Ensure all connections are secure and the fan is properly mounted.
- Restore power at the circuit breaker.

Image 4.1: Product dimensions (22"D x 22"W x 5.3"H) and recommended room sizes (Height 7FT-10FT, Length & Width UP TO 8.5ft x 8.5ft).
5. Operation
Your LEDIARY ceiling fan can be controlled via the included remote control or a Bluetooth-enabled smartphone app.
5.1 Remote Control Operation
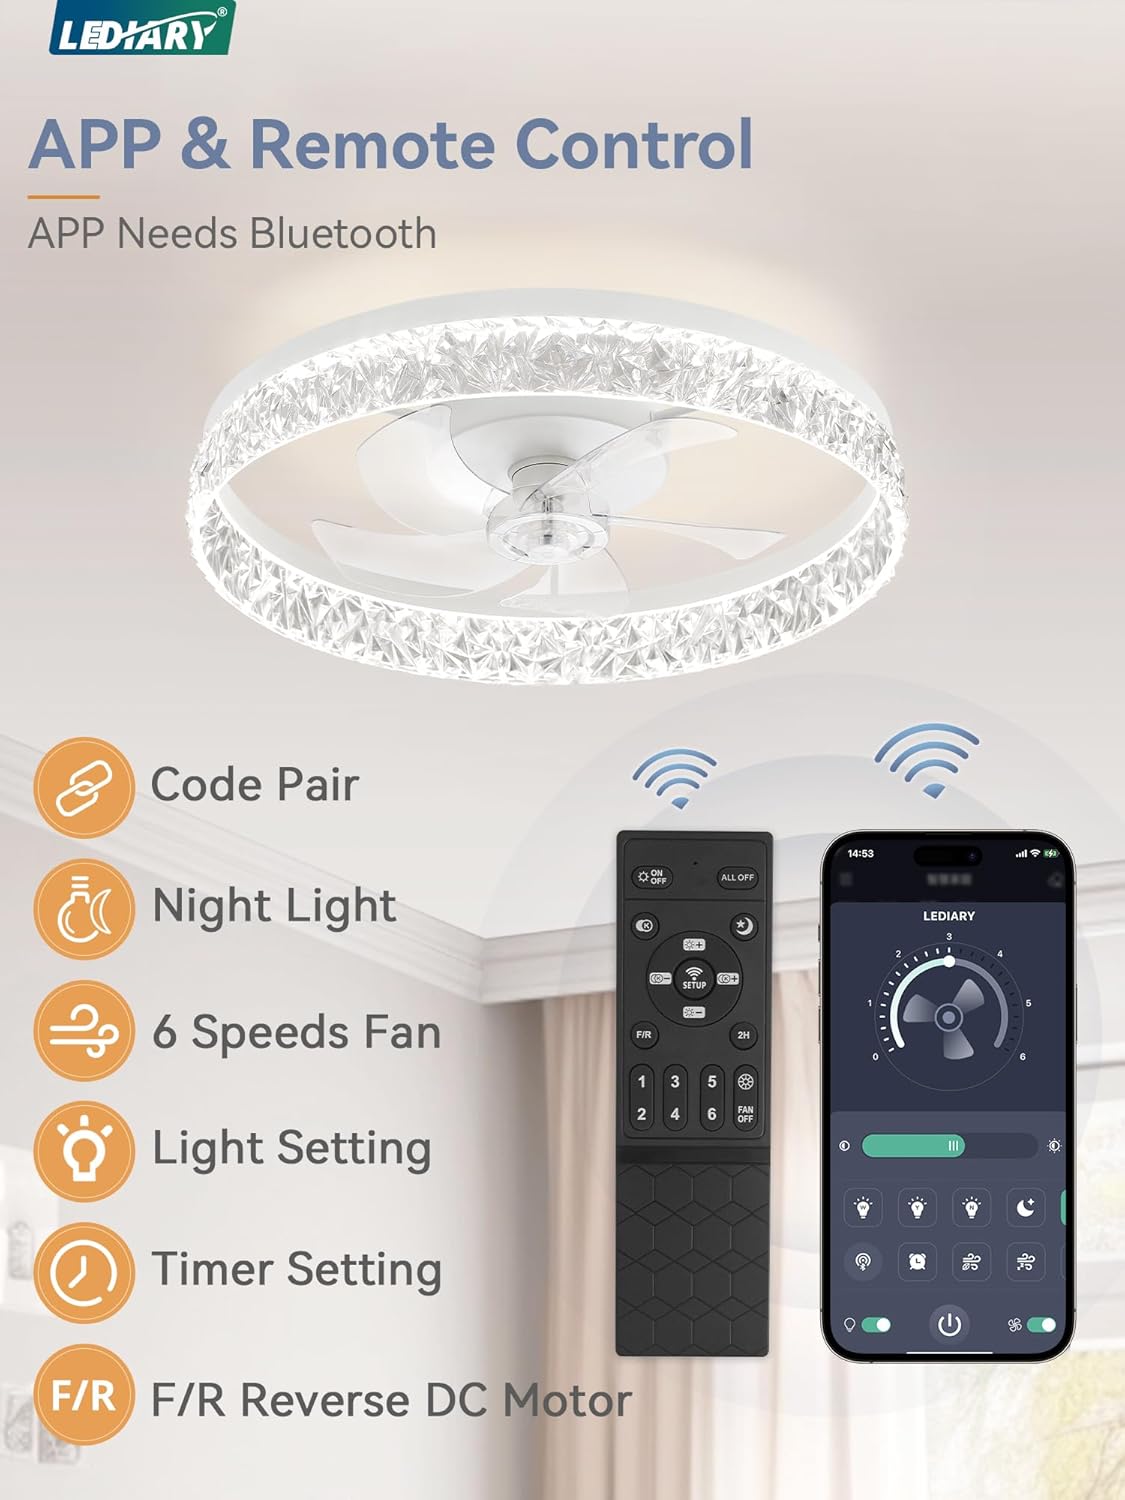
Image 5.1: The remote control and smartphone app interface for controlling the fan and light functions.
- Power On/Off: Press the ON/OFF button to turn the fan and light on or off.
- Fan Speed: Use the 1-6 buttons to select one of six fan speeds.
- Speeds 1-2: Soft Wind
- Speeds 3-4: Natural Wind
- Speeds 5-6: Cool Wind
- Light On/Off: Press the Light On/Off button to control the light independently.
- Color Temperature Adjustment: Use the CCT button to cycle through color temperatures (3000K Warm White, 4500K Natural, 6000K Daylight).
- Dimming: Use the Dimmer Up/Down buttons to adjust light brightness from 10% to 100%. The fan remembers your last light settings.
- Timer Setting: Press the Timer button to activate the 2-hour sleep timer. The fan will automatically turn off after 2 hours.
- Reverse DC Motor: Press the F/R button to change the fan's direction.
- Summer Mode (Forward): Creates a downdraft, providing a cooling effect.
- Winter Mode (Reverse): Creates an updraft, circulating warm air trapped near the ceiling.
- Night Light: Press the Night Light button for a low-intensity light setting.

Image 5.2: Illustration of adjustable color temperatures (3000K, 4500K, 6000K) and smooth dimming from 10% to 100% brightness.

Image 5.3: Visual representation of the reversible DC motor, showing forward airflow for summer cooling and reverse airflow for winter warmth circulation.
5.2 Bluetooth App Control
The fan can also be controlled via a dedicated Bluetooth app. Refer to the app's instructions for pairing and advanced features. The app provides similar controls to the remote, including fan speed, light settings, and timer functions.
6. Maintenance
Regular maintenance ensures optimal performance and extends the lifespan of your ceiling fan.
- Cleaning:
- Before cleaning, ensure the power is turned off at the circuit breaker.
- Wipe the fan and light fixture with a soft, damp cloth.
- Do not use abrasive cleaners or solvents, as these can damage the finish.
- Tighten Fasteners: Periodically check all screws and fasteners to ensure they are tight. Loose connections can cause noise or wobble.
- No Lubrication Required: The DC motor is permanently lubricated and does not require additional oiling.
7. Troubleshooting
If you experience issues with your ceiling fan, refer to the following common problems and solutions:
| Problem | Possible Cause | Solution |
|---|---|---|
| Fan does not start | No power to the fan; Loose wire connections; Remote control battery low. | Check circuit breaker; Verify all wire connections are secure; Replace remote control battery. |
| Light does not work | No power to the light; Loose wire connections; LED driver issue. | Check power supply; Verify light wiring; Contact customer support if LED driver is suspected. |
| Fan wobbles | Loose mounting screws; Unbalanced blades. | Ensure mounting bracket and fan unit are securely fastened; Check for any bent blades. |
| Remote control not working | Low battery; Not paired with fan; Obstruction between remote and receiver. | Replace battery; Refer to pairing instructions (if applicable); Ensure clear line of sight. |
| Fan is noisy | Loose screws; Motor issue; Obstruction. | Tighten all screws; Ensure no wires are rubbing; Contact customer support if motor noise persists. |

Image 7.1: Noise level comparison, highlighting the fan's quiet operation at approximately 30dB, suitable for bedrooms.
8. Specifications
| Brand | LEDIARY |
| Model | 22 Inch Ceiling Fan |
| Product Dimensions | 22"D x 22"W x 5.3"H |
| Item Weight | 9.23 pounds |
| Voltage | 120 Volts |
| Light Output | 3130 Lumens |
| Color Temperature | 3000K-6000K (Dimmable) |
| Fan Speeds | 6 |
| Motor Type | DC Motor (Reversible) |
| Control Method | Remote, Bluetooth App |
| Installation Type | Ceiling-mounted |
| Recommended Room Use | Bedroom, Kids Room, Kitchen, Living Room, Study Room |
9. Warranty and Support
This LEDIARY ceiling fan is backed by a 2-year support guarantee from the date of purchase. This warranty covers defects in materials and workmanship under normal use.
What is Covered:
- Manufacturing defects.
- Malfunctions under normal operating conditions.
What is Not Covered:
- Damage caused by improper installation or misuse.
- Damage from accidents, alterations, or unauthorized repairs.
- Normal wear and tear.
Customer Support:
For warranty claims, technical assistance, or any questions regarding your product, please contact LEDIARY customer service. Provide your purchase details and model number for efficient service.
LEDIARY is committed to providing 24-hour online technical support.

Image 9.1: Icon indicating availability of customer service and technical support.


