1. Introduction
This manual provides detailed instructions for the installation, operation, and maintenance of your Macrom T1003DAB 10.1-inch monitor. Please read this manual thoroughly before using the product to ensure correct operation and to prevent damage.
The Macrom T1003DAB is an advanced in-car multimedia system featuring a 10.1-inch QLED touchscreen, powered by an ARM Octa-Core 2.5 GHz processor and Android 13 operating system. It offers seamless integration with smartphones via wireless CarPlay and Android Auto, along with RDS and DAB+ radio functionality.

Figure 1.1: Macrom T1003DAB Main Interface
2. Product Features
- Display: 10.1-inch QLED Capacitive Touchscreen, adjustable in height, tilt, and rotation for optimal viewing.
- Processor: ARM Octa-Core 2.5 GHz for smooth and fast performance.
- Operating System: Android 13, compatible with thousands of apps from Google Play.
- Memory: 4GB RAM / 64GB Internal Storage.
- Wireless Connectivity: Integrated Wireless CarPlay and Android Auto for smartphone mirroring.
- Radio: RDS (Radio Data System) and DAB+ (Digital Audio Broadcasting) radio tuner.
- Installation: Universal 1DIN chassis for compatibility with most vehicles.
- Audio Output: Stereo and Surround (5.1) audio modes, with speaker and Bluetooth output options.
3. What's in the Box
The following components are included with your Macrom T1003DAB monitor:
- Metallic Installation Cage
- DAB Antenna
- External Microphone
- Bluetooth Module
- GPS Antenna
- ISO Cable
- Audio Cable
- Three USB Cables

Figure 3.1: Included Components and Accessories
4. Setup and Installation
The Macrom T1003DAB is designed for universal 1DIN installation. Professional installation is recommended.
4.1. Mechanical Installation
- Carefully remove your vehicle's existing head unit.
- Insert the provided metallic installation cage into the 1DIN slot of your vehicle's dashboard. Secure it firmly.
- Slide the Macrom T1003DAB unit into the secured metallic cage until it locks into place.
4.2. Electrical Connections
- Connect the ISO cable to your vehicle's wiring harness. Ensure all connections are secure.
- Connect the DAB antenna to the designated port on the unit. Position the antenna for optimal reception.
- Connect the GPS antenna to the unit and place it in a location with a clear view of the sky (e.g., dashboard).
- Connect the external microphone to the unit and route it to a suitable location for clear voice pickup (e.g., near the rearview mirror or steering column).
- Connect any additional audio or USB cables as required for external devices.
After all connections are made, carefully reassemble your vehicle's dashboard components.
5. Operating Instructions
5.1. Power On/Off
- To power on the unit, start your vehicle's ignition. The unit should power on automatically.
- To power off, turn off your vehicle's ignition. The unit will power down.
5.2. Basic Navigation and Controls
The unit features a QLED capacitive touchscreen for primary interaction. Physical buttons and a rotary knob are also available for quick access to common functions.
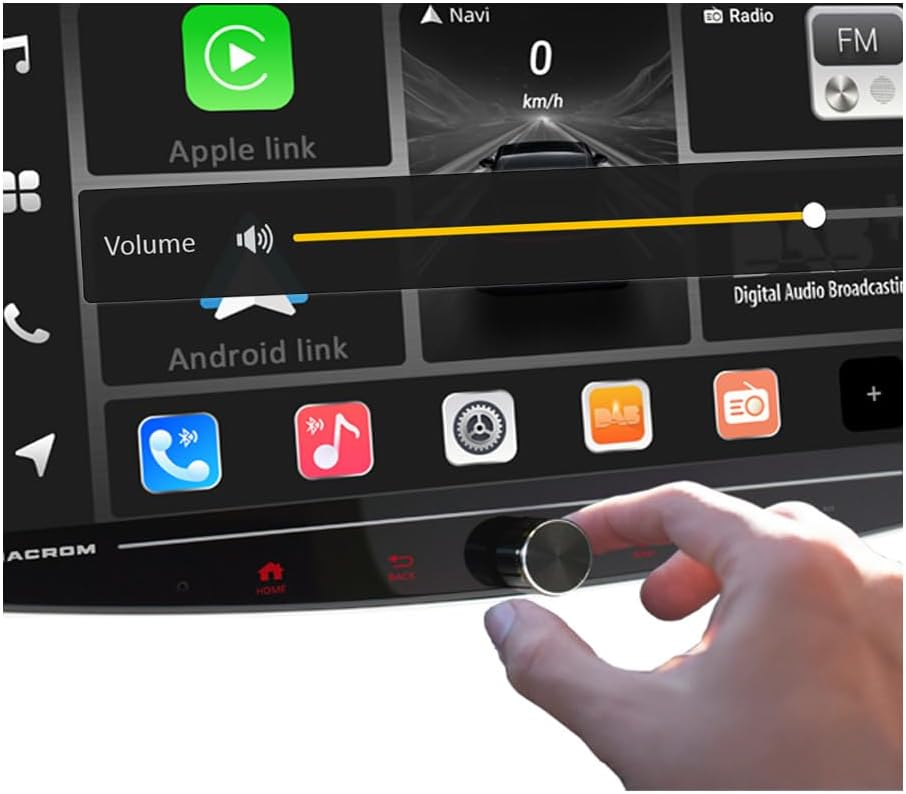
Figure 5.1: Adjusting Volume via Rotary Knob
- Touchscreen: Tap, swipe, and pinch gestures control the Android interface and applications.
- Rotary Knob: Typically controls volume. Pressing it may mute or access settings.
- Physical Buttons: Dedicated buttons for Home, Back, Navigation, Phone, and other functions are located on the unit's bezel.
5.3. Wireless CarPlay Connection
To connect your iPhone wirelessly via CarPlay:
- Ensure Bluetooth and Wi-Fi are enabled on your iPhone.
- On the T1003DAB unit, tap the 'Apple Link' icon.
- Follow the on-screen prompts to pair your iPhone via Bluetooth.
- Once paired, CarPlay will automatically launch, allowing access to phone, music, maps, and messages.

Figure 5.2: Wireless CarPlay Connection
5.4. Wireless Android Auto Connection
To connect your Android smartphone wirelessly via Android Auto:
- Ensure Bluetooth and Wi-Fi are enabled on your Android smartphone.
- On the T1003DAB unit, tap the 'Android Link' icon.
- Follow the on-screen prompts to pair your smartphone via Bluetooth.
- Once paired, Android Auto will automatically launch, providing access to navigation, media, and communication features.

Figure 5.3: Wireless Android Auto Connection
5.5. Radio Operation (RDS & DAB+)
Access the 'Radio' application from the main interface. You can switch between FM/AM (RDS) and DAB+ modes. Use the touchscreen to scan for stations, save presets, and view station information (if available).
5.6. Google Play Store and Apps
As the unit runs on Android 13, you can access the Google Play Store to download and install various applications. A stable internet connection (e.g., via smartphone tethering) is required for downloads and updates.
6. Display Adjustments
The 10.1-inch QLED display offers multiple adjustment options to ensure optimal visibility and ergonomic positioning.
6.1. Vertical Movement
The display can be moved vertically by up to 4cm (up or down) to suit your viewing preference and vehicle dashboard layout.

Figure 6.1: Bidirectional Vertical Movement (4cm Up/Down)
6.2. Vertical Axis Rotation
The display can be rotated up to 30 degrees along its vertical axis, allowing for angle adjustments towards the driver or passenger.

Figure 6.2: 30° Vertical Axis Rotation
6.3. Horizontal Axis Rotation
The display can also be rotated up to 30 degrees along its horizontal axis, enabling tilt adjustments for glare reduction or preferred viewing angle.
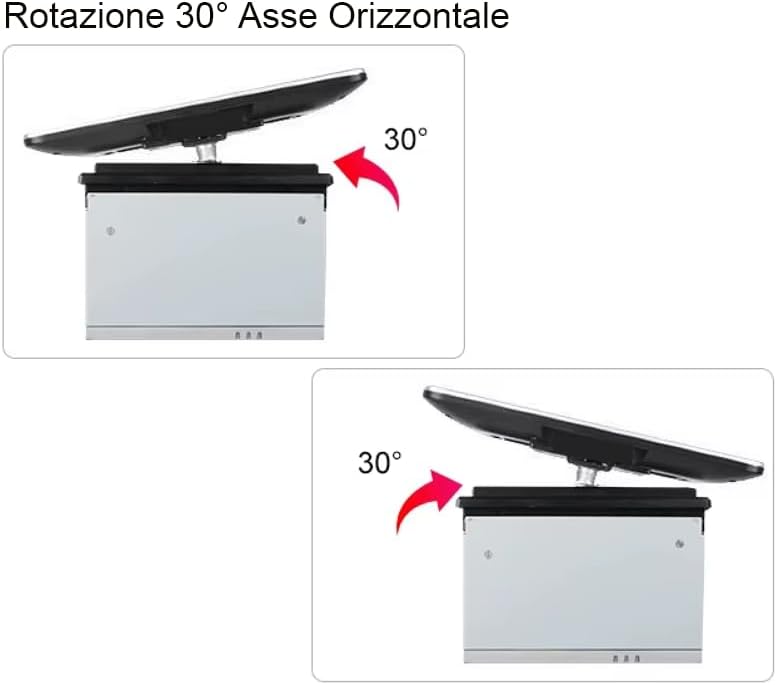
Figure 6.3: 30° Horizontal Axis Rotation
7. Specifications
| Feature | Specification |
|---|---|
| Model | T1003DAB |
| Brand | Macrom |
| Display Size | 10.1 inches |
| Display Type | QLED Capacitive Touchscreen |
| Processor | ARM Octa-Core 2.5 GHz |
| Operating System | Android 13 |
| Memory (RAM/Storage) | 4GB / 64GB |
| Wireless Connectivity | CarPlay, Android Auto |
| Radio Tuner | RDS, DAB+ |
| Audio Output Modes | Stereo, Surround (5.1) |
| Compatible Devices | Smartphone, PC |
| Connectors | HDMI, USB |
8. Troubleshooting
This section addresses common issues you might encounter with your Macrom T1003DAB monitor.
- No Power: Check all power connections, including the ISO cable. Ensure your vehicle's ignition is on.
- No Audio: Verify speaker connections. Check volume levels on the unit and any connected smartphone. Ensure the unit is not muted.
- CarPlay/Android Auto Not Connecting:
- Ensure Bluetooth and Wi-Fi are enabled on your smartphone.
- Forget the device from your smartphone's Bluetooth settings and re-pair.
- Restart both the unit and your smartphone.
- Poor DAB+ Radio Reception: Ensure the DAB antenna is correctly installed and positioned for optimal signal. DAB+ coverage can vary by region.
- Slow Performance/App Issues: Close unnecessary background applications. Ensure the unit has a stable internet connection for app updates.
- Display Not Responding: Try restarting the unit. If the issue persists, consult a professional.
9. Warranty and Support
Your Macrom T1003DAB monitor is covered by a manufacturer's warranty. For specific warranty terms and conditions, please refer to the warranty card included with your product or visit the official Macrom website.
For technical support, service, or further inquiries, please contact Macrom customer service or your authorized dealer. Keep your purchase receipt and product model number (T1003DAB) handy when seeking support.