1. Introduction
This manual provides detailed instructions for the installation, operation, and maintenance of your TEKXDD H8 Smart Lock. This 4-in-1 electronic lock offers multiple unlocking methods including Tuya App, fingerprint, digital password, and mechanical key. Please read this manual thoroughly before installation and use to ensure proper function and security.
2. Package Contents
Verify that all components are present in the package:
- Front Panel (with handle and keypad)
- Back Panel (with handle and battery compartment)
- Mortise Lock Body
- Strike Plate
- Mounting Screws and Accessories
- Mechanical Keys (2)
- User Manual (this document)
Note: 4 AAA batteries are required but not included in the package.
3. Specifications
| Feature | Specification |
|---|---|
| Model | H8 |
| Unlocking Methods | Tuya App, Fingerprint, Digital Password, Mechanical Key |
| Fingerprint Capacity | Up to 255 fingerprints |
| Password Capacity | Up to 100 customizable digit codes |
| Recognition Speed | ≤ 0.2 seconds |
| Recognition Rate | 99% |
| Applicable Door Thickness | 1.37 - 1.96 inches (35mm - 50mm) |
| Operating Temperature | 14°F - 140°F (-10°C - 60°C) |
| Power Supply | 4 x AAA batteries (not included) |
| Emergency Power | USB interface (for power bank) |
| Material | Stainless Steel |
| Dimensions (L x W x H) | 6.69 x 2.36 x 0.79 inches (170 x 60 x 20 mm) |
| Weight | 1.5 pounds (0.68 kg) |
4. Installation Guide
4.1 Door Preparation and Measurement
Ensure your door meets the specified thickness requirements (1.37-1.96 inches). Measure the backset (distance from the door edge to the center of the door hole) and adjust the latch accordingly to 60mm or 70mm.
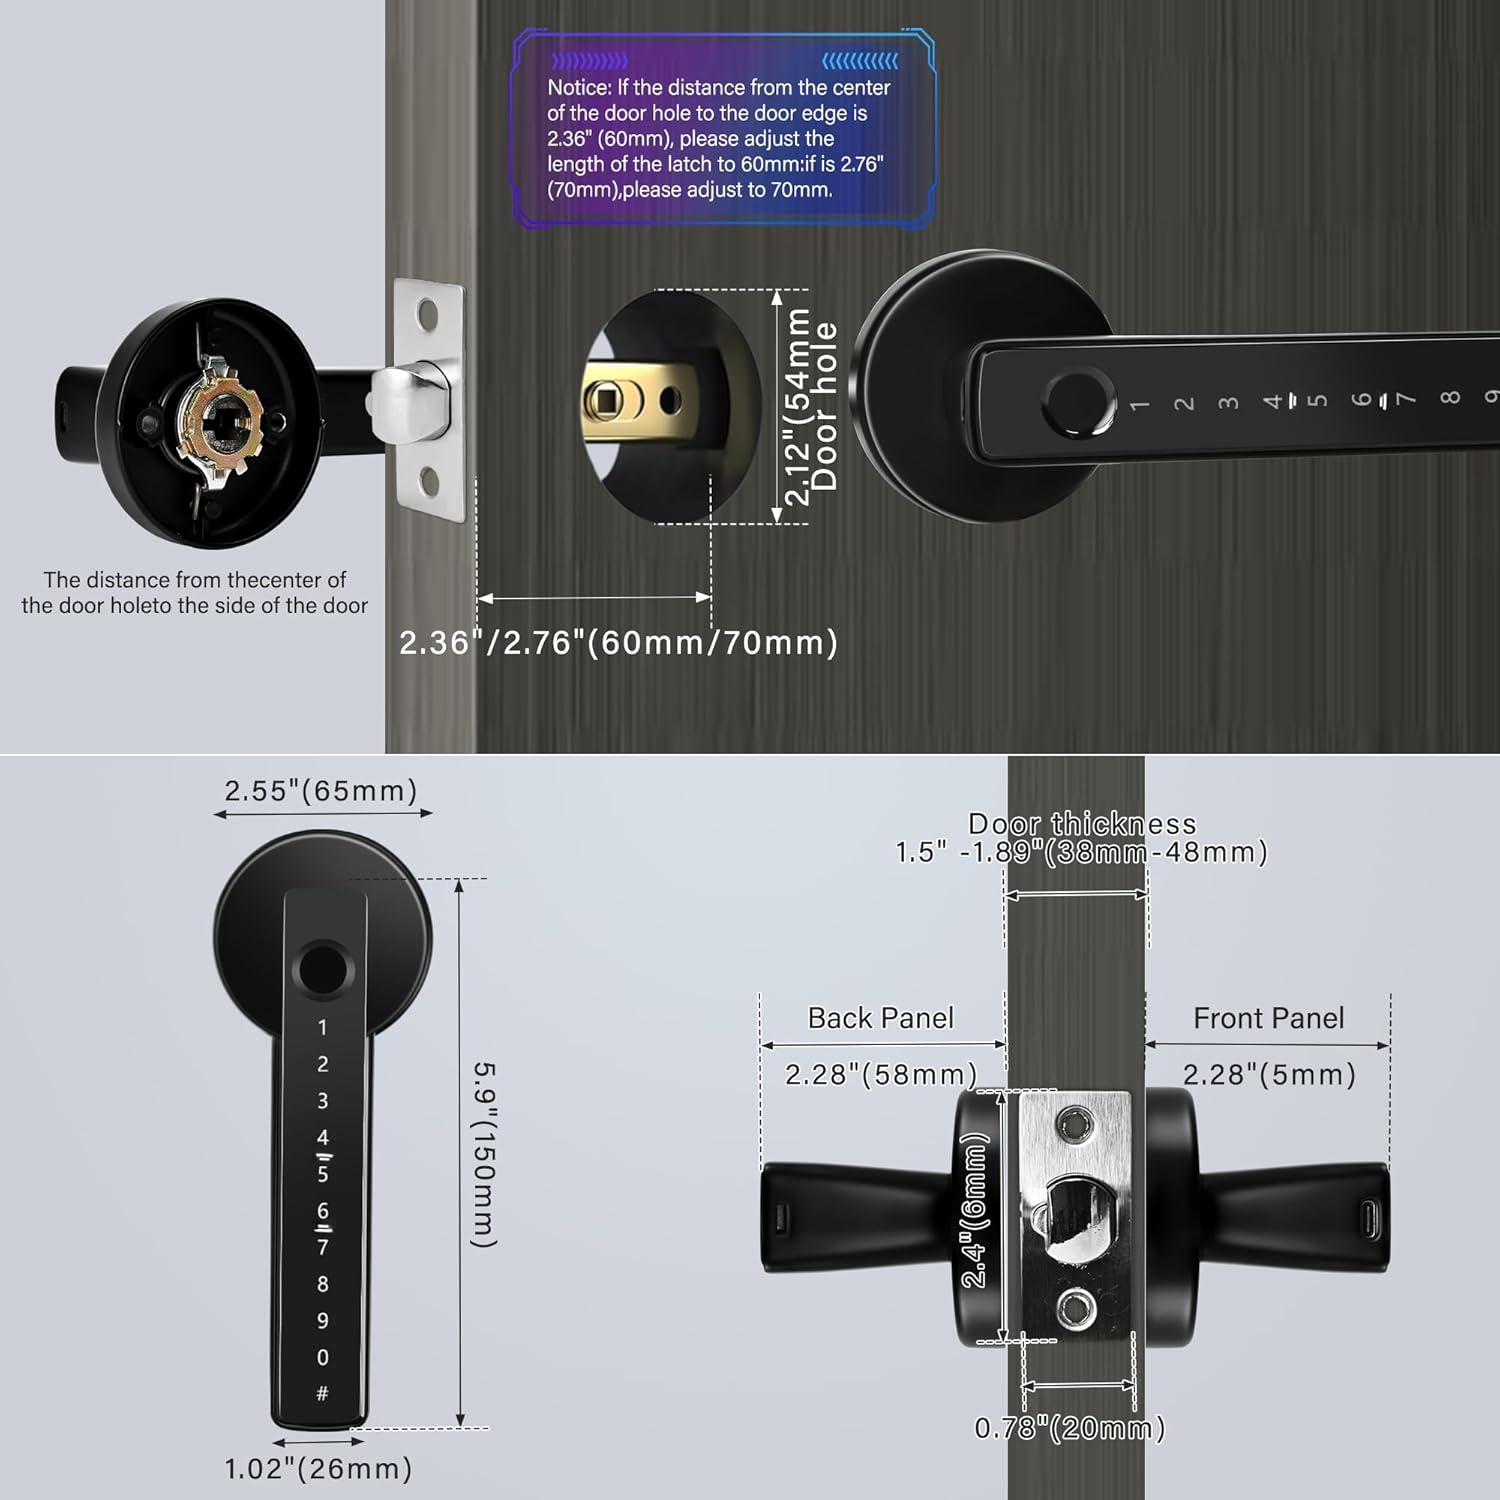
Image: Door Measurement Guide. This image illustrates the critical measurements for door preparation, including door thickness, backset (distance from door edge to center of hole), and the overall dimensions of the smart lock components (front panel, back panel, and mortise). It highlights how to adjust the latch for 60mm or 70mm backset.
4.2 Installing the Mortise Lock Body
- Insert the mortise lock body into the edge of the door.
- Secure it with screws. Ensure the latch bolt operates smoothly.
4.3 Installing the Front Panel
- Pass the spindle and cable through the door hole.
- Align the front panel with the mortise and secure it to the door.
4.4 Installing the Back Panel and Batteries
- Connect the cable from the front panel to the connector on the back panel.
- Align the back panel with the spindle and mounting holes.
- Secure the back panel with screws.
- Open the battery compartment cover on the back panel.
- Insert 4 new AAA batteries, ensuring correct polarity.
- Close the battery compartment cover.
4.5 Initial Setup and App Pairing (Tuya App)
- Download the "Tuya Smart" or "Smart Life" app from your smartphone's app store.
- Register or log in to your account.
- On the lock, press and hold the reset button (usually located on the back panel or inside the battery compartment) until you hear a prompt or see an indicator light.
- In the app, tap "+" to add a device. Select "Security & Video Surveillance" > "Door Lock (Wi-Fi)" or "Smart Lock".
- Follow the on-screen instructions to connect the lock to your Wi-Fi network. A Tuya gateway may be required for remote control functionality.

Image: Tuya App Interface. This image displays a smartphone screen showing the Tuya app interface for controlling the smart lock. It highlights features like one-touch unlocking, checking unlock records, remote control (requires gateway), door lock alarms, managing authorized users, and generating dynamic/temporary passwords.
5. Operating Instructions
5.1 Adding Users (Fingerprints, Passwords)
All user management (adding/deleting fingerprints, passwords) is performed through the Tuya App after the lock is paired.
- Open the Tuya App and select your TEKXDD H8 Smart Lock.
- Navigate to "User Management" or "Members".
- To Add Fingerprint: Select "Add Fingerprint" and follow the app's prompts to place your finger on the sensor multiple times until registered. The lock supports up to 255 fingerprints.
- To Add Password: Select "Add Password" and enter your desired digital code. You can set permanent, timed, or one-time passwords. The lock supports up to 100 customizable digit codes.

Image: Fingerprint Biometrics. This image highlights the smart lock's fingerprint recognition capabilities, stating a capacity of 255 fingerprints, a recognition speed of 0.2 seconds, a 99% accuracy rate, and 360° recognition direction for reliable access.
5.2 Unlocking Methods
- Fingerprint: Place your registered finger on the fingerprint sensor. The lock will unlock if the fingerprint is recognized.
- Digital Password: Enter your registered password on the keypad, then press '#'.
- Tuya App: Open the Tuya App, select your lock, and tap the "Unlock" button. (Requires a Tuya gateway for remote unlocking).
- Mechanical Key: Insert the mechanical key into the keyhole (usually hidden) and turn to unlock. This is for emergency access.
5.3 Anti-Peeping Password
To prevent others from guessing your password, you can enter random digits before and after your actual password. For example, if your password is "123456", you can enter "888123456999". The lock will recognize the correct sequence within the longer string.
5.4 Auto-Lock Function
The lock is designed to automatically lock after a set period once the door is closed. This setting can typically be configured within the Tuya App. You can also manually lock the door by pressing the button for 1 second or through the app.

Image: Lock Setting Methods. This image illustrates two methods for setting the lock's behavior: Method 1 shows pressing a button on the lock for 1 second to open/close unlocked mode, and Method 2 shows the Tuya app interface for turning off the automatic lock switch.
6. Maintenance
6.1 Battery Replacement
The lock will issue an alert when the batteries are running low. Replace all 4 AAA batteries promptly to ensure continuous operation. Always use new, high-quality alkaline batteries.
- Open the battery compartment cover on the back panel.
- Remove the old batteries.
- Insert 4 new AAA batteries, observing correct polarity (+/-).
- Close the battery compartment cover.
6.2 Emergency Power Supply
In case the batteries completely run out before replacement, you can use a portable power bank to temporarily power the lock via the USB interface located on the front panel. This allows you to unlock the door and replace the batteries.

Image: Emergency Unlock Options. This image displays the various emergency unlocking methods for the smart lock: Fingerprint, Smartphone APP, IC card (if supported by model), Mechanical Key, and Emergency USB power. It shows a USB power bank connected to the lock's emergency port and a mechanical key being used.
6.3 Cleaning
Wipe the lock's surface with a soft, damp cloth. Avoid using abrasive cleaners or solvents that could damage the finish or electronic components.
7. Troubleshooting
- Lock not responding: Check battery level. If low, replace batteries or use emergency USB power.
- Fingerprint not recognized: Ensure your finger is clean and dry. Try re-registering your fingerprint in the app.
- Password not working: Verify the correct password is being entered. Ensure no random digits are accidentally included unless using the anti-peeping feature.
- App connection issues: Ensure your phone's Bluetooth/Wi-Fi is on. Check if the lock is within range of your Wi-Fi router or Tuya gateway. Restart the app and the lock (by removing and reinserting batteries).
- Lock beeps continuously: This usually indicates low battery. Replace batteries immediately.
- Door not locking/unlocking smoothly: Check for any obstructions in the door frame or latch. Ensure the lock is installed correctly and aligned with the strike plate.
8. Warranty and Support
For any problems or inquiries, please contact TEKXDD customer support. You can typically reach support by logging into your Amazon account, navigating to "Your Orders", finding the order ID for this product, and clicking "Contact Seller".
Please retain your purchase receipt for warranty purposes.