
1. Introduction
This instruction manual provides detailed guidance for the installation, pairing, and operation of your Breeze Bay Universal Ceiling Fan Remote Control Kit. This kit is designed to replace existing remote controls for various 110V 3-speed AC ceiling fans, including models from Hunter, Casablanca, Hampton Bay, Harbor Breeze, Litex, Home Decorators Collection, and Honeywell. It offers convenient control over fan speeds and light functions, including dimming.
The kit is specifically compatible with Hunter and Casablanca fan remote accessories and parts such as 99119, 99127, 99110, 99116, 99121, 99371, 99122, 99123, 99600, 99770, 99813, 99372, 99392, 99373, 99195, 99375, 99771, 99815, K0471, K1131, K1430, K0472, K6017, K0474, KB286, K6132, K5579, K6266, K6731, K6927.

The remote control kit provides speed control, light on/off, and light dimming functions for your ceiling fan.
2. Package Contents
Please verify that all items listed below are included in your package:
- 1 x Remote Control
- 1 x Receiver
- 1 x Wall Mount Holder
- 1 x User Guide
- 6 x Wire Nuts
- 2 x Screws

Contents of the Breeze Bay Universal Ceiling Fan Remote Control Kit.
3. Setup and Installation
Safety Warning: Before beginning any installation, ensure the power to the ceiling fan is turned off at both the wall switch and the circuit breaker to prevent electrical shock.
Follow these steps to install the receiver and connect the wiring:
- Turn off the main power to the ceiling fan at the circuit breaker.
- Remove the canopy of your ceiling fan to access the wiring.
- Identify the existing wiring from the ceiling and to the fan/light.
- Connect the wires using the provided wire nuts as follows:
- White wire (from ceiling): Connect to the White (input Neutral) wire of the new receiver.
- Black and Red wires (from ceiling): Connect to the Black and Red (input live for both fan & light) wires of the new receiver.
- Yellow and Black wires (from receiver): Connect to the motor wire of the fan.
- Blue wire (from receiver): Connect to the light wire of the fan.
- Carefully tuck the new noise-free receiver into the fan's canopy. Ensure no wires are pinched.
- Reattach the fan canopy.
- Restore power at the circuit breaker.
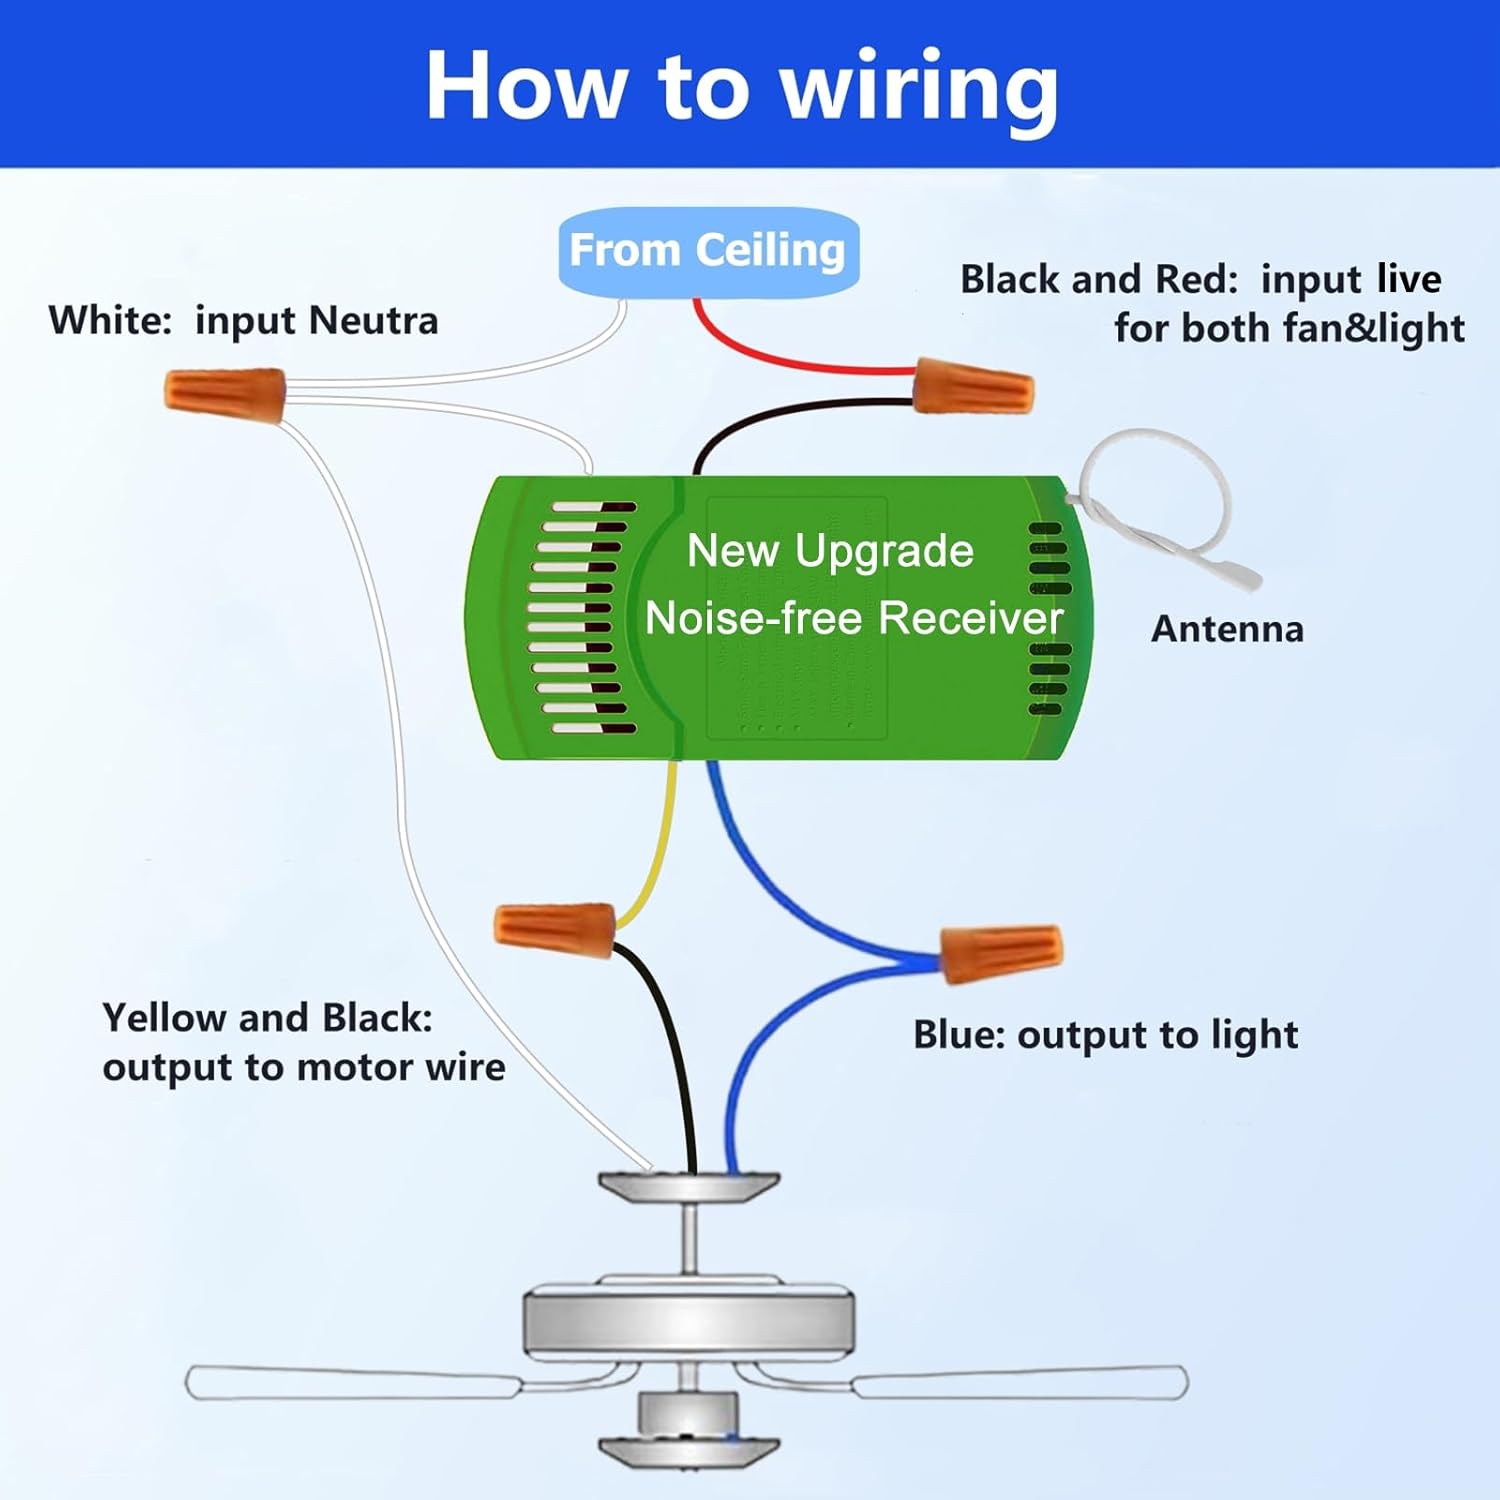
Wiring diagram for connecting the noise-free receiver to your ceiling fan.
4. Pairing Instructions
The remote control and receiver must be paired for proper operation. There are two methods for pairing:
Method 1: Using the '0' and '3' Keys
- Turn the fan speed to high and ensure the light is on.
- Insert a 3V CR2032 battery (NOT INCLUDED) into the new remote control.
- Turn off the fan/light at the wall switch.
- Within 30 seconds of turning the power back on, press and hold the '0' and '3' keys on the remote control simultaneously for at least four seconds until the fan responds.
Method 2: Using the Built-in Learning Key
- Turn off the power of the ceiling fan through the wall switch or circuit, and then turn it back on.
- Install a 3V CR2032 battery (NOT INCLUDED) in the remote control.
- Within 30 seconds of turning the power back on, press the learning key located in the battery compartment of the remote control for at least four seconds until the fan responds.
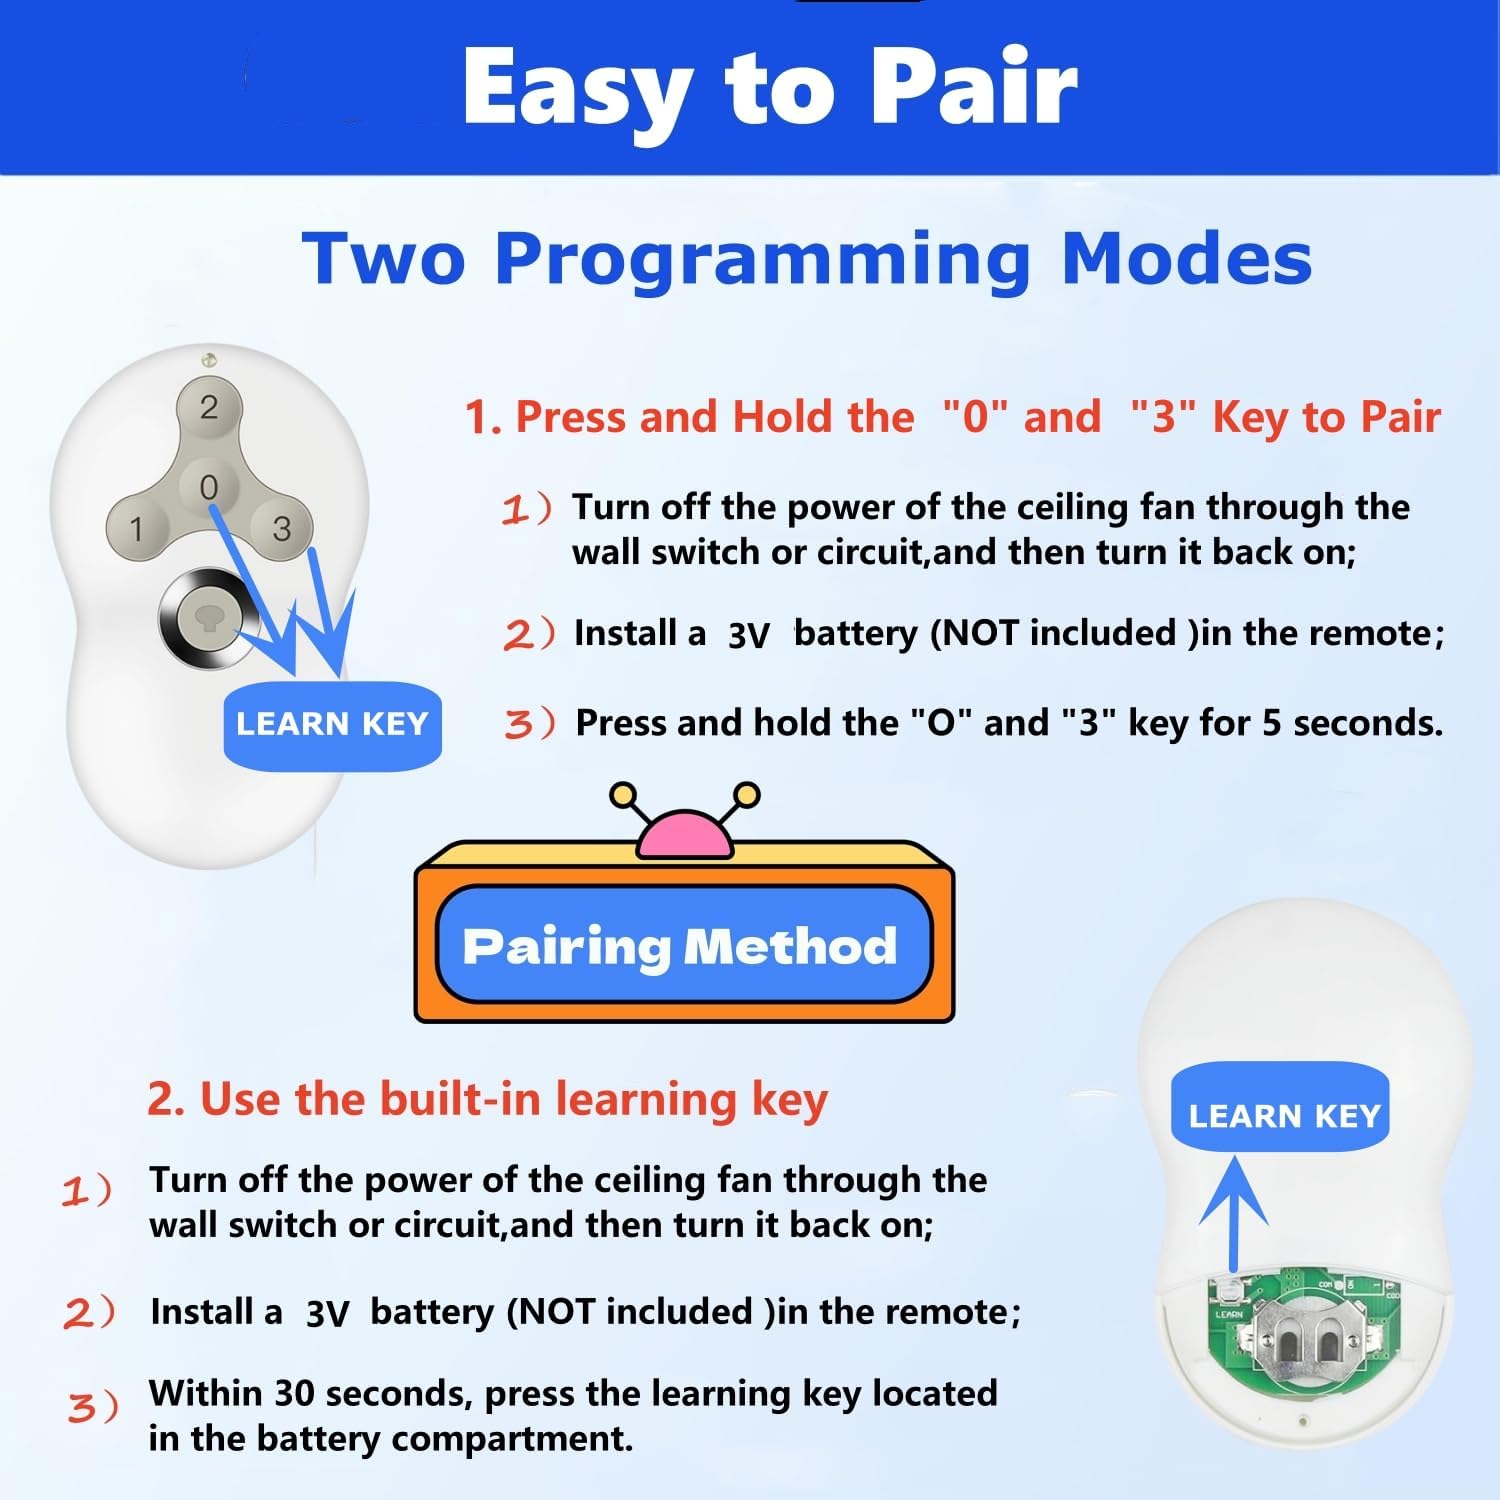
Two methods for pairing your remote control with the ceiling fan receiver.
5. Operating Instructions
The remote control provides comprehensive control over your ceiling fan and light functions:
- Fan Speed Control: The remote offers four fan speeds: Off, Low, Medium, and High. Use the dedicated fan speed buttons (usually marked '1', '2', '3', and '0' for off) to adjust the airflow to your preference.
- Light On/Off: Press the light bulb button to turn the fan light on or off.
- Light Dimming: Hold down the light bulb button to adjust the brightness level of the light. Release the button when the desired brightness is achieved.

The remote features dedicated buttons for 3-speed fan control.
6. Light Dimming Function
The light dimming feature allows you to create the perfect ambiance in any room. The fan remote control kit is compatible with various types of dimmable bulbs, including Incandescent, LED, CFL, and E-Ballast bulbs. Simply press and hold the light button to cycle through brightness levels and release when your desired setting is reached.

Adjust light brightness for different activities, from dining to resting.
7. Noise-Free Receiver
The upgraded green noiseless ceiling fan receiver is engineered to minimize operational noise, ensuring your ceiling fan runs almost silently. This feature contributes to a more comfortable and undisturbed environment, making it ideal for living rooms, bedrooms, dining rooms, and other areas where quiet operation is valued.
8. Troubleshooting
- Remote not responding:
- Check if the 3V CR2032 battery in the remote control is correctly installed and has sufficient charge. Replace if necessary.
- Ensure the remote is within range of the receiver.
- Fan or light not turning on/off:
- Verify that the main power to the fan is on at both the wall switch and the circuit breaker.
- Re-attempt the pairing process (Section 4) to ensure the remote and receiver are properly synchronized.
- Check all wiring connections in the fan canopy to ensure they are secure and correctly matched according to the wiring diagram.
- Light dimming not working:
- Ensure that the light bulbs installed are dimmable. Non-dimmable bulbs will not respond to the dimming function.
- Fan making unusual noise:
- While the receiver is designed to be noise-free, ensure the fan blades are balanced and securely attached.
- Check for any loose components within the fan housing.
9. Specifications
| Feature | Specification |
|---|---|
| Model Number | RC-5T1&RC-80R |
| Package Dimensions | 5.75 x 4.8 x 1.73 inches |
| Item Weight | 6.2 ounces |
| Brand | Breeze Bay |
| Special Feature | Light Dimmer |
| Color | White+Green |
| Max Number of Supported Devices | 5 |
| Compatible Devices | 3-Speed AC Ceiling Fan |
10. Warranty and Support
For warranty information or technical support, please refer to the contact details provided with your purchase or visit the official Breeze Bay website. Keep your purchase receipt as proof of purchase for any warranty claims.


