1. Important Safety Information
Before operating your SASIKEIBIKE A8 Electric Bike, please read this manual thoroughly. Failure to follow instructions can result in serious injury or property damage. Always wear a helmet and appropriate safety gear when riding. Ensure all components are correctly assembled and secured before each use.
- Always wear a certified helmet and appropriate safety gear.
- Perform a pre-ride inspection: check brakes, tire pressure, battery charge, and all fasteners.
- Obey all local traffic laws and regulations.
- Do not ride under the influence of alcohol or drugs.
- Be aware of your surroundings and ride defensively.
- Avoid riding in adverse weather conditions or on slippery surfaces.
- Do not exceed the maximum weight capacity of 300 lbs.
2. Package Contents
Your SASIKEIBIKE A8 Electric Bike package includes the following items:
- SASIKEIBIKE A8 Electric Bike (partially assembled)
- 48V 20AH Removable Battery
- Battery Charger
- Front Wheel
- Pedals (Left and Right)
- Seat Post with Saddle
- Front Fender
- Headlight
- Kickstand
- Tool Kit
- User Manual

Image: All components of the SASIKEIBIKE A8 Electric Bike laid out for assembly, including the main bike frame, front wheel, seat, pedals, and tool kit.
3. Assembly Instructions
Follow these steps to assemble your SASIKEIBIKE A8 Electric Bike. Refer to the assembly video for visual guidance.
3.1 Unboxing and Component Identification
Carefully remove the bike and all components from the packaging. Remove all protective wrapping and ties. Identify each part as listed in the "Package Contents" section.
Video: General assembly guide for an EUYBIKE electric bike, demonstrating unboxing and initial setup steps. While the model shown is F6F, the general assembly principles apply to the A8 model.
3.2 Handlebar Installation
- Insert the handlebar stem into the fork tube.
- Adjust the handlebar to your desired height and align it with the front wheel.
- Secure the handlebar stem by tightening the quick-release lever and the top bolt using the provided tool. Ensure it is firmly in place and does not rotate.

Image: Detailed view of the handlebar area, showing the upgraded LCD display, brake levers, and gear shifter. This illustrates the components that need to be secured.
3.3 Front Wheel and Fender Attachment
- Remove the protective spacer from the front fork.
- Carefully align the front wheel with the fork dropouts, ensuring the brake rotor slides correctly into the brake caliper.
- Install the washers and nuts onto the axle, then tighten them securely with the wrench.
- Attach the front fender to the fork using the provided screws and brackets. Ensure it is centered and does not rub against the tire.
- Connect the headlight cable to the main wiring harness.

Image: A close-up of the 20" x 4.0" all-terrain fat tire, highlighting its robust design for various road conditions including city, mountain, sand, and snow.
3.4 Pedal Installation
- Identify the Left (L) and Right (R) pedals. The left pedal has a reverse thread.
- Thread the right pedal (R) clockwise into the right crank arm.
- Thread the left pedal (L) counter-clockwise into the left crank arm.
- Tighten both pedals securely with the wrench.
3.5 Seat Post and Saddle Adjustment
- Insert the seat post with the saddle into the seat tube of the bike frame.
- Adjust the seat height to a comfortable riding position. Ensure your feet can touch the ground when stopped.
- Secure the seat post by closing the quick-release lever firmly.
- The saddle features integrated rear suspension for comfort.
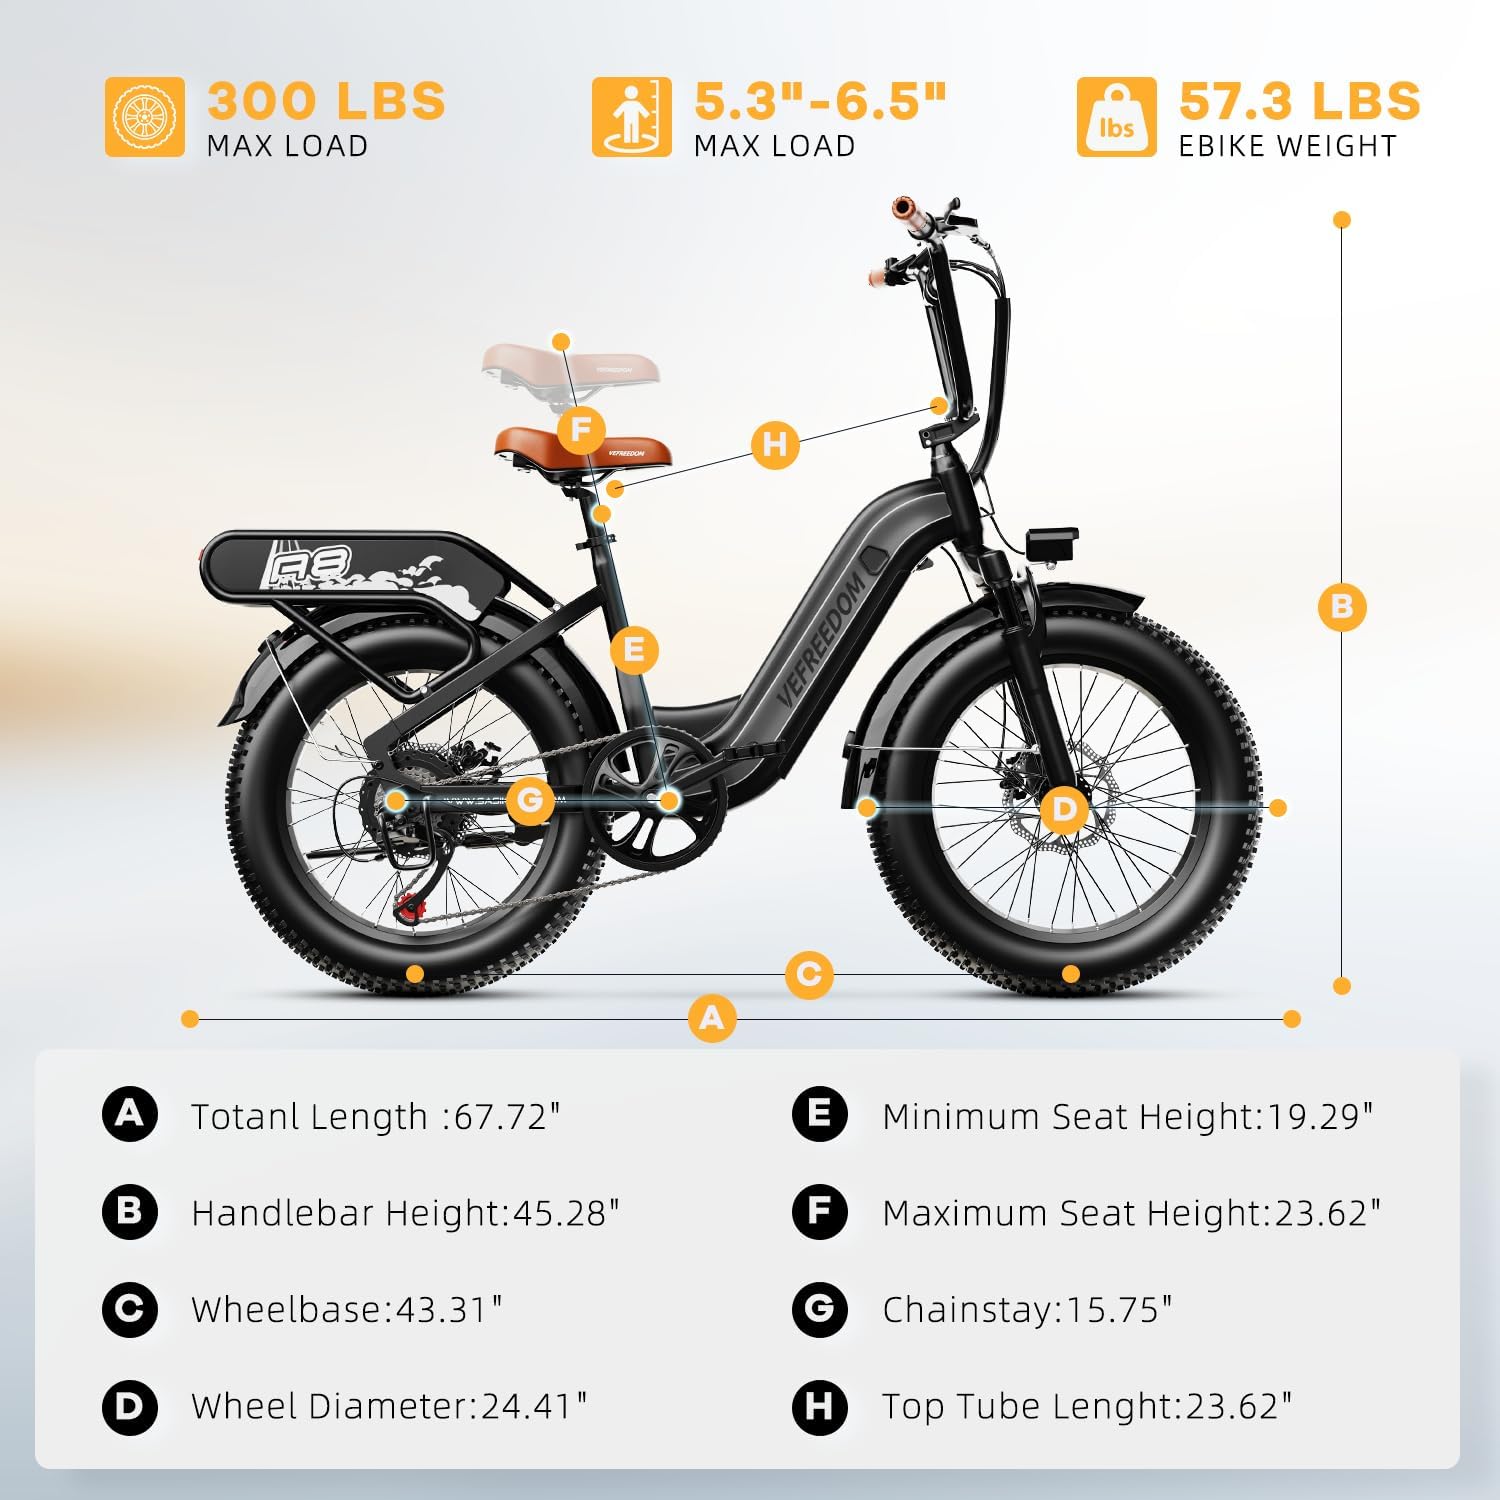
Image: A side profile diagram of the electric bike with labeled dimensions, including minimum and maximum seat heights, wheelbase, and overall length.
3.6 Kickstand Installation
Attach the kickstand to the designated mounting points on the rear frame of the bike using the provided bolts and Allen key. Ensure it is stable and supports the bike securely.
3.7 Final Checks
Before your first ride, double-check all bolts, nuts, and quick-release levers to ensure they are properly tightened. Verify that the brakes are functioning correctly and the tires are inflated to the recommended pressure.
4. Operating Instructions
Your SASIKEIBIKE A8 Electric Bike offers multiple riding modes for various preferences and terrains.
4.1 Powering On/Off
To power on the bike, insert the key into the battery lock and turn it to the "ON" position. Then, press and hold the power button on the LCD display. To power off, reverse the process.
4.2 Riding Modes
- Pedal-Assist Mode: The motor provides assistance as you pedal. You can adjust the level of assistance (PAS levels 1-5) using the '+' and '-' buttons on the display. Higher PAS levels provide more motor power.
- Throttle-Assist Mode: Engage the throttle on the handlebar to propel the bike without pedaling. The speed will depend on the throttle input and the selected PAS level.
- Manual Mode: Ride the bike like a traditional bicycle without any motor assistance. Use the 7-speed Shimano gear system for shifting.
- Walk Mode: Provides low-speed motor assistance (typically up to 6 km/h or 3.7 mph) to help you push the bike while walking. Activate this mode via the display controls.

Image: Visual representation of the four distinct riding modes available on the electric bike, demonstrating their intended use for different riding scenarios.
4.3 LCD Display Functions
The upgraded LCD display provides essential riding information:
- Speed: Current riding speed.
- Battery Level: Indicates remaining battery charge.
- Mileage: Displays trip distance and total odometer.
- PAS Level: Shows the current pedal-assist level (0-5).
- Headlight Indicator: Shows if the headlight is on.
Image: A detailed view of the bike's upgraded LCD display, showing various metrics like speed, battery charge, and trip information, along with the control buttons.
4.4 Gear Shifting
The bike is equipped with a professional 7-speed gear system. Use the shifter on the right handlebar to change gears according to terrain and desired pedaling effort. Shift smoothly to avoid strain on the drivetrain.
5. Battery Information and Charging
The SASIKEIBIKE A8 features a powerful 48V 20AH removable battery, providing a maximum range of up to 70 miles.
5.1 Charging the Battery
- Ensure the bike is powered off.
- Locate the charging port on the battery. It can be charged while installed on the bike or removed.
- Connect the charger to the charging port, then plug the charger into a standard wall outlet.
- The charger indicator light will typically turn red during charging and green when fully charged.
- Charging time is approximately 5 hours for a full charge.
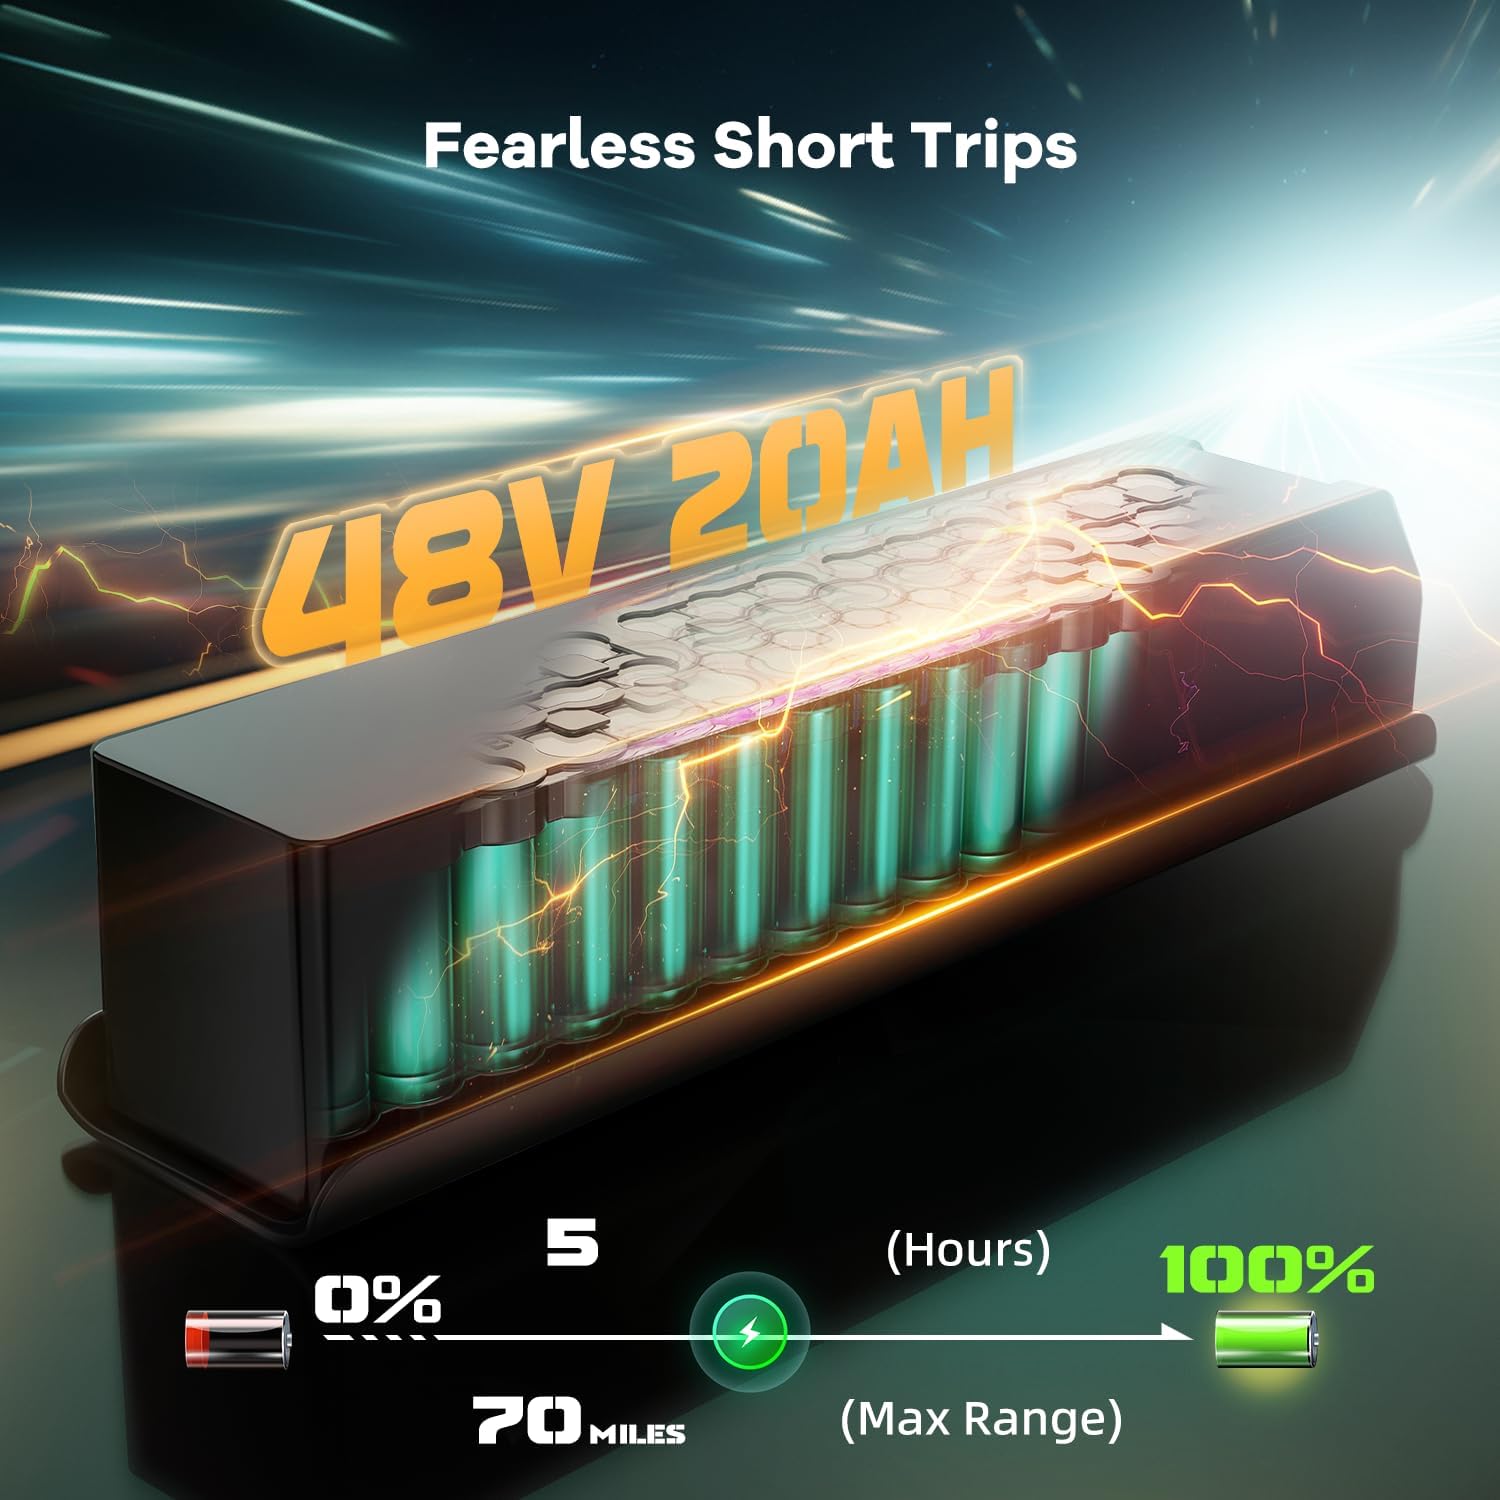
Image: A graphic illustrating the 48V 20AH battery, showing its capacity and the approximate charging time to achieve maximum range.
5.2 Battery Removal and Installation
To remove the battery, turn the key in the battery lock to the unlock position and carefully slide the battery out. To reinstall, align the battery with the frame slot and slide it in until it clicks into place, then lock it with the key.
6. Maintenance
Regular maintenance ensures the longevity and safe operation of your electric bike.
- Cleaning: Clean the bike regularly with a damp cloth. Avoid high-pressure washing directly on electrical components.
- Tires: Check tire pressure before each ride. Recommended pressure is typically indicated on the tire sidewall.
- Brakes: Inspect brake pads and rotors for wear. Ensure brake levers engage smoothly and provide adequate stopping power. The bike features ultra-sensitive dual disc brakes for instant braking.
- Chain: Keep the chain clean and lubricated to ensure smooth shifting and prevent rust.
- Fasteners: Periodically check and tighten all bolts and nuts, especially on critical components like the handlebars, wheels, and seat post.
- Battery Storage: If storing the bike for an extended period, charge the battery to 50-70% and store it in a cool, dry place. Recharge every 1-2 months to prevent deep discharge.
Image: A composite image highlighting the bike's practical details, including the bright front light, upgraded LCD, ultra-sensitive dual disc brakes, and professional 7-speed gear system.
7. Troubleshooting
This section addresses common issues you might encounter with your electric bike.
| Problem | Possible Cause | Solution |
|---|---|---|
| Bike does not power on | Battery not charged, battery not properly installed, power button not pressed correctly. | Check battery charge, ensure battery is fully inserted and locked, press and hold power button on display. |
| Motor not assisting | PAS level is 0, throttle not engaged, brake levers engaged, motor connection loose. | Increase PAS level, ensure throttle is fully engaged, release brake levers, check motor cable connections. |
| Brakes feel weak or noisy | Worn brake pads, misaligned caliper, air in hydraulic system (if applicable). | Inspect and replace brake pads if worn, adjust caliper alignment, consult a professional for hydraulic brake issues. |
| Gears are not shifting smoothly | Derailleur out of adjustment, dirty/dry chain, bent hanger. | Clean and lubricate chain, adjust derailleur, consult a bike mechanic for bent hanger. |
8. Specifications
Key technical specifications for the SASIKEIBIKE A8 Electric Bike:
| Feature | Specification |
|---|---|
| Bike Type | Electric Bike |
| Age Range | Adult |
| Brand | SASIKEIBIKE |
| Model Name | A8 |
| Motor Power | 1500W Peak Brushless Motor |
| Battery | 48V 20AH (Removable) |
| Max Speed | 30+ MPH |
| Max Range | Up to 70 Miles |
| Tire Size | 20" x 4.0" Fat Tire |
| Number of Speeds | 7 (Shimano) |
| Frame Material | High Carbon Steel / Aluminum |
| Suspension Type | Dual (Full Suspension) |
| Brake Style | Disc (Ultra-Sensitive Dual Brakes) |
| Item Weight | 70 Pounds |
| Max Load | 300 LBS |
| Special Feature | Adjustable Seat, Integrated Front & Rear Lights |
| Included Components | Tool Kit |

Image: The electric bike featuring its large rear rack, capable of carrying up to 300 lbs, suitable for various cargo needs.
9. Warranty and Support
The SASIKEIBIKE A8 Electric Bike comes with a 1-year warranty. For warranty claims, technical support, or replacement parts, please contact SASIKEIBIKE customer service through the retailer where you purchased the product or visit the official SASIKEIBIKE website.
Always refer to the official website or your purchase documentation for the most up-to-date warranty terms and contact information.


