
1. Introduction
This manual provides detailed instructions for the safe and efficient operation of the Signal fire AI-6A+ Fusion Splicing Machine. Please read this manual thoroughly before using the device to ensure proper functionality and to prevent damage or injury. Keep this manual for future reference.
2. Safety Information
Observe all safety precautions to prevent electric shock, fire, or personal injury. This device uses high voltage and a laser (VFL). Always wear appropriate personal protective equipment, including safety glasses, when operating the splicer.
- Do not operate the device in wet conditions or near flammable materials.
- Ensure the power adapter is correctly connected to a grounded outlet.
- Avoid direct exposure to the VFL (Visual Fault Locator) laser beam.
- Handle optical fibers with care; fiber shards can cause injury.
- Only use accessories and replacement parts approved by Signal fire.
3. Package Contents
Verify that all items are present in the package:
- Signal fire AI-6A+ Fusion Splicer
- Rechargeable Lithium Battery (5200mAh)
- Power Adapter/Charger
- Fiber Cleaver
- Fiber Strippers (e.g., Drop Cable Stripper, Fiber Optic Stripper)
- Cooling Tray
- Carrying Case
- User Manual (this document)
- Other accessories (e.g., spare electrodes, cleaning brush)
4. Product Overview
The Signal fire AI-6A+ is a high-performance fusion splicer designed for fiber optic cable installation and maintenance. It features six motors for precise core alignment, integrated Optical Power Meter (OPM) and Visual Fault Locator (VFL), and a 3-in-1 fiber holder for various fiber types.
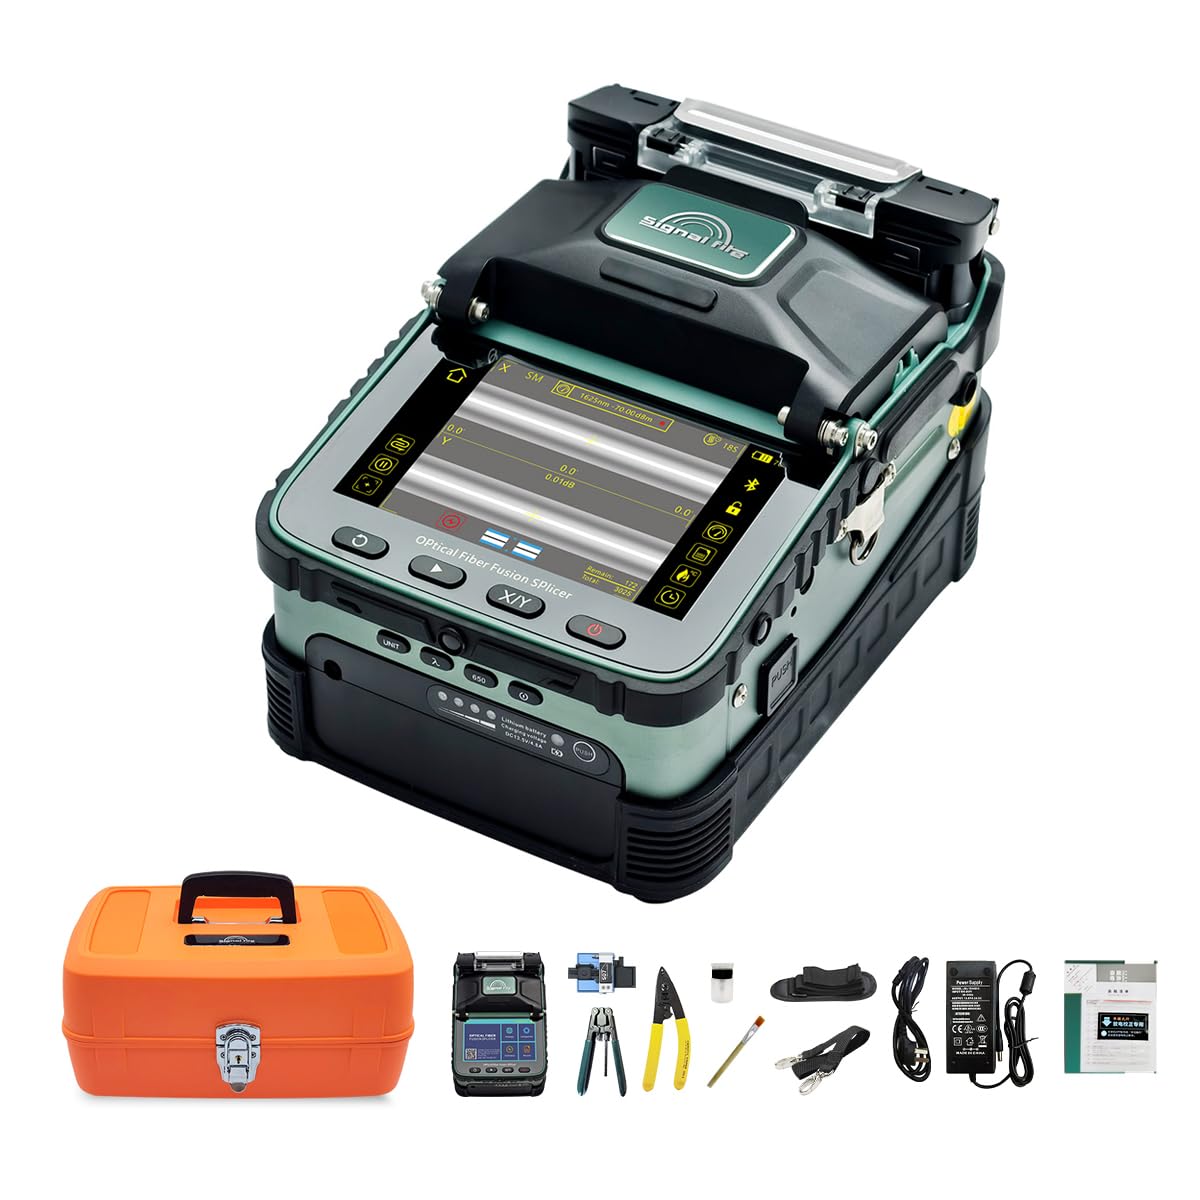
Figure 4.1: Signal fire AI-6A+ Fusion Splicer highlighting key features.
4.1 Key Features
- Fast Splicing & Heating: Achieves 8-second splicing and 18-second heating times.
- Core Alignment Technology: Utilizes six motors for precise fiber alignment, minimizing splice loss.
- Integrated OPM & VFL: Built-in Optical Power Meter for measuring connection loss and a Visual Fault Locator for continuity verification.
- 3-in-1 Fiber Holder: Compatible with SM/G.652, BIF (G.657), bare fiber, pigtail, rubber-insulated, and multi-fiber cables.
- High-Resolution LCD: 5-inch screen with up to 320x magnification for clear fiber inspection.
- Long Battery Life: 5200mAh lithium battery supports approximately 160 continuous splice and heat cycles.
- Intelligent Interaction: Mobile app connectivity for data management and multi-language support.
4.2 Component Identification

Figure 4.2: Labeled components of the AI-6A+ Fusion Splicer.
Refer to Figure 4.2 for the location of the following components:
- 5-inch Color Touchscreen: Displays splicing process, parameters, and menu options.
- Disassembly-free 3-in-1 Fiber Holder: Secures various fiber types.
- Cooling Rack: Expandable and closable for heat shrink sleeve cooling.
- Protective Case: Encloses the splicing area.
- Charging Channel ① & ②: Dual charging ports for the battery.
- Power Meter And Optical Modules Switch (Key for OPM & VFL): Activates and controls OPM and VFL functions.
- Continue/Reset Buttons: For controlling splicing operations.
- X/Y Display Toggle Key: Switches between X-axis, Y-axis, or simultaneous display of fiber alignment.
5. Setup
5.1 Battery Installation and Charging
The AI-6A+ is powered by a 5200mAh lithium battery. Ensure the battery is fully charged before initial use.

Figure 5.1: Battery installation and dual charging channels.
- To install the battery, press the button to pop up the battery compartment (refer to Figure 5.1). Insert the 5200mAh lithium battery into the compartment, ensuring correct orientation.
- Connect the power adapter to either Charging Channel ① or ② on the splicer, then plug the adapter into a power outlet. The battery can be charged while installed or separately.
- The charging indicator on the screen will show the charging status. A full charge typically takes approximately 3 hours.
5.2 Powering On/Off
- Power On: Press and hold the power button until the screen illuminates.
- Power Off: Press and hold the power button until the device shuts down.
6. Operating Instructions
6.1 Fiber Preparation
- Strip the Fiber: Use the appropriate fiber stripper to remove the outer jacket and coating, exposing the bare fiber. Ensure the stripped length is suitable for cleaving.
- Clean the Fiber: Wipe the bare fiber with an alcohol wipe (99% isopropyl alcohol) to remove any contaminants. Allow it to air dry completely.
- Cleave the Fiber: Place the cleaned fiber into the fiber cleaver and perform a precise cleave. A good cleave is crucial for low splice loss.
6.2 Splicing Process
- Open the splicer lid and the protective case.
- Carefully place the prepared fibers into the V-grooves of the 3-in-1 fiber holder. Ensure the fiber ends are positioned correctly between the electrodes.
- Close the protective case and the splicer lid. The device will automatically begin the splicing process, including fiber alignment, arc discharge, and splice loss estimation.
- Monitor the splicing process on the 5-inch LCD screen. The screen will display the estimated splice loss (e.g., 0.02dB for SM fiber).
- Once splicing is complete, open the splicer lid and carefully remove the spliced fiber.
6.3 Heating Process
- Slide a heat shrink protection sleeve over one of the fibers before splicing.
- After splicing, center the protection sleeve over the splice point.
- Place the sleeved splice into the heating oven (cooling rack).
- Close the heating oven lid. The device will automatically begin heating. The heating time is approximately 18 seconds.
- Once heating is complete, carefully remove the fiber and allow the sleeve to cool on the cooling rack.
6.4 Using the OPM (Optical Power Meter) and VFL (Visual Fault Locator)

Figure 6.1: OPM and VFL ports and function details.
The AI-6A+ integrates an OPM and VFL for comprehensive fiber testing. Refer to Figure 6.1 for port locations.
- OPM Function:
Connect the fiber to be tested to the OPM port. Use the 'UNIT' button (Key for OPM & VFL) to cycle through the ten available wavelengths: 850nm, 1300nm, 1310nm, 1490nm, 1550nm, 1625nm, 980nm, 1270nm, 1577nm, 1650nm. The measured optical power will be displayed on the screen. - VFL Function:
Connect the fiber to be tested to the VFL port. Use the '650' button (Key for OPM & VFL) to switch between three states: 15mW continuous output, 2Hz flashing, and steady off. The VFL emits a visible red laser to identify breaks or bends in the fiber.
6.5 Mobile App Connection
The splicer can connect to a mobile application for enhanced data management and control.
- Download the official Signal fire app from your mobile device's app store.
- Enable Bluetooth on your mobile device and the splicer.
- Open the app and follow the on-screen instructions to pair with your AI-6A+ splicer.
- Through the app, you can check splicing data, download records, and switch between eleven different languages.
6.6 Official Product Video
Video 6.1: Official demonstration of the Signal fire AI-6A+ Fusion Splicer with OPM and VFL features. This video illustrates the splicing process, OPM functionality, and VFL usage, providing a visual guide to the device's operation.
7. Maintenance
7.1 Cleaning
- Electrodes: Regularly inspect and clean the electrodes. Replace them if they are worn or damaged.
- V-Grooves and Lenses: Use a soft, lint-free cloth and alcohol to gently clean the V-grooves and observation lenses to ensure accurate fiber placement and inspection.
- General Cleaning: Keep the splicer free from dust and debris. Use a soft brush or compressed air for hard-to-reach areas.
7.2 Battery Care
- Charge the battery regularly, even if not in use, to maintain its lifespan.
- Store the battery in a cool, dry place away from direct sunlight.
- If the battery performance degrades significantly, consider replacing it with an official Signal fire battery.
8. Troubleshooting
This section addresses common issues you might encounter with your Signal fire AI-6A+ Fusion Splicer.
- High Splice Loss: Check fiber cleave quality, ensure fibers are clean, and verify electrode condition. Recalibrate arc power if necessary.
- Splicer Not Powering On: Ensure the battery is charged and correctly installed. Check the power adapter connection if using external power.
- Display Issues: Restart the device. If the problem persists, contact customer support.
- VFL Not Working: Check if the VFL is activated and if the fiber connection is secure.
For issues not covered here, please refer to the contact information in the Support section.
9. Specifications
| Feature | Specification |
|---|---|
| Brand | Signal fire |
| Model | AI-6A+ |
| Part Number | ZS-6AVNSOON |
| Power Source | Battery Powered |
| Battery Capacity | 5200mAh Lithium Battery |
| Splicing Time | 8 seconds |
| Heating Time | 18 seconds |
| Continuous Cycles | Approx. 160 (splice + heat) |
| Fiber Alignment | Core Alignment (6 motors) |
| Display | 5-inch High-Resolution LCD |
| Magnification | 320x (X/Y separately), 200x (X and Y simultaneously) |
| OPM Wavelengths | 850nm, 1300nm, 1310nm, 1490nm, 1550nm, 1625nm, 980nm, 1270nm, 1577nm, 1650nm |
| VFL Power | 15mW |
| Item Weight | 5.5 Kilograms |
| Item Dimensions | 5.31 x 7.8 x 4.8 inches |
| Color | Green |
10. Warranty and Support
Signal fire products are manufactured to high-quality standards. For warranty information, technical support, or service inquiries, please contact your authorized dealer or visit the official Signal fire website. Keep your purchase receipt as proof of purchase for warranty claims.
For more information, visit the Signal fire Store.


