1. Introduction
Thank you for choosing the AWESAFE 10 Inch Car Radio Stereo. This manual provides detailed instructions for installation, operation, and troubleshooting to ensure optimal performance and user experience. Please read this manual thoroughly before using the product and retain it for future reference.
Safety Information:
- Always operate the device responsibly and in accordance with local traffic laws.
- Do not attempt to install or repair the unit if you are not qualified. Seek professional assistance.
- Ensure all connections are secure before driving.
2. Compatible Vehicle Models
This car radio stereo is designed for specific vehicle models and years:
- Chevy Silverado 1500 (2007-2013)
- Chevy Silverado 2500HD (2007-2013)
- Chevy Silverado 3500HD (2007-2013)
- Chevrolet Avalanche (2007-2011)
- Chevrolet Express Van (2008-2011)
- Chevrolet Impala (2006-2012)
- GMC Acadia (2007-2012)
- GMC Savana (2008-2013)
- GMC Sierra (2007-2011)
- GMC Yukon (2007-2013)
3. Package Contents
Verify that all items listed below are included in your package:
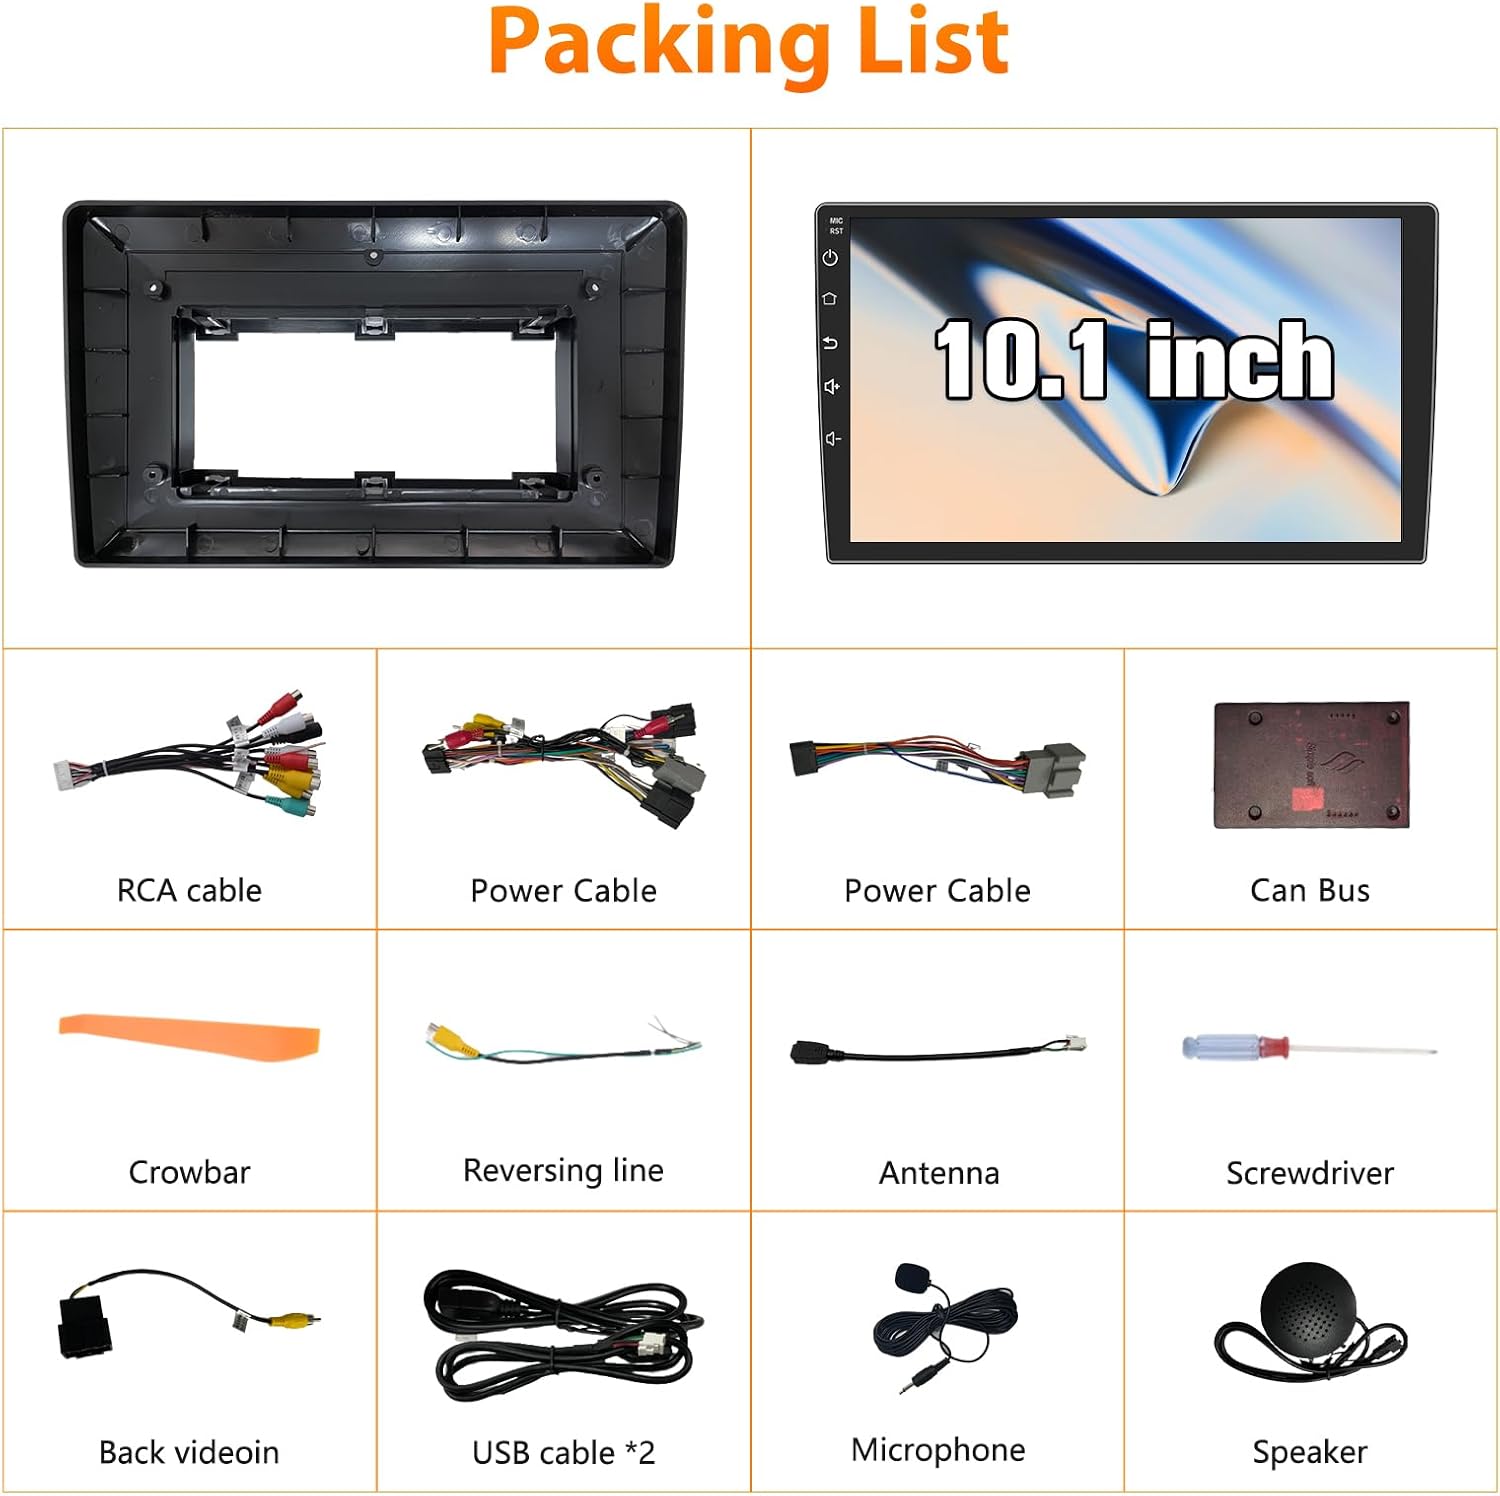
Image: Package Contents Diagram
- 10.1 Inch Car Radio Unit
- Power Cable (x2)
- RCA Cable
- Reversing Line
- Antenna & Back Video-in Cable
- Can Bus Decoder
- USB Cable (x2)
- Crowbar (Installation Tool)
- Screwdriver
- Speaker
- Microphone
4. Installation Guide
Professional installation is recommended. If you choose to install it yourself, proceed with caution. Always disconnect the vehicle's battery before starting installation.
4.1. Wiring Diagram

Image: Wiring Diagram
Refer to the wiring diagram for proper connection of all cables. Ensure each cable is connected to its corresponding port on the car radio and the vehicle's harness.
- Power Cable: Connect to the vehicle's power harness.
- RCA Cable: For audio/video input/output, including AMP control, AUX, and subwoofer output.
- Rear Camera Input Cable: Connect the backup camera.
- Can Bus Cable: For integrating with vehicle's CAN-BUS system (e.g., steering wheel controls).
- Radio Antenna: Connect the vehicle's radio antenna.
- GPS Antenna: Position in a location with clear sky view for optimal signal.
- USB Cables: For connecting USB devices or charging.
- Microphone: For hands-free calling.
4.2. General Installation Steps
- Carefully remove the factory radio and trim using the provided crowbar tool.
- Connect the new AWESAFE car radio to the vehicle's wiring harness according to the wiring diagram.
- Install the GPS antenna in a suitable location, typically on the dashboard or under the windshield, ensuring it has a clear view of the sky.
- Mount the backup camera (if included and desired) and route its cable to the radio unit.
- Secure the main unit in the dashboard.
- Reconnect the vehicle's battery and test all functions before fully reassembling the dashboard trim.
5. Setup and Basic Operation
5.1. Initial Power On
After installation, turn on your vehicle's ignition. The unit should power on automatically. Follow any on-screen prompts for initial setup, such as language selection and time zone.
5.2. Touch Screen Interface
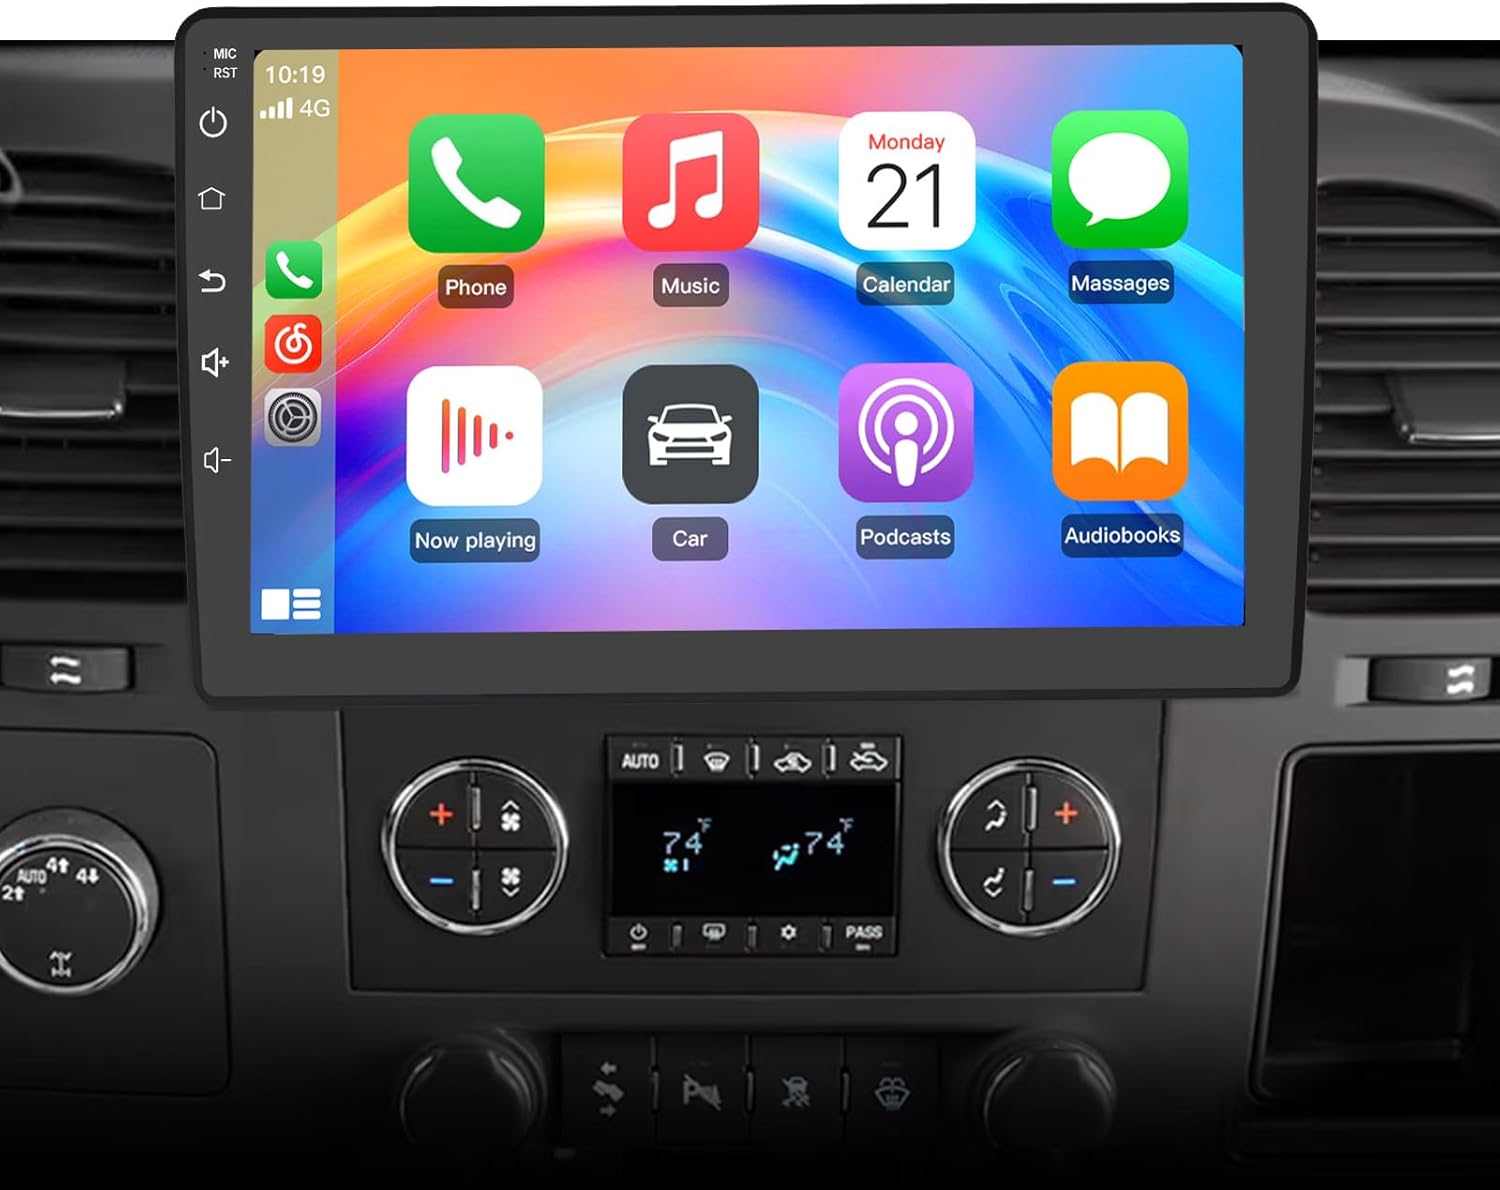
Image: Main Display with CarPlay Interface
The unit features a responsive 10-inch capacitive touchscreen. Navigate through menus and applications by tapping, swiping, and pinching (where applicable).
5.3. System Memory

Image: System Memory Overview
The unit is equipped with a 4-core processor, 2GB RAM, and 32GB ROM, providing sufficient performance for applications and storage.
6. Operating Instructions
6.1. Wireless CarPlay & Android Auto

Image: Wireless CarPlay and Android Auto
Connect your iPhone or Android phone wirelessly via Bluetooth to access CarPlay or Android Auto. This allows for navigation, calls, messages, and music playback directly from your phone's interface on the car stereo screen.
- Pairing: Go to the Bluetooth settings on the car stereo and your phone. Select the car stereo's Bluetooth name on your phone to pair.
- Activation: Once paired, CarPlay or Android Auto should launch automatically or can be selected from the main menu.
6.2. GPS Navigation

Image: GPS Navigation Interface
The unit supports online GPS navigation. Connect to a Wi-Fi network to download maps and receive real-time traffic updates. You can use pre-installed navigation apps or download others from the application store.
6.3. Bluetooth Connectivity

Image: Bluetooth Calling and Music
Connect your phone via Bluetooth for hands-free calling and wireless music streaming. The built-in microphone ensures clear communication.
- Making Calls: Access the phone application on the stereo to dial numbers or select contacts.
- Music Playback: Use the music application to control playback from your paired device.
6.4. FM/AM Radio

Image: FM/AM Radio Interface
Access the built-in FM/AM tuner for local radio stations. The unit supports automatic and manual station searching, as well as saving preset stations.
6.5. Split Screen Functionality
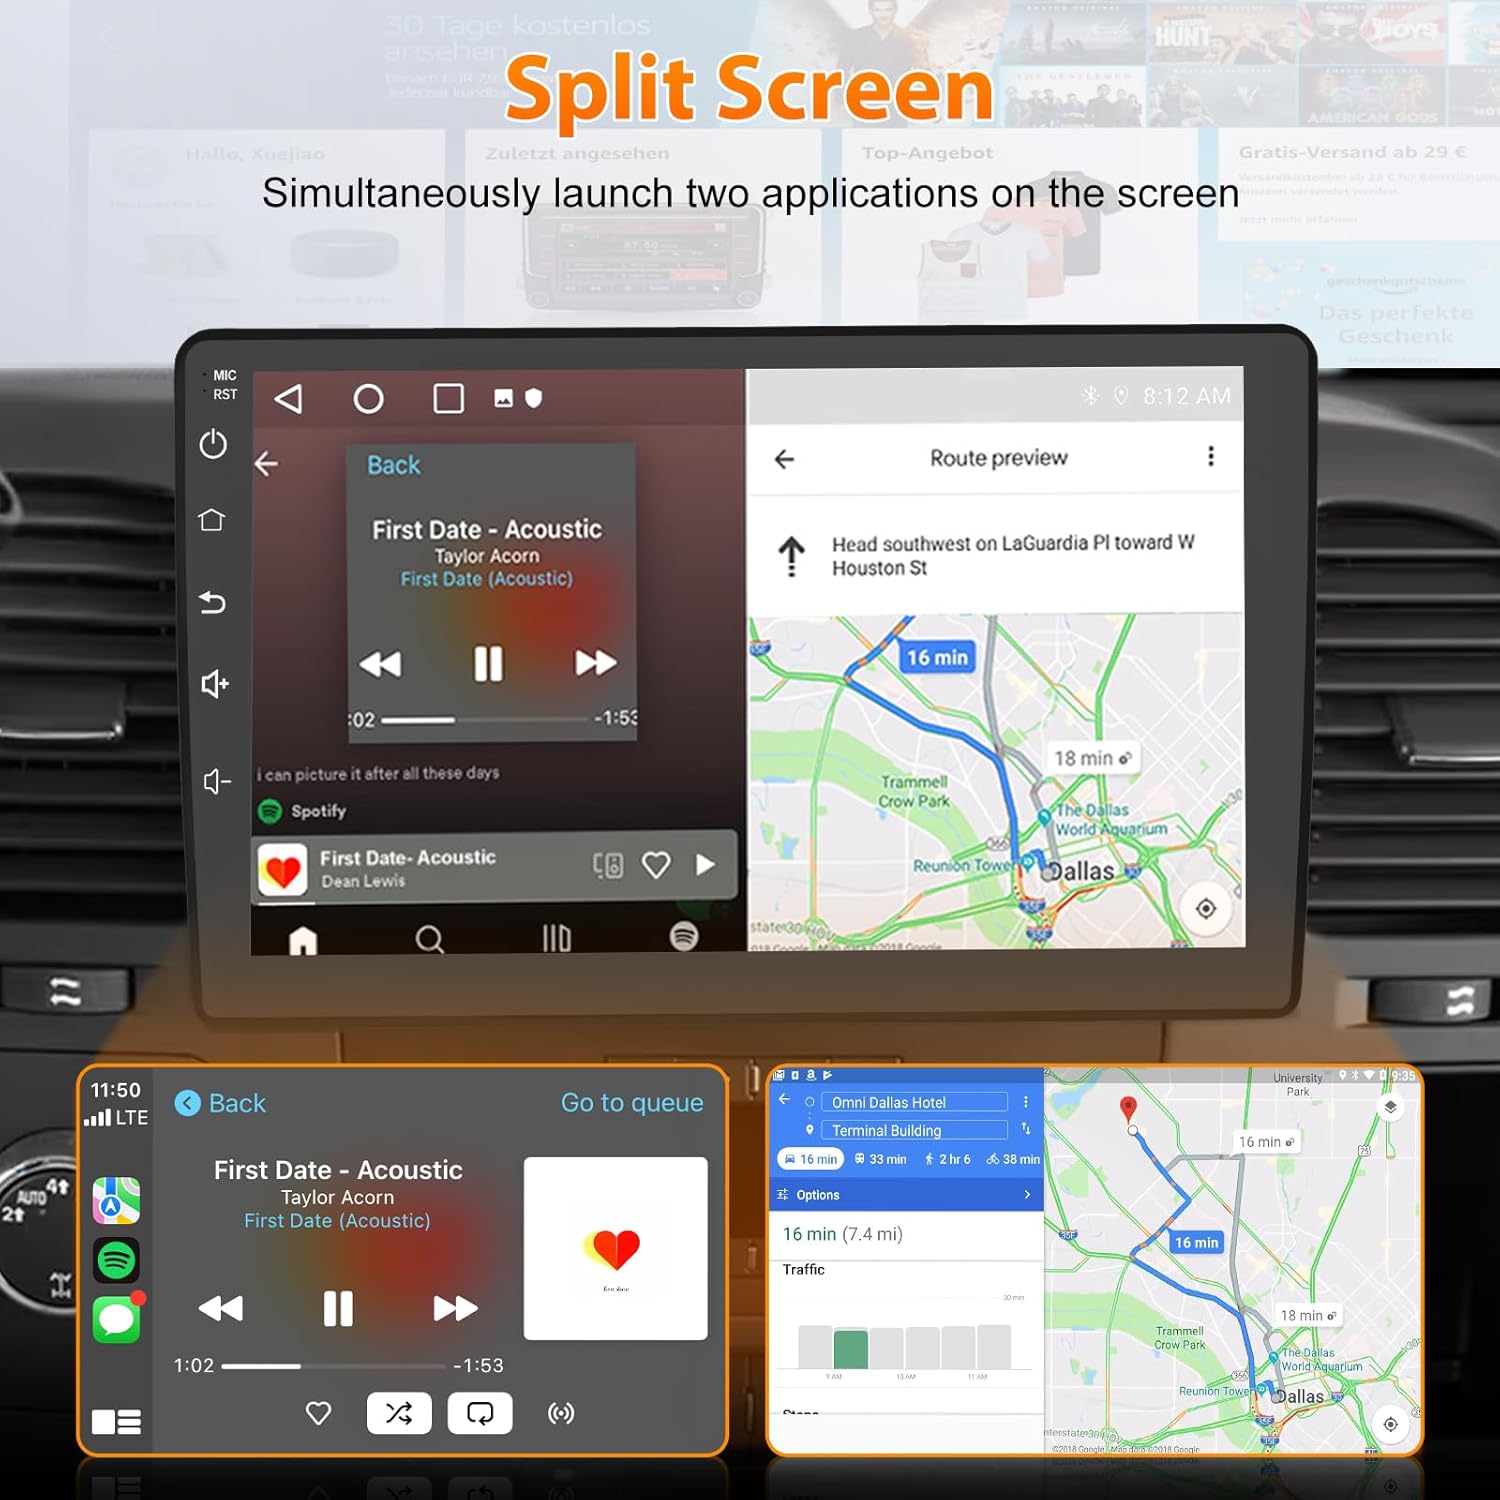
Image: Split Screen Display
The split-screen feature allows you to run two applications simultaneously, such as navigation and music playback, for enhanced multitasking.
- Activation: Typically, long-press an app icon or use a dedicated split-screen button (if available) to activate.
6.6. Steering Wheel Control (SWC)

Image: Steering Wheel Control Setup
Maintain control of your stereo without taking your hands off the wheel. The Steering Wheel Control feature allows you to adjust volume, change tracks, and manage calls effortlessly. Refer to the system settings for SWC learning and configuration.
6.7. DSP Sound System

Image: DSP Sound System
Equipped with a Digital Sound Processor (DSP) and 36-band equalizer, the unit allows for fine-tuning of audio output to suit your preferences, offering various sound modes like Normal, Jazz, Pop, Classical, and Rock.
6.8. 5GHz WiFi Connectivity

Image: 5GHz WiFi Connectivity
The unit supports 5GHz Wi-Fi, providing faster data transmission speeds for online applications, streaming, and map downloads.
6.9. Backup Camera
When the vehicle is shifted into reverse, the display will automatically switch to the backup camera view, providing parking assistance with guidelines.
7. Maintenance
To ensure the longevity and optimal performance of your car radio stereo, follow these simple maintenance guidelines:
- Cleaning: Use a soft, dry cloth to clean the screen and exterior. For stubborn smudges, a slightly damp cloth with a mild, non-abrasive cleaner can be used. Avoid harsh chemicals.
- Temperature: Avoid exposing the unit to extreme temperatures, both hot and cold, for extended periods.
- Software Updates: Periodically check for available software updates to ensure the system runs efficiently and has the latest features.
8. Troubleshooting
If you encounter issues, refer to the following common problems and solutions:
| Problem | Possible Cause | Solution |
|---|---|---|
| Unit does not power on. | Incorrect wiring, blown fuse, vehicle battery issue. | Check power connections, inspect vehicle fuses, ensure battery is charged. |
| No sound. | Volume too low, speaker wires disconnected, incorrect audio settings. | Increase volume, check speaker wiring, verify audio output settings. |
| Bluetooth connection issues. | Device not paired, Bluetooth off, interference. | Ensure Bluetooth is enabled on both devices, re-pair the device, move closer to the unit. Note: Initial connection may take 20-30 seconds. |
| GPS signal weak or inaccurate. | GPS antenna obstructed or improperly placed. | Relocate GPS antenna to a position with a clear view of the sky. |
| Steering Wheel Controls not working. | Incorrect wiring, SWC not configured. | Verify CAN-BUS or SWC wiring. Access system settings to perform SWC learning/configuration. |
| Backup camera not displaying. | Camera wiring issue, reverse trigger not connected. | Check camera connections and ensure the reverse trigger wire is correctly connected. |
If the problem persists, please contact customer support.
9. Specifications
| Feature | Detail |
|---|---|
| Display Size | 10 Inches |
| Display Type | Capacitive Touch Screen |
| Processor | 4 Core |
| RAM | 2GB |
| ROM | 32GB |
| Connectivity | Bluetooth, 5GHz WiFi |
| Special Features | Wireless CarPlay, Android Auto, GPS Navigation, DSP Sound System, Split Screen, Backup Camera Support, Steering Wheel Control |
| Map Type | North America (Online) |
| Item Weight | 4.27 pounds (1.94 Kilograms) |
| Package Dimensions | 11.57 x 7.8 x 5.12 inches |
10. Warranty and Support
10.1. Warranty Information
This AWESAFE product comes with a 1-year warranty from the date of purchase, covering manufacturing defects. Please retain your proof of purchase for warranty claims.
10.2. Customer Support

Image: Customer Support
For technical assistance, troubleshooting, or warranty inquiries, please contact AWESAFE customer support:
- Email: AWESAFE-US@outlook.com
- 24 Hours Customer Support